Difference between revisions of "Tank Robot"
Tylerlinked (talk | contribs) |
(minor rewrite, total table turnover) |
||
| Line 12: | Line 12: | ||
After entering the map, tanks slowly travel along a set path to the bomb hatch before deploying their bomb and ending the round. This path is unique to each map and may differ from the path of other robots in the wave, if any. They have their own bomb, independent of the one carried by the other robots, and in waves with tank(s) and bomb-carrying robots, both the tank and the robots must be destroyed to complete the wave. | After entering the map, tanks slowly travel along a set path to the bomb hatch before deploying their bomb and ending the round. This path is unique to each map and may differ from the path of other robots in the wave, if any. They have their own bomb, independent of the one carried by the other robots, and in waves with tank(s) and bomb-carrying robots, both the tank and the robots must be destroyed to complete the wave. | ||
| − | Tanks | + | Tanks are immune to all effects outside of damage and critical hits; they can only be stopped via destruction. They cannot have their movement interrupted or [[slow]]ed; standing in front of one will simply push the player away for no damage, while players that cannot be pushed away due to walls or props are crushed to death, and [[building]]s in the way are destroyed. They cannot be [[burn]]ed or soaked by [[Jarate]] or [[Mad Milk]], they do not give [[metal]] to [[Widowmaker]]s, they cannot be [[sap]]ped or marked for death, and they have no [[headshot|heads to shoot]] or [[backstab|backs to stab]]. Finally, they resist approximately 75% of [[miniguns|minigun]] damage, severely reducing a Heavy's damage output against it. |
Tanks have a health meter below the "robots remaining" display on the [[HUD]], and as they are more damaged, they will acquire bullet holes and cracks and lose parts, like the covering on their treads. The final tank of a mission has distinctive white stripes; this does not correlate to any of its properties. | Tanks have a health meter below the "robots remaining" display on the [[HUD]], and as they are more damaged, they will acquire bullet holes and cracks and lose parts, like the covering on their treads. The final tank of a mission has distinctive white stripes; this does not correlate to any of its properties. | ||
== Health == | == Health == | ||
| − | {| class="wikitable grid" | + | Each Tank in a wave has a given amount of health based on its intended difficulty and the length of the path it must travel. |
| − | ! class="header" style="background: #333; color: | + | |
| + | {| class="wikitable grid sortable" | ||
| + | ! class="header" style="border:1px solid #333;" | Health | ||
| + | ! class="header" style="border:1px solid #333;" | Mission | ||
| + | ! class="header" style="border:1px solid #333;" | Wave | ||
| + | |- | ||
| + | | style="border:1px solid #333;" | | ||
| + | {| | ||
| + | | width="{{#expr:10000/250}}px" height="100%" style="background-color:#5885A2; border:1px solid #18233D;" | 10000 | ||
| + | |} | ||
| + | | style="border:1px solid #333;" | <small>[[Mannhunt (mission)|Mannhunt]]</small> | ||
| + | | style="border:1px solid #333;" | <small>6D, 6E, 6F</small> | ||
| + | |- | ||
| + | | style="border:1px solid #333;" | | ||
| + | {| | ||
| + | | width="{{#expr:12000/250}}px" height="100%" style="background-color:#5885A2; border:1px solid #18233D;" | 12000 | ||
| + | |} | ||
| + | | style="border:1px solid #333;" | <small>[[Mannslaughter (mission)|Mannslaughter]]</small> | ||
| + | | style="border:1px solid #333;" | <small>3B</small> | ||
| + | |- | ||
| + | | style="border:1px solid #333;" | | ||
| + | {| | ||
| + | | width="{{#expr:13300/250}}px" height="100%" style="background-color:#5885A2; border:1px solid #18233D;" | 13300 | ||
| + | |} | ||
| + | | style="border:1px solid #333;" | <small>[[Cave-in (mission)|Cave-in]]</small> | ||
| + | | style="border:1px solid #333;" | <small>4</small> | ||
| + | |- | ||
| + | | style="border:1px solid #333;" | | ||
| + | {| | ||
| + | | width="{{#expr:14000/250}}px" height="100%" style="background-color:#5885A2; border:1px solid #18233D;" | 14000 | ||
| + | |} | ||
| + | | style="border:1px solid #333;" | <small>[[Mean Machines (mission)|Mean Machines]]</small> | ||
| + | | style="border:1px solid #333;" | <small>5A</small> | ||
| + | |- | ||
| + | | style="border:1px solid #333;" | | ||
| + | {| | ||
| + | | width="{{#expr:15000/250}}px" height="100%" style="background-color:#5885A2; border:1px solid #18233D;" | 15000 | ||
| + | |} | ||
| + | | style="border:1px solid #333;" | <small>[[Disintegration (mission)|Disintegration]]</small> | ||
| + | | style="border:1px solid #333;" | <small>5</small> | ||
| + | |- | ||
| + | | style="border:1px solid #333;" | | ||
| + | {| | ||
| + | | width="{{#expr:16000/250}}px" height="100%" style="background-color:#5885A2; border:1px solid #18233D;" | 16000 | ||
| + | |} | ||
| + | | style="border:1px solid #333;" | <small>[[Quarry (mission)|Quarry]]</small> | ||
| + | | style="border:1px solid #333;" | <small>6B</small> | ||
| + | |- | ||
| + | | style="border:1px solid #333;" | | ||
| + | {| | ||
| + | | width="{{#expr:17500/250}}px" height="100%" style="background-color:#5885A2; border:1px solid #18233D;" | 17500 | ||
| + | |} | ||
| + | | style="border:1px solid #333;" | <small>Cave-in</small> | ||
| + | | style="border:1px solid #333;" | <small>2B</small> | ||
| + | |- | ||
| + | | style="border:1px solid #333;" rowspan="3" | | ||
| + | {| | ||
| + | | width="{{#expr:18000/250}}px" height="100%" style="background-color:#5885A2; border:1px solid #18233D;" | 18000 | ||
| + | |} | ||
| + | | style="border:1px solid #333;" | <small>[[Machine Massacre (mission)|Machine Massacre]]</small> | ||
| + | | style="border:1px solid #333;" | <small>4, 7A</small> | ||
| + | |- | ||
| + | | style="border:1px solid #333;" | <small>[[Mech Mutilation (mission)|Mech Mutilation]]</small> | ||
| + | | style="border:1px solid #333;" | <small>1C</small> | ||
| + | |- | ||
| + | | style="border:1px solid #333;" | <small>Disintegration</small> | ||
| + | | style="border:1px solid #333;" | <small>2D</small> | ||
| + | |- | ||
| + | | style="border:1px solid #333;" rowspan="12" | | ||
| + | {| | ||
| + | | width="{{#expr:20000/250}}px" height="100%" style="background-color:#5885A2; border:1px solid #18233D;" | 20000 | ||
| + | |} | ||
| + | | style="border:1px solid #333;" | <small>[[Doe's Drill (mission)|Doe's Drill]]</small> | ||
| + | | style="border:1px solid #333;" | <small>3, 8</small> | ||
| + | |- | ||
| + | | style="border:1px solid #333;" | <small>[[Mann-euvers (mission)|Mann-euvers]]</small> | ||
| + | | style="border:1px solid #333;" | <small>2</small> | ||
| + | |- | ||
| + | | style="border:1px solid #333;" | <small>[[Doe's Doom (mission)|Doe's Doom]]</small> | ||
| + | | style="border:1px solid #333;" | <small>7</small> | ||
| + | |- | ||
| + | | style="border:1px solid #333;" | <small>Mannhunt</small> | ||
| + | | style="border:1px solid #333;" | <small>3</small> | ||
| + | |- | ||
| + | | style="border:1px solid #333;" | <small>[[Ctrl+Alt+Destruction (mission)|Ctrl+Alt+Destruction]]</small> | ||
| + | | style="border:1px solid #333;" | <small>7B</small> | ||
| + | |- | ||
| + | | style="border:1px solid #333;" | <small>[[CPU Slaughter (mission)|CPU Slaughter]]</small> | ||
| + | | style="border:1px solid #333;" | <small>6C, 6E</small> | ||
| + | |- | ||
| + | | style="border:1px solid #333;" | <small>Machine Massacre</small> | ||
| + | | style="border:1px solid #333;" | <small>7D</small> | ||
| + | |- | ||
| + | | style="border:1px solid #333;" | <small>Mech Mutilation</small> | ||
| + | | style="border:1px solid #333;" | <small>3D</small> | ||
| + | |- | ||
| + | | style="border:1px solid #333;" | <small>[[Cataclysm (mission)|Cataclysm]]</small> | ||
| + | | style="border:1px solid #333;" | <small>4A, 7A</small> | ||
| + | |- | ||
| + | | style="border:1px solid #333;" | <small>Mannslaughter</small> | ||
| + | | style="border:1px solid #333;" | <small>5C, 5E</small> | ||
| + | |- | ||
| + | | style="border:1px solid #333;" | <small>[[Benign Infiltration (mission)|Benign Infiltration]]</small> | ||
| + | | style="border:1px solid #333;" | <small>4A</small> | ||
| + | |- | ||
| + | | style="border:1px solid #333;" | <small>Disintegration</small> | ||
| + | | style="border:1px solid #333;" | <small>4A, 5B</small> | ||
| + | |- | ||
| + | | style="border:1px solid #333;" | | ||
| + | {| | ||
| + | | width="{{#expr:21000/250}}px" height="100%" style="background-color:#5885A2; border:1px solid #18233D;" | 21000 | ||
| + | |} | ||
| + | | style="border:1px solid #333;" | <small>Quarry</small> | ||
| + | | style="border:1px solid #333;" | <small>1</small> | ||
| + | |- | ||
| + | | style="border:1px solid #333;" | | ||
| + | {| | ||
| + | | width="{{#expr:22000/250}}px" height="100%" style="background-color:#5885A2; border:1px solid #18233D;" | 22000 | ||
| + | |} | ||
| + | | style="border:1px solid #333;" | <small>[[Desperation (mission)|Desperation]]</small> | ||
| + | | style="border:1px solid #333;" | <small>4</small> | ||
| + | |- | ||
| + | | style="border:1px solid #333;" | | ||
| + | {| | ||
| + | | width="{{#expr:22500/250}}px" height="100%" style="background-color:#5885A2; border:1px solid #18233D;" | 22500 | ||
| + | |} | ||
| + | | style="border:1px solid #333;" | <small>Mann-euvers</small> | ||
| + | | style="border:1px solid #333;" | <small>7</small> | ||
| + | |- | ||
| + | | style="border:1px solid #333;" | | ||
| + | {| | ||
| + | | width="{{#expr:24000/250}}px" height="100%" style="background-color:#5885A2; border:1px solid #18233D;" | 24000 | ||
| + | |} | ||
| + | | style="border:1px solid #333;" | <small>Doe's Doom</small> | ||
| + | | style="border:1px solid #333;" | <small>2A</small> | ||
| + | |- | ||
| + | | style="border:1px solid #333;" rowspan="6" | | ||
| + | {| | ||
| + | | width="{{#expr:25000/250}}px" height="100%" style="background-color:#5885A2; border:1px solid #18233D;" | 25000 | ||
| + | |} | ||
| + | | style="border:1px solid #333;" | <small>[[Day of Wreckening (mission)|Day of Wreckening]]</small> | ||
| + | | style="border:1px solid #333;" | <small>2, 6B</small> | ||
| + | |- | ||
| + | | style="border:1px solid #333;" | <small>Cave-in</small> | ||
| + | | style="border:1px solid #333;" | <small>6B</small> | ||
| + | |- | ||
| + | | style="border:1px solid #333;" | <small>Mannhunt</small> | ||
| + | | style="border:1px solid #333;" | <small>5C</small> | ||
| + | |- | ||
| + | | style="border:1px solid #333;" | <small>[[Disk Deletion (mission)|Disk Deletion]]</small> | ||
| + | | style="border:1px solid #333;" | <small>6, 8A-1, 8A-2</small> | ||
| + | |- | ||
| + | | style="border:1px solid #333;" | <small>[[Data Demolition (mission)|Data Demolition]]</small> | ||
| + | | style="border:1px solid #333;" | <small>3D, 4A</small> | ||
| + | |- | ||
| + | | style="border:1px solid #333;" | <small>Ctrl+Alt+Destruction</small> | ||
| + | | style="border:1px solid #333;" | <small>5</small> | ||
| + | |- | ||
| + | | style="border:1px solid #333;" | | ||
| + | {| | ||
| + | | width="{{#expr:26000/250}}px" height="100%" style="background-color:#5885A2; border:1px solid #18233D;" | 26000 | ||
| + | |} | ||
| + | | style="border:1px solid #333;" | <small>Mean Machines</small> | ||
| + | | style="border:1px solid #333;" | <small>3A</small> | ||
| + | |- | ||
| + | | style="border:1px solid #333;" | | ||
| + | {| | ||
| + | | width="{{#expr:28000/250}}px" height="100%" style="background-color:#5885A2; border:1px solid #18233D;" | 28000 | ||
| + | |} | ||
| + | | style="border:1px solid #333;" | <small>[[Crash Course (mission)|Crash Course]]</small> | ||
| + | | style="border:1px solid #333;" | <small>3</small> | ||
| + | |- | ||
| + | | style="border:1px solid #333;" rowspan="6" | | ||
| + | {| | ||
| + | | width="{{#expr:30000/250}}px" height="100%" style="background-color:#5885A2; border:1px solid #18233D;" | 30000 | ||
| + | |} | ||
| + | | style="border:1px solid #333;" | <small>Crash Course</small> | ||
| + | | style="border:1px solid #333;" | <small>5</small> | ||
| + | |- | ||
| + | | style="border:1px solid #333;" | <small>Data Demolition</small> | ||
| + | | style="border:1px solid #333;" | <small>6B, 6D</small> | ||
|- | |- | ||
| − | | style="border:1px solid #333;" | | + | | style="border:1px solid #333;" | <small>Ctrl+Alt+Destruction</small> |
| − | | style="border:1px solid #333;" | <small> | + | | style="border:1px solid #333;" | <small>2A</small> |
|- | |- | ||
| − | | style="border:1px solid #333;" | | + | | style="border:1px solid #333;" | <small>CPU Slaughter</small> |
| − | | style="border:1px solid #333;" | <small> | + | | style="border:1px solid #333;" | <small>6A</small> |
|- | |- | ||
| − | | style="border:1px solid #333;" | | + | | style="border:1px solid #333;" | <small>Benign Infiltration</small> |
| − | | style="border:1px solid #333;" | <small> | + | | style="border:1px solid #333;" | <small>6C</small> |
|- | |- | ||
| − | | style="border:1px solid #333;" | | + | | style="border:1px solid #333;" | <small>[[Broken Parts (mission)|Broken Parts]]</small> |
| − | | style="border:1px solid #333;" | <small> | + | | style="border:1px solid #333;" | <small>3D</small> |
|- | |- | ||
| − | | style="border:1px solid #333;" | | + | | style="border:1px solid #333;" | |
| − | | style="border:1px solid #333;" | <small> | + | {| |
| + | | width="{{#expr:32000/250}}px" height="100%" style="background-color:#5885A2; border:1px solid #18233D;" | 32000 | ||
| + | |} | ||
| + | | style="border:1px solid #333;" | <small>Data Demolition</small> | ||
| + | | style="border:1px solid #333;" | <small>6A</small> | ||
|- | |- | ||
| − | | style="border:1px solid #333;" | | + | | style="border:1px solid #333;" rowspan="2" | |
| − | | style="border:1px solid #333;" | <small> | + | {| |
| + | | width="{{#expr:33000/250}}px" height="100%" style="background-color:#5885A2; border:1px solid #18233D;" | 33000 | ||
| + | |} | ||
| + | | style="border:1px solid #333;" | <small>Crash Course</small> | ||
| + | | style="border:1px solid #333;" | <small>6B</small> | ||
|- | |- | ||
| − | | style="border:1px solid #333;" | | + | | style="border:1px solid #333;" | <small>Broken Parts</small> |
| − | | style="border:1px solid #333;" | <small> | + | | style="border:1px solid #333;" | <small>6B</small> |
|- | |- | ||
| − | | style="border:1px solid #333;" | | + | | style="border:1px solid #333;" rowspan="8" | |
| − | | style="border:1px solid #333;" | <small> | + | {| |
| + | | width="{{#expr:35000/250}}px" height="100%" style="background-color:#5885A2; border:1px solid #18233D;" | 35000 | ||
| + | |} | ||
| + | | style="border:1px solid #333;" | <small>Quarry</small> | ||
| + | | style="border:1px solid #333;" | <small>5</small> | ||
|- | |- | ||
| − | | style="border:1px solid #333;" | | + | | style="border:1px solid #333;" | <small>Ctrl+Alt+Destruction</small> |
| − | | style="border:1px solid #333;" | <small> | + | | style="border:1px solid #333;" | <small>7D</small> |
|- | |- | ||
| − | | style="border:1px solid #333;" | | + | | style="border:1px solid #333;" | <small>Desperation</small> |
| − | | style="border:1px solid #333;" | <small> | + | | style="border:1px solid #333;" | <small>7A</small> |
|- | |- | ||
| − | | style="border:1px solid #333;" | | + | | style="border:1px solid #333;" | <small>CPU Slaughter</small> |
| − | | style="border:1px solid #333;" | <small> | + | | style="border:1px solid #333;" | <small>4</small> |
|- | |- | ||
| − | | style="border:1px solid #333;" | | + | | style="border:1px solid #333;" | <small>Cataclysm</small> |
| − | | style="border:1px solid #333;" | <small> | + | | style="border:1px solid #333;" | <small>3A</small> |
|- | |- | ||
| − | | style="border:1px solid #333;" | | + | | style="border:1px solid #333;" | <small>[[Caliginous Caper (mission)|Caliginous Caper]]</small> |
| − | | style="border:1px solid #333;" | <small> | + | | style="border:1px solid #333;" | <small>4</small> |
|- | |- | ||
| − | | style="border:1px solid #333;" | | + | | style="border:1px solid #333;" | <small>[[Bone Shaker (mission)|Bone Shaker]]</small> |
| − | | style="border:1px solid #333;" | <small> | + | | style="border:1px solid #333;" | <small>2</small> |
|- | |- | ||
| − | | style="border:1px solid #333;" | | + | | style="border:1px solid #333;" | <small>Broken Parts</small> |
| − | | style="border:1px solid #333;" | <small> | + | | style="border:1px solid #333;" | <small>6B</small> |
|- | |- | ||
| − | | style="border:1px solid #333;" | | + | | style="border:1px solid #333;" rowspan="3" | |
| − | | style="border:1px solid #333;" | <small> | + | {| |
| + | | width="{{#expr:40000/250}}px" height="100%" style="background-color:#5885A2; border:1px solid #18233D;" | 40000 | ||
| + | |} | ||
| + | | style="border:1px solid #333;" | <small>Caliginous Caper</small> | ||
| + | | style="border:1px solid #333;" | <small>5</small> | ||
|- | |- | ||
| − | | style="border:1px solid #333;" | | + | | style="border:1px solid #333;" | <small>Bone Shaker</small> |
| − | | style="border:1px solid #333;" | <small> | + | | style="border:1px solid #333;" | <small>4A, 7</small> |
|- | |- | ||
| − | | style="border:1px solid #333;" | | + | | style="border:1px solid #333;" | <small>Broken Parts</small> |
| − | | style="border:1px solid #333;" | <small> | + | | style="border:1px solid #333;" | <small>2A</small> |
|- | |- | ||
| − | | style="border:1px solid #333;" | | + | | style="border:1px solid #333;" | |
| − | | style="border:1px solid #333;" | <small> | + | {| |
| + | | width="{{#expr:42000/250}}px" height="100%" style="background-color:#5885A2; border:1px solid #18233D;" | 42000 | ||
| + | |} | ||
| + | | style="border:1px solid #333;" | <small>Caliginous Caper</small> | ||
| + | | style="border:1px solid #333;" | <small>7</small> | ||
|- | |- | ||
| − | | style="border:1px solid #333;" | | + | | style="border:1px solid #333;" rowspan="3" | |
| − | | style="border:1px solid #333;" | <small | + | {| |
| + | | width="{{#expr:45000/250}}px" height="100%" style="background-color:#5885A2; border:1px solid #18233D;" | 45000 | ||
| + | |} | ||
| + | | style="border:1px solid #333;" | <small>Desperation</small> | ||
| + | | style="border:1px solid #333;" | <small>7C-2</small> | ||
|- | |- | ||
| − | | style="border:1px solid #333;" | | + | | style="border:1px solid #333;" | <small>Cataclysm</small> |
| − | | style="border:1px solid #333;" | <small> | + | | style="border:1px solid #333;" | <small>7F</small> |
|- | |- | ||
| − | | style="border:1px solid #333;" | | + | | style="border:1px solid #333;" | <small>Broken Parts</small> |
| − | | style="border:1px solid #333;" | <small> | + | | style="border:1px solid #333;" | <small>2A</small> |
|- | |- | ||
| − | | style="border:1px solid #333;" | | + | | style="border:1px solid #333;" | |
| − | | style="border:1px solid #333;" | <small> | + | {| |
| + | | width="{{#expr:46000/250}}px" height="100%" style="background-color:#5885A2; border:1px solid #18233D;" | 46000 | ||
| + | |} | ||
| + | | style="border:1px solid #333;" | <small>Bone Shaker</small> | ||
| + | | style="border:1px solid #333;" | <small>7F</small> | ||
|- | |- | ||
| − | | style="border:1px solid #333;" | | + | | style="border:1px solid #333;" rowspan="2" | |
| − | | style="border:1px solid #333;" | <small> | + | {| |
| + | | width="{{#expr:60000/250}}px" height="100%" style="background-color:#5885A2; border:1px solid #18233D;" | 60000 | ||
| + | |} | ||
| + | | style="border:1px solid #333;" | <small>Caliginous Caper</small> | ||
| + | | style="border:1px solid #333;" | <small>8G</small> | ||
|- | |- | ||
| − | | style="border:1px solid #333;" | | + | | style="border:1px solid #333;" | <small>Broken Parts</small> |
| − | | style="border:1px solid #333;" | <small> | + | | style="border:1px solid #333;" | <small>6D</small> |
|} | |} | ||
Revision as of 23:05, 30 June 2013
| Tank Robot | |
|---|---|

| |
| Basic Information | |
| Health: | Varies Lowest: 10000 |
| Speed: | 25% |
| “ | We don't know what this thing is, but it's big as hell, looks unstoppable, and it probably runs on human blood. We're just guessing that last part, because it's usually covered in it.
— Day 1 of the Mann vs. Machine update
|
” |
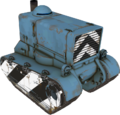
Tank Robots (referred just as Tank) are large bomb-carrying machines that arrive with the robots in Mann vs. Machine modes. They carry no offensive weapons and thus have no direct way of harming the player. They can take an extreme amount of damage before they are destroyed, far more so than any other robot. The Administrator announces the entrance, progress, and destruction of each tank.
After entering the map, tanks slowly travel along a set path to the bomb hatch before deploying their bomb and ending the round. This path is unique to each map and may differ from the path of other robots in the wave, if any. They have their own bomb, independent of the one carried by the other robots, and in waves with tank(s) and bomb-carrying robots, both the tank and the robots must be destroyed to complete the wave.
Tanks are immune to all effects outside of damage and critical hits; they can only be stopped via destruction. They cannot have their movement interrupted or slowed; standing in front of one will simply push the player away for no damage, while players that cannot be pushed away due to walls or props are crushed to death, and buildings in the way are destroyed. They cannot be burned or soaked by Jarate or Mad Milk, they do not give metal to Widowmakers, they cannot be sapped or marked for death, and they have no heads to shoot or backs to stab. Finally, they resist approximately 75% of minigun damage, severely reducing a Heavy's damage output against it.
Tanks have a health meter below the "robots remaining" display on the HUD, and as they are more damaged, they will acquire bullet holes and cracks and lose parts, like the covering on their treads. The final tank of a mission has distinctive white stripes; this does not correlate to any of its properties.
Contents
Health
Each Tank in a wave has a given amount of health based on its intended difficulty and the length of the path it must travel.
| Health | Mission | Wave | |
|---|---|---|---|
|
Mannhunt | 6D, 6E, 6F | |
|
Mannslaughter | 3B | |
|
Cave-in | 4 | |
|
Mean Machines | 5A | |
|
Disintegration | 5 | |
|
Quarry | 6B | |
|
Cave-in | 2B | |
|
Machine Massacre | 4, 7A | |
| Mech Mutilation | 1C | ||
| Disintegration | 2D | ||
|
Doe's Drill | 3, 8 | |
| Mann-euvers | 2 | ||
| Doe's Doom | 7 | ||
| Mannhunt | 3 | ||
| Ctrl+Alt+Destruction | 7B | ||
| CPU Slaughter | 6C, 6E | ||
| Machine Massacre | 7D | ||
| Mech Mutilation | 3D | ||
| Cataclysm | 4A, 7A | ||
| Mannslaughter | 5C, 5E | ||
| Benign Infiltration | 4A | ||
| Disintegration | 4A, 5B | ||
|
Quarry | 1 | |
|
Desperation | 4 | |
|
Mann-euvers | 7 | |
|
Doe's Doom | 2A | |
|
Day of Wreckening | 2, 6B | |
| Cave-in | 6B | ||
| Mannhunt | 5C | ||
| Disk Deletion | 6, 8A-1, 8A-2 | ||
| Data Demolition | 3D, 4A | ||
| Ctrl+Alt+Destruction | 5 | ||
|
Mean Machines | 3A | |
|
Crash Course | 3 | |
|
Crash Course | 5 | |
| Data Demolition | 6B, 6D | ||
| Ctrl+Alt+Destruction | 2A | ||
| CPU Slaughter | 6A | ||
| Benign Infiltration | 6C | ||
| Broken Parts | 3D | ||
|
Data Demolition | 6A | |
|
Crash Course | 6B | |
| Broken Parts | 6B | ||
|
Quarry | 5 | |
| Ctrl+Alt+Destruction | 7D | ||
| Desperation | 7A | ||
| CPU Slaughter | 4 | ||
| Cataclysm | 3A | ||
| Caliginous Caper | 4 | ||
| Bone Shaker | 2 | ||
| Broken Parts | 6B | ||
|
Caliginous Caper | 5 | |
| Bone Shaker | 4A, 7 | ||
| Broken Parts | 2A | ||
|
Caliginous Caper | 7 | |
|
Desperation | 7C-2 | |
| Cataclysm | 7F | ||
| Broken Parts | 2A | ||
|
Bone Shaker | 7F | |
|
Caliginous Caper | 8G | |
| Broken Parts | 6D |
Elimination
When a tank is the only robot in the wave (excluding support-class robots like Snipers), it should be focused by all players until it is destroyed. Kritzkrieg Medics and Canteens are extremely effective when paired with sustained high-damage classes like Heavies, Pyros (it should be noted that the Phlogistinator charges it's meter almost instantly against tanks), and Soldiers, or when used with Demomen using his Grenade Launchers and Stickybomb Launchers. Wrangled Sentry Guns also deal massive damage to tanks, but may have to be relocated once the tank passes out of their range or if they're in the tank's path. As well, the hitbox of the tank is very large, making weapons with "bullet spread", such as the Frontier Justice, effective even at medium-long range.
If a tank arrives with other robots, especially giant robots, consider killing the robots first, as tanks do not deal damage and can usually be dealt with after the regular robots if they have not traveled more than halfway. After arriving at the bomb hatch, the tank will take a while to deploy its bomb, so the team still has time to destroy it.
Related achievements
 Mann vs. Machievements
|
|
Update history
August 15, 2012 Patch (Mann vs. Machine)
- The Tank was added to the game.
- Fixed a crash related to server plug-ins spawning a Tank before the game is ready.
- Fixed the looping tank sound not playing if it was spawned far from the player.
- Fixed tank destruction effects playing at the map origin.
December 20, 2012 Patch (Mecha Update)
- [Undocumented] Rage from Buff Banner, Concheror, upgraded Minigun, and Mmmph from Phlogistinator can now be generated from Tanks.
Bugs
- If multiple tanks are in a wave, the Administrator may sometimes state that a tank is halfway through the wave even though it would just have spawned.
Gallery

Lightly damaged

Moderately damaged

Heavily damaged
Final wave skin


External links
- "Machines" official announcement, with the hint of the Tank Robot.
| |||||