Difference between revisions of "Scream Fortress 2013/pt-br"
LordKelvin (talk | contribs) m (LordKelvin moved page Helloween Special/pt-br to Scream Fortress 2013/pt-br over redirect) |
Muriloricci (talk | contribs) (Updated!) |
||
| Line 3: | Line 3: | ||
{{stub}} | {{stub}} | ||
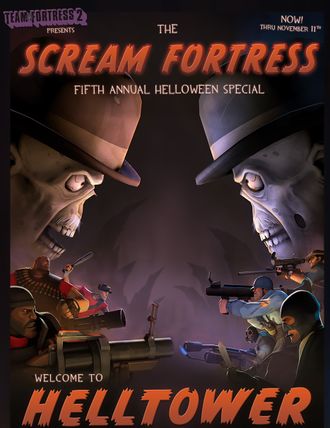
[[File:Fifth Annual Scream Fortress Special.jpg|right|330px|link=http://www.teamfortress.com/bazbobarrabus/]] | [[File:Fifth Annual Scream Fortress Special.jpg|right|330px|link=http://www.teamfortress.com/bazbobarrabus/]] | ||
| − | {{Quotation|''' | + | {{Quotation|'''Página da atualização'''|Claw your way through piles of musty books and skeletons while old people yell at each other about nonsense and get carried off to Hell! That's right, Team Feartress fans— we combined the terror of Halloween with the more muted and depressing terror of a retirement home, and accidentally invented an entirely new brand of horror! Then we realized listening to two old men bicker from beyond the grave isn't that horrifying, so we threw in a bunch of crazy spells you can cast at each other!}} |
| − | O <span class="plainlinks">'''[http://www.teamfortress.com/bazbobarrabus/ Scream Fortress Fifth Annual | + | O <span class="plainlinks">'''[http://www.teamfortress.com/bazbobarrabus/ Scream Fortress Fifth Annual Helloween Special]'''</span> é uma [[Patches/pt-br#Atualizações de Conteúdo|atualização]] lançada no dia {{Patch name|10|29|2013}}. Esta é a quinta atualização da série ''Scream Fortress'', adicionando o mapa de evento de Dia das Bruxas [[Helltower/pt-br|Helltower]], juntamente aos 102 [[hat/pt-br|chapéus]] e [[miscellaneous item/pt-br|itens misc]] com o tema do Dia das Bruxas. |
| + | |||
| + | == Linha do tempo == | ||
| + | O envio dos itens para o evento iniciaram no dia 18 de setembro de 2013, através do [http://www.teamfortress.com/post.php?id=11479 blog oficial do Team Fortress 2]. | ||
| + | |||
| + | O evento foi apresentado no dia 28 de outubro de 2013 através da [[comic/pt-br|história em quadrinho]] [[Grave Matters/pt-br|Grave Matters]]. | ||
| + | |||
| + | O evento durou do dia 29 de outubro de 2013 até o dia 11 de novembro de 2013. | ||
| − | |||
| − | |||
== Adições == | == Adições == | ||
=== Chapéus === | === Chapéus === | ||
{| class="wikitable collapsible" cellpadding="3" style="text-align:center;" | {| class="wikitable collapsible" cellpadding="3" style="text-align:center;" | ||
| + | | width="60px" style="background: #6A5587;" rowspan="2" | {{icon class|Scout}}<br/>'''[[Scout|<span style="color: #FFF;">Scout</span>]]''' | ||
| + | | align="center" style="background: #AD9DC3;" | {{item icon|Halloweiner|75px}} | ||
| + | | style="background: #F1ECF7;"| '''{{item link|Halloweiner}}''' | ||
| + | |- | ||
| + | | align="center" style="background: #AD9DC3;" | {{item icon|Horrific Head of Hare|75px}} | ||
| + | | style="background: #F1ECF7;"| '''{{item link|Horrific Head of Hare}}''' | ||
| + | |- | ||
| width="60px" style="background: #6A5587;" rowspan="4" | {{icon class|Soldier}}<br/>'''[[Soldier|<span style="color: #FFF;">Soldier</span>]]''' | | width="60px" style="background: #6A5587;" rowspan="4" | {{icon class|Soldier}}<br/>'''[[Soldier|<span style="color: #FFF;">Soldier</span>]]''' | ||
| align="center" style="background: #AD9DC3;" | {{item icon|Cadaver's Capper|75px}} | | align="center" style="background: #AD9DC3;" | {{item icon|Cadaver's Capper|75px}} | ||
| Line 25: | Line 37: | ||
| style="background: #F1ECF7;"| '''{{item link|Spellbinder's Bonnet}}''' | | style="background: #F1ECF7;"| '''{{item link|Spellbinder's Bonnet}}''' | ||
|- | |- | ||
| − | | width="60px" style="background: #6A5587;" rowspan=" | + | | width="60px" style="background: #6A5587;" rowspan="7" | {{icon class|Pyro}}<br/>'''[[Pyro|<span style="color: #FFF;">Pyro</span>]]''' |
| + | | align="center" style="background: #AD9DC3;" | {{item icon|Bozo's Bouffant|75px}} | ||
| + | | style="background: #F1ECF7;"| '''{{item link|Bozo's Bouffant}}''' | ||
| + | |- | ||
| + | | align="center" style="background: #AD9DC3;" | {{item icon|Corpsemopolitan|75px}} | ||
| + | | style="background: #F1ECF7;"| '''{{item link|Corpsemopolitan}}''' | ||
| + | |- | ||
| + | | align="center" style="background: #AD9DC3;" | {{item icon|Gothic Guise|75px}} | ||
| + | | style="background: #F1ECF7;"| '''{{item link|Gothic Guise}}''' | ||
| + | |- | ||
| align="center" style="background: #AD9DC3;" | {{item icon|Macabre Mask|75px}} | | align="center" style="background: #AD9DC3;" | {{item icon|Macabre Mask|75px}} | ||
| style="background: #F1ECF7;"| '''{{item link|Macabre Mask}}''' | | style="background: #F1ECF7;"| '''{{item link|Macabre Mask}}''' | ||
| + | |- | ||
| + | | align="center" style="background: #AD9DC3;" | {{item icon|Mucous Membrain|75px}} | ||
| + | | style="background: #F1ECF7;"| '''{{item link|Mucous Membrain}}''' | ||
|- | |- | ||
| align="center" style="background: #AD9DC3;" | {{item icon|Raven's Visage|75px}} | | align="center" style="background: #AD9DC3;" | {{item icon|Raven's Visage|75px}} | ||
| Line 36: | Line 60: | ||
|- | |- | ||
| width="60px" style="background: #6A5587;" rowspan="2" | {{icon class|Demoman}}<br/>'''[[Demoman|<span style="color: #FFF;">Demoman</span>]]''' | | width="60px" style="background: #6A5587;" rowspan="2" | {{icon class|Demoman}}<br/>'''[[Demoman|<span style="color: #FFF;">Demoman</span>]]''' | ||
| + | | align="center" style="background: #AD9DC3;" | {{item icon|Headtaker's Hood|75px}} | ||
| + | | style="background: #F1ECF7;"| '''{{item link|Headtaker's Hood}}''' | ||
| + | |- | ||
| align="center" style="background: #AD9DC3;" | {{item icon|Mann-Bird of Aberdeen|75px}} | | align="center" style="background: #AD9DC3;" | {{item icon|Mann-Bird of Aberdeen|75px}} | ||
| style="background: #F1ECF7;"| '''{{item link|Mann-Bird of Aberdeen}}''' | | style="background: #F1ECF7;"| '''{{item link|Mann-Bird of Aberdeen}}''' | ||
| − | |||
| − | |||
| − | |||
|- | |- | ||
| width="60px" style="background: #6A5587;" rowspan="2" | {{icon class|Heavy}}<br/>'''[[Heavy|<span style="color: #FFF;">Heavy</span>]]''' | | width="60px" style="background: #6A5587;" rowspan="2" | {{icon class|Heavy}}<br/>'''[[Heavy|<span style="color: #FFF;">Heavy</span>]]''' | ||
| Line 49: | Line 73: | ||
| style="background: #F1ECF7;"| '''{{item link|Horned Honcho}}''' | | style="background: #F1ECF7;"| '''{{item link|Horned Honcho}}''' | ||
|- | |- | ||
| − | | width="60px" style="background: #6A5587;" rowspan=" | + | | width="60px" style="background: #6A5587;" rowspan="5" | {{icon class|Medic}}<br/>'''[[Medic|<span style="color: #FFF;">Medic</span>]]''' |
| + | | align="center" style="background: #AD9DC3;" | {{item icon|Alternative Medicine Mann|75px}} | ||
| + | | style="background: #F1ECF7;"| '''{{item link|Alternative Medicine Mann}}''' | ||
| + | |- | ||
| + | | align="center" style="background: #AD9DC3;" | {{item icon|Das Blutliebhaber|75px}} | ||
| + | | style="background: #F1ECF7;"| '''{{item link|Das Blutliebhaber}}''' | ||
| + | |- | ||
| align="center" style="background: #AD9DC3;" | {{item icon|Medimedes|75px}} | | align="center" style="background: #AD9DC3;" | {{item icon|Medimedes|75px}} | ||
| style="background: #F1ECF7;"| '''{{item link|Medimedes}}''' | | style="background: #F1ECF7;"| '''{{item link|Medimedes}}''' | ||
| + | |- | ||
| + | | align="center" style="background: #AD9DC3;" | {{item icon|Shaman's Skull|75px}} | ||
| + | | style="background: #F1ECF7;"| '''{{item link|Shaman's Skull}}''' | ||
|- | |- | ||
| align="center" style="background: #AD9DC3;" | {{item icon|Trepanabotomizer|75px}} | | align="center" style="background: #AD9DC3;" | {{item icon|Trepanabotomizer|75px}} | ||
| Line 66: | Line 99: | ||
| align="center" style="background: #AD9DC3;" | {{item icon|Hyperbaric Bowler|75px}} | | align="center" style="background: #AD9DC3;" | {{item icon|Hyperbaric Bowler|75px}} | ||
| style="background: #F1ECF7;"| '''{{item link|Hyperbaric Bowler}}''' | | style="background: #F1ECF7;"| '''{{item link|Hyperbaric Bowler}}''' | ||
| + | |- | ||
| + | | width="60px" style="background:#6A5587;" rowspan = 1| {{icon class|Demoman}}<br/>'''[[Demoman|<span style="color: #FFF;">Demoman</span>]]'''<br/>{{icon class|Spy}}<br/>'''[[Spy|<span style="color: #FFF;">Spy</span>]]''' | ||
| + | | align="center" style="background: #AD9DC3;" | {{item icon|Ethereal Hood|75px}} | ||
| + | | style="background: #F1ECF7;"| '''{{item link|Ethereal Hood}}''' | ||
|- | |- | ||
| width="60px" style="background:#6A5587;" rowspan = 1| {{icon class|Pyro}}<br/>'''[[Pyro|<span style="color: #FFF;">Pyro</span>]]'''<br/>{{icon class|Engineer}}<br/>'''[[Engineer|<span style="color: #FFF;">Engineer</span>]]'''<br/>{{icon class|Sniper}}<br/>'''[[Sniper|<span style="color: #FFF;">Sniper</span>]]''' | | width="60px" style="background:#6A5587;" rowspan = 1| {{icon class|Pyro}}<br/>'''[[Pyro|<span style="color: #FFF;">Pyro</span>]]'''<br/>{{icon class|Engineer}}<br/>'''[[Engineer|<span style="color: #FFF;">Engineer</span>]]'''<br/>{{icon class|Sniper}}<br/>'''[[Sniper|<span style="color: #FFF;">Sniper</span>]]''' | ||
| Line 71: | Line 108: | ||
| style="background: #F1ECF7;"| '''{{item link|Snaggletoothed Stetson}}''' | | style="background: #F1ECF7;"| '''{{item link|Snaggletoothed Stetson}}''' | ||
|- | |- | ||
| − | | width="60px" style="background:#6A5587;" rowspan = | + | | width="60px" style="background:#6A5587;" rowspan = 7| {{icon class|All Classes}}<br/>'''[[Classes|<span style="color: #FFF;">Todas as classes</span>]]''' |
| + | | align="center" style="background: #AD9DC3;" | {{item icon|Birdie Bonnet|75px}} | ||
| + | | style="background: #F1ECF7;"| '''{{item link|Birdie Bonnet}}''' | ||
| + | |- | ||
| align="center" style="background: #AD9DC3;" | {{item icon|Dark Helm|75px}} | | align="center" style="background: #AD9DC3;" | {{item icon|Dark Helm|75px}} | ||
| style="background: #F1ECF7;"| '''{{item link|Dark Helm}}''' | | style="background: #F1ECF7;"| '''{{item link|Dark Helm}}''' | ||
| Line 77: | Line 117: | ||
| align="center" style="background: #AD9DC3;" | {{item icon|Haunted Hat|75px}} | | align="center" style="background: #AD9DC3;" | {{item icon|Haunted Hat|75px}} | ||
| style="background: #F1ECF7;"| '''{{item link|Haunted Hat}}''' | | style="background: #F1ECF7;"| '''{{item link|Haunted Hat}}''' | ||
| + | |- | ||
| + | | align="center" style="background: #AD9DC3;" | {{item icon|Magical Mercenary|75px}} | ||
| + | | style="background: #F1ECF7;"| '''{{item link|Magical Mercenary}}''' | ||
|- | |- | ||
| align="center" style="background: #AD9DC3;" | {{item icon|Manneater|75px}} | | align="center" style="background: #AD9DC3;" | {{item icon|Manneater|75px}} | ||
| Line 89: | Line 132: | ||
|} | |} | ||
| − | === Itens | + | === Itens misc === |
{| class="wikitable collapsible" cellpadding="3" style="text-align:center;" | {| class="wikitable collapsible" cellpadding="3" style="text-align:center;" | ||
| width="60px" style="background: #6A5587;" rowspan="3" | {{icon class|Scout}}<br/>'''[[Scout|<span style="color: #FFF;">Scout</span>]]''' | | width="60px" style="background: #6A5587;" rowspan="3" | {{icon class|Scout}}<br/>'''[[Scout|<span style="color: #FFF;">Scout</span>]]''' | ||
| Line 102: | Line 145: | ||
|- | |- | ||
| width="60px" style="background: #6A5587;" rowspan="2" | {{icon class|Soldier}}<br/>'''[[Soldier|<span style="color: #FFF;">Soldier</span>]]''' | | width="60px" style="background: #6A5587;" rowspan="2" | {{icon class|Soldier}}<br/>'''[[Soldier|<span style="color: #FFF;">Soldier</span>]]''' | ||
| − | | align="center" style="background: #AD9DC3;" | {{item icon| | + | | align="center" style="background: #AD9DC3;" | {{item icon|Grub Grenades|75px}} |
| − | | style="background: #F1ECF7;"| '''{{item link| | + | | style="background: #F1ECF7;"| '''{{item link|Grub Grenades}}''' |
|- | |- | ||
| align="center" style="background: #AD9DC3;" | {{item icon|Lieutenant Bites the Dust|75px}} | | align="center" style="background: #AD9DC3;" | {{item icon|Lieutenant Bites the Dust|75px}} | ||
| style="background: #F1ECF7;"| '''{{item link|Lieutenant Bites the Dust}}''' | | style="background: #F1ECF7;"| '''{{item link|Lieutenant Bites the Dust}}''' | ||
|- | |- | ||
| − | | width="60px" style="background: #6A5587;" rowspan=" | + | | width="60px" style="background: #6A5587;" rowspan="14" | {{icon class|Pyro}}<br/>'''[[Pyro|<span style="color: #FFF;">Pyro</span>]]''' |
| align="center" style="background: #AD9DC3;" | {{item icon|Beast From Below|75px}} | | align="center" style="background: #AD9DC3;" | {{item icon|Beast From Below|75px}} | ||
| style="background: #F1ECF7;"| '''{{item link|Beast From Below}}''' | | style="background: #F1ECF7;"| '''{{item link|Beast From Below}}''' | ||
| Line 117: | Line 160: | ||
| align="center" style="background: #AD9DC3;" | {{item icon|Creature From The Heap|75px}} | | align="center" style="background: #AD9DC3;" | {{item icon|Creature From The Heap|75px}} | ||
| style="background: #F1ECF7;"| '''{{item link|Creature From The Heap}}''' | | style="background: #F1ECF7;"| '''{{item link|Creature From The Heap}}''' | ||
| + | |- | ||
| + | | align="center" style="background: #AD9DC3;" | {{item icon|Death Support Pack|75px}} | ||
| + | | style="background: #F1ECF7;"| '''{{item link|Death Support Pack}}''' | ||
|- | |- | ||
| align="center" style="background: #AD9DC3;" | {{item icon|External Organ|75px}} | | align="center" style="background: #AD9DC3;" | {{item icon|External Organ|75px}} | ||
| Line 148: | Line 194: | ||
| style="background: #F1ECF7;"| '''{{item link|Up Pyroscopes}}''' | | style="background: #F1ECF7;"| '''{{item link|Up Pyroscopes}}''' | ||
|- | |- | ||
| − | | width="60px" style="background: #6A5587;" rowspan=" | + | | width="60px" style="background: #6A5587;" rowspan="3" | {{icon class|Demoman}}<br/>'''[[Demoman|<span style="color: #FFF;">Demoman</span>]]''' |
| − | |||
| − | |||
| − | |||
| align="center" style="background: #AD9DC3;" | {{item icon|Horsemann's Hand-Me-Down|75px}} | | align="center" style="background: #AD9DC3;" | {{item icon|Horsemann's Hand-Me-Down|75px}} | ||
| style="background: #F1ECF7;"| '''{{item link|Horsemann's Hand-Me-Down}}''' | | style="background: #F1ECF7;"| '''{{item link|Horsemann's Hand-Me-Down}}''' | ||
| Line 171: | Line 214: | ||
| style="background: #F1ECF7;"| '''{{item link|Monstrous Mandible}}''' | | style="background: #F1ECF7;"| '''{{item link|Monstrous Mandible}}''' | ||
|- | |- | ||
| − | | width="60px" style="background: #6A5587;" rowspan=" | + | | width="60px" style="background: #6A5587;" rowspan="1" | {{icon class|Engineer}}<br/>'''[[Engineer|<span style="color: #FFF;">Engineer</span>]]''' |
| + | | align="center" style="background: #AD9DC3;" | {{item icon|Grease Monkey|75px}} | ||
| + | | style="background: #F1ECF7;"| '''{{item link|Grease Monkey}}''' | ||
| + | |- | ||
| + | | width="60px" style="background: #6A5587;" rowspan="3" | {{icon class|Medic}}<br/>'''[[Medic|<span style="color: #FFF;">Medic</span>]]''' | ||
| align="center" style="background: #AD9DC3;" | {{item icon|Archimedes the Undying|75px}} | | align="center" style="background: #AD9DC3;" | {{item icon|Archimedes the Undying|75px}} | ||
| style="background: #F1ECF7;"| '''{{item link|Archimedes the Undying}}''' | | style="background: #F1ECF7;"| '''{{item link|Archimedes the Undying}}''' | ||
| Line 177: | Line 224: | ||
| align="center" style="background: #AD9DC3;" | {{item icon|Second Opinion|75px}} | | align="center" style="background: #AD9DC3;" | {{item icon|Second Opinion|75px}} | ||
| style="background: #F1ECF7;"| '''{{item link|Second Opinion}}''' | | style="background: #F1ECF7;"| '''{{item link|Second Opinion}}''' | ||
| + | |- | ||
| + | | align="center" style="background: #AD9DC3;" | {{item icon|Vicar's Vestments|75px}} | ||
| + | | style="background: #F1ECF7;"| '''{{item link|Vicar's Vestments}}''' | ||
|- | |- | ||
| width="60px" style="background: #6A5587;" rowspan="1" | {{icon class|Sniper}}<br/>'''[[Sniper|<span style="color: #FFF;">Sniper</span>]]''' | | width="60px" style="background: #6A5587;" rowspan="1" | {{icon class|Sniper}}<br/>'''[[Sniper|<span style="color: #FFF;">Sniper</span>]]''' | ||
| align="center" style="background: #AD9DC3;" | {{item icon|Carious Chameleon|75px}} | | align="center" style="background: #AD9DC3;" | {{item icon|Carious Chameleon|75px}} | ||
| style="background: #F1ECF7;"| '''{{item link|Carious Chameleon}}''' | | style="background: #F1ECF7;"| '''{{item link|Carious Chameleon}}''' | ||
| + | |- | ||
| + | | width="60px" style="background: #6A5587;" rowspan="1" | {{icon class|Spy}}<br/>'''[[Spy|<span style="color: #FFF;">Spy</span>]]''' | ||
| + | | align="center" style="background: #AD9DC3;" | {{item icon|Foul Cowl|75px}} | ||
| + | | style="background: #F1ECF7;"| '''{{item link|Foul Cowl}}''' | ||
|- | |- | ||
| width="60px" style="background:#6A5587;" rowspan = 1| {{icon class|Scout}}<br/>'''[[Scout|<span style="color: #FFF;">Scout</span>]]'''<br/>{{icon class|Demoman}}<br/>'''[[Demoman|<span style="color: #FFF;">Demoman</span>]]''' | | width="60px" style="background:#6A5587;" rowspan = 1| {{icon class|Scout}}<br/>'''[[Scout|<span style="color: #FFF;">Scout</span>]]'''<br/>{{icon class|Demoman}}<br/>'''[[Demoman|<span style="color: #FFF;">Demoman</span>]]''' | ||
| Line 186: | Line 240: | ||
| style="background: #F1ECF7;"| '''{{item link|Baphomet Trotters}}''' | | style="background: #F1ECF7;"| '''{{item link|Baphomet Trotters}}''' | ||
|- | |- | ||
| − | | width="60px" style="background:#6A5587;" rowspan = 8| {{icon class|All Classes}}<br/>'''[[Classes|<span style="color: #FFF;"> | + | | width="60px" style="background:#6A5587;" rowspan = 1| {{icon class|Soldier}}<br/>'''[[Soldier|<span style="color: #FFF;">Soldier</span>]]'''<br/>{{icon class|Pyro}}<br/>'''[[Pyro|<span style="color: #FFF;">Pyro</span>]]'''<br/>{{icon class|Demoman}}<br/>'''[[Demoman|<span style="color: #FFF;">Demoman</span>]]''' |
| + | | align="center" style="background: #AD9DC3;" | {{item icon|Candleer|75px}} | ||
| + | | style="background: #F1ECF7;"| '''{{item link|Candleer}}''' | ||
| + | |- | ||
| + | | width="60px" style="background:#6A5587;" rowspan = 1| {{icon class|Soldier}}<br/>'''[[Soldier|<span style="color: #FFF;">Soldier</span>]]'''<br/>{{icon class|Pyro}}<br/>'''[[Pyro|<span style="color: #FFF;">Pyro</span>]]''' | ||
| + | | align="center" style="background: #AD9DC3;" | {{item icon|Pin Pals|75px}} | ||
| + | | style="background: #F1ECF7;"| '''{{item link|Pin Pals}}''' | ||
| + | |- | ||
| + | | width="60px" style="background:#6A5587;" rowspan = 8| {{icon class|All Classes}}<br/>'''[[Classes|<span style="color: #FFF;">Todas as classes</span>]]''' | ||
| align="center" style="background: #AD9DC3;" | {{item icon|Accursed Apparition|75px}} | | align="center" style="background: #AD9DC3;" | {{item icon|Accursed Apparition|75px}} | ||
| style="background: #F1ECF7;"| '''{{item link|Accursed Apparition}}''' | | style="background: #F1ECF7;"| '''{{item link|Accursed Apparition}}''' | ||
| Line 213: | Line 275: | ||
|} | |} | ||
| − | === | + | === Conjuntos === |
| − | + | ||
| − | {| class="wikitable collapsible" cellpadding=" | + | {| class="wikitable collapsible" cellpadding="2" style="text-align:center;" |
| − | | width=" | + | | width="70px" style="background:#6A5587;" rowspan="2" | {{icon class|Scout}}<br/>'''[[Scout{{if lang}}|<span style="color:#FFF;">{{class name|scout}}</span>]]''' |
| − | | | + | | style="background:#E8E2F0;" rowspan="2" |{{icon item|Boston Bulldog|80px|link=The Boston Bulldog{{if lang}}}}<br/>'''{{item link|The Boston Bulldog}}'''<br/> |
| − | + | | align="center" style="background:#AD9DC3;" | {{icon item|Hound's Hood|75px}} | |
| − | + | | style="background:#F1ECF7;" | '''{{item link|Hound's Hood}}''' | |
| − | | align="center" style="background: #AD9DC3;" | {{item | ||
| − | | style="background: #F1ECF7;"| '''{{item link| | ||
|- | |- | ||
| − | | align="center" style="background: #AD9DC3;" | {{item | + | | align="center" style="background:#AD9DC3;" | {{icon item|Terrier Trousers|75px}} |
| − | | style="background: #F1ECF7;"| '''{{item link| | + | | style="background:#F1ECF7;" | '''{{item link|Terrier Trousers}}''' |
|- | |- | ||
| − | | width=" | + | | width="70px" style="background:#6A5587;" rowspan="6" | {{icon class|Soldier}}<br/>'''[[Soldier{{if lang}}|<span style="color:#FFF;">{{class name|soldier}}</span>]]''' |
| − | | align="center" style="background: #AD9DC3;" | {{item | + | | style="background:#E8E2F0;" rowspan="3" | {{icon item|Rocket Ranger|80px|link=The Rocket Ranger{{if lang}}}}<br/>'''{{item link|The Rocket Ranger}}'''<br/> |
| − | | style="background: #F1ECF7;"| '''{{item link|Hardium Helm}}''' | + | | align="center" style="background:#AD9DC3;" | {{icon item|Hardium Helm|75px}} |
| + | | style="background:#F1ECF7;" | '''{{item link|Hardium Helm}}''' | ||
|- | |- | ||
| − | | align="center" style="background: #AD9DC3;" | {{item | + | | align="center" style="background:#AD9DC3;" | {{icon item|Space Bracers|75px}} |
| − | | style="background: #F1ECF7;"| '''{{item link| | + | | style="background:#F1ECF7;" | '''{{item link|Space Bracers}}''' |
|- | |- | ||
| − | + | | align="center" style="background:#AD9DC3;" | {{icon item|Jupiter Jumpers|75px}} | |
| − | | align="center" style="background: #AD9DC3;" | {{item | + | | style="background:#F1ECF7;" | '''{{item link|Jupiter Jumpers}}''' |
| − | | style="background: #F1ECF7;"| '''{{item link| | ||
|- | |- | ||
| − | | align="center" style="background: #AD9DC3;" | {{item | + | | style="background:#E8E2F0;" rowspan="3" | {{icon item|Terracotta Trooper|80px|link=The Terracotta Trooper{{if lang}}}}<br/>'''{{item link|The Terracotta Trooper}}'''<br/> |
| − | | style="background: #F1ECF7;"| '''{{item link| | + | | align="center" style="background:#AD9DC3;" | {{icon item|Hidden Dragon|75px}} |
| + | | style="background:#F1ECF7;" | '''{{item link|Hidden Dragon}}''' | ||
|- | |- | ||
| − | | align="center" style="background: #AD9DC3;" | {{item | + | | align="center" style="background:#AD9DC3;" | {{icon item|Faux Manchu|75px}} |
| − | | style="background: #F1ECF7;"| '''{{item link| | + | | style="background:#F1ECF7;" | '''{{item link|Faux Manchu}}''' |
|- | |- | ||
| − | | align="center" style="background: #AD9DC3;" | {{item | + | | align="center" style="background:#AD9DC3;" | {{icon item|Shaolin Sash|75px}} |
| − | | style="background: #F1ECF7;"| '''{{item link| | + | | style="background:#F1ECF7;" | '''{{item link|Shaolin Sash}}''' |
|- | |- | ||
| − | | align="center" style="background: #AD9DC3;" | {{item | + | | width="70px" style="background:#6A5587;" rowspan="7" | {{icon class|Pyro}}<br/>'''[[Pyro{{if lang}}|<span style="color:#FFF;">Pyro</span>]]''' |
| − | | style="background: #F1ECF7;"| '''{{item link| | + | | style="background:#E8E2F0;" rowspan="3" | {{icon item|Burny the Pyrosaur|80px|link=Burny the Pyrosaur{{if lang}}}}<br/>'''{{item link|Burny the Pyrosaur}}'''<br/> |
| + | | align="center" style="background:#AD9DC3;" | {{icon item|Burny's Boney Bonnet|75px}} | ||
| + | | style="background:#F1ECF7;" | '''{{item link|Burny's Boney Bonnet}}''' | ||
|- | |- | ||
| − | | align="center" style="background: #AD9DC3;" | {{item | + | | align="center" style="background:#AD9DC3;" | {{icon item|Cauterizer's Caudal Appendage|75px}} |
| − | | style="background: #F1ECF7;"| '''{{item link| | + | | style="background:#F1ECF7;" | '''{{item link|Cauterizer's Caudal Appendage}}''' |
|- | |- | ||
| − | | align="center" style="background: #AD9DC3;" | {{item | + | | align="center" style="background:#AD9DC3;" | {{icon item|Monster's Stompers|75px}} |
| − | | style="background: #F1ECF7;"| '''{{item link| | + | | style="background:#F1ECF7;" | '''{{item link|Monster's Stompers}}''' |
|- | |- | ||
| − | | | + | | style="background:#E8E2F0;" rowspan="2" | {{icon item|Malice in Pyroland|80px|link=Malice in Pyroland{{if lang}}}}<br/>'''{{item link|Malice in Pyroland}}'''<br/> |
| − | | align="center" style="background: #AD9DC3;" | {{item | + | | align="center" style="background:#AD9DC3;" | {{icon item|Crispy Golden Locks|75px}} |
| − | | style="background: #F1ECF7;"| '''{{item link| | + | | style="background:#F1ECF7;" | '''{{item link|Crispy Golden Locks}}''' |
|- | |- | ||
| − | | align="center" style="background: #AD9DC3;" | {{item | + | | align="center" style="background:#AD9DC3;" | {{icon item|Scorched Skirt|75px}} |
| − | | style="background: #F1ECF7;"| '''{{item link| | + | | style="background:#F1ECF7;" | '''{{item link|Scorched Skirt}}''' |
|- | |- | ||
| − | | | + | | style="background:#E8E2F0;" rowspan="2" | {{icon item|Murky Lurker|80px|link=The Murky Lurker{{if lang}}}}<br/>'''{{item link|The Murky Lurker}}'''<br/> |
| − | | align="center" style="background: #AD9DC3;" | {{item | + | | align="center" style="background:#AD9DC3;" | {{icon item|Vicious Visage|75px}} |
| − | | style="background: #F1ECF7;"| '''{{item link| | + | | style="background:#F1ECF7;" | '''{{item link|Vicious Visage}}''' |
|- | |- | ||
| − | | align="center" style="background: #AD9DC3;" | {{item | + | | align="center" style="background:#AD9DC3;" | {{icon item|Abhorrent Appendages|75px}} |
| − | | style="background: #F1ECF7;"| '''{{item link| | + | | style="background:#F1ECF7;" | '''{{item link|Abhorrent Appendages}}''' |
|- | |- | ||
| − | | align="center" style="background: #AD9DC3;" | {{item | + | | width="70px" style="background:#6A5587;" rowspan="4" | {{icon class|Demoman}}<br/>'''[[Demoman{{if lang}}|<span style="color:#FFF;">{{class name|demoman}}</span>]]''' |
| − | | style="background: #F1ECF7;"| '''{{item link| | + | | style="background:#E8E2F0;" rowspan="2" | {{icon item|Count Tavish|80px|link=Count Tavish{{if lang}}}}<br/>'''{{item link|Count Tavish}}'''<br/> |
| + | | align="center" style="background:#AD9DC3;" | {{icon item|Transylvania Top|75px}} | ||
| + | | style="background:#F1ECF7;" | '''{{item link|Transylvania Top}}''' | ||
|- | |- | ||
| − | | align="center" style="background: #AD9DC3;" | {{item | + | | align="center" style="background:#AD9DC3;" | {{icon item|Lordly Lapels|75px}} |
| − | | style="background: #F1ECF7;"| '''{{item link| | + | | style="background:#F1ECF7;" | '''{{item link|Lordly Lapels}}''' |
|- | |- | ||
| − | | | + | | style="background:#E8E2F0;" rowspan="2" | {{icon item|Cursed Captain|80px|link=The Cursed Captain{{if lang}}}}<br/>'''{{item link|The Cursed Captain}}'''<br/> |
| − | | align="center" style="background: #AD9DC3;" | {{item | + | | align="center" style="background:#AD9DC3;" | {{icon item|Squid's Lid|75px}} |
| − | | style="background: #F1ECF7;"| '''{{item link| | + | | style="background:#F1ECF7;" | '''{{item link|Squid's Lid}}''' |
|- | |- | ||
| − | + | | align="center" style="background:#AD9DC3;" | {{icon item|Cap'n Calamari|75px}} | |
| − | | align="center" style="background: #AD9DC3;" | {{item | + | | style="background:#F1ECF7;" | '''{{item link|Cap'n Calamari}}''' |
| − | | style="background: #F1ECF7;"| '''{{item link| | ||
|- | |- | ||
| − | | | + | | style="background:#6A5587;" rowspan="4" | {{icon class|Medic}}<br/>'''[[Medic{{if lang}}|<span style="color:#FFF;">{{class name|medic}}</span>]]''' |
| − | | align="center" style="background: #AD9DC3;" | {{item | + | | style="background:#E8E2F0;" rowspan="2" | {{icon item|Sun King|80px|link=The Sun King{{if lang}}}}<br/>'''{{item link|The Sun King}}'''<br/> |
| − | | style="background: #F1ECF7;"| '''{{item link| | + | | align="center" style="background:#AD9DC3;" | {{icon item|Teutonkahmun|75px}} |
| + | | style="background:#F1ECF7;" | '''{{item link|Teutonkahmun}}''' | ||
|- | |- | ||
| − | | align="center" style="background: #AD9DC3;" | {{item | + | | align="center" style="background:#AD9DC3;" | {{icon item|Ramses' Regalia|75px}} |
| − | | style="background: #F1ECF7;"| '''{{item link| | + | | style="background:#F1ECF7;" | '''{{item link|Ramses' Regalia}}''' |
|- | |- | ||
| − | | | + | | style="background:#E8E2F0;" rowspan="2" | {{icon item|Doctor Galactic|80px|link=Doctor Galactic{{if lang}}}}<br/>'''{{item link|Doctor Galactic}}'''<br/> |
| − | + | | align="center" style="background:#AD9DC3;" | {{icon item|Surgeon's Space Suit|75px}} | |
| − | + | | style="background:#F1ECF7;" | '''{{item link|Surgeon's Space Suit}}''' | |
| − | |||
| − | |||
| − | | align="center" style="background: #AD9DC3;" | {{item | ||
| − | | style="background: #F1ECF7;"| '''{{item link| | ||
|- | |- | ||
| − | + | | align="center" style="background:#AD9DC3;" | {{icon item|Lo-Grav Loafers|75px}} | |
| − | | align="center" style="background: #AD9DC3;" | {{item | + | | style="background:#F1ECF7;" | '''{{item link|Lo-Grav Loafers}}''' |
| − | | style="background: #F1ECF7;"| '''{{item link| | ||
|- | |- | ||
| − | | align="center" style="background: #AD9DC3;" | {{item | + | | style="background:#6A5587;" rowspan="3" | {{icon class|Spy}}<br/>'''[[Spy{{if lang}}|<span style="color:#FFF;">{{class name|spy}}</span>]]''' |
| − | | style="background: #F1ECF7;"| '''{{item link| | + | | style="background:#E8E2F0;" rowspan="3" | {{icon item|Gravelpit Emperor|80px|link=The Gravelpit Emperor{{if lang}}}}<br/>'''{{item link|The Gravelpit Emperor}}'''<br/> |
| + | | align="center" style="background:#AD9DC3;" | {{icon item|Candyman's Cap|75px}} | ||
| + | | style="background:#F1ECF7;" | '''{{item link|Candyman's Cap}}''' | ||
|- | |- | ||
| − | | align="center" style="background: #AD9DC3;" | {{item | + | | align="center" style="background:#AD9DC3;" | {{icon item|Bountiful Bow|75px}} |
| − | | style="background: #F1ECF7;"| '''{{item link| | + | | style="background:#F1ECF7;" | '''{{item link|Bountiful Bow}}''' |
|- | |- | ||
| − | | align="center" style="background: #AD9DC3;" | {{ | + | | align="center" style="background:#AD9DC3;" | {{icon item|Bozo's Brogues|75px}} |
| − | + | | style="background:#F1ECF7;" | '''{{item link|Bozo's Brogues}}''' | |
| − | |||
| − | |||
| − | |||
| − | |||
| − | |||
| − | |||
| − | |||
| − | |||
| − | |||
| − | |||
| − | |||
| − | |||
| − | |||
| − | |||
| − | |||
| − | |||
| − | |||
| − | |||
| − | |||
| − | |||
| − | |||
| − | |||
| − | |||
| − | |||
| − | |||
| − | |||
| − | |||
| − | |||
| − | |||
| − | |||
| − | |||
| − | |||
| − | |||
| − | |||
| − | |||
| − | |||
| − | |||
| − | |||
| − | |||
| − | |||
| − | |||
| − | |||
| − | |||
| − | | style="background: #F1ECF7;"| '''{{item link|Bozo's Brogues | ||
| − | |||
| − | |||
| − | |||
| − | |||
| − | |||
| − | |||
| − | |||
| − | |||
| − | |||
| − | |||
| − | |||
|- | |- | ||
|} | |} | ||
| − | === Itens de | + | === Itens de ação === |
{| class="wikitable collapsible" cellpadding=2 style="text-align:center;" | {| class="wikitable collapsible" cellpadding=2 style="text-align:center;" | ||
| + | | align="center" style="background: #AD9DC3;" | {{Icon item|Fancy Spellbook|75px}} | ||
| + | | '''{{Item link|Fancy Spellbook}}''' | ||
| + | |- | ||
| align="center" style="background: #AD9DC3;" | {{Icon item|Spellbook Magazine|75px}} | | align="center" style="background: #AD9DC3;" | {{Icon item|Spellbook Magazine|75px}} | ||
| '''{{Item link|Spellbook Magazine}}''' | | '''{{Item link|Spellbook Magazine}}''' | ||
| Line 376: | Line 386: | ||
=== Ferramentas === | === Ferramentas === | ||
{| class="wikitable collapsible" cellpadding=2 style="text-align:center;" | {| class="wikitable collapsible" cellpadding=2 style="text-align:center;" | ||
| + | | align="center" style="background: #AD9DC3;" | {{Icon item|Costume Transmogrifier|75px}} | ||
| + | | '''{{Item link|Costume Transmogrifier}}''' | ||
| + | |- | ||
| + | | align="center" style="background: #AD9DC3;" | {{Icon item|Enchantment- Eternaween|75px}} | ||
| + | | '''[[Enchantment: Eternaween]]''' | ||
| + | |- | ||
| + | | align="center" style="background: #AD9DC3;" | {{Icon item|Spellbook Page|75px}} | ||
| + | | '''{{Item link|Spellbook Page}}''' | ||
| + | |- | ||
| align="center" style="background: #AD9DC3;" | {{Icon item|Spooky Key|75px}} | | align="center" style="background: #AD9DC3;" | {{Icon item|Spooky Key|75px}} | ||
| '''{{Item link|Spooky Key}}''' | | '''{{Item link|Spooky Key}}''' | ||
|- | |- | ||
| − | | align="center" style="background: #AD9DC3;" | {{Icon item| | + | | align="center" style="background: #AD9DC3;" | {{Icon item|Unfilled Fancy Spellbook|75px}} |
| − | | '''{{Item link| | + | | '''{{Item link|Unfilled Fancy Spellbook}}''' |
| − | |||
|} | |} | ||
| − | === | + | === Personagens não-jogáveis === |
| − | * Esqueletos | + | * [[Skeletons/pt-br|Esqueletos]] |
| + | * [[Monoculus/pt-br|Monoculus]] | ||
| − | === | + | === [[Bereavements/pt-br|Conquistas relacionadas]] === |
| − | + | {{Halloween 2013 achievement list}} | |
| − | |||
| − | |||
| − | |||
| − | |||
| − | |||
| − | |||
| − | |||
=== Mapas === | === Mapas === | ||
| − | [[Helltower/pt-br|Helltower]] | + | {{main|List of maps}} |
| + | {| class="wikitable" cellpadding="2" style="text-align:center;" | ||
| + | |- style="height:20px; color: #FFF;" | ||
| + | ! style="background: #6A5587;" class="header" | {{common string|name}} | ||
| + | ! style="background: #6A5587;" class="header" | {{common string|picture}} | ||
| + | ! style="background: #6A5587;" class="header" | {{common string|game mode}} | ||
| + | ! style="background: #6A5587;" class="header" | {{common string|file name}} | ||
| + | |- | ||
| + | | style="background: #AD9DC3;" | '''[[Helltower/pt-br|Helltower]]''' | ||
| + | | width="100px" | [[File:Plr hightower event3.png|160px|link=Helltower/pt-br]] | ||
| + | | style="background: #F1ECF7;" align="center" | '''[[Payload Race/pt-br|Carga Explosiva]]'''<br>[[File:RED Bombcart.png|30px|link=Payload Race/pt-br|Carga Explosiva]][[File:BLU Bombcart.png|30px| link=Payload Race/pt-br|Carga Explosiva]] | ||
| + | | style="background: #F1ECF7;" | {{code|plr_hightower_event}} | ||
| + | |- | ||
| + | |} | ||
== Curiosidades == | == Curiosidades == | ||
| − | * | + | * Várias mensagens codificadas aparecem nas páginas da atualização e elas utilizam [http://www.fontsy.com/font_details_24224.html símbolos de Agathodaimon]. |
| − | * | + | ** Duas são encontradas em laços que se estendem através da página. O primeiro diz "''Bazbo Bibbons''" e o segundo "''Abo alabazbus''". |
| + | ** Várias frases podem ser lidas na ilustração do livro de magias. | ||
| + | *** ''FEAR NOT THOSE WHO SEEK TO DESTROY YOU. FOR WITH THIS BOOK YOU ARE GRANTED THE STRENGTH OF A GIANT.'' | ||
| + | *** ''OR PERHAPS WHAT YOU SEEK IS A RAIN OF BURNING COMETS TO SMITE YOUR FOE.'' | ||
| + | *** ''A RAIN OF COMMETS{{sic}} ISN'T GOOD ENOUGH FOR YOU'' | ||
| + | *** ''FINE. YOU SHALL BE GIVEN THE SPEED OF CHEETAH.'' | ||
| + | *** ''AND STILL NOT GOOD ENOUGH FOR YOU'' | ||
| + | *** ''FINE. WELL LEAVE THIS TO CHANCE. TRY NOT TO BURN YOUR OWN FACE OFF.'' | ||
== Galeria == | == Galeria == | ||
<gallery> | <gallery> | ||
| − | File:Welcome to Helltower.jpg| | + | File:Welcome to Helltower.jpg|Cartão postal de Helltower |
</gallery> | </gallery> | ||
| − | |||
| − | {{ | + | {{Scream Fortress 2013 Nav}} |
| + | {{Major Updates Nav}} | ||
| + | [[Category:Major updates/pt-br]] | ||
Revision as of 12:47, 13 November 2013
Este artigo refere-se especificamente ao conteúdo lançado na atualização. Para informações sobre a atualização, veja
Atualização de 29 de outubro de 2013.
| "Vai, vai, vai!" Este artigo documenta uma adição recente. Ele pode conter especulações, links quebrados ou erros. Você pode ajudar a melhorá-lo editando esta página para incluir novas informações. |
| "Você é tão pequeno! É muito engraçado!" Este artigo ou seção é um esboço. Logo, não está completo. Você pode ajudar a Wiki do Team Fortress expandindo o artigo original (em inglês). |
| “ | Claw your way through piles of musty books and skeletons while old people yell at each other about nonsense and get carried off to Hell! That's right, Team Feartress fans— we combined the terror of Halloween with the more muted and depressing terror of a retirement home, and accidentally invented an entirely new brand of horror! Then we realized listening to two old men bicker from beyond the grave isn't that horrifying, so we threw in a bunch of crazy spells you can cast at each other!
— Página da atualização
|
” |
O Scream Fortress Fifth Annual Helloween Special é uma atualização lançada no dia Atualização de 29 de outubro de 2013. Esta é a quinta atualização da série Scream Fortress, adicionando o mapa de evento de Dia das Bruxas Helltower, juntamente aos 102 chapéus e itens misc com o tema do Dia das Bruxas.
Índice
Linha do tempo
O envio dos itens para o evento iniciaram no dia 18 de setembro de 2013, através do blog oficial do Team Fortress 2.
O evento foi apresentado no dia 28 de outubro de 2013 através da história em quadrinho Grave Matters.
O evento durou do dia 29 de outubro de 2013 até o dia 11 de novembro de 2013.
Adições
Chapéus
Itens misc
Conjuntos
Itens de ação
| Livro de Feitiços | |
| Revista de Feitiços |
Ferramentas
| Transmogrifador de Fantasia | |
| Enchantment: Eternaween | |
| Página do Livro de Feitiços | |
| Chave Apavorante | |
| Livro de Feitiços Incompleto |
Personagens não-jogáveis
Conquistas relacionadas
|
|
Mapas
Artigo principal: List of maps
| Nome | Imagem | Modo de jogo | Nome do arquivo |
|---|---|---|---|
| Helltower | 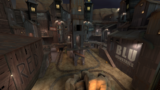
|
Carga Explosiva |
plr_hightower_event
|
Curiosidades
- Várias mensagens codificadas aparecem nas páginas da atualização e elas utilizam símbolos de Agathodaimon.
- Duas são encontradas em laços que se estendem através da página. O primeiro diz "Bazbo Bibbons" e o segundo "Abo alabazbus".
- Várias frases podem ser lidas na ilustração do livro de magias.
- FEAR NOT THOSE WHO SEEK TO DESTROY YOU. FOR WITH THIS BOOK YOU ARE GRANTED THE STRENGTH OF A GIANT.
- OR PERHAPS WHAT YOU SEEK IS A RAIN OF BURNING COMETS TO SMITE YOUR FOE.
- A RAIN OF COMMETS(sic) ISN'T GOOD ENOUGH FOR YOU
- FINE. YOU SHALL BE GIVEN THE SPEED OF CHEETAH.
- AND STILL NOT GOOD ENOUGH FOR YOU
- FINE. WELL LEAVE THIS TO CHANCE. TRY NOT TO BURN YOUR OWN FACE OFF.
Galeria
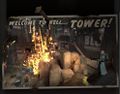
Cartão postal de Helltower

| ||||||||||||||||||||||||||||||||||||||||||||||||||||||||||||||||||||||||||||||||||||||||||||||||||