Difference between revisions of "Frontier"
m (Pair of typos.) |
NihonTiger (talk | contribs) m (→Lil' Chew Chew: Quick edit to reflect proper wiki style) |
||
| Line 13: | Line 13: | ||
==Lil' Chew Chew== | ==Lil' Chew Chew== | ||
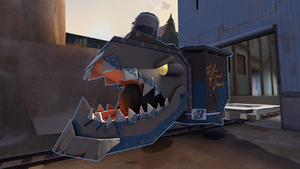
[[Image:chewchew.png|thumb|left|The cart, ''Lil' Chew-Chew''.]] | [[Image:chewchew.png|thumb|left|The cart, ''Lil' Chew-Chew''.]] | ||
| − | In place of the standard [[cart | + | In place of the standard [[BLU]] bomb [[cart]], the cart in Frontier is a large mechanized train engine known as "''Lil' Chew-Chew.''" Providing cover from frontal attacks, the train is capable of instantly killing anyone that is in its mouth when it's moving forward (whether willingly or forcibly) in addition to having a rideable platform and built-in [[Dispenser]] for BLU. It has a noticeably increased pushing range when compared to normal carts. |
== Locations == | == Locations == | ||
Revision as of 04:31, 8 December 2010
| Frontier | |
|---|---|

| |
| Basic Information | |
| Developer(s): | Unknown |
| Map Overview | |
Frontier is a Payload map by mangyCarface that focuses on aggressive offensive pushes.
Frontier is a single-stage Payload map with 4 control points for BLU to capture. It is orientated towards organizing pushes around the cart's movement to benefit from it's significant protection in lieu of suppressing RED due to the layout of terrain being in favor of the RED team. The crowning feature of Frontier is its custom Payload, "Lil' Chew-Chew."
Contents
Lil' Chew Chew
In place of the standard BLU bomb cart, the cart in Frontier is a large mechanized train engine known as "Lil' Chew-Chew." Providing cover from frontal attacks, the train is capable of instantly killing anyone that is in its mouth when it's moving forward (whether willingly or forcibly) in addition to having a rideable platform and built-in Dispenser for BLU. It has a noticeably increased pushing range when compared to normal carts.
Locations
- The Shack is a small, two-level building to the right of the BLU base. It has a small balcony that a Sentry Gun can be placed on to give a good area of fire over the top of the Payload.
- The Rock Wall separates the second cap point from a small house through which BLU may travel.
- The Rock Plateau comes right before the third cap and is ideal for RED to place Sentry Guns. There is even one rock spire with a medium ammo box and small health kit, allowing a skilled Engineer to place a high Sentry Gun out of sapping range.
- The Tunnel is a pathway that is near the Plateau and can be used a a choke point. Walkways along the top ends can be good areas to apply defense against the Payload from above.
Strategy
- BLU should always take advantage of their Payload, using it to shield them from incoming attacks while holding a hard defense to the sides. Likewise, the frontal protection provided by the Payload and terrain around the cart during key points encourages flanking and attacking from high ground by RED.
- Slow moving or just plain unlucky enemies can be shoved into front of the train and killed, assisted by a quick push from a Pyro's compression blast or a Scout's Force-A-Nature.
- The stairs inside the Shack can make it easy for a Spy to sneak up behind a Sentry Gun and the Engineer, so a Pyro would be well-suited to spycheck as well as deflect incoming rockets.
- The Cave right before the third cap is a good place either team to ambush players with the Backburner, or house a Sentry Gun.
- While taking the final point, BLU Snipers can use the newly opened shortcut to pick off REDs around the end of the tracks. Other classes can also take this path and quickly head to the ramp on the right, allowing closer access to RED's defenses.
- Underneath the final cap point there are large ammo and health kits, which most players do not normally venture to unless they fall down there. This allows a very sneaky BLU Engineer to possibly construct a small base to allow BLU faster access towards the end.
Changelog
- Small filesize + framerate optimizations
- Small detailing and clipping fixes
- New train and animations
- Etc.
| ||||||||||||||||||||||||||||||||||||||||||||||||

