Frontier
| Frontier | |
|---|---|

| |
| Basic Information | |
| Map type: | Payload |
| File name: | pl_frontier_final
|
| Released: | February 24, 2011 Patch (Community Map Pack Update) |
| Developer(s): | Patrick "MangyCarface" Mulholland Arhurt |
| Map Info | |
| Environment: | Alpine |
| Setting: | Daylight, Sunny |
| Hazards: | Pitfall, Li'l Chew Chew |
| Map Items | |
| Map Photos | |
 | |
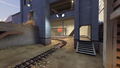
| Map overview | |
 | |
| Map Stamp | |
| Supporters Leaderboard | |
| “ | Meet "Li'l Chew Chew"—a razor-toothed BLU payload designed to messily devour any merc dumb enough to blunder in front of its path through this single-stage payload map. Eat your way past RED's defenses astride a gleaming metal death machine, powered by the blood of your enemies, and also gasoline (mostly gasoline, to be honest).
|
” |
Frontier is a single-stage Payload map with 4 checkpoints added in the Community Map Pack Update. It is oriented towards organizing pushes around the cart's movement to benefit from its significant protection instead of suppressing the RED team, because the layout of terrain is highly favorable towards the RED team. The crowning feature of Frontier is its custom cart, "Li'l Chew-Chew".
The setup timer is 1 minute and 10 seconds.
Contents
Li'l Chew Chew

In place of the standard BLU cart is a substantially larger mechanized train engine known as Li'l Chew Chew (also spelled "Lil' Chew Chew", or "Lil Chew Chew"). It has razor-sharp teeth and two headlights as eyes, and a rideable platform on the back. It is impossible to construct buildings on the rideable platform.
Being much larger than a standard Payload cart, Li'l Chew-Chew provides significant cover from frontal attacks. It is also capable of instantly killing any player in its mouth with a chomp. The range of this chomp is increased when traveling at full speed, catching any player directly in front of the moving cart. The platform also has a built-in BLU Dispenser; however, those riding on it have trouble seeing directly in front of the cart, as the main body of the train is in the way. It has a noticeably increased pushing range when compared to normal carts.
Locations
![]() The following locations are described from the BLU perspective.
The following locations are described from the BLU perspective.
Note: If you are having trouble with finding the locations listed here, see the Helpful overview section to see their exact position marked on the map.
Checkpoint A
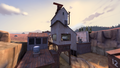
- First BLU Spawn: A large building with four exits. Li'l Chew Chew is initially located inside the spawn.
- Shack: A small, two-story building to the right of the BLU's initial spawn. There is a tiny balcony hanging off its side as well as a small health kit and a large ammo pack that can be found on the second floor.
- Cave: Positioned directly across the Shack is a hollowed-out section of a hill that leads directly to the Tower. Sandwiched in between the Cave and the Shack are the Li'l Chew Chew's tracks that lead to checkpoint A. The Cave also holds a medium health and ammo pack.
- Tower: This is a very tall building that overlooks the entire area of checkpoint A. It is positioned in such a way that the cart needs to first pass underneath it before exiting out of its back side to reach the first checkpoint. Although there is only a single staircase leading up to the top of the Tower, players can also access it by explosive jumping through its windows.
- Dwellings: A group of houses and hallways that are located at the base of the Tower.
- Cliffs: Stretching in between the Tower and the Canyon is an elevated section of terrain that runs parallel alongside the cart's tracks. There is also a small wooden shed atop the Cliff that contains a small health kit, as well as a larger building located opposite RED's first spawn exit that houses a large health pack and small ammo pack.
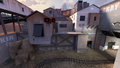
- Checkpoint A: Checkpoint A sits in an area surrounded by high cliffs and buildings just in front of RED's starting spawn area.

First BLU spawn exterior.

First BLU spawn interior.

Shack.

Cave.
Tower.

Tower as seen from the BLU side.

Dwellings below the Tower.

Cliff.

First/second spawn.

Checkpoint A.


Checkpoint B
- First RED Spawn and Second BLU Spawn: After checkpoint A gets captured, RED is moved out of their initial spawn, which then becomes occupied by BLU.
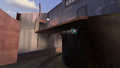
- Canyon: Right after passing checkpoint A, the cart makes a left turn and goes through a small valley where it is surrounded by cliffs from all of its sides. Bordering this area is also a deadly pitfall.
- First Incline: A large and steep incline on which the cart must travel after traversing the Canyon. On the right is the House, and at the top is the Warehouse.
- House: Located alongside the Incline is a medium-sized single-story house that also contains a medium health kit and medium ammo pack.
- Rock Wall: Splitting the Incline in two is a wall made out of large boulders that are adjacent to the Warehouse's left side.
- Warehouse: A big multi-story structure that houses checkpoint B. It is primarily located on the right side of the Incline, but parts of it also stretch all the way to the Maintenance Shed that comes after the checkpoint B. It has 6 entrances and exits in total, as well as a medium health kit inside.
- Spiraling Ramp: A vertical structure containing a ramp which ascends to the same level as the RED's second spawn.
- Third BLU Spawn: Built into the nearby terrain is the third BLU spawn, which becomes active once checkpoint B is captured.
- Checkpoint B: Checkpoint B is found at the top of a large hill inside of the Warehouse.

Canyon.

First Incline.

House.

Rock Wall.

Warehouse's exterior.

Warehouse's interior.

Spiraling Ramp.
Spiraling Ramp exterior.
Checkpoint B.


Checkpoint C
- Second Incline: Once the checkpoint B is captured, the cart makes a turn to the left and starts climbing up yet another steep incline. this one taking it to the Maintenance Shed.
- Second RED Spawn and Fourth BLU Spawn: Located on the left side of the Second Incline is a very tiny room that acts as the Second RED Spawn. Once checkpoint B is captured, RED is moved out of there. The room is then empty and purposeless, until checkpoint C is captured, at which point it becomes the fourth and final BLU spawn.
- Maintenance Shed: On the right side of the second Incline is a single-room shack that connects to passageway which leads directly to the Rock Plateau.
- One-way Gate: The building housing the Second RED Spawn (which has by now become the third BLU spawn) has a one-way gate that exits out onto an area in front of the Rock Plateau.
- Rock Plateau: A group of cliffs and rocks positioned in between (and also connected to) the Hollow Building and the Balcony Building. A small health kit and medium ammo pack can be found on the top of the tallest rock, which can only be reached by blast jumping or using the Thermal Thruster.
- Hollow building: A large storage-like building with a very tall ceiling. After entering it, the cart makes a U-turn before reaching the checkpoint C. In one of the corners sit a medium health and ammo pack. Attached to the Building's left side is a platform which also has a medium health and ammo pack.
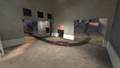
- Checkpoint C: Checkpoint C sits between the Antenna Building and the Rock Plateau. When this point is captured, two giant doors at the final pit slide open, revealing a satellite dish pointed at the sky.

Second Incline.

Maintenance Shed.

One-way Gate.

Rock Plateau.

Rock Plateau from RED's perspective.

Hollow Building.

Hollow Building interior.
Second/fourth spawn interior.

Second/fourth spawn rollout between Checkpoints B and C.
Checkpoint C.


Checkpoint D
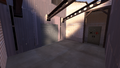
- Third RED Spawn: The RED team's third and final spawn area is located on either side of the checkpoint, connected by a catwalk.
- Below Flank: Hidden directly beneath Li'l Chew Chew's final stretch of tracks is an intricate set of cliffs and catwalks that offer many flank routes around the RED Final Spawn. Stashed away the way at the bottom is also a large health kit.
- Antenna Building: A building with an antenna on top of it, located on the other side of the tracks from the Rock Plateau. It contains stairs that lead to the Below Flank.
- Balcony Building: In one of the corners sits a dilapidated shed with a large uncovered terrace. It is directly connected to the right-side RED spawn via a metallic catwalk.
- Checkpoint D: Checkpoint D sits above a large open pit with a satellite dish at its bottom.

Antenna Building.

Staircase inside the Antenna Building.

Balcony Building.

Below Flank.

A section of the Below Flank.

Another way to access the Below Flank.

Exterior of the two RED spawns.

The catwalk connecting the two RED spawns.

Interior of the left RED spawn.

Checkpoint D.

Li'l Chew Chew at Final.

The Pit.

Cart being thrown into the Pit.


Helpful overview

1.Shack
2.Cave
3.Tower
4.Cliffs
5.Canyon
6.First Incline
7.House
8.Rock Wall
9.Warehouse
10.Second Incline
11 Maintenance Shed
12.Hollow building
13.Rock Plateau
14.Balcony Building
15.Red Catwalks
Yellow circle: Checkpoint A
Green circle: Checkpoint B
Black circle: Checkpoint C
White circle: Checkpoint D
Blue diagonal lines: First Blu spawn
Red diagonal lines: First Red spawn
Double Red/Blue diagonal lines: Second spawn
Red/Blue circle w/ double diagonal lines: Third spawn
Red/Blu square w/ circle and double diagonal lines: Fourth spawn
Strategy
 | “Sun Tzu's got nothing on us!” This map's Community strategy page is a stub. As such, it is not complete. You can help the Team Fortress Wiki Community Strategy Project by expanding it. Notes: None added |
Update history
- Added Frontier to the game.
October 13, 2011 Patch (Manniversary Update & Sale)
- Fixed various geometry bugs.
- Localized the team goal strings.
- Updated pl_frontier with author-submitted fixes:
- small prop adjustments.
- several unsewn/gappy displacements fixed up.
- func_push altered below final capture point.
- Fixed exploit where players could be pushed into enemy spawn rooms by the Payload cart.
- Fixed spawn doors not working properly after second capture.
- Players can no longer build inside kill volumes.
- Players can no longer build inside of Blu's second spawn room.
- Red players can now enter the Blu team spawn upon round win.
- Fixed Engineers being able to build in Red's final spawn room.
Changelog
First Release A1 (September 28, 2008)
Changelog A2 (October 1, 2008)
- Removed central RED spawn in favor of a forward spawn next to CP1.
- Second RED spawn moved into a separate room; former space used as side route, with a dropdown into the space before CP2.
- Added another exit from first BLUE spawn along with space to its right to avoid the congestion in this area in A1.
- One-way path added from bottom of warehouse after CP1 to area behind CP2.
- One-way path added from cliff overlooking CP1 to left side to hill preceding CP2.
- Shortcut added for RED when spawning from CP4; door closes after CP2 is captured.
- Train speed greatly reduced.
- Spawnwave times manipulated.
Changelog A3 (October 2, 2008)
- First RED spawn set to become a BLU spawn 10 seconds after CP1 is captured.
- BLU shortcut from first spawn to CP2 area after capturing it removed in favor of a new spawn location at shortcut‘s former exit.
- Spawnwave times manipulated in defense‘s favor.
Changelog A4 (October 7, 2008)
- Added left exit from BLU first spawn past first segment of track.
- Ramp added leading into building preceding CP1 choke.
- Tunnel dug through cliff on right of aforementioned choke to relieve congestion.
- Added path from cliff above CP1 connecting to top exit of second BLU spawn.
- Restructured stairs leading from warehouse around CP2.
- Platforming rearranged below final CP for BLU‘s benefit.
- Path from dropdown before CP2 opened out onto overlooking balcony.
- Spawnwave times generally increased.
- Train speed again cut.
Changelog A5 (October 9, 2008)
- Window added to building before CP1 allowing offense to pick off enemy sentries.
- Rightmost pathway onto hill after CP1‘s left exit sealed off to provide cover and conceal players taking that route.
- Spawnwave times adjusted in favor of BLU.
Changelog A6 (October 20, 2008)
- Contextual detailing added temporarily.
- Bridge added from cliff overlooking CP1 to path leading to rightmost entrance onto hill preceding CP2.
- CP2 warehouse bottom floor pathway moved up to top level.
- Path leading from space below CP4 around and back up to groundlevel.
- Ramps leading to top floor of CP3 warehouse added to its left side, allowing offense to gain higher ground inside.
- Entrance to former RED spawn between CP2 and CP3 removed to make holing up within easier.
- Roof added directly above CP4.
- CP4 moved back by roughly 25%.
- Spawnwave times manipulated, with RED‘s becoming generally longer.
Changelog A7 (October 20-21, 2008)
- No significant changes to geometry made.
- Clipping mistakes corrected.
- CP4 moved forward again slightly.
Changelog A8 (October 21, 2008)
- Doors added to block off path from CP2 warehouse past CP2 until it is captured.
Changelog A9
- Path from leftmost exit of BLU first spawn to building next to segment 1 choke diverted into earlier rock structure. Stairs added into this building from the ground floor.
- Second gallery window added below first within aforementioned building.
- Cliff pathway above CP1 diverted into nearby building.
- Windows cut into bridge structure before segment 2 hill.
- Segment 2 hill right entrance expanded into two-story building with dropdown into entrance.
- Ramp from defense's side of choking tunnelway in segment 3 added dropping down into former red spawn.
- Ramp from defense's side of tiered rock structure added up to top level; sliding door shortcut removed in compensation.
- Hole cut into roofing above CP4 for dropdown access.
Changelog A10
- Path into rock structure before segment 1 choke again rerouted, this time dropping down next to the ramp added into the building it used to connect to.
- Dropdown in segment 2 hill building moved to opposite side.
- Train speed decreased once more.
Changelog A11
- No significant layout changes were made.
- Gameplay-impacting lipping errors from a10 corrected.
Changelog A12
- No significant layout changes were made.
- Train speed increased by a factor of 1.3 after CP3 is captured, effectively shortening segment 4 by a factor of ~23%.
- RED spawnwave time increased for segment 2 and decreased slightly for segment 4.
Changelog A13 (November 12, 2008)
- No significant layout changes were made.
- Changes to RED spawn wave time during segment 2 reverted and decreased further.
- BLU spawn wave time reduced to 0 during segment 3.
Changelog BC
- First art pass applied. Innumerable small geometry and clipping changes made as a result.
- Cart replaced with first 'chewchew' model.
- Leftside exit of first BLU spawn restructured to provide height advantage over battlefield; pathway towards segment 1 choke building removed.
- Bridges spanning puddle to right of first BLU spawn removed.
- Accessible window in segment 1 choke building moved to the left to limit sentry dominance.
- Ramp added from first RED spawn onto rooves overlooking segment 1 choke.
- Path from segment 1 cliff to segment 2 hill completely removed.
- Bridge structure preceding segment 2 hill stripped of cover.
- Interior of CP3 warehouse adjusted to provide greater access to catwalks.
- Train speed again decreased by about 20%.
- Defensive spawn times increased, offensive decreased.
Changelog B1 (December 19, 2008)
- Opimization performed, unaffecting layout geometry significantly.
- Lighting pass run.
- Slight reduction to RED spawn times on latter half of map
Changelog B2 (January 14, 2009)
- Cart replaced with second 'chewchew' model; ramming ability changed to biting ability (no gameplay impact.)
- Various small geometry changes to help with optimization.
- Interior of segment 1 choke building completely removed for optimization and gameplay reasons.
- Path added onto roof of aforementioned building. Attic area joined onto roof to provide cover.
- Two exits of segment 1 cliff/choke after CP1 building removed for optimization reasons.
- Dropdown from segment 2 hill building moved back to original position.
- BLU spawn time for segment 1 reduced to 0 to match Valve standards.
Changelog RC (May 14, 2009)
- Dropdown in segment 2 hill building completely removed.
- Small geometry, optimization and clipping errors corrected.
- Train speed boosted up 13%.
- Final point position adjusted slightly.
Changelog Final (February 24, 2011)
- Vastly improved optimization; Lighting improved universally.
- Changed all disappearing brushes used as gates into proper sliding doors.
- First BLU spawn interior rearranged to provide better cover for offense within.
- Flow around bottom of segment 2 hill adjusted to offense's benefit. Lower area to right of second hill entrance removed completely.
- Flow within CP2 warehouse altered to better accommodate usual player activity inside.
- Path from side of CP2 warehouse around and above to segment 3 curved into spiral staircase to protect players and better optimize.
- Ground immediately out of former warehouse CP2 raised and hut added to provide cover for offensive players.
- Path from segment 3 rock tiers into warehouse made shorter to offense's benefit.
- Impenetrable window added as cover / spam blocker in front of shortcut from segment 2 to segment 4.
- Health and ammo pickup locations rearranged around last point to defense‘s advantage.
Bugs
- After the Payload has been delivered and the round has ended, the timer on the cart continues to drop.
- If a RED player is standing in the open door of BLU's second spawn point when the round ends, they are instantly teleported across the map into the third spawn point.
- If a BLU player pushes the cart, but not enough to get it out of the spawn room, and the cart retreats, the platform stops when it gets to its starting position, but Li'l Chew Chew keeps going until it reaches the same stopping point as the platform, resulting in Li'l Chew Chew clipping through over half of the platform. It returns to normal when a new round starts.
- Snipers can fire through the right window frame of the balcony building.
- Li'l Chew Chew can be glitched so the platform that it is towing ends up far behind the actual engine, allowing the BLU team to have a significant advantage as the cart ends up farther ahead than where the platform is. It also may have a model glitch, getting inside the ground and preventing RED team players from seeing the engine, which still has a functioning deathbox.
- RED Engineers can build a Teleporter Exit on the border of the entrance to BLU's first spawn, allowing RED entry if a BLU team member does a partner or group taunt.
- When the final point is capped, any BLU team members who were set to respawn at that time appear in RED's final spawn room, instead of BLU's intended final spawn room.
- Players can camp RED team's second spawn (BLU's 3rd) by using sticky bombs and firing at the top of a wall where the invisible walls cause the bombs to fall into the spawn area.
- On Linux servers, it is possible to clip out-of-bounds as an Engineer.
- Outside of BLU's first spawn there is an invisible water pool on the path to the Shack. It functions the same as normal water, but has no visible surface.
Trivia
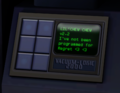
- The computer screen on Li'l Chew Chew bears the message: "Lil' Chew Chew v2.2 I've not been programmed for Regret <3 <3".
- The ticker tape below reads: "Lil' ChewChew OS 2.5 start up, Running System Check, Armor 100% ready, Vacuum Tubes 100% ready, Jaws 100% ready, Engines 100% ready, initializing vacuum tube logic --- Loading Chew-Chew personality, Debugging complete, Chew-Chew personality 100% ready, Maggot removal imminent, !!! Do not stand in front of ChewChew while operational!!!".
- The official announcement writes the cart's name as "Li'l Chew Chew", but the display on the computer screen reads "Lil' Chew Chew".
- There are multiple unobtainable hidden item pickups in certain locations of the map.
- A medium medkit inside the ground below the walkway from BLU's second spawn towards Canyon.
- A medium ammo and small health kit below a staircase in the Warehouse leading to the Second Incline.
Gallery
The screen on Li'l Chew Chew.

The ticker tape printed by Li'l Chew Chew.

An example of Li'l Chew Chew being detached from its platform.
The hidden medkit.

The hidden medium ammo and small health kits.

The invisible water as seen in the Valve Hammer Editor.

The water visible on a pre-release version of the map.


- Development of Li'l Chew Chew

The original train cart used in the alpha stages of development.
Concept art of Li'l Chew Chew.
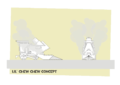
Li'l Chew Chew draft sketch.
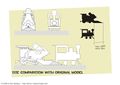
Li'l Chew Chew size comparison to alpha train cart.
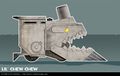
Li'l Chew Chew finished sketch.
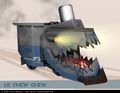
Li'l Chew Chew render.


External links
- An Empirical Approach to Iteration in Level Design by Patrick Mulholland — college thesis centering around the development of Frontier by the map's developer.
- PolyCount Forum post of the creation of Li'l Chew Chew.
| |||||