Difference between revisions of "Scream Fortress 2016"
BrazilianNut (talk | contribs) m (→{{common string|Cosmetic items}}: Reduced the vertical space the Pestering Jester occupies.) |
BrazilianNut (talk | contribs) m (→Additions) |
||
| Line 12: | Line 12: | ||
{{main|Cosmetic items{{if lang}}|l1={{common string|Cosmetic items}}}} | {{main|Cosmetic items{{if lang}}|l1={{common string|Cosmetic items}}}} | ||
{| class="wikitable collapsible" cellpadding="3" style="text-align:center;" | {| class="wikitable collapsible" cellpadding="3" style="text-align:center;" | ||
| − | | width=" | + | | width="80px" style="background:#6A5587;" rowspan="1" | '''{{class link|Scout|color=white|br=yes}}''' |
| − | | | + | | style="background:#4B69FF;" | {{item icon|Wing Mann|75px}} |
| − | | style="background: #F1ECF7;"| '''{{item link|Wing Mann}}''' | + | | style="background:#F1ECF7;" | '''{{item link|Wing Mann}}''' |
|- | |- | ||
| − | | | + | | style="background:#6A5587;" rowspan="3" | '''{{class link|Pyro|color=white|br=yes}}''' |
| − | | | + | | style="background:#EB4B4B;" | {{item icon|Combustible Cutie|75px}} |
| − | | style="background: #F1ECF7;"| '''{{item link|Combustible Cutie}}''' | + | | style="background:#F1ECF7;" | '''{{item link|Combustible Cutie}}''' |
|- | |- | ||
| − | | | + | | style="background:#4B69FF;" | {{item icon|Cranial Carcharodon|75px}} |
| − | | style="background: #F1ECF7;"| '''{{item link|Cranial Carcharodon}}''' | + | | style="background:#F1ECF7;" | '''{{item link|Cranial Carcharodon}}''' |
|- | |- | ||
| − | | | + | | style="background:#FFD700;" | {{item icon|Hovering Hotshot|75px}} |
| − | | style="background: #F1ECF7;"| '''{{item link|Hovering Hotshot}}''' | + | | style="background:#F1ECF7;" | '''{{item link|Hovering Hotshot}}''' |
|- | |- | ||
| − | | | + | | style="background:#6A5587;" rowspan="2" | '''{{class link|Demoman|color=white|br=yes}}''' |
| − | | | + | | style="background:#FFD700;" | {{item icon|Aerobatics Demonstrator|75px}} |
| − | | style="background: #F1ECF7;"| '''{{item link|Aerobatics Demonstrator}}''' | + | | style="background:#F1ECF7;" | '''{{item link|Aerobatics Demonstrator}}''' |
|- | |- | ||
| − | | | + | | style="background:#8847FF;" | {{item icon|Spirit of the Bombing Past|75px}} |
| − | | style="background: #F1ECF7;"| '''{{item link|Spirit of the Bombing Past}}''' | + | | style="background:#F1ECF7;" | '''{{item link|Spirit of the Bombing Past}}''' |
|- | |- | ||
| − | | | + | | style="background:#6A5587;" rowspan="3" | '''{{class link|Heavy|color=white|br=yes}}''' |
| − | | | + | | style="background:#8847FF;" | {{item icon|Heavy Tourism|75px}} |
| − | | style="background: #F1ECF7;"| '''{{item link|Heavy Tourism}}''' | + | | style="background:#F1ECF7;" | '''{{item link|Heavy Tourism}}''' |
|- | |- | ||
| − | | | + | | style="background:#4B69FF;" | {{item icon|Mad Mask|75px}} |
| − | | style="background: #F1ECF7;"| '''{{item link|Mad Mask}}''' | + | | style="background:#F1ECF7;" | '''{{item link|Mad Mask}}''' |
|- | |- | ||
| − | | | + | | style="background:#D32CE6;" | {{item icon|Mo'Horn|75px}} |
| − | | style="background: #F1ECF7;"| '''{{item link|Mo'Horn}}''' | + | | style="background:#F1ECF7;" | '''{{item link|Mo'Horn}}''' |
|- | |- | ||
| − | | | + | | style="background:#6A5587;" rowspan="4" | '''{{class link|Engineer|color=white|br=yes}}''' |
| − | | | + | | style="background:#8847FF;" | {{item icon|Corpus Christi Cranium|75px}} |
| − | | style="background: #F1ECF7;"| '''{{item link|Corpus Christi Cranium}}''' | + | | style="background:#F1ECF7;" | '''{{item link|Corpus Christi Cranium}}''' |
|- | |- | ||
| − | | | + | | style="background:#4B69FF;" | {{item icon|El Paso Poncho|75px}} |
| − | | style="background: #F1ECF7;"| '''{{item link|El Paso Poncho}}''' | + | | style="background:#F1ECF7;" | '''{{item link|El Paso Poncho}}''' |
|- | |- | ||
| − | | | + | | style="background:#FFD700;" | {{item icon|Final Frontier Freighter|75px}} |
| − | | style="background: #F1ECF7;"| '''{{item link|Final Frontier Freighter}}''' | + | | style="background:#F1ECF7;" | '''{{item link|Final Frontier Freighter}}''' |
|- | |- | ||
| − | | | + | | style="background:#4B69FF;" | {{item icon|Wide-Brimmed Bandito|75px}} |
| − | | style="background: #F1ECF7;"| '''{{item link|Wide-Brimmed Bandito}}''' | + | | style="background:#F1ECF7;" | '''{{item link|Wide-Brimmed Bandito}}''' |
|- | |- | ||
| − | | | + | | style="background:#6A5587;" rowspan="3" | '''{{class link|Medic|color=white|br=yes}}''' |
| − | | | + | | style="background:#D32CE6;" | {{item icon|Burly Beast|75px}} |
| − | | style="background: #F1ECF7;"| '''{{item link|Burly Beast}}''' | + | | style="background:#F1ECF7;" | '''{{item link|Burly Beast}}''' |
|- | |- | ||
| − | | | + | | style="background:#4B69FF;" | {{item icon|Colossal Cranium|75px}} |
| − | | style="background: #F1ECF7;"| '''{{item link|Colossal Cranium}}''' | + | | style="background:#F1ECF7;" | '''{{item link|Colossal Cranium}}''' |
|- | |- | ||
| − | | | + | | style="background:#4B69FF;" | {{item icon|Surgeon's Sidearms|75px}} |
| − | | style="background: #F1ECF7;"| '''{{item link|Surgeon's Sidearms}}''' | + | | style="background:#F1ECF7;" | '''{{item link|Surgeon's Sidearms}}''' |
|- | |- | ||
| − | | | + | | style="background:#6A5587;" rowspan="2" | '''{{class link|Spy|color=white|br=yes}}''' |
| − | | | + | | style="background:#8847FF;" | {{item icon|Big Topper|75px}} |
| − | | style="background: #F1ECF7;"| '''{{item link|Big Topper}}''' | + | | style="background:#F1ECF7;" | '''{{item link|Big Topper}}''' |
|- | |- | ||
| − | | | + | | style="background:#4B69FF;" | {{item icon|Showstopper|75px}} |
| − | | style="background: #F1ECF7;"| '''{{item link|Showstopper}}''' | + | | style="background:#F1ECF7;" | '''{{item link|Showstopper}}''' |
|- | |- | ||
| − | | | + | | align="left" style="background:#6A5587;" rowspan="1" | '''{{class link|Scout|color=white}}'''<br>'''{{class link|Soldier|color=white}}'''<br>'''{{class link|Pyro|color=white}}'''<br>'''{{class link|Heavy|color=white}}''' |
| − | | | + | | style="background:#D32CE6;" | {{item icon|Pestering Jester|75px}} |
| − | | style="background: #F1ECF7;"| '''{{item link|Pestering Jester}}''' | + | | style="background:#F1ECF7;" | '''{{item link|Pestering Jester}}''' |
|- | |- | ||
| − | | | + | | style="background:#6A5587;" rowspan="5" | '''{{class link|All Classes|color=white|br=yes}}''' |
| − | | | + | | style="background:#EB4B4B;" | {{item icon|Class Crown|75px}} |
| − | | style="background: #F1ECF7;"| '''{{item link|Class Crown}}''' | + | | style="background:#F1ECF7;" | '''{{item link|Class Crown}}''' |
|- | |- | ||
| − | | | + | | style="background:#8847FF;" | {{item icon|Lil' Bitey|75px}} |
| − | | style="background: #F1ECF7;"| '''{{item link|Lil' Bitey}}''' | + | | style="background:#F1ECF7;" | '''{{item link|Lil' Bitey}}''' |
|- | |- | ||
| − | | | + | | style="background:#4B69FF;" | {{item icon|Nasty Norsemann|75px}} |
| − | | style="background: #F1ECF7;"| '''{{item link|Nasty Norsemann}}''' | + | | style="background:#F1ECF7;" | '''{{item link|Nasty Norsemann}}''' |
|- | |- | ||
| − | | | + | | style="background:#4B69FF;" | {{item icon|Spooktacles|75px}} |
| − | | style="background: #F1ECF7;"| '''{{item link|Spooktacles}}''' | + | | style="background:#F1ECF7;" | '''{{item link|Spooktacles}}''' |
|- | |- | ||
| − | | | + | | style="background:#8847FF;" | {{item icon|Toadstool Topper|75px}} |
| − | | style="background: #F1ECF7;"| '''{{item link|Toadstool Topper}}''' | + | | style="background:#F1ECF7;" | '''{{item link|Toadstool Topper}}''' |
|} | |} | ||
| − | === | + | === Taunts === |
| − | {{main|Taunts | + | {{main|Taunts}} |
{| class="wikitable collapsible" cellpadding=2 style="text-align:center;" | {| class="wikitable collapsible" cellpadding=2 style="text-align:center;" | ||
| − | | style="background | + | | width="80px" style="background:#6A5587;" rowspan="2" | '''{{class link|All Classes|br=yes|color=white}}''' |
| − | | | + | | style="background:#AD9DC3;" | {{Icon item|Second Rate Sorcery|75px}} |
| − | | style="background | + | | style="background:#F1ECF7;" | '''{{item link|Second Rate Sorcery}}''' |
|- | |- | ||
| − | | | + | | style="background:#AD9DC3;" | {{Icon item|Victory Lap|75px}} |
| − | | style="background | + | | style="background:#F1ECF7;" | '''{{item link|Victory Lap}}''' |
|} | |} | ||
| − | === | + | === Tools === |
| − | {{main|Tools | + | {{main|Tools}} |
{| class="wikitable collapsible" cellpadding="3" style="text-align:center;" | {| class="wikitable collapsible" cellpadding="3" style="text-align:center;" | ||
| − | | | + | | width="80px" style="background:#AD9DC3;" | {{item icon|Creepy Crawly Case|75px}} |
| − | | style="background: #F1ECF7;"| '''{{item link|Creepy Crawly Case}}''' | + | | style="background:#F1ECF7;" | '''{{item link|Creepy Crawly Case}}''' |
|- | |- | ||
| − | | | + | | style="background:#AD9DC3;" | {{item icon|Creepy Crawly Key|75px}} |
| − | | style="background: #F1ECF7;"| '''{{item link|Creepy Crawly Key}}''' | + | | style="background:#F1ECF7;" | '''{{item link|Creepy Crawly Key}}''' |
|- | |- | ||
| − | | | + | | style="background:#AD9DC3;" | {{item icon|Unusualifier|75px}} |
| − | | style="background: #F1ECF7;"| '''{{item link|Unusualifier}}''' | + | | style="background:#F1ECF7;" | '''{{item link|Unusualifier}}''' |
|} | |} | ||
| − | === | + | === Maps === |
| − | {{main| | + | {{main|List of maps}} |
{|class="wikitable" cellpadding=2 style="text-align:center;" | {|class="wikitable" cellpadding=2 style="text-align:center;" | ||
|-style="height:20px;" | |-style="height:20px;" | ||
| − | !class="header" style="background-color:#6A5587;color:#FFFFFF;" | + | ! class="header" style="background-color:#6A5587;color:#FFFFFF;" | Name |
| − | !class="header" style="background-color:#6A5587;color:#FFFFFF;" | + | ! class="header" style="background-color:#6A5587;color:#FFFFFF;" | Picture |
| − | !class="header" style="background-color:#6A5587;color:#FFFFFF;" | + | ! class="header" style="background-color:#6A5587;color:#FFFFFF;" | Game mode |
| − | !class="header" style="background-color:#6A5587;color:#FFFFFF;" | + | ! class="header" style="background-color:#6A5587;color:#FFFFFF;" | File name |
|- | |- | ||
| − | |style="background | + | | style="background:#AD9DC3;" | '''[[Brimstone (map)|Brimstone]]''' |
| − | | | + | | style="background:#F1ECF7;" | [[File:Pl_fifthcurve_event.png|160px|link=Brimstone (map)]] |
| − | | | + | | style="background:#F1ECF7;" | '''[[Payload]]'''<br>[[File:Hoodoo Bombcart.png|50px|link=Payload]] |
| − | + | | {{code|pl_fifthcurve_event}} | |
|- | |- | ||
| − | |style="background | + | | style="background:#AD9DC3;" | '''[[Maple Ridge Event]]''' |
| − | | | + | | style="background:#F1ECF7;" | [[File:Koth_maple_ridge_event.png|160px|link=Maple Ridge Event]] |
| − | | | + | | style="background:#F1ECF7;" | '''[[King of the Hill]]'''<br>[[File:Controlpoint.png|50px|link=King of the Hill]] |
| − | + | | {{code|koth_maple_ridge_event}} | |
|- | |- | ||
| − | |style="background | + | | style="background:#AD9DC3;" | '''[[Pit of Death{{if lang}}|Pit of Death]]''' |
| − | | | + | | style="background:#F1ECF7;" | [[File:Pd_pit_of_death_event.png|160px|link=Pit of Death{{if lang}}]] |
| − | | | + | | style="background:#F1ECF7;" | '''[[Player Destruction]]'''<br>[[File:Hud_invasion_bottle.png|50px|link=Player Destruction]] |
| − | + | | {{code|pd_pit_of_death_event}} | |
|} | |} | ||
| Line 146: | Line 146: | ||
{{main|Unusual effects}} | {{main|Unusual effects}} | ||
<gallery perrow="4"> | <gallery perrow="4"> | ||
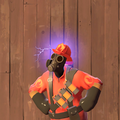
| − | File:Unusual Neutron Star.png|{{item name|Neutron Star}} | + | File:Unusual Neutron Star.png| {{item name|Neutron Star}} |
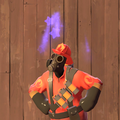
| − | File:Unusual Tesla Coil.png|{{item name|Tesla Coil}} | + | File:Unusual Tesla Coil.png| {{item name|Tesla Coil}} |
| − | File:Unusual Starstorm Insomnia.png|{{item name|Starstorm Insomnia}} | + | File:Unusual Starstorm Insomnia.png| {{item name|Starstorm Insomnia}} |
| − | File:Unusual Starstorm Slumber.png|{{item name|Starstorm Slumber}} | + | File:Unusual Starstorm Slumber.png| {{item name|Starstorm Slumber}} |
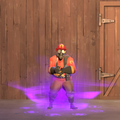
| − | File:Unusual Hellish Inferno.png|{{item name|Hellish Inferno}} | + | File:Unusual Hellish Inferno.png| {{item name|Hellish Inferno}} |
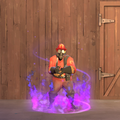
| − | File:Unusual Spectral Swirl.png|{{item name|Spectral Swirl}} | + | File:Unusual Spectral Swirl.png| {{item name|Spectral Swirl}} |
| − | File:Unusual Infernal Flames.png|{{item name|Infernal Flames}} | + | File:Unusual Infernal Flames.png| {{item name|Infernal Flames}} |
| − | File:Unusual Infernal Smoke.png|{{item name|Infernal Smoke}} | + | File:Unusual Infernal Smoke.png| {{item name|Infernal Smoke}} |
</gallery> | </gallery> | ||
Revision as of 02:43, 25 November 2019

This article is for content released in the update. For the patch itself, see October 21, 2016 Patch.
Scream Fortress 2016 was a major update released on October 21, 2016. The update added two new taunts, 3 new maps, 24 new cosmetics, a new tool item the Unusualifier, as well as the return of Merasmissions from the previous year's event.
Contents
Timeline
The event originally was scheduled for October 21, 2016 to November 9, 2016, but it was extended to end on November 16th, 2016.
Additions
Cosmetic items
Main article: Cosmetic items
Taunts
Main article: Taunts
| Second Rate Sorcery | ||
| Victory Lap |
Tools
Main article: Tools
| Creepy Crawly Case | |
| Creepy Crawly Key | |
| Unusualifier |
Maps
Main article: List of maps
| Name | Picture | Game mode | File name |
|---|---|---|---|
| Brimstone | 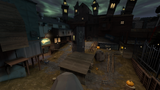
|
Payload
|
pl_fifthcurve_event
|
| Maple Ridge Event | 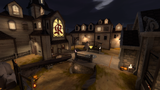
|
King of the Hill |
koth_maple_ridge_event
|
| Pit of Death | 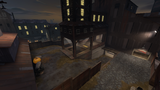
|
Player Destruction
|
pd_pit_of_death_event
|
Unusual effects
Main article: Unusual effects
Neutron Star
Tesla Coil

Starstorm Insomnia
Starstorm Slumber

Hellish Inferno
Spectral Swirl
Infernal Flames

Infernal Smoke


Gallery
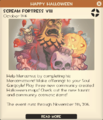
In-game notification about the start of the event.
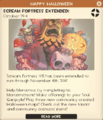
In-game notification about the extension.
- User Twolfe Halloween2016.png
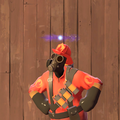
Pre-event teaser picture.


| |||||
| ||||||||||||||||||||||||||||||||||||||||||||||||||||||||||||||||||||||||||||||||||||||||||||||||||