Difference between revisions of "Community Powerhouse strategy"
m (Auto: WordFilter(Sentry Guns/Sentries(?!\s+Gun) → Sentry Guns) (Review RC#3053696)) |
m (Auto: Sync Map infobox) |
||
| Line 2: | Line 2: | ||
{{Map infobox | {{Map infobox | ||
| map-strategy = yes | | map-strategy = yes | ||
| − | | game-type | + | | map-status = official |
| − | | file-name | + | | map-name = Powerhouse |
| + | | map-game-type = Control Point | ||
| + | | map-file-name = cp_powerhouse | ||
| map-image = Cp powerhouse.png | | map-image = Cp powerhouse.png | ||
| + | | map-released = {{Patch name|7|2|2015}} | ||
| + | | map-released-major = Gun Mettle Update | ||
| map-environment = Industrial | | map-environment = Industrial | ||
| map-setting = Daylight, sunny | | map-setting = Daylight, sunny | ||
| − | | map-deep-water | + | | map-has-deep-water = yes |
| − | | map-health | + | | map-pickups-health-small = 7 |
| − | | map-health | + | | map-pickups-health-medium = 8 |
| − | | map-health | + | | map-pickups-health-large = 2 |
| − | | map-ammo | + | | map-pickups-ammo-small = 3 |
| − | | map-ammo | + | | map-pickups-ammo-medium = 10 |
| − | | map-ammo | + | | map-pickups-ammo-large = 2 |
| − | | map-bots = | + | | map-has-bots = yes |
}} | }} | ||
Latest revision as of 20:09, 20 January 2024
| Powerhouse | |
|---|---|

| |
| Basic Information | |
| Map type: | Control Point |
| File name: | cp_powerhouse
|
| Released: | July 2, 2015 Patch (Gun Mettle Update) |
| Developer(s): | Valve |
| Map Info | |
| Environment: | Industrial |
| Setting: | Daylight, sunny |
| Deep Water: | Yes |
| Bot support: | Yes |
| Map Items | |
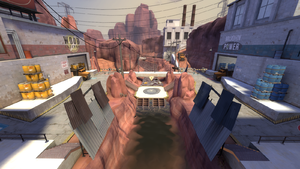
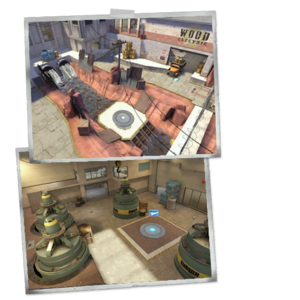
| Map Photos | |
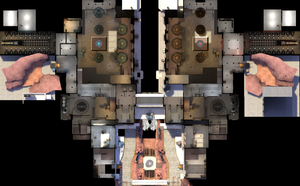
| Map Overview | |
This article is about Community Powerhouse strategy.
Note: It is recommended to read the main Powerhouse article first to become familiar with the names of key map locations used in this article.
General strategy
- As this map has three control points instead of five, capturing goes a lot faster. Make sure that the middle control point is protected or else the battle can easily swing in the opposite direction.
- This map has many different paths you can take. If one doesn't work, use another.
- Due to the nature and layout of the map, it's very common for a prolonged stalemate to occur. Be sure to keep an eye on your team's class balance so you're not unbalanced.
- Because of Powerhouse's "stalematey" nature, actual coordination will be needed. Don't be afraid to hop on the Voice chat and help direct play. Even the best team falls apart without communication.
- The central point is very open and vulnerable from multiple sides and angles. Use this to put massive amounts of pressure onto any team attempting to capture it, thus making them fall apart, and allowing you to capture the point in return. In fact, most of the battles for middle are won this way.
- If you are attacking the enemy's last point, keep in mind that you will first need to capture their Launch Pad Room, which can best be achieved by launching an assault from the advantageous Team Sides.
- With the aforementioned Launch Pad room in your hands, you can either make a dash for the Final point itself, or settle in the Control Room, where another attack can be organized.
- If you are defending your team's last point, then make sure to stage yourself in the Launch Pad Room, which acts as a buffer-zone between the middle and the final point.
- In the event that the Launch Pad Room is lost, you can retreat to the Control Room in order to setup a last line of defense.
Class-specific strategy
 Scout
Scout
- The middle control point is fast to capture and can easily turn the tide of the battle. When the enemy team is pushing, try to sneak by and capture the point.
- Utilize alternative routes to flank the enemy team. This task can further be aided with the use of Bonk! Atomic Punch, especially if you are trying to traverse the Chokepoints.
- This map has a sharp contrast between an open middle point, and a relatively enclosed first/third point. As such, switching between weapons which can benefit from their respective areas is an important strategy to employ.
- For example; mobility-enhancing weapons, such as the Soda Popper or the Atomizer, are very effective on the open middle point, where there is plenty of space available.
- Meanwhile, Force-A-Nature and Back Scatter perform better inside Powerhouse's enclosed sections, where the distance between your targets can quickly be closed.
- The Mad Milk is dangerously effective inside the Chokepoint, where players often clump up together.
- If you have reached the enemy team's battlements, you can camp on top of them and wait for any unaware attackers to pass below.
- The small section of Water on Powerhouse serves as a surprisingly good ambush spot.
 Soldier
- Try to rocket jump through the Battlement's. You can quickly get the drop on enemy Snipers harassing your team. In addition, you will gain a height advantage over the enemy's Launch Pad Room.
- There are many chokepoints throughout the map. Spamming rockets to keep the enemy team at bay can help your team regroup and strategize.
- The area around central point contains many different pieces of cover, on which you can rocket jump to gain a slight Height advantage.
- If you are assaulting the Launch Pad Room, it might be a vise to equip the Battalion's Backup, whose resistances can greatly aid in safely traversing the Chokepoint.
- If you are defending the Launch Pad Room on the other hand, then the Buff Banner becomes of greater importance.
- The Control Room offers an excellent vantage point over the enemy's last point. Use it to target hostile Sentry Guns outside of their range.
 Pyro
Pyro
- Use your airblast to keep the enemy team off the middle control point. Try to push them into the moat to slow them down.
- A Phlogistinator charge can be deadly in confined spaces. Team up with a fully charged Medic and wipe out their team!
- Equip the Homewrecker and become your Engineer's best friend. Keeping his Teleporters up will help your team win the round, especially since there are no forward spawns.
- On the small stretch of water found on Powerhouse, the Neon Annihilator can be used to a niche degree.
- The Thermal Thruster is immensely useful on the middle point, where there is plenty of available space to fly around. Just watch out for any Snipers!
- You can utilize your Compression blast in order to deny enemy Soldiers from rocket jumping to the Battlements.
- If you have somehow reached the enemy Launch Pad Room, you can hide underneath a set of stairs in order to organize an ambush.
- A small ledge can be seen hanging of the Battlements, which serves as an excellent ambush spot for a Pyro. Especially if he's using the Back Burner.
- Reaching the Battlements can be quickly achieved with the Detonator, which can also be used to cross the water.
 Demoman
- Many of the corridors are narrow, so use your Grenade Launcher when possible.
- Get sticky traps on the control points whenever possible. As the map only has three points and they can be captured fast.
- The Iron Bomber can be useful for dealing big damage and chip damage against enemy teams, especially with the lack of roll on grenades. Use it like you would the Stickybomb Launcher with deadly results!
- If you are defending the Launch Pad Room, make sure to spam explosives into the Battlements, as that will deny attackers the height advantage,
- The Sticky Jumper can be used to instantly transport yourself to enemy Battlements at the beginning of a round.
- This is useful for surprising those pesky Snipers camping there.
- Mindlessly lobbing grenades at the opposing team's side will put a lot strain on their effort to capture the central point.
- Not to mention the pressure on their Medics to repair all of that damage.
- You can get a nice overview of point's 1/3 from within the Control room. Thus allowing you to safely clean up any Sentry Guns from a far.
- Since the area around the last point is very large, some Sentry Guns might be out of your weaponry's range, requiring the use of the Loch-n-Load.
- Demoknight is not a very good choice on Powerhouse, especially if you are attacking a well fortified team.
 Heavy
Heavy
- In close firefights, use yourself as a tank to help your team push forward.
- As a Heavy, you're a great Medic buddy. Keep him alive and feed him Lunchbox items when he's weak.
- The middle point is very open. Use the Fists of Steel at the beginning of a match if you want to avoid getting Headshoted.
- On Powerhouse, a combination of strong firepower and decent mobility is necessary to win a round, something which the Stock Minigun offers plenty.
- You can drop down into the enemy's Launch Pad Room from within the Battlement's, which allows you to surprise its defenders.
- If a group of enemies are holding out in the Control Room, a slow and cautious ascend up the staircase, preferably with Medic support, will quickly flush them out.
- Powerhouse has many nooks and crannies, in which you can hide and organize a successful ambush. Such as:
- In between the turbines on Capture Point 1/3, a garage-esque space directly below the Control Room, inside the waterfall and many others...
 Engineer
- The last control points have plenty of spots to cover with your Sentry Gun. Set your sights to defend the point as much as possible.
- Since there is no forward spawn rooms for an attacking team, keeping up your Teleporters is essential. Especially if you are tying to capture the final point.
- There are plenty of rooms to hide a Teleporter Exit in. Look for an area that is not getting much action. Such as:
- On top of the Cisterns, behind the sheets of metal inside the Battlements, on the small ledge which hangs off the Battlements, underneath the Water...
- A Eureka Effect loadout can be very powerful on this map, as there is quite a lot of flanking potential.
- For example, an Engineer can flank around the Central Point at the beginning of a round and setup in the enemy's Control room.
- Because of the space between mid and last, incremental territorial gains will be key. Be sure to keep your Sentry nest moved to keep pace with your team.
- Due to this, the Rescue Ranger might be useful, as it allows you to quickly move up your gear and not fall behind.
 Medic
Medic
- The Central control point is very open, allowing your enemies to either: shoot you from a far, come at you from the sky or simply flank you. So it is important to keep your eyes wide open and lookout for any potential threats.
- This should not be too hard to do, since the Medi Gun allows you to turn a full 360° circle while still keeping your healing beam attached.
- Medic's regular ÜberCharge is often necessary for breaking through the Chokepoint and subsequently capturing the Launch Pad room.
- Stock Über is also useful for defense. That is, if you are trying to break out of the Launch Pad room.
- Assist your team in the main push for the Final control point. There are lots of tight corners where teammates can get heavily damaged.
- Crusader's Crossbow can be utilized for healing teammates up in the Battlements, without having to go there yourself.
- At the beginning of a round, it might be a wise idea to Overheal allied Soldiers, as they can rocket jump over to enemy's side and cause widespread havoc.
 Sniper
- The Battlement's give you a nearly-full overview of the middle point, while offering sizeable protection, as well as additional access to Health and Ammo packs.
- If your team has managed to capture the opposing Launch Pad Room, you can then advance up to the enemy's Battlements and take up a position there.
- A good overview of the Final control point can be achieved from the Control Room.
- The Huntsman is a fairly good weapon on Powerhouse, which has many easily-spammable chokepoints.
 Spy
Spy
- Sentry nests can be tricky to bust on this map for the other classes. Try to help your team by destroying them.
- This map is not filled with many Ammo packs, so consider using the L'Etranger if you are struggling with Cloak.
- Fighting around the Middle point is usually very chaotic and distracting, something you can easily take advantage off.
- Water, on Middle point. acts as natural camouflage, in which you can patiently wait for an opportune moment to strike.
- The Battlements are usually filled to the brim with clueless Snipers.
- Teleporters win games, especially on Powerhouse where there is no forward spawns. If you find your team is stuck defending your last point, go behind enemy lines and take out their teleporter entrance. Your team will thank you.

