Difference between revisions of "Product (competitive custom map)"
m |
(Added some stuff relevant to highlander) |
||
| Line 24: | Line 24: | ||
* '''Spawn''': Spawn is the area between the spawn building and the first row of buildings. | * '''Spawn''': Spawn is the area between the spawn building and the first row of buildings. | ||
* '''Cliff''': Cliff is the large rocky outcrop that overlooks the point and valley, and the wooden pathway connecting it to the middle building. | * '''Cliff''': Cliff is the large rocky outcrop that overlooks the point and valley, and the wooden pathway connecting it to the middle building. | ||
| + | * '''Pocket''': Pocket is the area beneath the cliff. | ||
* '''Main''': Main is the area below the short catwalk. | * '''Main''': Main is the area below the short catwalk. | ||
* '''Right''': Right is the area below the wooden pathway. | * '''Right''': Right is the area below the wooden pathway. | ||
| Line 48: | Line 49: | ||
* Product encourages using the Kritzkrieg. | * Product encourages using the Kritzkrieg. | ||
** If you are running Kritz, your demo should be getting most of the heals, and you need to be pushing as fast as possible to prevent the other team from getting Über. | ** If you are running Kritz, your demo should be getting most of the heals, and you need to be pushing as fast as possible to prevent the other team from getting Über. | ||
| + | * On highlander, the sniper typically plays cliff or Japan. | ||
===Pushing to the Point=== | ===Pushing to the Point=== | ||
| Line 54: | Line 56: | ||
** Your combo can hold under the walkway connecting Cliff and House while you have a flank class on Cliff and near the medium Health pack. | ** Your combo can hold under the walkway connecting Cliff and House while you have a flank class on Cliff and near the medium Health pack. | ||
** You can put your combo right behind the sign blocking the point, giving yourself a very strong push, at the cost of being easy to bomb. | ** You can put your combo right behind the sign blocking the point, giving yourself a very strong push, at the cost of being easy to bomb. | ||
| + | ** On highlander, your engineer can build a dispenser in pocket, and your medic can use it as dispenser armor, but it is very easy for a demo to spam from the other side. | ||
* When you have Über advantage, you need to act quickly, and try to kill the enemy Medic before he gets his Über. | * When you have Über advantage, you need to act quickly, and try to kill the enemy Medic before he gets his Über. | ||
** If you have Kritz, pop on the Demoman and try to clear the point and kill the combo. | ** If you have Kritz, pop on the Demoman and try to clear the point and kill the combo. | ||
Latest revision as of 09:20, 27 December 2024
This article is for competitive play, based on the standard community competitive format. For the generic article on this topic, see: Viaduct.
The community competitive scene changes frequently. Some or all info may be outdated.
The community competitive scene changes frequently. Some or all info may be outdated.
 | “I built that.” This page contains information about a custom map that is not an officially released Team Fortress 2 map. All released Valve and Community-made TF2 maps can be found on the list of maps. |
| Product | |
|---|---|

| |
| Basic Information | |
| Map type: | King of the Hill |
| File name: | koth_product_final
|
| Version: | Final |
| Released: | December 21, 2015 |
| Last updated: | July 29, 2021 |
| Developer(s): | JackyLegs Mimas Torres lawn |
| Link(s): | TF2Maps |
| Map Info | |
| Environment: | Temperate, Alpine |
| Setting: | Daylight |
| Map Items | |
| Map Photos | |
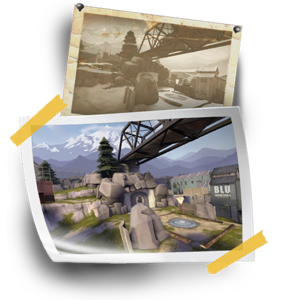
Product is a King of the Hill map, a modified version of Viaduct that has been tailored to competitive play. The biggest changes are retexturing and an extra opening in the midpoint wall that contains a small health pack. Product may offer better performance for older PCs due to the lack of snow effects.
Contents
Locations
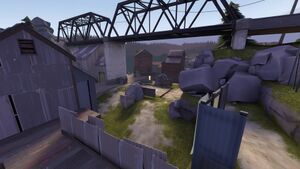
- Spawn: Spawn is the area between the spawn building and the first row of buildings.
- Cliff: Cliff is the large rocky outcrop that overlooks the point and valley, and the wooden pathway connecting it to the middle building.
- Pocket: Pocket is the area beneath the cliff.
- Main: Main is the area below the short catwalk.
- Right: Right is the area below the wooden pathway.
- Japan: Japan is the area on the short catwalk.
- China: China is the area on the wooden pathway.
- Valley: Valley is the area between the first and second row of buildings.
- Grass: Grass is the small hill between the first and second row of buildings.
- Concrete: Concrete is the concrete area leading to the Connector and control point.
- Connector: Connector is the area connecting two sides of the Concrete via small wooden hallway.
Strategy
General
- Product is very offclass-friendly, and you may find the standard competitive class composition not to be the most efficient.
- Your flanks can run Heavy and Sniper almost full time, and running a Spy is often viable.
- Your pocket can also run Heavy, or switch to Gunboats while letting the Medic primarily heal the Demoman or the Heavy.
- Product encourages using the Kritzkrieg.
- If you are running Kritz, your demo should be getting most of the heals, and you need to be pushing as fast as possible to prevent the other team from getting Über.
- On highlander, the sniper typically plays cliff or Japan.
Pushing to the Point
- When you don't control the point, there are multiple points to hold.
- You can hold near the medium Health pack with your combo, and have your flank on the other side.
- Your combo can hold under the walkway connecting Cliff and House while you have a flank class on Cliff and near the medium Health pack.
- You can put your combo right behind the sign blocking the point, giving yourself a very strong push, at the cost of being easy to bomb.
- On highlander, your engineer can build a dispenser in pocket, and your medic can use it as dispenser armor, but it is very easy for a demo to spam from the other side.
- When you have Über advantage, you need to act quickly, and try to kill the enemy Medic before he gets his Über.
- If you have Kritz, pop on the Demoman and try to clear the point and kill the combo.
- If you're running a Heavy, use the Über to walk him onto the point, and force the other team back to their valley.
- If you're at disadvantage or have no Medic, your first priority should be killing the other team's Medic.
- If you have no Medic, it can be worthwhile to sacrifice 2 or even more players in an attempt to kill the Medic.
- If you're at a disadvantage, pulling out all the way to your Spawn is the best way to ensure that your Medic doesn't die.
Holding the Point
- After you control the point, you need to decide where to hold based on multiple factors:
- If you have Über advantage, more players, or feel confident, you can push all the way up to the other team's Valley, or even attempt a spawn camp.
- If your Medic died, you have fewer players, or you don't feel confident, you should pull back to where you originally were holding, and wait for the enemy push.
- The best way to counter an Über on Product is to try to kite it, then collapse immediately after it expires.
- Often, Medics will switch to Kritz if they went down, so as to make up for Über advantage. If you've capped the point, be expecting a Kritz, and be ready to pop.
Additional Images
Changelog
Changelog:
RC9:
- Fixed pomson, bison and wrap assassin projectiles being blocked by the middle connector
- Prevents wallbugging above "concrete" houses for information
- Other minor adjustments
RCX:
- Prevent players from changing class from the enemy spawn
- Fixed smoothing groups on the rock models
FINAL:
- Adjusted cap zone to better match visual indications
- Fixed asymmetries related to mid
- Fixed undefined spawn wave times before first capture (set to 6sec)
- Changed spawnpoint order to prevent penalizing loadout changes
- Fixed pickups being blockable by teleports
- Fixed incorrectly clipped nook on japan
- Redesigned connector with equivalent geometry that prevents splash issues
- Improved rock collision models
- Improved roof clipping around secondary spawn exit
- Improved clipping around triple windows
- Other minor clipping improvements
- Improved bot behavior
- Improved soundscapes
- Improved lighting
- Adjusted prop fade distances
| |||||||||||||||||||||||||||||||
| ||||||||||||||||||||||||||||||||||||||||||||||||


