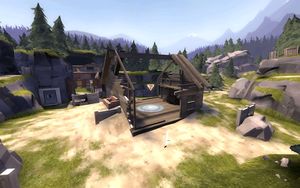
Warmfront (competitive custom map)
The community competitive scene changes frequently. Some or all info may be outdated.
| Warmfront (competitive custom map) | |
|---|---|

| |
| Basic Information | |
| Developer(s): | Unknown |
| Map Info | |
| Environment: | Alpine |
| Setting: | Daylight, sunny |
Warmfront is a community-created unofficial Standard Control Point map. It is a modified version of Coldfront, with Alpine setting for the purpose of optimization. It has notable changes on the map texture and weather, CP1/CP5 and CP2/CP4 gameplay changes. This version of the map is not in the official maps, as such it is mostly seen only in competitive matches.
The objective is to capture all five control points. Each team starts with their second and final control points locked, leaving only the middle point available. This map is commonly used in most leagues, including (Insert Leauge here)
Contents
Locations
Needs an overview image and galleries of Warmfront.
Note: Most of the layout is derived of Coldfront.
Each area of the map provides ample opportunity for certain classes to utilize their abilities in order to overcome their enemies. Scouts, Soldiers and Demomen are able to traverse the cliffs and main house, while the slope of the terrain and sharp corners allows ambush classes such as the Pyro, Engineer and Heavy to take down attackers. In addition, various open spaces indoors allow Medics and Spies to move freely to advantageous positions while Snipers lay down suppressive shots.
Control Point 3 (Decrepit Cabin)
The central control point rests comfortably within the wreckage of the cabin.
- Entrances: Each team has three paths to the house area. Two paths enter from the ground, going uphill as you get closer to the house, and an upper path among the one of the high cliffs.
- High Cliff: One of the passageways into the area from yard. Normally a one-way drop-down, but Scouts and Soldiers can climb up, too. It is a common Sniper perch.
- House: The worn down cabin which holds the control point. Soldiers and Demos can rocket jump on top for a better view of the area.
- Behind the Rocks: A small safe haven for Medics and Engineers, especially due to the close proximity to medium Health and Ammo packs.
- Yard: Each side has a large, open intermediate area in between CP2 and the CP3 cabin. Separated into two halves by a pipe-bridge.
Control Points 2 & 4 (Warehouse Caves)
The intermediate control points are set in the centre of the elevated concrete road.
- Entrances from Yard: Teams most commonly enter in through the main central path (building), but the side route (pipes) and can also be accessed as an alternate route. It differs from Coldfront, where the entrance is elevated and the ramp removed for balance purposes.
- Garage: The location of the first forward resupply. An effective but risky flank to topple defenders on the platform.
- Platform: A large elevated platform near the control point. Teams should base their defenses around this platform, but beware of flanks through the ramp room.
Control Points 1 & 5 (Headquarters)
The final control points are locked into the centre of the circular final chamber.
- Entrances from CP 2/4: Three small but separated doorways are used to enter the final chamber. Far left (through silo), center, and far right.
- Silo: Otherwise known as the far left flank, this passage is most commonly used to sneak an assault on the final CP, but can become dangerous if you're caught in this narrow passage.
- Outer Ring: The upper ring surrounding the central chamber that all teams must pass through if entering/exiting the area. The slight height advantage and plenty of cover makes it significant location to control for both attackers and defenders. The support beams spanning across the ceiling do not have collision detection and players can pass right through them.
- Central Chamber: The open space in the center of the room. Its lower elevation makes this a no-man's land if the attackers succeed in taking the Outer Ring. Good for hiding Sentry Guns.
- The Back: The elevated area behind the final control point. A stable but not most ideal point of defense for a team making a last-ditch or makeshift defense. Health and ammo packs area available in the back, but in Warmfront, the back of the final CP is covered with glass, similar to Badlands. It was made for balance purposes.
Tactics
Needs tactics from experienced competitive players.
Rollouts
Demoman
Rollout #1
The usual route will be like in first demonstration. First, sticky your way to the left base exit, then place a sticky on the left wall and jump to the Central Chamber. Place a sticky near the slope, jump your way through the Central Path and pick ammo + health on your left. Take the left exit, then place a sticky right at the door. Jump to the right by air strafing towards the High Cliff on the far right. From here you can take another jump, or just attack the CP house and the enemy's left Yard. See air strafing if you don't know how to air strafe.
Rollout #2
Mostly the same as the first, but while exiting the left exit from the Central Path, sticky to the right wall just outside the door, and jump to the left side, while also picking a health pack there. From here you can attack enemies from below the enemy's High Cliff, the enemy's right Yard, and the CP house.
Soldier
Needs a good rollout video.
| |||||||||||||||||||||||||||||||


