Community Watchtower strategy
| “You are so small! Is funny to me!” This article is a stub. As such, it is not complete. You can help Team Fortress Wiki by expanding it. |
| Community Watchtower strategy | |
|---|---|

| |
| Basic Information | |
| Developer(s): | Unknown |
| Map Photos | |
This article is about Community Watchtower strategy.
Contents
General
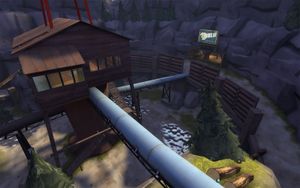
- Due to the wide and more vertical nature of this map, it is quite unlike any of the other Arena maps. Snipers do very well in Watchtower, both sniping from the sides or from the watchtower itself. They also can jump onto a thin wooden border on the outside of the gate facing the watchtower. This gives them an early chance to headshot a class with low health.
- Unlike most other Arena maps, keeping the middle point secured before it activates is very important. Try to coordinate with your team in the initial push through to the tower. If the enemies who push directly into the tower can be warded off, a Demoman can be key in securing the middle area with Stickybombs, blocking it off. A Heavy or a Pyro lingering in the main building can be tough to deal with as well. Skilled Engineers, with support from their team, could set up at the point after a push, making it nearly inaccessible to your enemies. This trick is hard to pull off twice, but it can often be a good surprise tactic. What also makes it difficult is the scarcity of metal in the map; the only metal is far away at the bottom of the map, and is picked up often. This means a Dispenser must usually be built before a Sentry Gun. If one is lucky, dropped weapons can be a good source of metal.
- The roof of the watchtower can be reached by a rocket jump or a sticky jump, and there is a hole which can be used to fire below. This is one of the more reliable ways to take out enemies in the watchtower itself, but it also makes one a sitting duck for Snipers.
- In a unique twist, the windows on the titular watchtower can all be broken. Shooting these windows open can open it up to a lot of fire from outside, especially from the pipes on either side of the building. This is especially useful for Demoman, who can break the windows open with a sticky and then barrage the watchtower with explosives.
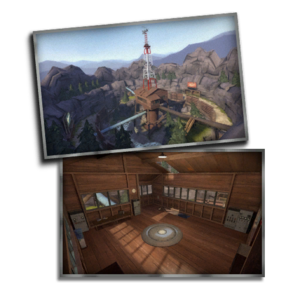
- On the ground, Snipers have a small slit of vision into the watchtower. This can be used for a sneaky kill as the Sniper dot will appear on the ceiling.
Class Strategies
 Scout
Scout
- Make use of the Scout's double jump by jumping off the pipes and then jumping back onto them to avoid enemy fire.
- The Scout's speed is incredibly useful in such a large map, giving him a clear advantage over several other classes.
- The Force-A-Nature can be used to access the roof of the Watchtower via force jumping.
- The Scout can use his double jump to negate fall damage when jumping or falling from the pipes.
- The Shortstop may be useful on this map due to its longer range.
 Soldier
- The Direct Hit is useful at the Higher Pipes where the logs meet, as enemies going up the logs will have nowhere to go if you fire a rocket directly down the logs.
- The Soldier can use the high ground on this map (roof, pipes) to hit unsuspecting enemies on the ground easily with splash damage.
 Pyro
Pyro
- The pools on the center valley can extinguish fire. For a Pyro, it is important to therefore put an emphasis on following up all attacks — burn and run is not an effective strategy here.
- Long open sight lines on the sides make short-range classes like the Pyro ineffective in these areas. Try indirectly assaulting through other areas of the map or from above, if possible.
 Demoman
- The Sticky Jumper is extremely effective on this map; especially when used in conjunction with the Ullapool Caber. Place Stickies outside of the Spawn at the start of a round and Stickyjump across the map, Killing any unsuspecting enemies with your Melee weapon.
 Heavy
Heavy
- WARNING: Many people rage against Heavies in arena as they feel that it is imbalanced with his high health and high damage.
- A useful method is to stay inside the Tower Shack with your Minigun revved up.
- The Fists of Steel are extremely useful on this map as you will take much less damage from Snipers.
- The Sandvich is ideal on this map as you can use it to quickly heal yourself if under heavy Sniper fire.
 Engineer
- Sentry Guns are extremely effective when used inside the Tower Shack.
- Mini Sentry Guns are useful if placed on the ground under the pipes, as enemies knocked off will take heavy fall damage and may die due to the Sentry Guns fire.
 Medic
Medic
- Playing on the ground or on either side of the pipes is dangerous; as Soldiers on higher ground can bomb you and you may be picked off by Snipers. As such, it is important to stay on higher ground and even on the point if you can.
- Try to overheal Demomen at the start of a round, as they will have more health left when they Stickyjump across the map.
- As a Medic try to stay behind cover as much as possible as you are a main target for Snipers.
 Sniper
- Watchtower has very little cover for enemies heading towards the middle, and the pipes are fairly small, not giving them much room to manoeuvre. This makes enemies very predictable and much easier to headshot.
- A great spot in Watchtower is just to the right of the spawn area, where you can just see over the wooden fence. You can easily see enemies approaching the tower from the enemy spawn, giving you the ability to take out enemies within seconds of the round starting. Medics are the easiest to take down, as you can see their healing beam before you see them if they are healing someone.
- If an enemy Sniper is using this spot, simply move to a similar area to the left, and shoot them the second you see them. They probably will not see you as they would be focused on the pipe your team will be crossing. If you are fast enough you can take them out before they kill any of your teammates.
- You can watch the control point in the tower by standing on one of the high pipes near the cliff. You should only remain there if all the remaining enemies are inside the tower. You will have to shoot out the windows before you are able to shoot them, which will tip them off and force them to duck to stay out of the way, making it easier for your teammates to catch them off guard.
- If you are the last one alive and there is one enemy left in the tower, a good strategy is to shoot out one of the windows and (if you have it) throw a jar of Jarate inside and cover them with it. At this point they will be watching the direction you threw it from. Jump from the pipe down to the staircase and make your way up behind them and finish them with your melee weapon - they shouldn't see you coming.
 Spy
Spy
- Spies can jump onto the ascending stairs right when the round starts to uncloak and backstab those running straight for the point.
- When cloaked on the pipe, Spies can shift over slightly to avoid detection.
- The Ambassador is extremely effective on this map as it can be used to pick off enemies across the map and possibly headshot them.
- When a round starts, go along the pipe, disguise and drop onto the staircase to the right, this way you will have a chance to backstab any enemies going along the pipe parallel to yours.
