Frontier
| “You are so small! Is funny to me!” This article is a stub. As such, it is not complete. You can help Team Fortress Wiki by expanding it. |
| Frontier | |
|---|---|

| |
| Basic Information | |
| Developer(s): | Unknown |
| Map Overview | |
Frontier is a Payload map by MangyCarface that focuses on aggressive offensive pushes.
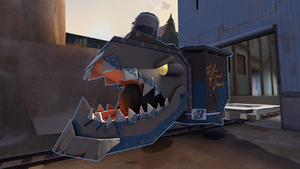
Frontier is a single-stage payload map with 4 control points for BLU to capture. It is designed to address some of the problems with payload maps, namely the tendency to push forward hard and then bring the cart up afterwards, and the assumed advantages of the defending RED team. The crowning feature of Frontier is its custom payload, "Lil' Chew-Chew."
The BLU team's primary goal is to guide Lil' Chew Chew on its tracks to the end of the map to destroy the RED laser array. By continuously pushing the cart forward and breaking through RED defensive positions, the BLU team will be victorious. Failure to push forward will eventually result in the payload slowly moving backwards to the previously captured checkpoint, eroding your team's past progress. Opposite to the BLU team's objective, the RED team's goal is to stop the payload train at all costs. By fighting off their opposition for a long enough period of time, the RED team will be victorious.
Lil' Chew Chew
The payload in Frontier is not a standard bomb cart but rather a large mechanized train engine known as "Lil' Chew-Chew." If there are three or more BLU players pushing Lil' Chew Chew, it will kill any player it runs into whilst animating a Heavy mechanical "chomp." Anyone who actually enters the mouth of Chew Chew, whether it is being pushed or not, will be similarly killed. To move forward and capture points in Frontier, BLU team members simply stand on or close by the platform Chew Chew trails behind itself. It absorbs all frontal damage, forcing RED to apply a very loose, flanking defense in order to stop any BLU progress. As with standard payload carts, Chew Chew works as a dispenser to the BLU team and disguised RED Spies, providing health and ammo.
Locations
- The Shack is a small, two-level building to the right of the BLU base. It has a small balcony that a sentry can be placed on to give a good area of fire over the top of the payload.
- The Rock Wall seperates the second cap point from a small house through which BLU may travel.
- The Rock Plateau comes right before the third cap and is ideal for RED to place sentries. There is even one rock spire whith a medium ammo box and small health kit, allowing a skilled Engineer to place a high sentry out of sapping range.
- The Tunnel is a pathway that is near the Plateau and can be used a a choke point. Walkways along the top ends can be good areas to apply defense against the payload from above.
Strategy
- BLU should always take advantage of their payload, using it to shield them from incoming attacks while holding a hard defense to the sides. This can be difficult when the tracks turn to a 90 degree angle, like before Cap #2, where RED has a much easier time attacking the payload from the side.
- Slow moving enemies like Heavies and Soldiers, even while ubered, can be lured in front of the train and then quickly mowed down with a quick push by two or more Scouts.
- The stairs inside the Shack can make it easy for a Spy to sneak up behind a sentry and the Engineer, so a Pyro would be well-suited to spycheck as well as deflect incoming rockets.
- The Cave right before the third cap is a good place either team to ambush players with the backburner, or house a sentry.
- While taking the final point, BLU Snipers can use the newly opened shortcut to pick off REDs around the end of the tracks. Other classes can also take this path and quickly head to the ramp on the right, allowing closer access to RED's defenses.
- Underneath the final cap point there are large ammo and health kits, which most players do not normaly venture to unless they fall down there. This allows a very sneaky BLU Engineer to possibly construct a small base to allow BLU faster access towards the end.
- While not neccessarily a strategy, many players will ride the payload down into the laser array if BLU wins.
Additional Links
- Additional Screenshots: http://www.fpsbanana.com/maps/screens/74124

