Community Mountain Lab strategy
(Redirected from Community Mountain Lab Strategy)
| “Sun Tzu's got nothing on us!” This article is a Community strategy stub. As such, it is not complete. You can help the Team Fortress Wiki Community Strategy Project by expanding it. Notes: Expand the "General Strategy" section to cover map locations in more detail. Potentially look at the class-specific strategies as well. |
| Mountain Lab | |
|---|---|

| |
| Basic Information | |
| Map type: | Control Point |
| File name: | cp_mountainlab
|
| Released: | October 27, 2010 Patch (Scream Fortress Update) |
| Variants: | Mann Manor |
| Developer(s): | Valve Valentin "3DNJ" Levillain |
| Map Info | |
| Environment: | Alpine |
| Setting: | Evening, overcast |
| Hazards: | Pit |
| Map Items | |
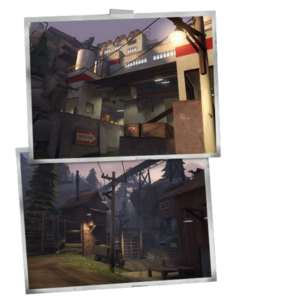
| Map Photos | |
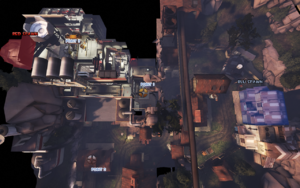
| Map Overview | |
For strategy specific to the Halloween variant of Mountain Lab, see Community Mann Manor strategy.
This article is about Community Mountain Lab strategy.
Note: It is recommended to read the main Mountain Lab article first to become familiar with the names of key map locations used in this article.
General strategy
- The final point is very open and as such is susceptible to combined-fire maneuvers.
- Be wary of players who may try to knock you into the pit with a compression blast or knockback.
- At point A, be sure to watch the shortcut for RED team. Spies can Cloak and get behind you easily by taking this path.
- At point B, the RED team can attack from the hole in the roof. Be aware to check up there before going to capture the point.
- When defending point C, be aware that you can possibly be spawn camped easily. If so, do not forget that you have the top exit of the spawn as well.
- When you are attack, don't forget there are many paths to get to point C. If a Engineer is defending one of those paths, try taking another one of those paths.
Class-specific strategy
 Scout
Scout
- A good idea when going for the final Control point is to wait in a corner or secluded out of sight area near the control point for all the enemies to pass, then start capturing. You may be able to draw the enemies back, allowing your team to advance.
- Be sure to take the secluded routes, to maximize surprise. This way you can have the enemies' health low before they even realize they're being attacked.
- The Sandman or Wrap Assassin may be a good choice for this map, due to the long straightaways being easy to hit enemies with projectiles such as these two weapons have.
- On Defense, keep in mind that Teleporters are crucial to the offense after capturing the first two points. Use the Bonk! Atomic Punch to slip past any defenses the enemy may have outside the mountain lab, and take out any entrances.
- Try not to be seen while behind enemy lines. Specifically while destroying the Teleporter Entrances, take the long way to BLU's yard through the warehouse to ensure you are not detected in your mission.
 Soldier
- Try and avoid the open areas, as it gives the enemy a large window for avoiding your rockets.
- Use your Rocket Launcher's blast radius to take advantage of the closed in control points such as point C, as it is a great way for clearing enemies off.
- Avoid enemy Pyros in small areas, if you cannot escape, use your Shotgun so that the Pyro cannot reflect your rockets.
- Fire rockets if a large group of enemies are traveling down one of the long straightaways. The blast from your rocket should be able to deal damage most of the enemy players.
- When on BLU, at Control point C you can take the path above the room that the Control point is in then from there attack from above, this is useful for taking out a Sentry Gun or a Engineer nest.
 Pyro
Pyro
- The first Control point gives the opportunity for the Pyro to shine in supporting his team. Instead of being on the front lines, Spy check the buildings before the point every now and then. Be sure to also Spy check anyone coming from your spawn because you cannot see them come out after respawning while on the point. Spies will disguise and round the corner pretending to have respawned, and ambush attackers on the point. Enemies will often defend the first point from the small opening above it. While they defend there, move up and attack them from the back, killing them with your Flamethrower before they can react. Optionally, equip the Backburner for maximum damage. This will tremendously reduce the pressure on your team. If there are not many defenders in that opening, stay around the second point and keep Engineers and Demomen from setting up defenses, which will make it easier for your team to push to the second control point.
- Spies may use the arch walkway after the first control point to drop down for leaping stabs on your team. Once your team is attacking the second point, keep up the Spy checking, especially around the arch to counter those Spies. While standing on the second control point, use your Compression Blast to reflect the projectiles of enemy Soldiers and Demomen to keep your team from taking too much damage. Continue Spy checking your team's reinforcements.
- While the first two control points can be tough for a Pyro as the space around is very open, once you have pushed (or been pushed) to the third point, the narrow hallways are perfect for ambushing enemies.
- The Control points themselves, however, are pretty tight, which is great for the Flamethrower.
- Remember, airblasting enemies off the point, especially the final point, is always an option.
 Demoman
- Much like the Soldier, take advantage of the closed in spaces around the control points to deny capping.
- Use the corners of the hallways in the lab to ambush unsuspecting enemies.
- On the BLU team, the areas overlooking the last point can be utilized to easily take out enemies or buildings on or near the point with using the Stickybomb Launcher or Scottish Resistance.
- On defence use Point A's slow capture time and walled off design to your advantage by dealing splash damage to al the would be capturers.
- While defending the last point, set up stickybombs around the various doorframes around the point outside an attacker's view. If there is a Medic unaware of your trap, try to wait until he is exposed to the bombs before detonating. ÜberCharges can be particularly more devastating here, keep this in mind.
 Heavy
Heavy
- As the areas to the first two points are pretty open, stick with a Medic and stay out of sight to not be spotted by a enemy Sniper.
- Equipping the Gloves of Running Urgently to run through the open is also a good idea so it is harder for a enemy Sniper to Headshot you.
- It is good to use the Huo-Long Heater to Spy check around this map. Check around any Medics healing you, Spies will aim for Medics that have full Übercharge
- The Dalokohs Bar is an excellent choice to give you more defense against any Snipers catching you out in the open field, as they cannot kill you with 2 uncharged Headshots at fully buffed health.
- The Natascha or Brass Beast can serve this purpose as well, with their 20% damage resistance bonus while revved. They may however prove less efficient when fighting inside the lab itself, as Snipers have more restricted sightlines to your head, and your mobility or damage penalty could cause you problems.
 Engineer
- Put your Sentry Gun in the hallways of the lab to enforce area denial.
- It takes time for enemies to reach the walkway and rooms above the first control point, so set up a Sentry to defend the point.
- The trudge from spawn to the last point is fairly lengthy, so set up some Teleporters to cut the travel for your team.
- If you have the Pomson 6000 equipped, it isn't a bad idea to spam shots in the hallways or the long open areas.
- It is crucial that you avoid putting your Sentry Gun too far away from control points, otherwise your Sentry Gun will not be able to reach the enemies attacking the point.
- The first Control point is near a building with a large health and ammo supply. Setting up your defense here is recommended if your team can defend the upstairs room and outside your Sentry Gun's field of view.
 Medic
Medic
- Since the Control points are closed in, keep multiple teammates healed and try not to stick to one of them unless escorting a Heavy across an open area.
- Use your ÜberCharge in open areas if attacking, this will make it impossible for enemy Snipers to Headshot you. When defending a long straightaway, use your ÜberCharge there so the person that you are Übering will be able to kill the enemy more efficiently.
- For defending the first two Control points, use the default Medi Gun to use ÜberCharges that will matter to your team. At the final Control point C, you are better off using the Übercharge of a Kritzkrieg to fire in the enclose area where the point is and in long straightaways.
 Sniper
- The path from BLU spawn to the point A is excellent for sniping incoming enemies.
- The roof of Point B is great for defending and attacking Snipers, as you can aim towards people coming from RED spawn or aim towards people coming from Point A.
- The long corridor in the entrance to the lab is great for picking off approaching enemies. Stand at the end of this corridor and go back for health and ammo if needed.
- The area above the RED spawn gives you a good, long look to the room across. Use this to your advantage of headshotting enemy players that are defending the Control point that is located below.
 Spy
Spy
- One of the safest ways to get through the middle is to Cloak and to go across the top, where there is usually little to no traffic.
- Remember to sap teleporters when defending as a Spy, as it is a long walk to Control point C. This will prevent the attacking team from being able to hoard point C, making it easier to defend.
- On offense, a good place to hide out at the first control point is inside the building behind it, disguised as a Sniper. Then, when you see an opening in the enemies, perhaps an exposed back, jump through the window and attack. After, Cloak and go back to the window, or escape.
 Go through this area while Cloaked to minimize chances of being discovered.
- As the BLU team pushes forward and captures points, they have to travel longer distances from their spawn area to reach the front lines. This creates more opportunities to ambush BLU players as they travel to the frontlines.


