Difference between revisions of "Scream Fortress 2022"
(Fixed maps section and added a line to intro) |
GrampaSwood (talk | contribs) (Tag: Undo) |
||
| (35 intermediate revisions by 18 users not shown) | |||
| Line 1: | Line 1: | ||
| − | |||
{{Patch info|10|5|2022}} | {{Patch info|10|5|2022}} | ||
| − | '''Scream Fortress 2022''' or '''Scream Fortress XIV''' was | + | [[File:Scream Fortress 2016.png|right|365px]] |
| + | |||
| + | '''Scream Fortress 2022''' or '''Scream Fortress XIV''' was the [[Halloween event]] that started on October 1, 2022, with the in-game activation of [[Holiday|holiday-restricted]] cosmetics. Four days later, the major seasonal update {{patch name|10|5|2022}} added 6 new community [[Halloween map]]s, 22 new community [[cosmetic items]], 5 new community holiday-restricted cosmetic items, 5 new community [[taunts]], 25 new [[Unusual#Scream Fortress Series|Unusual effects]], and 11 new [[War Paint]]s. The free [[Halloween Contracts]] were also reactivated in the [[ConTracker]] for the Event, with 6 new contracts added to cover the new Halloween maps. Additionally, all previously completed Halloween contracts were reset, allowing players to earn their rewards once again. | ||
== Timeline == | == Timeline == | ||
On October 1st, 2022, [[Holiday|holiday-restricted]] cosmetics were activated, and the Special Event menu was added to the Casual mode selection with Halloween maps from previous events. | On October 1st, 2022, [[Holiday|holiday-restricted]] cosmetics were activated, and the Special Event menu was added to the Casual mode selection with Halloween maps from previous events. | ||
| − | On October 5th, 2022, [[Halloween Contracts]] were activated, the Special Event menu was updated with the featured | + | On October 5th, 2022, [[Halloween Contracts]] were activated, the Special Event menu was updated with the new featured Halloween maps, and [[Soul Gargoyle]]s began collecting souls. Soul Gargoyles were given out during this time to players who launched the game and did not yet have one. |
| − | + | This event ended on November 7th, 2022. | |
== Additions == | == Additions == | ||
| Line 16: | Line 17: | ||
{|class="wikitable" cellpadding=2 style="text-align:center;" | {|class="wikitable" cellpadding=2 style="text-align:center;" | ||
|-style="height:20px;" | |-style="height:20px;" | ||
| − | ! class="header" style="background:# | + | ! class="header" style="background:#BD0BB4;color:#FFFFFF;" | {{common string|Name}} |
| − | ! class="header" style="background:# | + | ! class="header" style="background:#BD0BB4;color:#FFFFFF;" | {{common string|Picture}} |
| − | ! class="header" style="background:# | + | ! class="header" style="background:#BD0BB4;color:#FFFFFF;" | {{common string|Game mode}} |
| − | ! class="header" style="background:# | + | ! class="header" style="background:#BD0BB4;color:#FFFFFF;" | {{common string|File name}} |
|- | |- | ||
| − | | width="90px" style="background:# | + | | width="90px" style="background:#FD52FF;" | '''[[Bonesaw (map){{if lang}}|<font color="white">Bonesaw</font>]]''' |
| − | | style="background:# | + | | style="background:#DDC9E1;" | [[File:Plr hacksaw event.png|160px|link=Bonesaw (map){{if lang}}]] |
| − | | style="background:# | + | | style="background:#DDC9E1;" | '''[[Payload Race{{if lang}}|{{common string|Payload Race}}]]'''<br>[[File:RED Bonesaw Bombcart.png|30px|link=Payload#Payload_Race_2{{if lang}}]][[File:BLU Bonesaw Bombcart.png|30px|link=Payload{{if lang}}#Payload_Race_2]] |
| − | | {{code| | + | | {{code|plr_hacksaw_event}} |
|- | |- | ||
| − | | style="background:# | + | | style="background:#FD52FF;" | '''[[Crasher{{if lang}}|<font color="white">Crasher</font>]]''' |
| − | | style="background:# | + | | style="background:#DDC9E1;" | [[File:Ctf crasher.png|160px|link=Crasher{{if lang}}]] |
| − | | style="background:# | + | | style="background:#DDC9E1;" | '''[[Capture the Flag{{if lang}}|{{common string|Capture the Flag}}]]'''<br>[[File:Crasher Briefcase Barrel.png|50px|link=Capture the Flag{{if lang}}]] |
| − | | {{code| | + | | {{code|ctf_crasher}} |
|- | |- | ||
| − | | style="background:# | + | | style="background:#FD52FF;" | '''[[Ghoulpit{{if lang}}|<font color="white">Ghoulpit</font>]]''' |
| − | | style="background:# | + | | style="background:#DDC9E1;" | [[File:Pl sludgepit event.png|160px|link=Ghoulpit{{if lang}}]] |
| − | | style="background:# | + | | style="background:#DDC9E1;" | '''[[Payload{{if lang}}|{{common string|Payload}}]]'''<br>[[File:GhoulpitPayloadCart.png|50px|link=Payload{{if lang}}]] |
| − | | {{code| | + | | {{code|pl_sludgepit_event}} |
|- | |- | ||
| − | | style="background:# | + | | style="background:#FD52FF;" | '''[[Helltrain{{if lang}}|<font color="white">Helltrain</font>]]''' |
| − | | style="background:# | + | | style="background:#DDC9E1;" | [[File:Ctf helltrain event.png|160px|link=Helltrain{{if lang}}]] |
| − | | style="background:# | + | | style="background:#DDC9E1;" | '''[[Capture the Flag{{if lang}}|{{common string|Capture the Flag}}]]'''<br>[[File:Helltrain Coal Flag BLU.png|50px|link=Capture the Flag{{if lang}}]] |
| − | | {{code| | + | | {{code|ctf_helltrain_event}} |
|- | |- | ||
| − | | style="background:# | + | | style="background:#FD52FF;" | '''[[Soul-Mill{{if lang}}|<font color="white">Soul-Mill</font>]]''' |
| − | | style="background:# | + | | style="background:#DDC9E1;" | [[File:Koth sawmill event.png|160px|link=Soul-Mill{{if lang}}]] |
| − | | style="background:# | + | | style="background:#DDC9E1;" | '''[[King of the Hill{{if lang}}|{{common string|King of the Hill}}]]'''<br>[[File:Controlpoint.png|50px|link=King of the Hill{{if lang}}]] |
| − | | {{code| | + | | {{code|koth_sawmill_event}} |
|- | |- | ||
| − | | style="background:# | + | | style="background:#FD52FF;" | '''[[Spookeyridge{{if lang}}|<font color="white">Spookeyridge</font>]]''' |
| − | | style="background:# | + | | style="background:#DDC9E1;" | [[File:Cp spookeyridge.png|160px|link=Spookeyridge{{if lang}}]] |
| − | | style="background:# | + | | style="background:#DDC9E1;" | '''[[Control Point (game mode){{if lang}}|{{common string|Attack/Defend}}]]'''<br>[[File:Controlpoint.png|50px|link=Control Point (game mode){{if lang}}]] |
| {{code|cp_spookeyridge}} | | {{code|cp_spookeyridge}} | ||
|} | |} | ||
| Line 55: | Line 56: | ||
{{main|Cosmetic items}} | {{main|Cosmetic items}} | ||
{| class="wikitable collapsible" cellpadding="3" style="text-align:center;" | {| class="wikitable collapsible" cellpadding="3" style="text-align:center;" | ||
| − | | width="90px" style="background:# | + | | width="90px" style="background:#BD0BB4;" rowspan="2" | '''{{class link|Scout|br=yes|color=white}}''' |
| style="background:#4B69FF;" | {{item icon|Imp's Imprint|75px}} | | style="background:#4B69FF;" | {{item icon|Imp's Imprint|75px}} | ||
| − | | style="background:# | + | | style="background:#DDC9E1;" | '''{{item link|Imp's Imprint}}''' |
|- | |- | ||
| style="background:#8847FF;" | {{item icon|Masked Fiend|75px}} | | style="background:#8847FF;" | {{item icon|Masked Fiend|75px}} | ||
| − | | style="background:# | + | | style="background:#DDC9E1;" | '''{{item link|Masked Fiend}}''' |
|- | |- | ||
| − | | style="background:# | + | | style="background:#BD0BB4;" rowspan="3" | '''{{class link|Soldier|br=yes|color=white}}''' |
| style="background:#D32CE6;" | {{item icon|Cranial Cowl|75px}} | | style="background:#D32CE6;" | {{item icon|Cranial Cowl|75px}} | ||
| − | | style="background:# | + | | style="background:#DDC9E1;" | '''{{item link|Cranial Cowl}}''' |
|- | |- | ||
| style="background:#4B69FF;" | {{item icon|Firearm Protector|75px}} | | style="background:#4B69FF;" | {{item icon|Firearm Protector|75px}} | ||
| − | | style="background:# | + | | style="background:#DDC9E1;" | '''{{item link|Firearm Protector}}''' |
|- | |- | ||
| style="background:#8847FF;" | {{item icon|Safety Stripes|75px}} | | style="background:#8847FF;" | {{item icon|Safety Stripes|75px}} | ||
| − | | style="background:# | + | | style="background:#DDC9E1;" | '''{{item link|Safety Stripes}}''' |
|- | |- | ||
| − | | style="background:# | + | | style="background:#BD0BB4;" rowspan="3" | '''{{class link|Pyro|br=yes|color=white}}''' |
| style="background:#FFD700;" | {{item icon|Fire Breather|75px}} | | style="background:#FFD700;" | {{item icon|Fire Breather|75px}} | ||
| − | | style="background:# | + | | style="background:#DDC9E1;" | '''{{item link|Fire Breather}}''' |
|- | |- | ||
| style="background:#FFD700;" | {{item icon|Magical Mount|75px}} | | style="background:#FFD700;" | {{item icon|Magical Mount|75px}} | ||
| − | | style="background:# | + | | style="background:#DDC9E1;" | '''{{item link|Magical Mount}}''' |
|- | |- | ||
| style="background:#EB4B4B;" | {{item icon|Propaniac|75px}} | | style="background:#EB4B4B;" | {{item icon|Propaniac|75px}} | ||
| − | | style="background:# | + | | style="background:#DDC9E1;" | '''{{item link|Propaniac}}''' |
|- | |- | ||
| − | | style="background:# | + | | style="background:#BD0BB4;" rowspan="3" | '''{{class link|Demoman|br=yes|color=white}}''' |
| style="background:#D32CE6;" | {{item icon|Alcoholic Automaton|75px}} | | style="background:#D32CE6;" | {{item icon|Alcoholic Automaton|75px}} | ||
| − | | style="background:# | + | | style="background:#DDC9E1;" | '''{{item link|Alcoholic Automaton}}''' |
|- | |- | ||
| style="background:#4B69FF;" | {{item icon|Bombard Brigadier|75px}} | | style="background:#4B69FF;" | {{item icon|Bombard Brigadier|75px}} | ||
| − | | style="background:# | + | | style="background:#DDC9E1;" | '''{{item link|Bombard Brigadier}}''' |
|- | |- | ||
| style="background:#4B69FF;" | {{item icon|Nightbane Brim|75px}} | | style="background:#4B69FF;" | {{item icon|Nightbane Brim|75px}} | ||
| − | | style="background:# | + | | style="background:#DDC9E1;" | '''{{item link|Nightbane Brim}}''' |
|- | |- | ||
| − | | style="background:# | + | | style="background:#BD0BB4;" rowspan="4" | '''{{class link|Heavy|br=yes|color=white}}''' |
| style="background:#4B69FF;" | {{item icon|Horror Shawl|75px}} | | style="background:#4B69FF;" | {{item icon|Horror Shawl|75px}} | ||
| − | | style="background:# | + | | style="background:#DDC9E1;" | '''{{item link|Horror Shawl}}''' |
|- | |- | ||
| style="background:#FFD700;" | {{item icon|Misha's Maw|75px}} | | style="background:#FFD700;" | {{item icon|Misha's Maw|75px}} | ||
| − | | style="background:# | + | | style="background:#DDC9E1;" | '''{{item link|Misha's Maw}}''' |
|- | |- | ||
| style="background:#8847FF;" | {{item icon|Road Block|75px}} | | style="background:#8847FF;" | {{item icon|Road Block|75px}} | ||
| − | | style="background:# | + | | style="background:#DDC9E1;" | '''{{item link|Road Block}}''' |
|- | |- | ||
| style="background:#D32CE6;" | {{item icon|Road Rage|75px}} | | style="background:#D32CE6;" | {{item icon|Road Rage|75px}} | ||
| − | | style="background:# | + | | style="background:#DDC9E1;" | '''{{item link|Road Rage}}''' |
|- | |- | ||
| − | | style="background:# | + | | style="background:#BD0BB4;" rowspan="4" | '''{{class link|Engineer|br=yes|color=white}}''' |
| style="background:#FFD700;" | {{item icon|Cabinet Mann|75px}} | | style="background:#FFD700;" | {{item icon|Cabinet Mann|75px}} | ||
| − | | style="background:# | + | | style="background:#DDC9E1;" | '''{{item link|Cabinet Mann}}''' |
|- | |- | ||
| style="background:#8847FF;" | {{item icon|Dustbowl Devil|75px}} | | style="background:#8847FF;" | {{item icon|Dustbowl Devil|75px}} | ||
| − | | style="background:# | + | | style="background:#DDC9E1;" | '''{{item link|Dustbowl Devil}}''' |
|- | |- | ||
| style="background:#4B69FF;" | {{item icon|More Gun Marshal|75px}} | | style="background:#4B69FF;" | {{item icon|More Gun Marshal|75px}} | ||
| − | | style="background:# | + | | style="background:#DDC9E1;" | '''{{item link|More Gun Marshal}}''' |
|- | |- | ||
| style="background:#FFD700;" | {{item icon|Pony Express|75px}} | | style="background:#FFD700;" | {{item icon|Pony Express|75px}} | ||
| − | | style="background:# | + | | style="background:#DDC9E1;" | '''{{item link|Pony Express}}''' |
|- | |- | ||
| − | | style="background:# | + | | style="background:#BD0BB4;" rowspan="2" | '''{{class link|Medic|br=yes|color=white}}''' |
| style="background:#8847FF;" | {{item icon|Lavish Labwear|75px}} | | style="background:#8847FF;" | {{item icon|Lavish Labwear|75px}} | ||
| − | | style="background:# | + | | style="background:#DDC9E1;" | '''{{item link|Lavish Labwear}}''' |
|- | |- | ||
| style="background:#D32CE6;" | {{item icon|Victorian Villainy|75px}} | | style="background:#D32CE6;" | {{item icon|Victorian Villainy|75px}} | ||
| − | | style="background:# | + | | style="background:#DDC9E1;" | '''{{item link|Victorian Villainy}}''' |
|- | |- | ||
| − | | style="background:# | + | | style="background:#BD0BB4;" rowspan="2" | '''{{class link|Sniper|br=yes|color=white}}''' |
| style="background:#8847FF;" | {{item icon|Headhunter's Brim|75px}} | | style="background:#8847FF;" | {{item icon|Headhunter's Brim|75px}} | ||
| − | | style="background:# | + | | style="background:#DDC9E1;" | '''{{item link|Headhunter's Brim}}''' |
|- | |- | ||
| style="background:#4B69FF;" | {{item icon|Hunting Cloak|75px}} | | style="background:#4B69FF;" | {{item icon|Hunting Cloak|75px}} | ||
| − | | style="background:# | + | | style="background:#DDC9E1;" | '''{{item link|Hunting Cloak}}''' |
|- | |- | ||
| − | | style="background:# | + | | style="background:#BD0BB4;" rowspan="1" | '''{{class link|Spy|br=yes|color=white}}''' |
| style="background:#4B69FF;" | {{item icon|Turncoat|75px}} | | style="background:#4B69FF;" | {{item icon|Turncoat|75px}} | ||
| − | | style="background:# | + | | style="background:#DDC9E1;" | '''{{item link|Turncoat}}''' |
|- | |- | ||
| − | | style="background:# | + | | style="background:#BD0BB4;" rowspan="3" | '''{{class link|All Classes|br=yes|color=white}}''' |
| style="background:#4B69FF;" | {{item icon|Beaten and Bruised|75px}} | | style="background:#4B69FF;" | {{item icon|Beaten and Bruised|75px}} | ||
| − | | style="background:# | + | | style="background:#DDC9E1;" | '''{{item link|Beaten and Bruised}}''' |
|- | |- | ||
| style="background:#EB4B4B;" | {{item icon|Onimann|75px}} | | style="background:#EB4B4B;" | {{item icon|Onimann|75px}} | ||
| − | | style="background:# | + | | style="background:#DDC9E1;" | '''{{item link|Onimann}}''' |
|- | |- | ||
| style="background:#4B69FF;" | {{item icon|Starlight Sorcerer|75px}} | | style="background:#4B69FF;" | {{item icon|Starlight Sorcerer|75px}} | ||
| − | | style="background:# | + | | style="background:#DDC9E1;" | '''{{item link|Starlight Sorcerer}}''' |
|} | |} | ||
=== War Paints === | === War Paints === | ||
{{main|War Paint}} | {{main|War Paint}} | ||
| − | + | ||
| − | ==== {{decorated name|Scream Fortress XIV | + | ==== {{decorated name|Scream Fortress Collection|XIV}} ==== |
<gallery> | <gallery> | ||
| − | File:Backpack | + | File:Backpack Sacred Slayer War Paint Factory New.png|<div class="warpaint item-grade elite">{{Decorated name|Sacred Slayer}}</div> |
| − | File:Backpack | + | File:Backpack Bonzo Gnawed War Paint Factory New.png|<div class="warpaint item-grade assassin">{{Decorated name|Bonzo Gnawed}}</div> |
| − | File:Backpack | + | File:Backpack Ghoul Blaster War Paint Factory New.png|<div class="warpaint item-grade assassin">{{Decorated name|Ghoul Blaster}}</div> |
| − | File:Backpack | + | File:Backpack Metalized Soul War Paint Factory New.png|<div class="warpaint item-grade commando">{{Decorated name|Metalized Soul}}</div> |
| − | File:Backpack | + | File:Backpack Pumpkin Plastered War Paint Factory New.png|<div class="warpaint item-grade commando">{{Decorated name|Pumpkin Plastered}}</div> |
| − | File:Backpack | + | File:Backpack Chilly Autumn War Paint Factory New.png|<div class="warpaint item-grade commando">{{Decorated name|Chilly Autumn}}</div> |
| − | File:Backpack | + | File:Backpack Sunriser War Paint Factory New.png|<div class="warpaint item-grade mercenary">{{Decorated name|Sunriser}}</div> |
| − | File:Backpack | + | File:Backpack Health and Hell War Paint Factory New.png|<div class="warpaint item-grade mercenary">{{Decorated name|Health and Hell}}</div> |
| − | File:Backpack | + | File:Backpack Health and Hell (Green) War Paint Factory New.png|<div class="warpaint item-grade mercenary">{{Decorated name|Health and Hell (Green)}}</div> |
| − | + | File:Backpack Hypergon War Paint Factory New.png|<div class="warpaint item-grade mercenary">{{Decorated name|Hypergon}}</div> | |
| − | + | File:Backpack Cream Corned War Paint Factory New.png|<div class="warpaint item-grade mercenary">{{Decorated name|Cream Corned}}</div> | |
| − | File:Backpack | ||
| − | File:Backpack | ||
</gallery> | </gallery> | ||
| − | + | ||
=== Taunts === | === Taunts === | ||
{{main|Taunts}} | {{main|Taunts}} | ||
{| class="wikitable collapsible" cellpadding="3" style="text-align:center;" | {| class="wikitable collapsible" cellpadding="3" style="text-align:center;" | ||
| − | | width="90px" style="background:# | + | | width="90px" style="background:#BD0BB4;" rowspan="2" | '''{{class link|Demoman|br=yes|color=white}}''' |
| − | | style="background:# | + | | style="background:#FD52FF;" | {{item icon|Drunk Mann's Cannon|75px}} |
| − | | style="background:# | + | | style="background:#DDC9E1;" | '''{{item link|Drunk Mann's Cannon}}''' |
|- | |- | ||
| − | | style="background:# | + | | style="background:#FD52FF;" | {{item icon|Shanty Shipmate|75px}} |
| − | | style="background:# | + | | style="background:#DDC9E1;" | '''{{item link|Shanty Shipmate}}''' |
|- | |- | ||
| − | | style="background:# | + | | style="background:#BD0BB4;" | '''{{class link|Engineer|br=yes|color=white}}''' |
| − | | style="background:# | + | | style="background:#FD52FF;" | {{item icon|Texas Twirl 'Em|75px}} |
| − | | style="background:# | + | | style="background:#DDC9E1;" | '''{{item link|Texas Twirl 'Em}}''' |
|- | |- | ||
| − | | style="background:# | + | | style="background:#BD0BB4;" | '''{{class link|Spy|br=yes|color=white}}''' |
| − | | style="background:# | + | | style="background:#FD52FF;" | {{item icon|Travel Agent|75px}} |
| − | | style="background:# | + | | style="background:#DDC9E1;" | '''{{item link|Travel Agent}}''' |
|- | |- | ||
| − | | style="background:# | + | | style="background:#BD0BB4;" | '''{{class link|All classes|br=yes|color=white}}''' |
| − | | style="background:# | + | | style="background:#FD52FF;" | {{item icon|Scaredy-cat!|75px}} |
| − | | style="background:# | + | | style="background:#DDC9E1;" | '''{{item link|Scaredy-cat!}}''' |
|} | |} | ||
| Line 193: | Line 192: | ||
{{main|Tools}} | {{main|Tools}} | ||
{| class="wikitable collapsible" cellpadding="3" style="text-align:center;" | {| class="wikitable collapsible" cellpadding="3" style="text-align:center;" | ||
| − | | width="90px" style="background:# | + | | width="90px" style="background:#FD52FF;" | {{item icon|Ghoulish Gains Case|75px}} |
| − | | style="background:# | + | | style="background:#DDC9E1;" | '''{{item link|Ghoulish Gains Case}}''' |
|- | |- | ||
| − | | style="background:# | + | | style="background:#FD52FF;" | {{item icon|Ghoulish Gains Key|75px}} |
| − | | style="background:# | + | | style="background:#DDC9E1;" | '''{{item link|Ghoulish Gains Key}}''' |
|- | |- | ||
| − | | style="background:# | + | | style="background:#FD52FF;" | {{item icon|Scream Fortress XIV War Paint Case|75px}} |
| − | | style="background:# | + | | style="background:#DDC9E1;" | '''{{item link|Scream Fortress XIV War Paint Case}}''' |
|- | |- | ||
| − | | style="background:# | + | | style="background:#FD52FF;" | {{item icon|Scream Fortress XIV War Paint Key|75px}} |
| − | | style="background:# | + | | style="background:#DDC9E1;" | '''{{item link|Scream Fortress XIV War Paint Key}}''' |
|} | |} | ||
=== Unusual effects === | === Unusual effects === | ||
{{main|Unusual effects}} | {{main|Unusual effects}} | ||
| − | |||
{{Scream Fortress 2022 Unusual effects}} | {{Scream Fortress 2022 Unusual effects}} | ||
| − | + | ||
== Gallery == | == Gallery == | ||
<gallery> | <gallery> | ||
| − | + | File:News item 2022-10-05 Scream Fortress 2022.png|In-game notification about the start of the event. | |
</gallery> | </gallery> | ||
| Line 226: | Line 224: | ||
{{Major Updates Nav}} | {{Major Updates Nav}} | ||
| − | |||
[[Category:Events]] | [[Category:Events]] | ||
[[Category:Major updates]] | [[Category:Major updates]] | ||
| + | [[Category:Scream Fortress 2022]] | ||
Latest revision as of 11:28, 8 September 2023

Scream Fortress 2022 or Scream Fortress XIV was the Halloween event that started on October 1, 2022, with the in-game activation of holiday-restricted cosmetics. Four days later, the major seasonal update October 5, 2022 Patch added 6 new community Halloween maps, 22 new community cosmetic items, 5 new community holiday-restricted cosmetic items, 5 new community taunts, 25 new Unusual effects, and 11 new War Paints. The free Halloween Contracts were also reactivated in the ConTracker for the Event, with 6 new contracts added to cover the new Halloween maps. Additionally, all previously completed Halloween contracts were reset, allowing players to earn their rewards once again.
Contents
Timeline
On October 1st, 2022, holiday-restricted cosmetics were activated, and the Special Event menu was added to the Casual mode selection with Halloween maps from previous events.
On October 5th, 2022, Halloween Contracts were activated, the Special Event menu was updated with the new featured Halloween maps, and Soul Gargoyles began collecting souls. Soul Gargoyles were given out during this time to players who launched the game and did not yet have one.
This event ended on November 7th, 2022.
Additions
Maps
| Name | Picture | Game mode | File name |
|---|---|---|---|
| Bonesaw | 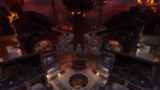
|
Payload Race |
plr_hacksaw_event
|
| Crasher | 
|
Capture the Flag
|
ctf_crasher
|
| Ghoulpit | 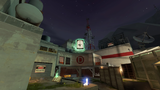
|
Payload
|
pl_sludgepit_event
|
| Helltrain | 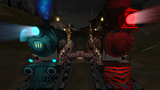
|
Capture the Flag |
ctf_helltrain_event
|
| Soul-Mill | 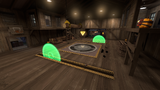
|
King of the Hill |
koth_sawmill_event
|
| Spookeyridge | 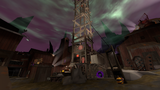
|
Attack/Defend |
cp_spookeyridge
|
Cosmetic items
War Paints
Scream Fortress XIV Collection
 Sacred Slayer
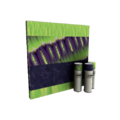 Bonzo Gnawed
 Ghoul Blaster
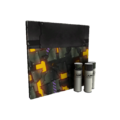 Metalized Soul
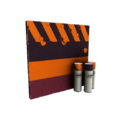 Pumpkin Plastered
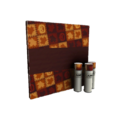 Chilly Autumn
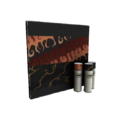 Sunriser
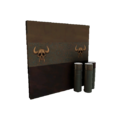
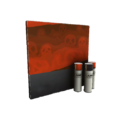 Health and Hell
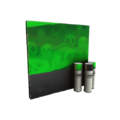 Health and Hell (Green)
 Hypergon
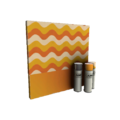 Cream Corned


_War_Paint_Factory_New.png)


Taunts
| Drunk Mann's Cannon | ||
| Shanty Shipmate | ||
| Texas Twirl 'Em | ||
| Travel Agent | ||
| Scaredy-cat! |
Tools
| Ghoulish Gains Case | |
| Ghoulish Gains Key | |
| Scream Fortress XIV War Paint Case | |
| Scream Fortress XIV War Paint Key |
Unusual effects
| Scream Fortress XIV Unusual effects | ||||||
|---|---|---|---|---|---|---|
| Cosmetic effects |  |
 |
 |
 |
 |
 |
| Haunted Kraken | Eerie Kraken | Soulful Slice | Horsemann's Hack | RED | BLU | |
| Haunted Forever! | ||||||
 |
 |
 |
 |
 |
 | |
| Forever And Forever! | Cursed Forever! | Moth Plague | Malevolent Monoculi | RED | BLU | |
| Haunted Wick | ||||||
 |
 | |||||
| Wicked Wick | Spectral Wick | |||||
| Taunt effects |  |
 |
 |
 |
 |
 |
| RED | BLU | Pungent Poison | Blazed Brew | Mysterious Mixture | Linguistic Deviation | |
| Marigold Ritual | ||||||
 |
 |
 |
 |
 |
 | |
| Aurelian Seal | RED | BLU | Prismatic Haze | RED | BLU | |
| Runic Imprisonment | Rising Ritual | |||||
 |
 |
 |
 |
 | ||
| RED | BLU | Toxic Grip | Infernal Grip | Death Grip | ||
| Bloody Grip | ||||||
Gallery
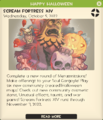
In-game notification about the start of the event.

See also
External links
- "Scream Fortress XIV has arrived!", TF2 Official Website, October 5, 2022
| ||||||||||||||||||||||
| |||||||||||||||||||||||||||||||||||||||||||||||||||||||||||||||||||||||||||||||||||||||||||||||