Difference between revisions of "Community Double Cross strategy"
HitlineMiamo (talk | contribs) (mc) |
m (Auto: Sync Map infobox) |
||
| (2 intermediate revisions by one other user not shown) | |||
| Line 2: | Line 2: | ||
{{Map infobox | {{Map infobox | ||
| − | | game-type | + | | map-strategy = yes |
| − | | file-name | + | | map-status = official |
| + | | map-name = Double Cross | ||
| + | | map-game-type = Capture the Flag | ||
| + | | map-file-name = ctf_doublecross | ||
| map-image = CTF DoubleCross RedBase.png | | map-image = CTF DoubleCross RedBase.png | ||
| − | | map-environment = Industrial | + | | map-released = {{Patch name|12|17|2009}} |
| − | | map-setting = | + | | map-released-major = WAR! Update |
| − | | map-deep-water | + | | map-environment = Industrial, alpine |
| − | | map-hazards = [[ | + | | map-setting = Night time |
| − | | map-health | + | | map-has-deep-water = yes |
| − | | map-health | + | | map-hazards = [[Environmental death#Pitfalls|Pitfall]] |
| − | | map | + | | map-pickups-health-small = 8 |
| − | + | | map-pickups-health-medium = 1 | |
| − | | map-ammo | + | | map-pickups-ammo-small = 6 |
| − | + | | map-pickups-ammo-medium = 2 | |
}} | }} | ||
Latest revision as of 19:31, 20 January 2024
| “Sun Tzu's got nothing on us!” This article is a Community strategy stub. As such, it is not complete. You can help the Team Fortress Wiki Community Strategy Project by expanding it. Notes: Expand the "General Strategy" section to cover map locations in more detail. Potentially look at the class-specific strategies as well. |
| Double Cross | |
|---|---|
| |
| Basic Information | |
| Map type: | Capture the Flag |
| File name: | ctf_doublecross
|
| Released: | December 17, 2009 Patch (WAR! Update) |
| Variants: | Doublefrost |
| Developer(s): | Valve |
| Map Info | |
| Environment: | Industrial, alpine |
| Setting: | Night time |
| Hazards: | Pitfall |
| Deep Water: | Yes |
| Map Items | |
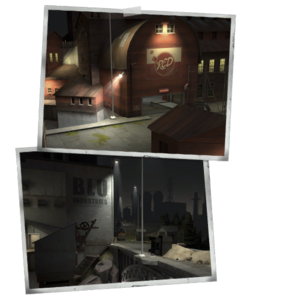
| Map Photos | |
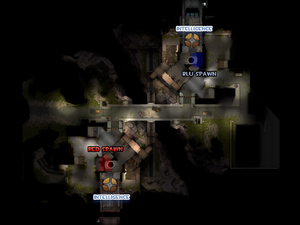
| Map Overview | |
This article is about Community Double Cross strategy.
Note: It is recommended to read the main Double Cross article first to become familiar with the names of key map locations used in this article.
General strategy
- The sewer access shed in the courtyard is an excellent way to avoid the main entrance if you are looking for an escape route with the Intelligence.
- Soldiers, Demomen, and Scouts can reach the enemy battlements via Rocket jumping, Sticky jumping, or double jumping, respectively. From here, you have direct access to the Intelligence room. Also note that Soldiers, Demomen, and Scouts can escape back up to the balcony overlooking the refuse area near the Battlements. Scouts can do it with either a regular double jump or a triple jump, though it is far more difficult in only two jumps and requires practice to execute reliably.
- It is not too difficult to organize a strong push with offensive classes into the enemy courtyard, as unlike many other CTF maps there are no easily defensible Sentry Gun locations. If Medic-backed Heavies and Soldiers make it to the enemy base entrance, they will be in a good position to break into the Intelligence room directly. Be wary of enemies attacking from the upper gantry coming from the spawn while in the enemy courtyard or Intelligence room.
- While carrying the Intelligence, falling into the bottomless pit beneath the two bridges will cause the Intelligence to return to its home base. For clever players who know how to effectively utilize knockback, this can be used as a very effective defense against fleeing enemy Intelligence carriers.
- As an Engineer, Soldier, or Demoman, it's possible to jump through the door between the enemy spawn and water pool via a sticky, rocket, or sentry rocket jump.
- If jumping from the battlements onto the railroad tracks, jumping onto the fence near the bottom of the staircase or on to a high point of the staircase will decrease or nullify fall damage.
- There is an often-overlooked third spawn exit leading directly to the sewers. If Snipers are causing your team issues, pick them off from the bridge. This is a good way to move for the most part unseen past enemy defenses.
Class-specific strategy
 Scout
Scout
Offense
- Scouts may find it easier to use the sewer system to get to the enemy Intelligence, as most of the enemy forces will be concentrated on the bridge.
- A skillful Scout can double-jump and crouch from the bridge to reach the enemy balcony, allowing them to snatch the Intelligence very quickly. Using the Force-A-Nature or Atomizer will make it easier to reach the balcony.
- Similarly, you can use this technique with your own balcony for a faster return to the Intelligence room to capture the Intelligence.
- Your ability to easily reach the battlements makes you a great asset to your team if there is an excessive amount of enemy Snipers on the battlements. If they do not see you, jump to the roof of the battlements; you can kill any enemy Snipers in the area with ease.
- Using the lower bridge can prove quite hazardous for a Scout. The narrow width and long length of the bridge does not allow much room for dodging projectiles from a class like the Soldier or Demoman. Try to avoid long distance face-to-face conflicts with these classes on the lower bridge. If for some reason you cannot avoid such a conflict, weapon heckling can be useful.
 Soldier
Offense
- If at the back of the enemy sewers as Soldier, you can rocket jump up into the courtyard near the Intelligence. This can potentially bypass a large portion of the enemy's defenses.
- Soldiers can rocket jump to the main bridge from the battlements and vice versa. This allows for a faster escape route and an easier path to the enemy Intelligence. The Soldier can also rocket jump to the battlements via the train bridge.
 Pyro
Pyro
General
- The large chasm over the middle of Double Cross provides Pyros an excellent opportunity to use the compression blast for kills. Utilize this to eliminate greater threats to your team, such as ÜberCharged enemies or people carrying your Intelligence.
- It is possible to hide behind some of the large piles or mounds in the middle of the map and knock passers-by right into the chasm below.
- The Flare Gun is of great use here in the map's middle against enemy Snipers and Heavies, due to the long sight lines. Be careful, though, as Snipers can use those same sight lines.
- The Detonator can prove to be very useful due to the map's long sight lines. The flares can be shot down the middle of the map and detonated in order to set many enemies ablaze to force them to fall back or be hit again for even greater damage. The Detonator, unlike the Flare Gun, can also be used to jump onto many key locations.
- If enemies are turtling or simply not around, the enemy roof is a great place to jump to. This jump is easiest to perform when you position yourself to the left of the lamppost. When used in tandem with the Backburner, a skilled Pyro can ambush players on the ledge. This can be especially useful against enemy Snipers, as this forces them to play carefully rather than allowing them to focus only on sniping.
- While in the enemy sewers, you can jump from the sewer into the shed if you crouch while jumping. This can allow for easy ambush kills with the Backburner or for an easy attempt at taking the enemy Intelligence.
- After taking the intelligence, you can escape by exiting through the entrance towards the ledge. To accomplish this jump, you must jump onto the wooden planks and then jump up while crouching until you are on the ledge. After jumping over the fence, it is important to be wary of enemies. This route can provide an excellent escape route, as most enemies will immediately rush to the opposite exit in order to begin defending.
- Another useful jump can be performed by jumping onto the slanted roof of the sewer access shed. The entire surface of the roof is maneuverable and provides great coverage for area denial as well as a great escape or ambush route.
Offense
- If the enemy team is distracted enough, you can take the role of a Spy and sneak into the battlements to eliminate Snipers. You can then decide to go for the Intelligence from here, but watch for enemies and Sentry Guns guarding it.
- The Back Scratcher and the Powerjack may be useful when playing a flanking Pyro, due to the relatively limited availability of health packs on this map.
- The Backburner can be very powerful on this map. It rewards the Pyro for flanking well and playing aggressively while still retaining the ability to use the compression blast to launch enemies into the chasm.
Defense
- A good place to ambush enemies is the corner to the right of your base's exit. Here you can wait for enemies to come by and burn them to a crisp.
- Another good ambush location is right outside the enemy base, from the top of the staircase.
 Demoman
Offense
- The bush on the lower bridge is useful for hiding a Demoman with the Chargin' Targe or Splendid Screen. Wait until an enemy passes, then charge out and rack up the head counter when using the Eyelander, Nessie's Nine Iron or Horseless Headless Horsemann's Headtaker.
- It is possible to charge with the Chargin' Targe or Splendid Screen from the upper bridge to reach the battlements.
Defense
- The large mounds or piles on the upper bridge can be used by Demomen to place a sticky trap for unsuspecting enemies.
- The Loose Cannon with its knockback is quite effective at pushing enemies off the bridge and allows for good covering fire for an offensive push by your allies.
 Heavy
Heavy
General
- Try to stay off the main bridge, as enemy Snipers often target players there.
- If you cannot avoid this, equipping the Fists of Steel will protect you from enemy Snipers. If you suffer from some damage, you can always hide behind the crates at the mid-point of the main bridge and use a Sandvich.
Offense
- Try to make it into the base in surprising and unexpected ways, such as through the sewers. The best way to do this would be across the lower bridge; just watch out for others trying the same thing.
 Engineer
General
- Putting a Sentry Gun up around the middle bridge area is generally a bad idea as it is far too open and will be destroyed quickly, though putting Level 1 and 2 Sentry Guns in the enemy team's blind spots (at the top of the stairwell coming from below the bridge or behind the crates in the middle of the bridge) can stop Scouts and other fast classes from passing. When doing this, do not upgrade your Sentry Gun to Level 3 as their rockets will reveal the Sentry Gun's location as soon as an enemy passes.
- Skilled Engineers can consider building a Sentry Gun in a location that guards both bridges, such as the ammo drops halfway across the upper bridge, or on the roof of the shed outside the front entrance. Be warned, however, that Sentry Guns here are difficult to establish and are usually destroyed quickly. However, on successful deployment, they can prove difficult to remove.
- Placing a Sentry in the farthest corner of the Courtyard (by some crates across from the Intelligence room) offers you a great vantage point if you Wrangle it as well. It allows you not only to defend several key entrances, such as the sewer entrance and both Intelligence room entrances but gives you a clear shot from the courtyard to the front entrance of your base, allowing you to assist your team with extra firepower.
- A good Sentry placement in the Intelligence room can be quite effective at defending the Intelligence.
- Skilled Engineers can sneak a Teleporter exit in the enemy team's basement sewer.
Offense
- A Sentry Gun can be put up in the enemy sewers in the same way as in 2Fort, allowing your teammates to teleport under the enemy base and readily access their Intelligence room. Be careful though, as there are 3 different ways that the enemy can access the sewers and take out your Sentry Gun (the pipe toward their lower spawn hatch, down the stairwell in the corner, and from the drop in the nearby room).
- You can get on top of the enemy battlements, allowing your teammates to reach there from a Teleporter for an unexpected attack. You can achieve this by stepping onto the battlements, placing a Dispenser onto the far left visible spot of the deck, and hopping onto the Dispenser and then into the battlements. Make sure you return for some metal to build the Sentry Gun, unless you're using the Gunslinger. You can also deploy a Sentry next to the small staircase right beside the main doors of either fort and Sentry Jump onto the battlements with the Wrangler. Be sure you get some metal for a Teleporter exit before making the jump.
- Once the enemy team spots this base, they can easily destroy this base by lugging Grenades and Sticky Bombs from the battlements or from the main bridge where they are out of the Sentry Gun's range. An ideal defense strategy is to use the Wrangler to attack people exploiting the regular range of the Sentry Gun or have a Pyro reflect incoming projectiles.
- By using the Wrangler and Rescue Ranger, an Engineer can easily access the roof of the enemy teams base. The player should first fully upgrade a Sentry Gun and a Teleporter Entrance outside of their spawn. After this, the player should pick up their Sentry and run out to the upper bridge and place it down while enemies are distracted or inattentive. The Wrangler should then be used to allow the Engineer to jump onto the roof by crouch jumping and commanding the Sentry to fire rockets underneath the Engineer. When on top of the roof, use the Rescue Ranger to pick up the Sentry from a distance and place it on the corner of the roof that overlooks the upper bridge as well as the enemy battlements. Afterward, place a Dispenser to gain health and ammo back. Once these steps have been completed, wait until the Dispenser supplies 50 metal, or 25 metal if using the Eureka Effect, to construct the Teleporter Exit.
- Correctly performing this strategy completely shuts down enemy Snipers and forces enemy Soldiers and Demomen to direct all attention to you rather than to their intelligence.
- In order to keep the nest alive for as long as possible, ensure that at all times the Teleporter is front of you. When repairing the Sentry Gun, it is acceptable to run ahead of the Teleporter to make necessary repairs if need be.
- Once the nest has been constructed in its entirety, it is wise to spycheck all players who use your Teleporter.
Defense
- As usual in CTF maps, the Intelligence room is a perfect place for a Sentry Gun. There are multiple places in the room you can use, such as at the top of the stairs, under the stairs, and across the room in the small doorway alcoves. However, each of these areas can be fired at from beyond the Sentry Gun's range from either of the doors to the Intelligence room.
- Conservative Engineers can construct a reasonably effective Sentry Gun at the top of the gantry in the Intelligence room to guard it. Be warned: building on the gantry in the courtyard will allow enemies who walk directly underneath it to get to the Intelligence room untouched.
- Outside the main spawn door, you can also put a Sentry Gun on the edge of the upper level that will overlook the main entrance to the base, stopping any direct charges from the enemy. This spot can be flanked though, from the stairwell that comes from the sewer and also the walkway from the Intelligence room (though this way will almost never be used when the enemy can go directly for the Intelligence).
- Outside the Intelligence room, there is also a large sunken area with a ledge that leads to the Sniper deck. Putting a Sentry here will prevent any Scouts, Soldiers or Demomen from accessing the Intelligence room from the lesser known route (it will also prevent them from running through the Intelligence room and trying to jump to safety).
- It is possible to build a Sentry Gun on top of your battlements, although that's not suggested since enemy Snipers can easily pick off at it. It still will supply some defense against rocket jumping Soldiers and sticky jumping Demomen and enemies going inside your base through the main door.
 Medic
Medic
General
- Your role is no different here. Heal teammates, build your ÜberCharge and use your Über to help teammates destroy strong defenses such as Sentry nests.
- You can arc needles over the blockades on the top bridge to deal minor damage to enemies who are out of reach from regular weapons.
- The Crusader's Crossbow can be used to harass enemies on the Sniper deck on either fort. Take advantage of the fact that it deals increased damage from a greater distance.
- Health pick-ups on this map are widely distributed. Focus on extinguishing burning teammates and healing damaged ones between waves of enemy attackers, rather than maintaining your pocket.
- The most common place to find an enemy Sentry on this map is in the Intelligence room itself. Beware of deploying your ÜberCharge before you reach it, otherwise you risk not being able to provide the support required to destroy it.
 Sniper
General
- You can shoot directly into the enemy courtyard by hanging out of a battlement window.
- As a Sniper, you are very vulnerable when watching the bridges. Use the plentiful amount of scenery to hide from the enemy's sight.
Offense
- Use the Huntsman and the SMG or the Jarate to maximize your close range efficiency. It's better to do this in groups of two or three Snipers, but it can be done with just one if you take the sewer path.
Defense
- One place to wait is directly outside your base, in the back of a grass patch. You can see both the lower and the upper bridges.
- Be careful about sniping from the battlements. Always watch the enemy battlements for enemy Snipers and Soldiers and the occasional Engineer with a Wrangler. Spies may also attack you due to the isolation, so pack Jarate or a Razorback if you feel the need to do so.
- Hiding on the left edge of the battlements protects you from the enemy ones,while retaining the view of their front entrance. Stay here if you're having significant trouble with their harassment.
 Spy
Spy
General
- If crossing the main bridge, you can climb onto the boxes and then onto the truck in order to prevent bumping into enemies.
Offense
- Spies may find the sewer system useful in order to get into the base quickly and without provoking attention. The map also provides many unobtrusive places to hide while cloaked, such as on top of crates and barrels.
- If using the Dead Ringer, try jumping from the bridge and land on the rails to activate the Cloak. Enter the sewers and turn on the first left to hide in the water when uncloaking, then disguise as an enemy class to avoid detection from the enemy Engineers that usually build Sentry Guns close to the stairs, so don't equip the Your Eternal Reward or the Wanga Prick. After grabbing the Intelligence, stay with the Dead Ringer open, in case you encounter any enemies on the way out.
- The lowered area past the Intelligence room is a useful place to decloak before snatching the Intelligence as it is usually empty.
- Remember the hole in the courtyard to the basement. This can be used for a quick getaway, possibly for escaping with the Intelligence.
Defense
- Usually a good place to wait with the Cloak and Dagger is on top of the truck, on the main bridge. From here, wait until a slower class like Soldiers and Heavies come by, then decloak and stab them. Just be careful not to be seen by the enemies on the battlements, and be sure they're the last enemies coming.
- Another good spot to decloak or just wait with the Cloak and Dagger is the small shack outside of the main base entrance. It provides enough cover and allows you to easily anticipate which enemies are approaching from their base, providing ample backstab opportunities.
