Difference between revisions of "Smissmas 2014/nl"
(Created page with "{{trans}} {{hatnote|Voor de grote update van 2010, zie Australian Christmas.}} {{hatnote|Voor de grote update van 2011, zie Australian Christmas 2011.}} {{hatnote|Voor...") |
BrazilianNut (talk | contribs) |
||
| (7 intermediate revisions by 4 users not shown) | |||
| Line 1: | Line 1: | ||
| − | {{trans}} | + | {{update trans}} |
| − | + | ||
| − | {{ | + | {{DISPLAYTITLE:Smissmas 2014}} |
| − | |||
| − | |||
{{patch info|12|22|2014}} | {{patch info|12|22|2014}} | ||
| + | {{Infobox | ||
| + | | title = Smissmas 2014 | ||
| + | | image = Smissmas14 Cup.png | ||
| + | | imagewidth = 380px | ||
| + | }} | ||
{{Quotation | {{Quotation | ||
| '''TF2 Blog''' | | '''TF2 Blog''' | ||
| Line 10: | Line 13: | ||
}} | }} | ||
| − | [[ | + | De '''Smissmas 2014''' update was een [[Patches/nl#MU|grote content]] update voor ''[[Team Fortress 2/nl|Team Fortress 2]]'', gereleased op {{Patch name|12|22|2014}}. Het was een sequel opvolgend op vroegere [[Steam Workshop/nl|community-gemaakte]] updates, op aanvraag van Valve in samenwerking met vele Christmas Workshop inzendingen. |
| − | De | + | De update voegde 28 nieuwe [[Cosmetic items/nl|cosmetische voorwerpen]] met een winter thema en 7 nieuwe [[Festive weapons/nl|Feestelijk wapens]] toe. Het hoogtepunt van de update was een nieuwe [[Mann Co. Beta Maps/nl|beta]] [[List of game modes/nl|speltype]], ''[[Mannpower/nl|Mannpower]]'', samen met twee nieuwe beta maps, [[Foundry (Capture the Flag)/nl|Foundry (verover de vlag)]] en [[Gorge (Capture the Flag)/nl|Gorge (verover de vlag)]]. Veel reeds bestaande [[Demoman/nl|Demoman]] wapens hadden veranderingen in de manier waarop ze functioneerden. Er zijn ook drie gloednieuwe wapens toegevoegd, de ''[[Quickiebomb Launcher/nl|Quickiebomb Launcher]]'', de ''[[Iron Bomber/nl|Iron Bomber]]'', en de ''[[Panic Attack/nl|Panic Attack]]''. |
| − | + | == Toevoegingen == | |
| + | === Mappen === | ||
| + | {{main|List of maps/nl|l1=Lijst van mappen}} | ||
| + | {| class="wikitable" cellpadding=2 style="text-align:center;" | ||
| + | |- style="height: 20px;" | ||
| + | ! class="header" style="background:#6B0000; color:#FFFFFF" | {{common string|Name}} | ||
| + | ! class="header" style="background:#6B0000; color:#FFFFFF" | {{common string|Picture}} | ||
| + | ! class="header" style="background:#6B0000; color:#FFFFFF" | {{common string|Game mode}} | ||
| + | ! class="header" style="background:#6B0000; color:#FFFFFF" | {{common string|File name}} | ||
| + | |- | ||
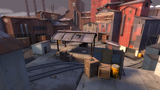
| + | | style="background:#990000;" | '''[[Foundry (Capture the Flag){{if lang}}|<span style="color:#FFF;">Foundry<br/>{{parenthesis|{{gamemode name|Capture the Flag}}}}</span>]]''' | ||
| + | | style="background:#FAE5E5;" | [[File:Ctf_foundry.jpg|160px|link=Foundry (Capture the Flag){{if lang}}]] | ||
| + | | style="background:#FAE5E5;" | '''{{gamemode link|Mannpower}}'''<br>[[File:Backpack Grappling Hook.png|50px|link=Mannpower{{if lang}}]] | ||
| + | | style="background:#FAE5E5;" | {{code|ctf_foundry}} | ||
| + | |- | ||
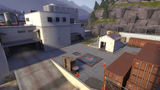
| + | | style="background:#990000;" | '''[[Gorge (Capture the Flag){{if lang}}|<span style="color:#FFF;">Gorge<br/>{{parenthesis|{{gamemode name|Capture the Flag}}}}</span>]]''' | ||
| + | | style="background:#FAE5E5;" | [[File:Ctf gorge.jpg|160px|link=Gorge (Capture the Flag){{if lang}}]] | ||
| + | | style="background:#FAE5E5;" | '''{{gamemode link|Mannpower}}'''<br>[[File:Backpack Grappling Hook.png|50px|link=Mannpower{{if lang}}]] | ||
| + | | style="background:#FAE5E5;" | {{code|ctf_gorge}} | ||
| + | |} | ||
| − | |||
=== Wapens === | === Wapens === | ||
| − | {{main|Weapons}} | + | {{main|Weapons/nl|l1=Wapens}} |
{| class="wikitable" cellpadding=2 style="text-align:center;" | {| class="wikitable" cellpadding=2 style="text-align:center;" | ||
| − | | width=" | + | | width="85px" style="background:#6B0000;" rowspan="2" | '''{{class link|Demoman|br=yes|color=white}}''' |
| − | | | + | | style="background:#990000;" | {{item icon|Iron Bomber|75px}} |
| − | | style="background: #FAE5E5;" | ''' | + | | style="background:#FAE5E5;" | '''{{item link|Iron Bomber}}''' |
| − | |||
| − | |||
| − | |||
|- | |- | ||
| − | | | + | | style="background:#990000;" | {{item icon|Quickiebomb Launcher|75px}} |
| − | + | | style="background:#FAE5E5;" | '''{{item link|Quickiebomb Launcher}}''' | |
| − | |||
|- | |- | ||
| + | | align="left" style="background:#6B0000;" | '''{{class link|Soldier|color=white}}'''<br/>'''{{class link|Pyro|color=white}}'''<br/>'''{{class link|Heavy|color=white}}'''<br/>'''{{class link|Engineer|color=white}}''' | ||
| + | | style="background:#990000;" | {{item icon|Panic Attack|75px}} | ||
| + | | style="background:#FAE5E5;" | '''{{item link|Panic Attack}}''' | ||
|} | |} | ||
| − | === | + | === Feestelijke wapens === |
| − | {{main| | + | {{main|Festive weapons/nl|l1=Feestelijke wapens}} |
{| class="wikitable collapsible" cellpadding="3" style="text-align:center;" | {| class="wikitable collapsible" cellpadding="3" style="text-align:center;" | ||
| − | | width=" | + | | width="85px" style="background:#6B0000;" | '''{{class link|Scout|br=yes|color=white}}''' |
| − | | | + | | style="background:#990000;" | {{item icon|Festive Bonk! Atomic Punch|75px}} |
| − | | style="background: #FAE5E5;"| ''' | + | | style="background:#FAE5E5;" | '''{{item link|Festive Bonk! Atomic Punch}}''' |
|- | |- | ||
| − | | | + | | style="background:#6B0000;" | '''{{class link|Pyro|br=yes|color=white}}''' |
| − | | style="background: #FAE5E5;"| ''' | + | | style="background:#990000;" | {{item icon|Festive Backburner|75px}} |
| + | | style="background:#FAE5E5;" | '''{{item link|Festive Backburner}}''' | ||
|- | |- | ||
| − | | | + | | style="background:#6B0000;" | '''{{class link|Demoman|br=yes|color=white}}''' |
| − | | style="background: #FAE5E5;"| ''' | + | | style="background:#990000;" | {{item icon|Festive Chargin' Targe|75px}} |
| + | | style="background:#FAE5E5;" | '''{{item link|Festive Chargin' Targe}}''' | ||
|- | |- | ||
| − | | | + | | style="background:#6B0000;" | '''{{class link|Medic|br=yes|color=white}}''' |
| − | | style="background: #FAE5E5;"| ''' | + | | style="background:#990000;" | {{item icon|Festive Bonesaw|75px}} |
| + | | style="background:#FAE5E5;" | '''{{item link|Festive Bonesaw}}''' | ||
|- | |- | ||
| − | | | + | | style="background:#6B0000;" | '''{{class link|Sniper|br=yes|color=white}}''' |
| − | | | + | | style="background:#990000;" | {{item icon|Festive SMG|75px}} |
| − | | style="background: #FAE5E5;"| ''' | + | | style="background:#FAE5E5;" | '''{{item link|Festive SMG}}''' |
|- | |- | ||
| − | | | + | | style="background:#6B0000;" | '''{{class link|Spy|br=yes|color=white}}''' |
| − | | | + | | style="background:#990000;" | {{item icon|Festive Revolver|75px}} |
| − | | style="background: #FAE5E5;"| ''' | + | | style="background:#FAE5E5;" | '''{{item link|Festive Revolver}}''' |
|- | |- | ||
| − | | align="center" style="background: #990000;" | {{item icon| | + | | align="left" style="background:#6B0000;" | '''{{class link|Soldier|color=white}}'''<br/>'''{{class link|Pyro|color=white}}'''<br/>'''{{class link|Heavy|color=white}}'''<br/>'''{{class link|Engineer|color=white}}''' |
| − | | style="background: #FAE5E5;"| ''' | + | | style="background:#990000;" | {{item icon|Festive Shotgun|75px}} |
| + | | style="background:#FAE5E5;" | '''{{item link|Festive Shotgun}}''' | ||
| + | |} | ||
| + | |||
| + | === Cosmetische voorwerpen === | ||
| + | {{main|Cosmetic items/nl|l1=Cosmetische voorwerpen}} | ||
| + | {| class="wikitable collapsible" cellpadding="3" style="text-align:center;" | ||
| + | | width="85px" style="background:#6B0000;" rowspan="3" | '''{{class link|Scout|br=yes|color=white}}''' | ||
| + | | style="background:#990000;" | {{item icon|Courtier's Collar|75px}} | ||
| + | | style="background:#FAE5E5;" | '''{{item link|Courtier's Collar}}''' | ||
|- | |- | ||
| − | | | + | | style="background:#990000;" | {{item icon|Harlequin's Hooves|75px}} |
| − | | style="background: #FAE5E5;"| ''' | + | | style="background:#FAE5E5;" | '''{{item link|Harlequin's Hooves}}''' |
|- | |- | ||
| − | | | + | | style="background:#990000;" | {{item icon|Mountebank's Masque|75px}} |
| − | | style="background: #FAE5E5;"| ''' | + | | style="background:#FAE5E5;" | '''{{item link|Mountebank's Masque}}''' |
|- | |- | ||
| − | | | + | | style="background:#6B0000;" | '''{{class link|Soldier|br=yes|color=white}}''' |
| − | | style="background: #FAE5E5;"| ''' | + | | style="background:#990000;" | {{item icon|Skullcap|75px}} |
| + | | style="background:#FAE5E5;" | '''{{item link|Skullcap}}''' | ||
|- | |- | ||
| − | | | + | | style="background:#6B0000;" rowspan="5" | '''{{class link|Pyro|br=yes|color=white}}''' |
| − | | | + | | style="background:#990000;" | {{item icon|Black Knight's Bascinet|75px}} |
| − | | style="background: #FAE5E5;"| ''' | + | | style="background:#FAE5E5;" | '''{{item link|Black Knight's Bascinet}}''' |
|- | |- | ||
| − | | | + | | style="background:#990000;" | {{item icon|Charred Chainmail|75px}} |
| − | | style="background: #FAE5E5;"| ''' | + | | style="background:#FAE5E5;" | '''{{item link|Charred Chainmail}}''' |
|- | |- | ||
| − | | | + | | style="background:#990000;" | {{item icon|Pyromancer's Hood|75px}} |
| − | | style="background: #FAE5E5;"| ''' | + | | style="background:#FAE5E5;" | '''{{item link|Pyromancer's Hood}}''' |
|- | |- | ||
| − | | | + | | style="background:#990000;" | {{item icon|Pyromancer's Raiments|75px}} |
| − | + | | style="background:#FAE5E5;" | '''{{item link|Pyromancer's Raiments}}''' | |
| − | | style="background: #FAE5E5;"| ''' | ||
|- | |- | ||
| − | | | + | | style="background:#990000;" | {{item icon|Torcher's Tabard|75px}} |
| − | | style="background: #FAE5E5;"| ''' | + | | style="background:#FAE5E5;" | '''{{item link|Torcher's Tabard}}''' |
|- | |- | ||
| − | | | + | | style="background:#6B0000;" rowspan="3" | '''{{class link|Demoman|br=yes|color=white}}''' |
| − | | | + | | style="background:#990000;" | {{item icon|Scot Bonnet|75px}} |
| − | | style="background: #FAE5E5;"| ''' | + | | style="background:#FAE5E5;" | '''{{item link|Scot Bonnet}}''' |
|- | |- | ||
| − | | | + | | style="background:#990000;" | {{item icon|Storm Stompers|75px}} |
| − | | style="background: #FAE5E5;"| ''' | + | | style="background:#FAE5E5;" | '''{{item link|Storm Stompers}}''' |
|- | |- | ||
| − | | | + | | style="background:#990000;" | {{item icon|Valhalla Helm|75px}} |
| − | | style="background: #FAE5E5;"| ''' | + | | style="background:#FAE5E5;" | '''{{item link|Valhalla Helm}}''' |
|- | |- | ||
| − | | | + | | style="background:#6B0000;" rowspan="2" | '''{{class link|Heavy|br=yes|color=white}}''' |
| − | | style="background: #FAE5E5;"| ''' | + | | style="background:#990000;" | {{item icon|Old Man Frost|75px}} |
| + | | style="background:#FAE5E5;" | '''{{item link|Old Man Frost}}''' | ||
|- | |- | ||
| − | | | + | | style="background:#990000;" | {{item icon|Siberian Facehugger|75px}} |
| − | | style="background: #FAE5E5;"| ''' | + | | style="background:#FAE5E5;" | '''{{item link|Siberian Facehugger}}''' |
|- | |- | ||
| − | | | + | | style="background:#6B0000;" rowspan="5" | '''{{class link|Engineer|br=yes|color=white}}''' |
| − | | | + | | style="background:#990000;" | {{item icon|Clubsy The Seal|75px}} |
| − | | style="background: #FAE5E5;"| ''' | + | | style="background:#FAE5E5;" | '''{{item link|Clubsy The Seal}}''' |
|- | |- | ||
| − | | | + | | style="background:#990000;" | {{item icon|Conagher's Combover|75px}} |
| − | | style="background: #FAE5E5;"| ''' | + | | style="background:#FAE5E5;" | '''{{item link|Conagher's Combover}}''' |
|- | |- | ||
| − | | | + | | style="background:#990000;" | {{item icon|Cop Caller|75px}} |
| − | + | | style="background:#FAE5E5;" | '''{{item link|Cop Caller}}''' | |
| − | | style="background: #FAE5E5;"| ''' | ||
|- | |- | ||
| − | | | + | | style="background:#990000;" | {{item icon|Holstered Heaters|75px}} |
| − | | style="background: #FAE5E5;"| ''' | + | | style="background:#FAE5E5;" | '''{{item link|Holstered Heaters}}''' |
|- | |- | ||
| − | | | + | | style="background:#990000;" | {{item icon|Thermal Insulation Layer|75px}} |
| − | | style="background: #FAE5E5;"| ''' | + | | style="background:#FAE5E5;" | '''{{item link|Thermal Insulation Layer}}''' |
|- | |- | ||
| − | | | + | | style="background:#6B0000;" rowspan="2" | '''{{class link|Medic|br=yes|color=white}}''' |
| − | | style="background: #FAE5E5;"| ''' | + | | style="background:#990000;" | {{item icon|Surgeon's Shako|75px}} |
| + | | style="background:#FAE5E5;" | '''{{item link|Surgeon's Shako}}''' | ||
|- | |- | ||
| − | | | + | | style="background:#990000;" | {{item icon|Unknown Mann|75px}} |
| − | + | | style="background:#FAE5E5;" | '''{{item link|Unknown Mann}}''' | |
| − | | style="background: #FAE5E5;"| ''' | ||
|- | |- | ||
| − | | | + | | style="background:#6B0000;" rowspan="4" | '''{{class link|Sniper|br=yes|color=white}}''' |
| − | | style="background: #FAE5E5;"| ''' | + | | style="background:#990000;" | {{item icon|Bushman's Bristles|75px}} |
| + | | style="background:#FAE5E5;" | '''{{item link|Bushman's Bristles}}''' | ||
|- | |- | ||
| − | | | + | | style="background:#990000;" | {{item icon|Marksman's Mohair|75px}} |
| − | | style="background: #FAE5E5;"| ''' | + | | style="background:#FAE5E5;" | '''{{item link|Marksman's Mohair}}''' |
|- | |- | ||
| − | | | + | | style="background:#990000;" | {{item icon|Professional's Ushanka|75px}} |
| − | + | | style="background:#FAE5E5;" | '''{{item link|Professional's Ushanka}}''' | |
| − | |||
| − | |||
| − | |||
| − | |||
| − | |||
| − | | style="background: #FAE5E5;"| ''' | ||
|- | |- | ||
| − | | | + | | style="background:#990000;" | {{item icon|Wally Pocket|75px}} |
| − | + | | style="background:#FAE5E5;" | '''{{item link|Wally Pocket}}''' | |
| − | | style="background: #FAE5E5;"| ''' | ||
|- | |- | ||
| − | | | + | | style="background:#6B0000;" rowspan="3" | '''{{class link|Spy|br=yes|color=white}}''' |
| − | | | + | | style="background:#990000;" | {{item icon|Pocket Momma|75px}} |
| − | | style="background: #FAE5E5;"| ''' | + | | style="background:#FAE5E5;" | '''{{item link|Pocket Momma}}''' |
|- | |- | ||
| − | | | + | | style="background:#990000;" | {{item icon|Puffy Provocateur|75px}} |
| − | + | | style="background:#FAE5E5;" | '''{{item link|Puffy Provocateur}}''' | |
| − | | style="background: #FAE5E5;"| ''' | ||
|- | |- | ||
| − | | | + | | style="background:#990000;" | {{item icon|Stealthy Scarf|75px}} |
| − | + | | style="background:#FAE5E5;" | '''{{item link|Stealthy Scarf}}''' | |
| − | | style="background: #FAE5E5;"| ''' | ||
| − | |||
| − | |||
| − | |||
| − | |||
| − | |||
| − | |||
| − | |||
| − | |||
|- | |- | ||
| + | | style="background:#6B0000;" | '''{{class link|All Classes|br=yes|color=white}}''' | ||
| + | | style="background:#990000;" | {{item icon|Co-Pilot|75px}} | ||
| + | | style="background:#FAE5E5;" | '''{{item link|Co-Pilot}}''' | ||
|} | |} | ||
| Line 170: | Line 189: | ||
{{main|Tools}} | {{main|Tools}} | ||
{| class="wikitable collapsible" cellpadding="3" style="text-align:center;" | {| class="wikitable collapsible" cellpadding="3" style="text-align:center;" | ||
| − | | | + | | style="background:#6B0000;" | {{Icon item|Naughty Winter Crate Key 2014|75px}} |
| − | | | + | | style="background:#990000;" | '''[[Naughty Winter Crate Key 2014{{if lang}}|<font color="white">{{item name|Naughty Winter Crate Key 2014}}]]''' |
| − | | style="background: #FAE5E5;" | + | | style="background:#FAE5E5;" align="left" | Wordt gebruikt om een [[Naughty Winter Crate 2014/nl|Naughty Winter Crate 2014]] te openen. Deze sleutel kan geen nice crates opendoen. Na 2/16/2015 veranderd deze sleutel in een normale sleutel. |
| − | |||
| − | |||
| − | |||
| − | | | ||
|- | |- | ||
| + | | style="background:#6B0000;" | {{Icon item|Nice Winter Crate Key 2014|75px}} | ||
| + | | style="background:#990000;" | '''[[Nice Winter Crate Key 2014{{if lang}}|<font color="white">{{item name|Nice Winter Crate Key 2014}}]]''' | ||
| + | | style="background:#FAE5E5;" align="left" | Wordt gebruikt om een [[Nice Winter Crate 2014/nl|Nice Winter Crate 2014]] te openen. Deze sleutel kan geen naughty crates openen. Na 2/16/2015 veranderd deze sleutel in een normale sleutel. | ||
|} | |} | ||
| − | === | + | === Actievoorwerpen === |
| − | {| class="wikitable" cellpadding=2 style="text-align:center;" | + | {{main|Action items/nl|l1=Actievoorwerpen}} |
| − | | | + | {| class="wikitable collapsible" cellpadding=2 style="text-align:center;" |
| − | + | | width="85px" style="background: #990000;" | {{Icon item|Grappling Hook|75px}} | |
| − | + | | style="background:#FAE5E5;" | '''{{item link|Grappling Hook}}''' | |
| − | |||
| − | |||
| − | |||
| − | |||
| − | | | ||
| − | |style="background | ||
| − | |||
| − | |||
| − | |||
| − | |||
| − | |||
| − | |||
|} | |} | ||
=== Wapen tweaks === | === Wapen tweaks === | ||
{| class="wikitable" | {| class="wikitable" | ||
| − | ! style="background: #6B0000;" class="header" | <span style="color: white;"> | + | ! style="background:#6B0000;" class="header" | <span style="color:white;">Klasse</span> |
| − | ! style="background: #6B0000;" class="header" | <span style="color: white;"> | + | ! style="background:#6B0000;" class="header" | <span style="color:white;">Wapen</span> |
| − | ! style="background: #6B0000;" class="header" | <span style="color: white;"> | + | ! style="background:#6B0000;" class="header" | <span style="color:white;">Veranderingen</span> |
|- | |- | ||
| − | ! style="background: #990000;" rowspan=20 | {{ | + | ! width="85px" style="background:#990000;" rowspan=20 | {{class link|Demoman|br=yes|color=white}} |
! style="background: #FAE5E5;" rowspan=2 | All explosive primary<br>and secondary weapons | ! style="background: #FAE5E5;" rowspan=2 | All explosive primary<br>and secondary weapons | ||
|- | |- | ||
| − | | {{c|+| | + | | {{c|+|Veranderd:}} Verschil in schade gedaan bij granaten en stickybombs verminderd van +/- 10% schade naar +/-2%.<br> |
| − | {{c|-| | + | {{c|-|Veranderd:}} Granaten en stickybombs hebben nu dezelfde radius als een raket. Verandert van 159Hu naar 146Hu. |
|- | |- | ||
! style="background: #FAE5E5;" rowspan=2 | {{Icon item|Grenade Launcher|icon-size=75px}} <br /> [[Grenade Launcher]] | ! style="background: #FAE5E5;" rowspan=2 | {{Icon item|Grenade Launcher|icon-size=75px}} <br /> [[Grenade Launcher]] | ||
|- | |- | ||
| − | | {{c|+| | + | | {{c|+|Veranderd:}} {{botignore|Direct hit}} Granaten doen nu volle schaden aan de vijand en negeren waar de granaat het doelwit raakt. Vroeger zou een granaat alleen een kans hebben om volle schaden aan te richten als men op de voeten van de vijand richte. |
|- | |- | ||
! style="background: #FAE5E5;" rowspan=2 | {{Icon item|Stickybomb Launcher|icon-size=75px}} <br /> [[Stickybomb Launcher]] | ! style="background: #FAE5E5;" rowspan=2 | {{Icon item|Stickybomb Launcher|icon-size=75px}} <br /> [[Stickybomb Launcher]] | ||
|- | |- | ||
| − | | {{c|-| | + | | {{c|-|Veranderd:}} Stickybombs dat in de lucht ontploffen krijgen nu een grotere explosie naarmate de stickybomb langer vliegt, beginnend bij 85% bij standaard afsteltijd (0.8s) en gaat terug naar 100% bij een duur van 2 seconden . Stickybombs dat de wereld aanraken hebben nog steeds volle radius.<br> |
| − | {{c|+| | + | {{c|+|Veranderd:}} Stickybombs hebben een meer zichtbare trail tijdens het vliegen door de lucht.<br> |
| − | {{c|+| | + | {{c|+|Veranderd:}} Stickybomb afstel deeltjes zijn iets meer zichtbaar. |
|- | |- | ||
! style="background: #FAE5E5;" rowspan=2 | {{Icon item|Loose Cannon|icon-size=75px}} <br /> [[Loose Cannon]] | ! style="background: #FAE5E5;" rowspan=2 | {{Icon item|Loose Cannon|icon-size=75px}} <br /> [[Loose Cannon]] | ||
|- | |- | ||
| − | | {{c|+| | + | | {{c|+|Veranderd:}} Double donk explosie schade doet nu volle radius schade. Hiervoor was de double donk explosie schade verminderd door de afstand van de explosie.<br> |
| − | {{c|+| | + | {{c|+|Verwijderd:}} het verwijderen van een geheim nadeel waarbij kannonkogels die de wereld raakte 50% minder schade zouden doen bovenop de normale schadevermindering bij het raken van de wereld . |
|- | |- | ||
! style="background: #FAE5E5;" rowspan=2 | {{Icon item|Loch-n-Load|icon-size=75px}} <br /> [[Loch-n-Load]] | ! style="background: #FAE5E5;" rowspan=2 | {{Icon item|Loch-n-Load|icon-size=75px}} <br /> [[Loch-n-Load]] | ||
|- | |- | ||
| − | | {{c|=| | + | | {{c|=|Veranderd:}} Door aanpassingen in schadeverschil bij granaten kan een Loch-n-Load maximaal nog maar 124 schade toebrengen.<br> |
| − | {{c|+| | + | {{c|+|Verwijderd:}} verwijderen van de 25% extra schade aan zichzelf.<br> |
| − | {{c|-| | + | {{c|-|Toegevoegd:}} toevoeging van 25% minder explosie radius.<br> |
| − | {{c|+| | + | {{c|+|Veranderd:}} veranderen van het nadeel van magazijngrote naar -25% (3 granaten per clip) van -50% (2 granaten per clip).<br> |
| − | {{c|=| | + | {{c|=|Veranderd:}} Loch-n-Load granaten draaien niet meer zichtbaar wanneer ze in de lucht zijn. |
|- | |- | ||
| − | ! style="background: #FAE5E5;" rowspan=2 | {{Icon item|Ali Baba's Wee Booties|icon-size=75px}} <br /> [[Ali Baba's Wee Booties]] <br /> {{Icon item|Bootlegger|icon-size=75px}} <br /> [[Bootlegger]] | + | ! style="background: #FAE5E5;" rowspan=2 | {{Icon item|Ali Baba's Wee Booties|icon-size=75px}} <br /> [[Ali Baba's Wee Booties/nl|Ali Baba's Wee Booties]] <br /> {{Icon item|Bootlegger|icon-size=75px}} <br /> [[Bootlegger/nl|Bootlegger]] |
|- | |- | ||
| − | | {{c|+| | + | | {{c|+|Toegevoegd:}} vullen van +25% van de charge meter bij het halen van een chargekill tijdens het dragen van dit item. |
|- | |- | ||
! style="background: #FAE5E5;" rowspan=2 | {{Icon item|Tide Turner|icon-size=75px}} <br /> [[Tide Turner]] | ! style="background: #FAE5E5;" rowspan=2 | {{Icon item|Tide Turner|icon-size=75px}} <br /> [[Tide Turner]] | ||
|- | |- | ||
| − | | {{c|-| | + | | {{c|-|Toegevoegd:}} Toevoegen van nadeel: het nemen van schade verminderd de duur van een charge.<br> |
| − | {{c|-| | + | {{c|-|Verminderd:}} Een kill halen met dit wapen levert nu nog maar 75% charge op in de plaats van 100%. |
|- | |- | ||
! style="background: #FAE5E5;" rowspan=2 | {{Icon item|Scottish Resistance|icon-size=75px}} <br /> [[Scottish Resistance]] | ! style="background: #FAE5E5;" rowspan=2 | {{Icon item|Scottish Resistance|icon-size=75px}} <br /> [[Scottish Resistance]] | ||
|- | |- | ||
| − | | {{c|+| | + | | {{c|+|Veranderd:}} Het is nu iets makkelijker om een stickysprong te doen met de Scottish Resistance. Toegevoegde afstandcontrole voor stickybomb sprongen naar sticky schade radius tot 146 van 100. |
|- | |- | ||
! style="background: #FAE5E5;" rowspan=2 | {{Icon item|Scotsman's Skullcutter|icon-size=75px}} <br /> [[Scotsman's Skullcutter]] | ! style="background: #FAE5E5;" rowspan=2 | {{Icon item|Scotsman's Skullcutter|icon-size=75px}} <br /> [[Scotsman's Skullcutter]] | ||
|- | |- | ||
| − | | {{c|+| | + | | {{c|+|Veranderd:}} Bewegingssnelheid nadeel is alleen aanwezig bij het actief gebruiken van het wapen. |
|- | |- | ||
! style="background: #FAE5E5;" rowspan=2 | {{Icon item|Claidheamh Mòr|icon-size=75px}} <br /> [[Claidheamh Mòr]] | ! style="background: #FAE5E5;" rowspan=2 | {{Icon item|Claidheamh Mòr|icon-size=75px}} <br /> [[Claidheamh Mòr]] | ||
|- | |- | ||
| − | | {{c|+| | + | | {{c|+|Toegevoegd:}} Toevoegen van het vullen van 25% van de charge meter bij het halen van een chargekill. |
| − | |||
|} | |} | ||
| − | == | + | == Galerij == |
<gallery> | <gallery> | ||
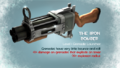
| − | File:S14 Panic Attack blog.png| | + | File:S14 Panic Attack blog.png|Het nieuw wapen de ''[[Panic Attack/nl|Panic Attack]]'' op de [[TF2 Official Website#Blog|TF2 Blog]]. |
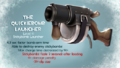
| − | File:S14 Quickiebomb Launcher blog.png| | + | File:S14 Quickiebomb Launcher blog.png|Het nieuw wapen de ''[[Quickiebomb Launcher/nl|Quickiebomb Launcher]]'' op de TF2 Blog. |
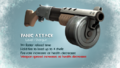
| − | File:S14 Iron Bomber blog.png| | + | File:S14 Iron Bomber blog.png|Het nieuwe wapen de ''[[Iron Bomber/nl|Iron Bomber]]'' op de TF2 Blog. |
</gallery> | </gallery> | ||
== Externe links == | == Externe links == | ||
| − | * [ | + | * [https://www.teamfortress.com/post.php?id=15304 Merry Smissmas, Everyone!] {{lang icon|en}} |
{{Smissmas 2014 Nav}} | {{Smissmas 2014 Nav}} | ||
| − | {{ | + | {{Smissmas Events Nav}} |
| − | + | {{Major Updates Nav}} | |
| − | |||
| − | |||
Latest revision as of 00:09, 22 January 2025
| Deze vertaling heeft een update nodig. Je kan helpen deze pagina te verbeteren door door hem te bewerken met inhoud van Smissmas 2014 (bron bekijken). Zie ook Help:Language translation. |
|

| “ | Smissmas is bijna hier, en iedereen hier bij het tf2 team is druk bezig met het verzamelen van cadeaus en in groep onder Valve's maretak proberen te staan. De zoenenteller staat momenteel nog op nul, maar we zijn hier om te blijven. Dat is juist, we zullen hier de hele week blijven staan als we weten dat er een kans is om te kussen. Probeer maar langs ons te gaan, DOTA2 team. Jij ook, CS:GO.
— TF2 Blog
|
” |
De Smissmas 2014 update was een grote content update voor Team Fortress 2, gereleased op 22 december 2014-patch. Het was een sequel opvolgend op vroegere community-gemaakte updates, op aanvraag van Valve in samenwerking met vele Christmas Workshop inzendingen.
De update voegde 28 nieuwe cosmetische voorwerpen met een winter thema en 7 nieuwe Feestelijk wapens toe. Het hoogtepunt van de update was een nieuwe beta speltype, Mannpower, samen met twee nieuwe beta maps, Foundry (verover de vlag) en Gorge (verover de vlag). Veel reeds bestaande Demoman wapens hadden veranderingen in de manier waarop ze functioneerden. Er zijn ook drie gloednieuwe wapens toegevoegd, de Quickiebomb Launcher, de Iron Bomber, en de Panic Attack.
Inhoud
Toevoegingen
Mappen
| Naam | Afbeelding | Spelmodus | Bestandsnaam |
|---|---|---|---|
| Foundry (Verover de vlag) |
|
Mannpower
|
ctf_foundry
|
| Gorge (Verover de vlag) |
|
Mannpower
|
ctf_gorge
|
Wapens
| IJzeren Bommenwerper | ||
| Bliksemse Bommenwerper | ||
| Paniekaanval |
Feestelijke wapens
| Feestelijke Bonk! Atomic Punch | ||
| Feestelijke Rugbrander | ||
| Feestelijk Stormend Schild | ||
| Feestelijke Bottenzaag | ||
| Feestelijke SMG | ||
| Feestelijke Revolver | ||
| Feestelijke Shotgun |
Cosmetische voorwerpen
gereedschappen
| Stoute Winterkratsleutel 2014 | Wordt gebruikt om een Naughty Winter Crate 2014 te openen. Deze sleutel kan geen nice crates opendoen. Na 2/16/2015 veranderd deze sleutel in een normale sleutel. | |
| Goede Winterkratsleutel 2014 | Wordt gebruikt om een Nice Winter Crate 2014 te openen. Deze sleutel kan geen naughty crates openen. Na 2/16/2015 veranderd deze sleutel in een normale sleutel. |
Actievoorwerpen
| Grijphaak |
Wapen tweaks
| Klasse | Wapen | Veranderingen |
|---|---|---|
| All explosive primary and secondary weapons | ||
| ||
Grenade Launcher | ||
Stickybomb Launcher | ||
| ||
Loose Cannon | ||
| ||
Loch-n-Load | ||
| ||
Ali Baba's Wee Booties Bootlegger | ||
Tide Turner | ||
| ||
Scottish Resistance | ||
Scotsman's Skullcutter | ||
Claidheamh Mòr | ||
Galerij
Het nieuw wapen de Panic Attack op de TF2 Blog.
Het nieuw wapen de Quickiebomb Launcher op de TF2 Blog.
Het nieuwe wapen de Iron Bomber op de TF2 Blog.


Externe links
- Merry Smissmas, Everyone! (Engels)
| |||||
| ||||||||||||||||||||||||||||||||||||||||||||||||||||||||||||||||||||||||||||||||||||||||||||||||||