Difference between revisions of "Community Badlands (Arena) strategy"
m (Added some missing class links.) |
m (Auto: Sync Map infobox) |
||
| (7 intermediate revisions by 2 users not shown) | |||
| Line 1: | Line 1: | ||
| − | {{ | + | {{community strategy stub|Expand the "General Strategy" section to cover map locations in more detail. Potentially look at the class-specific strategies as well.}} |
{{Map infobox | {{Map infobox | ||
| − | | map-name | + | | map-strategy = yes |
| − | | game-type=Arena | + | | map-status = official |
| − | | file-name=arena_badlands | + | | map-name = Badlands (Arena) |
| − | | map-image=arenabadlands.jpg | + | | map-game-type = Arena |
| − | | map- | + | | map-file-name = arena_badlands |
| − | | map-ammo | + | | map-image = arenabadlands.jpg |
| − | | map-ammo | + | | map-released = {{Patch name|8|19|2008}} |
| + | | map-released-major = Heavy Update | ||
| + | | map-environment = Desert | ||
| + | | map-setting = Dusk, overcast | ||
| + | | map-has-deep-water = yes | ||
| + | | map-has-pyrovision = yes | ||
| + | | map-pickups-ammo-small = 2 | ||
| + | | map-pickups-ammo-medium = 4 | ||
| + | | map-pickups-ammo-large = 2 | ||
}} | }} | ||
| + | |||
| + | {{hatnote|This article is about strategy specific to the [[Arena]] variant of Badlands. For strategy specific to the [[Control Point (game mode)|Control Point]] variant, see [[Community Badlands (Control Point) strategy]]. For strategy specific to the [[King of the Hill]] variant, see [[Community Badlands (King of the Hill) strategy]].}} | ||
| + | |||
| + | This article is about '''Community Badlands (Arena) strategy'''. | ||
| + | |||
| + | '''Note''': It is recommended to read the main [[Badlands (Arena)]] article first to become familiar with the names of key map locations used in this article. | ||
{{TOC limit|3}} | {{TOC limit|3}} | ||
| Line 68: | Line 82: | ||
* Spray damage will be high in the open areas. Try to stay out of choke points. | * Spray damage will be high in the open areas. Try to stay out of choke points. | ||
* Getting on top of the crates will let you pick off weak enemies with your [[Revolver]] while not letting them get easy hits on you. | * Getting on top of the crates will let you pick off weak enemies with your [[Revolver]] while not letting them get easy hits on you. | ||
| − | |||
{{Map strategy}} | {{Map strategy}} | ||
Latest revision as of 19:15, 20 January 2024
| “Sun Tzu's got nothing on us!” This article is a Community strategy stub. As such, it is not complete. You can help the Team Fortress Wiki Community Strategy Project by expanding it. Notes: Expand the "General Strategy" section to cover map locations in more detail. Potentially look at the class-specific strategies as well. |
| Badlands (Arena) | |
|---|---|

| |
| Basic Information | |
| Map type: | Arena |
| File name: | arena_badlands
|
| Released: | August 19, 2008 Patch (Heavy Update) |
| Variants: | Control Point and King of the Hill |
| Developer(s): | Valve |
| Map Info | |
| Environment: | Desert |
| Setting: | Dusk, overcast |
| Deep Water: | Yes |
| Pyrovision Support: | Yes |
| Map Items | |
| Map Photos | |
| Map Overview | |
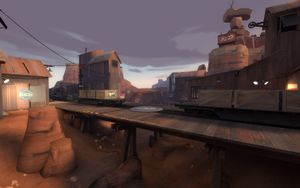
This article is about strategy specific to the Arena variant of Badlands. For strategy specific to the Control Point variant, see Community Badlands (Control Point) strategy. For strategy specific to the King of the Hill variant, see Community Badlands (King of the Hill) strategy.
This article is about Community Badlands (Arena) strategy.
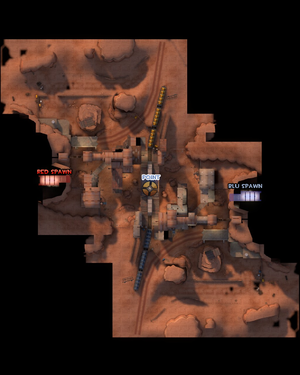
Note: It is recommended to read the main Badlands (Arena) article first to become familiar with the names of key map locations used in this article.
General strategy
- Unlike the other versions of Badlands, the Arena version has water, located under the small bridges by the spires. If you are on fire or are covered in Mad Milk or Jarate, and a Medic is nowhere to be seen, this area should be the first place you go to as burn damage can severely cripple your chances of winning.
- Firing on enemy choke points is an effective way to deal damage on this map. Even if no enemies are killed, they will be likely be heavily weakened. Try to aim for Medics like in most Arena maps.
Class-specific strategy
 Scout
Scout
- The Scout's extra speed allows him to quickly run behind the enemy team by running under the bridge.
- The house is a very tight area, crippling the Scout's ability to dodge enemy fire. It is not advisable to enter the house if the enemy team is in it.
 Soldier
- The crates by the control point can be used to gain a minor height advantage. This will allow you to get the maximum amount of damage on the enemy.
- Rocket jumping costs a significant portion of the Soldier's health and should be avoided unless Medics or Dispensers are available.
- If rocket jumping, use the Gunboats over other secondary weapons as backwards rocket jumping is very useful for covering long distances.
- It would be more advisable to use the Shotgun if there are friendly Medics or Dispensers available so you can pick off weakened enemies.
 Pyro
Pyro
- Badlands has many open spaces that allow long-ranged classes to harass Pyros very effectively. Scouts are particularly dangerous.
- The Axtinguisher/Postal Pummeler allows Pyros to make fast, clean kills without taking much damage.
- The First Blood crit boost effect significantly extends the effective range of the Shotgun.
- Try going around the House and in the side entrance to get the drop on the enemy from behind. This method is even more effective with the Degreaser and the Axtinguisher as you can quickly eliminate enemies.
- The Flare Gun can be effective because of the wide open spaces in the central area.
- Aiming the Flare Gun at the enemies' House can ignite an opponent.
 Demoman
- Sticky traps can be placed on the left side of the enemy house to thwart incoming enemies that have opted not to pass through the house.
- Enemies coming out of the valley across the bridge from the house have a lot of cover to hide their approach, but well-placed stickies will make their stay a short one. Place your traps around the numerous corners and ensure your distribution can take out weakened enemies running back to their spawn in search of a Medic or Dispenser.
- Stickyjumps can be utilized effectively on this map. If done correctly, a single Stickyjump will propel a Demoman across the entirety of the primary battle area.
- A Demoman with the First Blood buff can easily wipe out the majority of the enemy team. Stickyjump quickly to the enemy house and score a kill before proceeding to wreak havoc on the team with your Critical Stickies while they are still bunched together. The key to this strategy lies in making it to the other team before they have a chance to spread out.
- Use your Grenade Launcher to flush out weakened enemies hiding in the houses or behind the train cars on the bridge, ideally forcing them into an Ambush.
 Heavy
Heavy
- The Sandvich is very valuable in Badlands, because there are no health pickups.
- Drop your Sandvich for your Medic if he's on fire or has low health.
- The bridge is small enough that the Minigun will kill any opposing players extremely quickly. However, the crates provide excellent cover for enemies to hide behind.
- The bridge is extremely exposed to any enemy Snipers in the valley.
- Going to the opposing spawn early on in the round may be advantageous. Make sure not to take a route going near the bridge, as the element of surprise may be lost if you are seen crossing the bridge. With this route you will be able to destroy the un-upgraded Engineer buildings, but be sure to bring a Medic and a Sandvich in case you're noticed.
 Engineer
- A Sentry Gun in the house pointed through the window onto the point effectively keeps the enemy team off the point. The nearby ammunition supplies make this location easy to setup at.
- Try to upgrade your sentry to level three before moving the sentry to the ledge.
- Dispensers placed in the building by spawn or in the house provide your teammates with a safe place to heal and to restock on ammunition.
 Medic
Medic
- Medics are essential on this map due to the lack of health pickups.
- Badlands is a particularly large arena map, which means that there is plenty of space to hide in. The Medic's regeneration is invaluable on this health-starved map.
 Sniper
- Snipers on the bridge and at either end of the valley can see most of the map and can pick off enemies with ease.
- Snipers have an almost unique ability in the late game to deal with turtling Engineers. They can kill the Engineer without ever coming within Sentry Gun range. However, the Wrangler does give the Engineer an effective way to fight back.
 Spy
Spy
- At the start of a round, if you go under the bridge, you'll have an advantage to backstab anyone leaving the House.
- Take care in the tight confines of the buildings, as it is quite easy to bump into an enemy and blow your cover.
- Spray damage will be high in the open areas. Try to stay out of choke points.
- Getting on top of the crates will let you pick off weak enemies with your Revolver while not letting them get easy hits on you.

