Difference between revisions of "Scream Fortress 2014/es"
(→Adiciones: Traducidos parte de los objetos) |
(→Sets de disfraces) |
||
| Line 183: | Line 183: | ||
|} | |} | ||
| − | === Sets de | + | === Sets de disfraces === |
{| class="wikitable collapsible" cellpadding="2" style="text-align:center;" | {| class="wikitable collapsible" cellpadding="2" style="text-align:center;" | ||
| width="70px" style="background:#6A5587;" rowspan="6" | {{icon class|Scout}}<br/>'''[[Scout{{if lang}}|<span style="color:#FFF;">{{class name|scout}}</span>]]''' | | width="70px" style="background:#6A5587;" rowspan="6" | {{icon class|Scout}}<br/>'''[[Scout{{if lang}}|<span style="color:#FFF;">{{class name|scout}}</span>]]''' | ||
| − | | style="background:#E8E2F0;" rowspan="3" |'''[[The Deep-Fried Dummy]]'''<br/> | + | | style="background:#E8E2F0;" rowspan="3" |'''[[The Deep-Fried Dummy/es|El Pelele Frito]]'''<br/> |
| align="center" style="background:#AD9DC3;" | {{icon item|Nugget Noggin|75px}} | | align="center" style="background:#AD9DC3;" | {{icon item|Nugget Noggin|75px}} | ||
| − | | style="background:#F1ECF7;" | '''[[Nugget Noggin]]''' | + | | style="background:#F1ECF7;" | '''[[Nugget Noggin/es|El Cabezapollo]]''' |
|- | |- | ||
| align="center" style="background:#AD9DC3;" | {{icon item|Fowl Fists|75px}} | | align="center" style="background:#AD9DC3;" | {{icon item|Fowl Fists|75px}} | ||
| − | | style="background:#F1ECF7;" | '''[[Fowl Fists]]''' | + | | style="background:#F1ECF7;" | '''[[Fowl Fists/es|Los Puños Aviares]]''' |
|- | |- | ||
| align="center" style="background:#AD9DC3;" | {{icon item|Talon Trotters|75px}} | | align="center" style="background:#AD9DC3;" | {{icon item|Talon Trotters|75px}} | ||
| − | | style="background:#F1ECF7;" | '''[[Talon Trotters]]''' | + | | style="background:#F1ECF7;" | '''[[Talon Trotters/es|Las Patas de Gallo]]''' |
|- | |- | ||
| − | | style="background:#E8E2F0;" rowspan="3" |'''[[The Rooftop Rebel]]'''<br/> | + | | style="background:#E8E2F0;" rowspan="3" |'''[[The Rooftop Rebel/es|El Rebelde de la Azotea]]'''<br/> |
| align="center" style="background:#AD9DC3;" | {{icon item|Head Hunter|75px}} | | align="center" style="background:#AD9DC3;" | {{icon item|Head Hunter|75px}} | ||
| − | | style="background:#F1ECF7;" | '''[[Head Hunter]]''' | + | | style="background:#F1ECF7;" | '''[[Head Hunter/es|El Cazador de Cabezas]]''' |
|- | |- | ||
| align="center" style="background:#AD9DC3;" | {{icon item|Claws And Infect|75px}} | | align="center" style="background:#AD9DC3;" | {{icon item|Claws And Infect|75px}} | ||
| − | | style="background:#F1ECF7;" | '''[[Claws And Infect]]''' | + | | style="background:#F1ECF7;" | '''[[Claws And Infect/es|Las Zarpas Infectadas]]''' |
|- | |- | ||
| align="center" style="background:#AD9DC3;" | {{icon item|Crazy Legs|75px}} | | align="center" style="background:#AD9DC3;" | {{icon item|Crazy Legs|75px}} | ||
| − | | style="background:#F1ECF7;" | '''[[Crazy Legs]]''' | + | | style="background:#F1ECF7;" | '''[[Crazy Legs/es|Las Piernas Locas]]''' |
|- | |- | ||
| width="70px" style="background:#6A5587;" rowspan="3" | {{icon class|Soldier}}<br/>'''[[Soldier{{if lang}}|<span style="color:#FFF;">{{class name|soldier}}</span>]]''' | | width="70px" style="background:#6A5587;" rowspan="3" | {{icon class|Soldier}}<br/>'''[[Soldier{{if lang}}|<span style="color:#FFF;">{{class name|soldier}}</span>]]''' | ||
| − | | style="background:#E8E2F0;" rowspan="3" |'''[[The Sgt. Helsing]]'''<br/> | + | | style="background:#E8E2F0;" rowspan="3" |'''[[The Sgt. Helsing/es|El Sargento Helsing]]'''<br/> |
| align="center" style="background:#AD9DC3;" | {{icon item|Hellhunter's Headpiece|75px}} | | align="center" style="background:#AD9DC3;" | {{icon item|Hellhunter's Headpiece|75px}} | ||
| − | | style="background:#F1ECF7;" | '''[[Hellhunter's Headpiece]]''' | + | | style="background:#F1ECF7;" | '''[[Hellhunter's Headpiece/es|El Tocado del Cazador del Infierno]]''' |
|- | |- | ||
| align="center" style="background:#AD9DC3;" | {{icon item|Supernatural Stalker|75px}} | | align="center" style="background:#AD9DC3;" | {{icon item|Supernatural Stalker|75px}} | ||
| − | | style="background:#F1ECF7;" | '''[[Supernatural Stalker]]''' | + | | style="background:#F1ECF7;" | '''[[Supernatural Stalker/es|El Acechador Sobrenatural]]''' |
|- | |- | ||
| align="center" style="background:#AD9DC3;" | {{icon item|Ghoul Gibbin' Gear|75px}} | | align="center" style="background:#AD9DC3;" | {{icon item|Ghoul Gibbin' Gear|75px}} | ||
| − | | style="background:#F1ECF7;" | '''[[Ghoul Gibbin' Gear]]''' | + | | style="background:#F1ECF7;" | '''[[Ghoul Gibbin' Gear/es|El Equipamiento Antidemonios]]''' |
|- | |- | ||
| width="70px" style="background:#6A5587;" rowspan="2" | {{icon class|Pyro}}<br/>'''[[Pyro{{if lang}}|<span style="color:#FFF;">Pyro</span>]]''' | | width="70px" style="background:#6A5587;" rowspan="2" | {{icon class|Pyro}}<br/>'''[[Pyro{{if lang}}|<span style="color:#FFF;">Pyro</span>]]''' | ||
| − | | style="background:#E8E2F0;" rowspan="2" | '''[[The Automated Abnormality]]'''<br/> | + | | style="background:#E8E2F0;" rowspan="2" | '''[[The Automated Abnormality/es|La Anormalidad Automatizada]]'''<br/> |
| align="center" style="background:#AD9DC3;" | {{icon item|Moccasin Machinery|75px}} | | align="center" style="background:#AD9DC3;" | {{icon item|Moccasin Machinery|75px}} | ||
| − | | style="background:#F1ECF7;" | '''[[Moccasin Machinery]]''' | + | | style="background:#F1ECF7;" | '''[[Moccasin Machinery/es|El Mocasín Mecánico]]''' |
|- | |- | ||
| align="center" style="background:#AD9DC3;" | {{icon item|Arsonist Apparatus|75px}} | | align="center" style="background:#AD9DC3;" | {{icon item|Arsonist Apparatus|75px}} | ||
| − | | style="background:#F1ECF7;" | '''[[Arsonist Apparatus]]''' | + | | style="background:#F1ECF7;" | '''[[Arsonist Apparatus/es|El Dispositivo Incendiario]]''' |
|- | |- | ||
| width="70px" style="background:#6A5587;" rowspan="2" | {{icon class|Demoman}}<br/>'''[[Demoman{{if lang}}|<span style="color:#FFF;">{{class name|demoman}}</span>]]''' | | width="70px" style="background:#6A5587;" rowspan="2" | {{icon class|Demoman}}<br/>'''[[Demoman{{if lang}}|<span style="color:#FFF;">{{class name|demoman}}</span>]]''' | ||
| − | | style="background:#E8E2F0;" rowspan="2" | '''[[The Forgotten King]]'''<br/> | + | | style="background:#E8E2F0;" rowspan="2" | '''[[The Forgotten King/es|El Rey Olvidado]]'''<br/> |
| align="center" style="background:#AD9DC3;" | {{icon item|Forgotten King's Restless Head|75px}} | | align="center" style="background:#AD9DC3;" | {{icon item|Forgotten King's Restless Head|75px}} | ||
| − | | style="background:#F1ECF7;" | '''[[Forgotten King's Restless Head]]''' | + | | style="background:#F1ECF7;" | '''[[Forgotten King's Restless Head/es|La Cabeza sin Reposo del Rey Olvidado]]''' |
|- | |- | ||
| align="center" style="background:#AD9DC3;" | {{icon item|Forgotten King's Pauldrons|75px}} | | align="center" style="background:#AD9DC3;" | {{icon item|Forgotten King's Pauldrons|75px}} | ||
| − | | style="background:#F1ECF7;" | '''[[Forgotten King's Pauldrons]]''' | + | | style="background:#F1ECF7;" | '''[[Forgotten King's Pauldrons/es|Los Cubrehombros del Rey Olvidado]]''' |
|- | |- | ||
| width="70px" style="background:#6A5587;" rowspan="3" | {{icon class|Heavy}}<br/>'''[[Heavy{{if lang}}|<span style="color:#FFF;">{{class name|heavy}}</span>]]''' | | width="70px" style="background:#6A5587;" rowspan="3" | {{icon class|Heavy}}<br/>'''[[Heavy{{if lang}}|<span style="color:#FFF;">{{class name|heavy}}</span>]]''' | ||
| − | | style="background:#E8E2F0;" rowspan="3" | '''[[The Minsk Beast]]'''<br/> | + | | style="background:#E8E2F0;" rowspan="3" | '''[[The Minsk Beast/es|El Minsknotauro]]'''<br/> |
| align="center" style="background:#AD9DC3;" | {{icon item|Minsk Beef|75px}} | | align="center" style="background:#AD9DC3;" | {{icon item|Minsk Beef|75px}} | ||
| − | | style="background:#F1ECF7;" | '''[[Minsk Beef]]''' | + | | style="background:#F1ECF7;" | '''[[Minsk Beef/es|El Rumiante de Minsk]]''' |
|- | |- | ||
| align="center" style="background:#AD9DC3;" | {{icon item|Bull Locks|75px}} | | align="center" style="background:#AD9DC3;" | {{icon item|Bull Locks|75px}} | ||
| − | | style="background:#F1ECF7;" | '''[[Bull Locks]]''' | + | | style="background:#F1ECF7;" | '''[[Bull Locks/es|La Barba del Bóvido]]''' |
|- | |- | ||
| align="center" style="background:#AD9DC3;" | {{icon item|Bone-Cut Belt|75px}} | | align="center" style="background:#AD9DC3;" | {{icon item|Bone-Cut Belt|75px}} | ||
| − | | style="background:#F1ECF7;" | '''[[Bone-Cut Belt]]''' | + | | style="background:#F1ECF7;" | '''[[Bone-Cut Belt/es|La Hombrera Acolmillada]]''' |
|- | |- | ||
| style="background:#6A5587;" rowspan="7" | {{icon class|Medic}}<br/>'''[[Medic{{if lang}}|<span style="color:#FFF;">{{class name|medic}}</span>]]''' | | style="background:#6A5587;" rowspan="7" | {{icon class|Medic}}<br/>'''[[Medic{{if lang}}|<span style="color:#FFF;">{{class name|medic}}</span>]]''' | ||
| − | | style="background:#E8E2F0;" rowspan="3" | '''[[Canis Ex Machina]]'''<br/> | + | | style="background:#E8E2F0;" rowspan="3" | '''[[Canis Ex Machina/es|Canis Ex Machina]]'''<br/> |
| align="center" style="background:#AD9DC3;" | {{icon item|Hundkopf|75px}} | | align="center" style="background:#AD9DC3;" | {{icon item|Hundkopf|75px}} | ||
| − | | style="background:#F1ECF7;" | '''[[Hundkopf]]''' | + | | style="background:#F1ECF7;" | '''[[Hundkopf/es|El Hundkopf]]''' |
|- | |- | ||
| align="center" style="background:#AD9DC3;" | {{icon item|Herzensbrecher|75px}} | | align="center" style="background:#AD9DC3;" | {{icon item|Herzensbrecher|75px}} | ||
| − | | style="background:#F1ECF7;" | '''[[Herzensbrecher]]''' | + | | style="background:#F1ECF7;" | '''[[Herzensbrecher/es|El Herzensbrecher]]''' |
|- | |- | ||
| align="center" style="background:#AD9DC3;" | {{icon item|Kriegsmaschine-9000|75px}} | | align="center" style="background:#AD9DC3;" | {{icon item|Kriegsmaschine-9000|75px}} | ||
| − | | style="background:#F1ECF7;" | '''[[Kriegsmaschine-9000]]''' | + | | style="background:#F1ECF7;" | '''[[Kriegsmaschine-9000/es|La Kriegsmaschine-9000]]''' |
|- | |- | ||
| − | | style="background:#E8E2F0;" rowspan="2" | '''[[Dr. Acula]]'''<br/> | + | | style="background:#E8E2F0;" rowspan="2" | '''[[Dr. Acula/es|Dr. Ácula]]'''<br/> |
| align="center" style="background:#AD9DC3;" | {{icon item|Vampire Makeover|75px}} | | align="center" style="background:#AD9DC3;" | {{icon item|Vampire Makeover|75px}} | ||
| − | | style="background:#F1ECF7;" | '''[[Vampire Makeover]]''' | + | | style="background:#F1ECF7;" | '''[[Vampire Makeover/es|La Transformación del Transilvano]]''' |
|- | |- | ||
| align="center" style="background:#AD9DC3;" | {{icon item|Vampiric Vesture|75px}} | | align="center" style="background:#AD9DC3;" | {{icon item|Vampiric Vesture|75px}} | ||
| − | | style="background:#F1ECF7;" | '''[[Vampiric Vesture]]''' | + | | style="background:#F1ECF7;" | '''[[Vampiric Vesture/es|La Vestimenta Vampírica]]''' |
|- | |- | ||
| − | | style="background:#E8E2F0;" rowspan="2" | '''[[The Templar]]'''<br/> | + | | style="background:#E8E2F0;" rowspan="2" | '''[[The Templar/es|El Templario]]'''<br/> |
| align="center" style="background:#AD9DC3;" | {{icon item|Templar's Spirit|75px}} | | align="center" style="background:#AD9DC3;" | {{icon item|Templar's Spirit|75px}} | ||
| − | | style="background:#F1ECF7;" | '''[[Templar's Spirit]]''' | + | | style="background:#F1ECF7;" | '''[[Templar's Spirit/es|El Espíritu del Templario]]''' |
|- | |- | ||
| align="center" style="background:#AD9DC3;" | {{icon item|Wings of Purity|75px}} | | align="center" style="background:#AD9DC3;" | {{icon item|Wings of Purity|75px}} | ||
| − | | style="background:#F1ECF7;" | '''[[Wings of Purity]]''' | + | | style="background:#F1ECF7;" | '''[[Wings of Purity/es|Las Alas de la Pureza]]''' |
|- | |- | ||
| style="background:#6A5587;" rowspan="5" | {{icon class|Sniper}}<br/>'''[[Sniper{{if lang}}|<span style="color:#FFF;">{{class name|sniper}}</span>]]''' | | style="background:#6A5587;" rowspan="5" | {{icon class|Sniper}}<br/>'''[[Sniper{{if lang}}|<span style="color:#FFF;">{{class name|sniper}}</span>]]''' | ||
| − | | style="background:#E8E2F0;" rowspan="3" | '''[[The Manngaroo]]'''<br/> | + | | style="background:#E8E2F0;" rowspan="3" | '''[[The Manngaroo/es|El Mannguro]]'''<br/> |
| align="center" style="background:#AD9DC3;" | {{icon item|Marsupial Muzzle|75px}} | | align="center" style="background:#AD9DC3;" | {{icon item|Marsupial Muzzle|75px}} | ||
| − | | style="background:#F1ECF7;" | '''[[Marsupial Muzzle]]''' | + | | style="background:#F1ECF7;" | '''[[Marsupial Muzzle/es|El Hocico Marsupial]]''' |
|- | |- | ||
| align="center" style="background:#AD9DC3;" | {{icon item|Kanga Kickers|75px}} | | align="center" style="background:#AD9DC3;" | {{icon item|Kanga Kickers|75px}} | ||
| − | | style="background:#F1ECF7;" | '''[[Kanga Kickers]]''' | + | | style="background:#F1ECF7;" | '''[[Kanga Kickers/es|Los Pateadores Australianos]]''' |
|- | |- | ||
| align="center" style="background:#AD9DC3;" | {{icon item|Roo Rippers|75px}} | | align="center" style="background:#AD9DC3;" | {{icon item|Roo Rippers|75px}} | ||
| − | | style="background:#F1ECF7;" | '''[[Roo Rippers]]''' | + | | style="background:#F1ECF7;" | '''[[Roo Rippers/es|Los Destripadores de Canguro]]''' |
|- | |- | ||
| − | | style="background:#E8E2F0;" rowspan="2" | '''[[The Reptiloid]]'''<br/> | + | | style="background:#E8E2F0;" rowspan="2" | '''[[The Reptiloid/es|El Reptiloide]]'''<br/> |
| align="center" style="background:#AD9DC3;" | {{icon item|Scaly Scrapers|75px}} | | align="center" style="background:#AD9DC3;" | {{icon item|Scaly Scrapers|75px}} | ||
| − | | style="background:#F1ECF7;" | '''[[Scaly Scrapers]]''' | + | | style="background:#F1ECF7;" | '''[[Scaly Scrapers/es|Los Rascadores Escamosos]]''' |
|- | |- | ||
| align="center" style="background:#AD9DC3;" | {{icon item|Cranial Conspiracy|75px}} | | align="center" style="background:#AD9DC3;" | {{icon item|Cranial Conspiracy|75px}} | ||
| − | | style="background:#F1ECF7;" | '''[[Cranial Conspiracy]]''' | + | | style="background:#F1ECF7;" | '''[[Cranial Conspiracy/es|La Conspiración Craneal]]''' |
|- | |- | ||
|} | |} | ||
Revision as of 13:29, 8 November 2014
 | Esta página está en proceso de ser traducida al español. Si hablas español, publica una versión traducida en la discusión o comunícate con quienes hayan contribuido a la página (observando el historial de la página). |
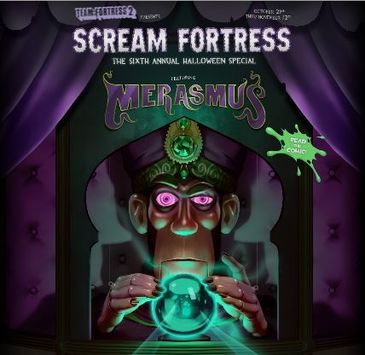
Scream Fortress 2014 es una actualización mayor que introduce un carnival administrado por Merasmus. Introduce los coches de choque como una actividad para el final de la ronda, la cual tiene tres modos separados. Es la sexta actualización Scream Fortress. Todos los jugadores que entren a Team Fortress 2 después de descargar la actualización recibirán un Caldero de Regalos de Halloween, que contiene tres objetos aleatorios de la actualización de Scream Fortress 2014, uno de ellos tendrá siempre las calidades Raro y Embrujado.
La actualización trae 50 nuevos objetos cosméticos, 6 logros, el mapa del evento de Halloween Carnival of Carnage como también La Cantimplora Trauma o Trato y El Necromachacador: un arma cuerpo a cuerpo para todas las clases (con excepción del Spy).
La actualización trae además la introducción de los cosméticos de calidad de Aspecto Raro de Aspecto Embrujado. Todos los objetos raros embrujados incluyen 2 partes raras -- "Juegos Ganados en Carnival" y "Víctimas en el Inframundo de Carnival" (jugadores eliminados del circuito). Las víctimas solo cuentan en el Carnival of Carnage.
Índice
Adiciones
Armas
All Classes |
El Necromachacador |
- *Todas las clases excepto el Spy
Objetos Cosméticos
Sets de disfraces
Objetos de Acción
Maps
| Nombre | Imagen | Modo de juego | Nombre del archivo |
|---|---|---|---|
| Carnival of Carnage | 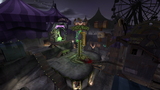
|
Special Delivery | sd_doomsday_event
|
Logros de Halloween
|
|


Curiosidades
- Agathodaimon symbols were used on the update's page to write the spells names. These symbols were also used in the previous Halloween updates of 2012 and 2013.
Enlaces externos
| ||||||||||||||||||||||||||||||||||||||||||||||||||||||||||||||||||||||||||||||||||||||||||||||||||