Difference between revisions of "Summer 2023 Update"
BrazilianNut (talk | contribs) m (→Cosmetic items: Fixed some grades.) |
(Changed colors to match case) |
||
| Line 16: | Line 16: | ||
{|class="wikitable" cellpadding=2 style="text-align:center;" | {|class="wikitable" cellpadding=2 style="text-align:center;" | ||
|-style="height:20px;" | |-style="height:20px;" | ||
| − | ! class="header" style="background:# | + | ! class="header" style="background:#3f195f;color:#FFFFFF;" | {{common string|Name}} |
| − | ! class="header" style="background:# | + | ! class="header" style="background:#3f195f;color:#FFFFFF;" | {{common string|Picture}} |
| − | ! class="header" style="background:# | + | ! class="header" style="background:#3f195f;color:#FFFFFF;" | {{common string|Game mode}} |
| − | ! class="header" style="background:# | + | ! class="header" style="background:#3f195f;color:#FFFFFF;" | {{common string|File name}} |
|- | |- | ||
| − | | width="85px" style="background:# | + | | width="85px" style="background:#65467E;" | '''[[Cashworks{{if lang}}|<font color="white">Cashworks</font>]]''' |
| − | | style="background:# | + | | style="background:#C1B5CB;" | [[File:Pl cashworks.png|160px|link=Cashworks{{if lang}}]] |
| − | | style="background:# | + | | style="background:#C1B5CB;" | '''[[Payload{{if lang}}|{{common string|Payload}}]]'''<br>[[File:BLU Bombcart.png|50px|link=Payload{{if lang}}]] |
| {{code|pl_cashworks}} | | {{code|pl_cashworks}} | ||
|- | |- | ||
| − | | style="background:# | + | | style="background:#65467E;" | '''[[Hardwood{{if lang}}|<font color="white">Hardwood</font>]]''' |
| − | | style="background:# | + | | style="background:#C1B5CB;" | [[File:Cp hardwood.png|160px|link=Hardwood{{if lang}}]] |
| − | | style="background:# | + | | style="background:#C1B5CB;" | '''[[Control Point (game mode){{if lang}}|{{common string|Attack/Defend}}]]'''<br>[[File:Controlpoint.png|50px|link=Control Point (game mode){{if lang}}]] |
| {{code|cp_hardwood}} | | {{code|cp_hardwood}} | ||
|- | |- | ||
| − | | style="background:# | + | | style="background:#65467E;" | '''[[Pelican Peak{{if lang}}|<font color="white">Pelican Peak</font>]]''' |
| − | | style="background:# | + | | style="background:#C1B5CB;" | [[File:Ctf pelican peak.png|160px|link=Pelican Peak{{if lang}}]] |
| − | | style="background:# | + | | style="background:#C1B5CB;" | '''[[Capture the Flag{{if lang}}|{{common string|Capture the Flag}}]]'''<br>[[File:Intel_red_idle.png|50px|link=Capture the Flag{{if lang}}]] |
| {{code|ctf_pelican_peak}} | | {{code|ctf_pelican_peak}} | ||
|- | |- | ||
| − | | style="background:# | + | | style="background:#65467E;" | '''[[Phoenix{{if lang}}|<font color="white">Phoenix</font>]]''' |
| − | | style="background:# | + | | style="background:#C1B5CB;" | [[File:Pl phoenix.png|160px|link=Phoenix{{if lang}}]] |
| − | | style="background:# | + | | style="background:#C1B5CB;" | '''[[Payload{{if lang}}|{{common string|Payload}}]]'''<br>[[File:BLU Bombcart.png|50px|link=Payload{{if lang}}]] |
| {{code|pl_phoenix}} | | {{code|pl_phoenix}} | ||
|- | |- | ||
| − | | style="background:# | + | | style="background:#65467E;" | '''[[Reckoner{{if lang}}|<font color="white">Reckoner</font>]]''' |
| − | | style="background:# | + | | style="background:#C1B5CB;" | [[File:Cp reckoner.png|160px|link=Reckoner{{if lang}}]] |
| − | | style="background:# | + | | style="background:#C1B5CB;" | '''[[Control Point (game mode){{if lang}}|{{common string|Control Point}}]]'''<br>[[File:Controlpoint.png|50px|link=Control Point (game mode){{if lang}}]] |
| {{code|cp_reckoner}} | | {{code|cp_reckoner}} | ||
|- | |- | ||
| − | | style="background:# | + | | style="background:#65467E;" | '''[[Rotunda{{if lang}}|<font color="white">Rotunda</font>]]''' |
| − | | style="background:# | + | | style="background:#C1B5CB;" | [[File:Koth rotunda.png|160px|link=Rotunda{{if lang}}]] |
| − | | style="background:# | + | | style="background:#C1B5CB;" | '''[[King of the Hill{{if lang}}|{{common string|King of the Hill}}]]'''<br>[[File:Controlpoint.png|50px|link=King of the Hill{{if lang}}]] |
| {{code|koth_rotunda}} | | {{code|koth_rotunda}} | ||
|- | |- | ||
| − | | style="background:# | + | | style="background:#65467E;" | '''[[Selbyen{{if lang}}|<font color="white">Selbyen</font>]]''' |
| − | | style="background:# | + | | style="background:#C1B5CB;" | [[File:Pd selbyen.png|160px|link=Selbyen{{if lang}}]] |
| − | | style="background:# | + | | style="background:#C1B5CB;" | '''[[Player Destruction{{if lang}}|{{common string|Player Destruction}}]]'''<br>[[File:Selbyen pickup|50px|link=Player Destruction{{if lang}}]] |
| {{code|pd_selbyen}} | | {{code|pd_selbyen}} | ||
|- | |- | ||
| − | | style="background:# | + | | style="background:#65467E;" | '''[[Sharkbay{{if lang}}|<font color="white">Sharkbay</font>]]''' |
| − | | style="background:# | + | | style="background:#C1B5CB;" | [[File:Koth sharkbay.png|160px|link=Sharkbay{{if lang}}]] |
| − | | style="background:# | + | | style="background:#C1B5CB;" | '''[[King of the Hill{{if lang}}|{{common string|King of the Hill}}]]'''<br>[[File:Controlpoint.png|50px|link=King of the Hill{{if lang}}]] |
| {{code|koth_sharkbay}} | | {{code|koth_sharkbay}} | ||
|- | |- | ||
| − | | style="background:# | + | | style="background:#65467E;" | '''[[Sulfur{{if lang}}|<font color="white">Sulfur</font>]]''' |
| − | | style="background:# | + | | style="background:#C1B5CB;" | [[File:Cp sulfur.png|160px|link=Sulfur{{if lang}}]] |
| − | | style="background:# | + | | style="background:#C1B5CB;" | '''[[Control Point (game mode){{if lang}}|{{common string|Attack/Defend}}]]'''<br>[[File:Controlpoint.png|50px|link=Control Point (game mode){{if lang}}]] |
| {{code|cp_sulfur}} | | {{code|cp_sulfur}} | ||
|- | |- | ||
| − | | style="background:# | + | | style="background:#65467E;" | '''[[Venice{{if lang}}|<font color="white">Venice</font>]]''' |
| − | | style="background:# | + | | style="background:#C1B5CB;" | [[File:Pl venice.png|160px|link=Venice{{if lang}}]] |
| − | | style="background:# | + | | style="background:#C1B5CB;" | '''[[Payload{{if lang}}|{{common string|Payload}}]]'''<br>[[File:BLU Bombcart.png|50px|link=Payload{{if lang}}]] |
| {{code|pl_venice}} | | {{code|pl_venice}} | ||
|- | |- | ||
| − | | style="background:# | + | | style="background:#65467E;" | '''[[VSH Distillery{{if lang}}|<font color="white">VSH Distillery</font>]]''' |
| − | | style="background:# | + | | style="background:#C1B5CB;" | [[File:Vsh distillery.png|160px|link=VSH Distillery{{if lang}}]] |
| − | | style="background:# | + | | style="background:#C1B5CB;" | '''[[Vs. Saxton Hale{{if lang}}|{{common string|Vs. Saxton Hale}}]]'''<br>[[File:Item icon Saxton.png|50px|link=Vs. Saxton Hale{{if lang}}]] |
| {{code|vsh_distillery}} | | {{code|vsh_distillery}} | ||
|- | |- | ||
| − | | style="background:# | + | | style="background:#65467E;" | '''[[VSH Nucleus{{if lang}}|<font color="white">VSH Nucleus</font>]]''' |
| − | | style="background:# | + | | style="background:#C1B5CB;" | [[File:Vsh nucleus.png|160px|link=VSH Nucleus{{if lang}}]] |
| − | | style="background:# | + | | style="background:#C1B5CB;" | '''[[Vs. Saxton Hale{{if lang}}|{{common string|Vs. Saxton Hale}}]]'''<br>[[File:Item icon Saxton.png|50px|link=Vs. Saxton Hale{{if lang}}]] |
| {{code|vsh_nucleus}} | | {{code|vsh_nucleus}} | ||
|- | |- | ||
| − | | style="background:# | + | | style="background:#65467E;" | '''[[VSH Skirmish{{if lang}}|<font color="white">VSH Skirmish</font>]]''' |
| − | | style="background:# | + | | style="background:#C1B5CB;" | [[File:Vsh skirmish.png|160px|link=VSH Skirmish{{if lang}}]] |
| − | | style="background:# | + | | style="background:#C1B5CB;" | '''[[Vs. Saxton Hale{{if lang}}|{{common string|Vs. Saxton Hale}}]]'''<br>[[File:Item icon Saxton.png|50px|link=Vs. Saxton Hale{{if lang}}]] |
| {{code|vsh_skirmish}} | | {{code|vsh_skirmish}} | ||
|- | |- | ||
| − | | style="background:# | + | | style="background:#65467E;" | '''[[VSH Tiny Rock{{if lang}}|<font color="white">VSH Tiny Rock</font>]]''' |
| − | | style="background:# | + | | style="background:#C1B5CB;" | [[File:Vsh tinyrock.png|160px|link=VSH Tiny Rock{{if lang}}]] |
| − | | style="background:# | + | | style="background:#C1B5CB;" | '''[[Vs. Saxton Hale{{if lang}}|{{common string|Vs. Saxton Hale}}]]'''<br>[[File:Item icon Saxton.png|50px|link=Vs. Saxton Hale{{if lang}}]] |
| {{code|vsh_tinyrock}} | | {{code|vsh_tinyrock}} | ||
|} | |} | ||
| Line 95: | Line 95: | ||
{{main|Cosmetic items}} | {{main|Cosmetic items}} | ||
{| class="wikitable collapsible" cellpadding="3" style="text-align:center;" | {| class="wikitable collapsible" cellpadding="3" style="text-align:center;" | ||
| − | | width="85px" style="background:# | + | | width="85px" style="background:#3f195f;" rowspan="2" | '''{{Class link|Scout|color=white|br=yes}}''' |
| style="background:#4B69FF;" | {{item icon|Brimmed Bootlegger|75px}} | | style="background:#4B69FF;" | {{item icon|Brimmed Bootlegger|75px}} | ||
| − | | style="background:# | + | | style="background:#C1B5CB;" | '''{{item link|Brimmed Bootlegger}}''' |
|- | |- | ||
| style="background:#8847FF;" | {{item icon|Prohibition Opposition|75px}} | | style="background:#8847FF;" | {{item icon|Prohibition Opposition|75px}} | ||
| − | | style="background:# | + | | style="background:#C1B5CB;" | '''{{item link|Prohibition Opposition}}''' |
|- | |- | ||
| − | | style="background:# | + | | style="background:#3f195f;" rowspan="2" | '''{{Class link|Soldier|color=white|br=yes}}''' |
| style="background:#8847FF;" | {{item icon|Close Quarters Cover|75px}} | | style="background:#8847FF;" | {{item icon|Close Quarters Cover|75px}} | ||
| − | | style="background:# | + | | style="background:#C1B5CB;" | '''{{item link|Close Quarters Cover}}''' |
|- | |- | ||
| style="background:#4B69FF;" | {{item icon|Stealth Bomber|75px}} | | style="background:#4B69FF;" | {{item icon|Stealth Bomber|75px}} | ||
| − | | style="background:# | + | | style="background:#C1B5CB;" | '''{{item link|Stealth Bomber}}''' |
|- | |- | ||
| − | | style="background:# | + | | style="background:#3f195f;" rowspan="3" | '''{{Class link|Pyro|color=white|br=yes}}''' |
| style="background:#4B69FF;" | {{item icon|Firestalker|75px}} | | style="background:#4B69FF;" | {{item icon|Firestalker|75px}} | ||
| − | | style="background:# | + | | style="background:#C1B5CB;" | '''{{item link|Firestalker}}''' |
|- | |- | ||
| style="background:#D32CE6;" | {{item icon|Flame Warrior|75px}} | | style="background:#D32CE6;" | {{item icon|Flame Warrior|75px}} | ||
| − | | style="background:# | + | | style="background:#C1B5CB;" | '''{{item link|Flame Warrior}}''' |
|- | |- | ||
| style="background:#8847FF;" | {{item icon|Soho Sleuth|75px}} | | style="background:#8847FF;" | {{item icon|Soho Sleuth|75px}} | ||
| − | | style="background:# | + | | style="background:#C1B5CB;" | '''{{item link|Soho Sleuth}}''' |
|- | |- | ||
| − | | style="background:# | + | | style="background:#3f195f;" rowspan="2" | '''{{Class link|Demoman|color=white|br=yes}}''' |
| style="background:#4B69FF;" | {{item icon|Blast Bowl|75px}} | | style="background:#4B69FF;" | {{item icon|Blast Bowl|75px}} | ||
| − | | style="background:# | + | | style="background:#C1B5CB;" | '''{{item link|Blast Bowl}}''' |
|- | |- | ||
| style="background:#8847FF;" | {{item icon|Shrapnel Shell|75px}} | | style="background:#8847FF;" | {{item icon|Shrapnel Shell|75px}} | ||
| − | | style="background:# | + | | style="background:#C1B5CB;" | '''{{item link|Shrapnel Shell}}''' |
|- | |- | ||
| − | | style="background:# | + | | style="background:#3f195f;" rowspan="3" | '''{{Class link|Heavy|color=white|br=yes}}''' |
| style="background:#D32CE6;" | {{item icon|Brother Mann|75px}} | | style="background:#D32CE6;" | {{item icon|Brother Mann|75px}} | ||
| − | | style="background:# | + | | style="background:#C1B5CB;" | '''{{item link|Brother Mann}}''' |
|- | |- | ||
| style="background:#4B69FF;" | {{item icon|Heavy Metal|75px}} | | style="background:#4B69FF;" | {{item icon|Heavy Metal|75px}} | ||
| − | | style="background:# | + | | style="background:#C1B5CB;" | '''{{item link|Heavy Metal}}''' |
|- | |- | ||
| style="background:#8847FF;" | {{item icon|Hog Heels|75px}} | | style="background:#8847FF;" | {{item icon|Hog Heels|75px}} | ||
| − | | style="background:# | + | | style="background:#C1B5CB;" | '''{{item link|Hog Heels}}''' |
|- | |- | ||
| − | | style="background:# | + | | style="background:#3f195f;" rowspan="3" | '''{{Class link|Engineer|color=white|br=yes}}''' |
| style="background:#4B69FF;" | {{item icon|Cargo Constructor|75px}} | | style="background:#4B69FF;" | {{item icon|Cargo Constructor|75px}} | ||
| − | | style="background:# | + | | style="background:#C1B5CB;" | '''{{item link|Cargo Constructor}}''' |
|- | |- | ||
| style="background:#EB4B4B;" | {{item icon|Cranium Cooler|75px}} | | style="background:#EB4B4B;" | {{item icon|Cranium Cooler|75px}} | ||
| − | | style="background:# | + | | style="background:#C1B5CB;" | '''{{item link|Cranium Cooler}}''' |
|- | |- | ||
| style="background:#8847FF;" | {{item icon|Hazard Handler|75px}} | | style="background:#8847FF;" | {{item icon|Hazard Handler|75px}} | ||
| − | | style="background:# | + | | style="background:#C1B5CB;" | '''{{item link|Hazard Handler}}''' |
|- | |- | ||
| − | | style="background:# | + | | style="background:#3f195f;" rowspan="2" | '''{{Class link|Medic|color=white|br=yes}}''' |
| style="background:#4B69FF;" | {{item icon|Medical Emergency|75px}} | | style="background:#4B69FF;" | {{item icon|Medical Emergency|75px}} | ||
| − | | style="background:# | + | | style="background:#C1B5CB;" | '''{{item link|Medical Emergency}}''' |
|- | |- | ||
| style="background:#D32CE6;" | {{item icon|Über-Wear|75px}} | | style="background:#D32CE6;" | {{item icon|Über-Wear|75px}} | ||
| − | | style="background:# | + | | style="background:#C1B5CB;" | '''{{item link|Über-Wear}}''' |
|- | |- | ||
| − | | style="background:# | + | | style="background:#3f195f;" rowspan="4" | '''{{Class link|Sniper|color=white|br=yes}}''' |
| style="background:#4B69FF;" | {{item icon|Bushman|75px}} | | style="background:#4B69FF;" | {{item icon|Bushman|75px}} | ||
| − | | style="background:# | + | | style="background:#C1B5CB;" | '''{{item link|Bushman}}''' |
|- | |- | ||
| style="background:#D32CE6;" | {{item icon|Cranium Cover|75px}} | | style="background:#D32CE6;" | {{item icon|Cranium Cover|75px}} | ||
| − | | style="background:# | + | | style="background:#C1B5CB;" | '''{{item link|Cranium Cover}}''' |
|- | |- | ||
| style="background:#D32CE6;" | {{item icon|Glorious Gambeson|75px}} | | style="background:#D32CE6;" | {{item icon|Glorious Gambeson|75px}} | ||
| − | | style="background:# | + | | style="background:#C1B5CB;" | '''{{item link|Glorious Gambeson}}''' |
|- | |- | ||
| style="background:#8847FF;" | {{item icon|Preventative Measure|75px}} | | style="background:#8847FF;" | {{item icon|Preventative Measure|75px}} | ||
| − | | style="background:# | + | | style="background:#C1B5CB;" | '''{{item link|Preventative Measure}}''' |
|- | |- | ||
| − | | style="background:# | + | | style="background:#3f195f;" rowspan="2" | '''{{Class link|Spy|color=white|br=yes}}''' |
| style="background:#8847FF;" | {{item icon|Cleaner's Cap|75px}} | | style="background:#8847FF;" | {{item icon|Cleaner's Cap|75px}} | ||
| − | | style="background:# | + | | style="background:#C1B5CB;" | '''{{item link|Cleaner's Cap}}''' |
|- | |- | ||
| style="background:#4B69FF;" | {{item icon|Le Professionnel|75px}} | | style="background:#4B69FF;" | {{item icon|Le Professionnel|75px}} | ||
| − | | style="background:# | + | | style="background:#C1B5CB;" | '''{{item link|Le Professionnel}}''' |
|- | |- | ||
| − | | style="background:# | + | | style="background:#3f195f;" rowspan="2" | '''{{Class link|All classes|color=white|br=yes}}''' |
| style="background:#4B69FF;" | {{item icon|Brothers in Blues|75px}} | | style="background:#4B69FF;" | {{item icon|Brothers in Blues|75px}} | ||
| − | | style="background:# | + | | style="background:#C1B5CB;" | '''{{item link|Brothers in Blues}}''' |
|- | |- | ||
| style="background:#EB4B4B;" | {{item icon|Full Metal Helmet|75px}} | | style="background:#EB4B4B;" | {{item icon|Full Metal Helmet|75px}} | ||
| − | | style="background:# | + | | style="background:#C1B5CB;" | '''{{item link|Full Metal Helmet}}''' |
|} | |} | ||
| Line 201: | Line 201: | ||
{{main|Taunts}} | {{main|Taunts}} | ||
{| class="wikitable collapsible" cellpadding="6" style="text-align:center;" | {| class="wikitable collapsible" cellpadding="6" style="text-align:center;" | ||
| − | | width="85px" style="background:# | + | | width="85px" style="background:#3f195f;" | '''{{Class link|Scout|br=yes|color=white}}''' |
| − | | style="background:# | + | | style="background:#65467E;" | {{Icon item|Killer Signature|75px}} |
| − | | style="background:# | + | | style="background:#C1B5CB;" | '''{{item link|Killer Signature}}''' |
|- | |- | ||
| − | | style="background:# | + | | style="background:#3f195f;"| '''{{Class link|Soldier|br=yes|color=white}}''' |
| − | | style="background:# | + | | style="background:#65467E;" | {{Icon item|Star-Spangled Strategy|75px}} |
| − | | style="background:# | + | | style="background:#C1B5CB;" | '''{{item link|Star-Spangled Strategy}}''' |
|- | |- | ||
| − | | style="background:# | + | | style="background:#3f195f;" | '''{{Class link|Heavy|br=yes|color=white}}''' |
| − | | style="background:# | + | | style="background:#65467E;" | {{Icon item|Road Rager|75px}} |
| − | | style="background:# | + | | style="background:#C1B5CB;" | '''{{item link|Road Rager}}''' |
|- | |- | ||
| − | | style="background:# | + | | style="background:#3f195f;" | '''{{Class link|Medic|br=yes|color=white}}''' |
| − | | style="background:# | + | | style="background:#65467E;" | {{Icon item|Head Doctor|75px}} |
| − | | style="background:# | + | | style="background:#C1B5CB;" | '''{{item link|Head Doctor}}''' |
|- | |- | ||
| − | | style="background:# | + | | style="background:#3f195f;" | '''{{Class link|Spy|br=yes|color=white}}''' |
| − | | style="background:# | + | | style="background:#65467E;" | {{Icon item|Tuefort Tango|75px}} |
| − | | style="background:# | + | | style="background:#C1B5CB;" | '''{{item link|Tuefort Tango}}''' |
|- | |- | ||
| − | | style="background:# | + | | style="background:#3f195f;" | '''{{Class link|All classes|color=white|br=yes}}''' |
| − | | style="background:# | + | | style="background:#65467E;" | {{Icon item|Killer Joke|75px}} |
| − | | style="background:# | + | | style="background:#C1B5CB;" | '''{{item link|Killer Joke}}''' |
|} | |} | ||
| Line 229: | Line 229: | ||
{{main|Tools}} | {{main|Tools}} | ||
{| class="wikitable collapsible" cellpadding="3" style="text-align:center;" | {| class="wikitable collapsible" cellpadding="3" style="text-align:center;" | ||
| − | | width="85px" style="background:# | + | | width="85px" style="background:#65467E;" | {{item icon|Summer 2023 Cosmetic Case|75px}} |
| − | | style="background:# | + | | style="background:#C1B5CB;" | '''{{item link|Summer 2023 Cosmetic Case}}''' |
|- | |- | ||
| − | | style="background:# | + | | style="background:#65467E;" | {{item icon|Summer 2023 Cosmetic Key|75px}} |
| − | | style="background:# | + | | style="background:#C1B5CB;" | '''{{item link|Summer 2023 Cosmetic Key}}''' |
|} | |} | ||
Revision as of 04:19, 13 July 2023
| “Let's go, let's go, let's go!” This article documents a recent addition. It may contain speculation, broken links or errors. You can help improve it by editing this page to include new information. |
| “You are so small! Is funny to me!” This article is a stub. As such, it is not complete. You can help Team Fortress Wiki by expanding it. |
This article is for content released in the update. For the patch itself, see July 12, 2023 Patch.

The Summer 2023 update was a major update for Team Fortress 2 released on July 12th, 2023. It featured the in-game addition of several items, as well as 14 new maps, selected by Valve from the Steam Workshop due to their outstanding quality. The update added 25 new cosmetic items, 6 new taunts, and 20 new Unusual effects in total (12 for cosmetics and 8 for taunts).
Contents
Timeline
- Summer 2023 Update released July 12th, 2023.
- Event is set to end September 15th, 2023.
Additions
Maps
Main article: List of maps
| Name | Picture | Game mode | File name |
|---|---|---|---|
| Cashworks | 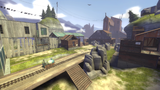
|
Payload
|
pl_cashworks
|
| Hardwood | 
|
Attack/Defend |
cp_hardwood
|
| Pelican Peak | 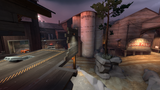
|
Capture the Flag |
ctf_pelican_peak
|
| Phoenix | 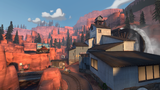
|
Payload
|
pl_phoenix
|
| Reckoner | 
|
Control Point |
cp_reckoner
|
| Rotunda | 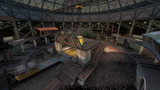
|
King of the Hill |
koth_rotunda
|
| Selbyen | 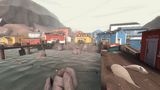
|
Player Destruction 50px |
pd_selbyen
|
| Sharkbay | 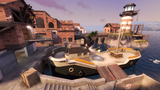
|
King of the Hill |
koth_sharkbay
|
| Sulfur | 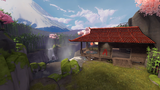
|
Attack/Defend |
cp_sulfur
|
| Venice | 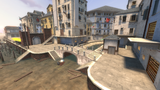
|
Payload
|
pl_venice
|
| VSH Distillery | 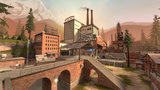
|
Versus Saxton Hale |
vsh_distillery
|
| VSH Nucleus | 
|
Versus Saxton Hale |
vsh_nucleus
|
| VSH Skirmish | 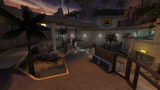
|
Versus Saxton Hale |
vsh_skirmish
|
| VSH Tiny Rock | 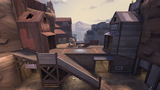
|
Versus Saxton Hale |
vsh_tinyrock
|
Cosmetic items
Main article: Cosmetic items
War Paints
Main article: War Paint
Template:Dictionary/decorated/summer 2023 paint collection
 Steel Brushed
 Secretly Serviced
 Sky Stallion
 Bomb Carrier
 Business Class
 Deadly Dragon
 Team Serviced
 Warborn
 Pacific Peacemaker
 Mechanized Monster


Taunts
Main article: Taunts
| Killer Signature | ||
| Star-Spangled Strategy | ||
| Road Rager | ||
| Head Doctor | ||
| Tuefort Tango | [[Tuefort Tango|Template:Dictionary/items/tuefort tango]] | |
| Killer Joke |
Tools
Main article: Tools
| Summer 2023 Cosmetic Case | |
| Summer 2023 Cosmetic Key |
Unusual effects
Main article: Unusual effects
| Summer 2023 Update Unusual effects | ||||||
|---|---|---|---|---|---|---|
| Cosmetic effects |  |
 |
 |
 |
 |
 |
| RED | BLU | RED | BLU | Jellyfish Hunter | Jellyfish Jam | |
| Hard Carry | Jellyfish Field | |||||
 |
 |
 |
 |
 |
 | |
| Global Clusters | Celestial Starburst | Sylicone Succiduous | Sakura Smoke Bomb | Treasure Trove | Bubble Breeze | |
 |
 | |||||
| Fireflies | Mountain Halo | |||||
| Taunt effects |  |
 |
 |
 |
 |
 |
| RED | BLU | RED | BLU | Solar Scorched | Floppin' Frenzy | |
| Deepsea Rave | Pastel Trance | |||||
 |
||||||
| Wildflower Meadows | Blooming Beacon | Beaming Beacon | Blazing Beacon | |||
Gallery
In-game notification.

| ||||||||||||||||||||||
| ||||||||||||||||||||||||||||||||||||||||||||||||||||||||||||||||||||||||||||||||||||||||||||||||||