Sulfur
| Sulfur | |
|---|---|

| |
| Basic Information | |
| Map type: | Attack/Defend |
| File name: | cp_sulfur
|
| Released: | July 12, 2023 Patch (Summer 2023 Update) |
| Developer(s): | Freyja E-Arkham Sarexicus 'Rito donhonk Kimberly "iiboharz" Riswick Lauren "Yrrzy" Godfrey Maxime "Fubar" Dupuis |
| Map Info | |
| Environment: | Japan |
| Setting: | Daylight, sunny |
| Hazards: | Boiling water, Pitfall, Drowning |
| Deep Water: | Yes |
| Bot support: | Yes |
| Map Items | |
| Map Photos | |
 | |
| Map overview | |
 | |
| Map Stamp | |
| Supporters Leaderboard | |
Sulfur is a community-created Attack/Defend Control Point map added in the Summer 2023 Update. It is set in the Japanese countryside, with most action happening inside an a traditional Japanese bathing facility.
Unlike other Control Point maps, Sulfur features two separate timers and the attacking team BLU can capture the final point at any time. While the final point is held by BLU, the normal timer is paused and a separate timer starts, starting at 3:00 by default. If this timer reaches 0:00 and BLU owns Point D, BLU automatically wins the round regardless of how many preceding points are owned. RED can capture the final point while it's being held by BLU, resuming the normal timer and pausing the timer dedicated to Point D.
As BLU captures Points A, B, and C, it becomes easier for Point D to be captured. This effect is two-fold. For one, new routes open up for BLU while while others that are more beneficial to RED close down. Additionally, capturing Point A reduces the time needed for BLU to hold Point D by 30 seconds, and capturing Point C removes the second timer altogether, meaning that BLU instantly wins the moment they capture the final control point.
The setup timer is 1 minute and 10 seconds.
Sulfur was contributed to the Steam Workshop.
Contents
Locations
![]() The following locations are described from the BLU perspective.
The following locations are described from the BLU perspective.
Spawns
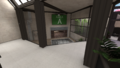
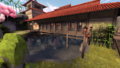
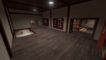
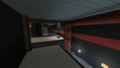
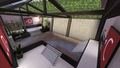
- BLU Spawn: BLU's spawn is located inside of a large temple that has two sides. The left side has three exits which lead towards Point A and the left flank of Point D. The right side has two exits, granting access to Point B and then subsequently to Point C behind it. Throughout the round, as points get captured, BLU's spawn remains in the same temple, however the exact side of the building which the BLU team spawns in does shift. With them first spawning on the left side, before being shifted to the right after A's capture and then returning back to the left with B's capture where they remain in for the rest of the round. Found inside the spawn is a hot tub that swiftly heals players, while also giving them a small overheal of 15 health in the process.[1]
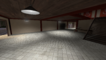
- First RED Spawn: The initial RED spawn is also designed in such a way that it is able to access multiple points simultaneously. Located at the middle-point between BLU Spawn and Point D. It has three exits: The left one leads to the Lobby and Point A. The right one grants access to Point B, while the middle one exits towards Point D onto the A/B Walkway. After Point A gets captured, the exit towards it is closed off, leaving only two exits for RED. And after Point C is captured, RED is moved out of this spawn altogether.
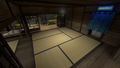
BLU spawn room.
The healing bath inside BLU spawn.
Another view inside BLU spawn.

BLU spawn's Point A side.

BLU spawn's Point B side.

First RED spawn.


Point A (Waterfall)
- Point A: The first point is located above a waterfall, inside a small wooden house connected to the nearby cliff. Capturing A blocks the RED Spawn door to A makes the boiling water around D harmless and unlocks an underwater route from Point B to D. It also reduces the timer to hold D by 30 seconds.
- Ledge: Located right outside the BLU spawn's left side is an elevated wooden platform flanked by two tall rocks with cherry trees on top. The platform overlooks the Waterfall and has a sightline onto the first control point. Found on the platform is a medium health pack.
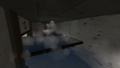
- Waterfall: The first control point is located atop a deck hanging over the side of a cliff. Emerging from underneath the point is a waterfall that first passes through an open area with a medium health pack before running off into a lethal pitfall.
- A/B Connector: Located to the right of the Ledge is a wooden set of stairs leading to a room that connects the areas of Point A (accessible from the room's left exit) and Point B (accessible from the right exit). The room also has a small health pack and a medium ammo pack.
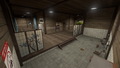
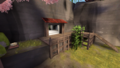
- Storage: Located far behind the first point, and separated from it by a clearing, is a long building attached to the side of the Lobby. It contains multiple closed garage shutters and leads to the Greenhouse.
- Lobby: This is a large and spacious room, located to the rear right of Point A, that contains one of the three exits for the initial RED spawn while also connecting Points A and D together. Not counting the RED spawn exit, it has a total of 5 ways to enter/exit it. Another passage, the Dropdown, also opens up later on.
- Dropdown: Directly in front of the Lobby exit is a metal grate that looks over the Lobby. Below said platform is a hole in the floor that drops players into a water-filled tunnel, which serves a direct route to Point D. The Dropdown starts out closed but eventually opens up following Point A's capture.
Point A.

Path to Point A from BLU spawn.

The Ledge.

The Waterfall area.
Entrance to the A/B Connector.

The A/B Connector.

The Storage building.

Inside the Storage.

The Lobby, RED's first spawn exit seen in the background.
Lobby's doorway leading to Point A.

The Dropdown.
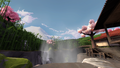
View from Control Point A.


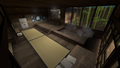
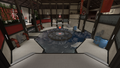
Point B (Onsen)
- Point B: The second point is located in a small corridor over a large pond. Capturing B pushes the RED team's spawn backwards, opens the C Gate, adjusts the layout of point D to be more elevated, and extends some catwalks to it that cross over the water.
- Pond: The area around Point B is dominated by a deep pond of steaming water.
- Windows: Point B is located inside a long and narrow wooden building that spans the entire length of the Pond and is adorned with many windows. Below it is a large health and ammo pack.
- Arched Bridge: Behind the Windows structure is a short bridge that connects the Windows to the C Gate.
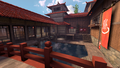
Point B.
The Pond and the Windows above it.

Inside the Windows building.
The large health pack below the Windows.
The Arched Bridge and the C gate behind it.


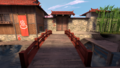
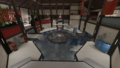
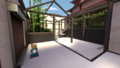
Point C (Garden)
- Point C: The third point is in a garden surrounded by buildings on all sides with a boulder in its middle. Capturing C further elevates Point D upwards, removes the catwalk that directly connected second RED spawn to the point, and gives easier access via a set of stairs. The amount of time BLU is required to hold D in order to win is reduced to zero seconds.
- Sewer Grate: Submerged inside the Pond is a tunnel that leads straight to Point D. The passage is initially blocked by metal bars which then open up after B's capture. Additionally, this tunnel eventually links up with the tunnel found below the Dropdown, with the two coming together at a medium health pack.
- C Gate: There are two ways to access the third control point from Point B. The right-most path is through a tall gate that slowly begins opening up after the previous point was captured. It leads to the Forest Route and has a medium health pack and a large ammo pack that sit behind the gate.
- Cherry Tree Yard: The left-most route is through a wooden building besides the C Gate, which then connects to a small, outdoor yard positioned in the shade of a cherry tree; a medium health and ammo pack can also be found here. From here, players can turn left towards Point D itself or go right and enter the C/D Connector.
- Forest Route: Going through the C Gate takes players down a mossy cobble road that meanders besides a bamboo forest and leads directly to the third control point.
- Katana Temple: To the right of the control point is a large house that has some Half-Zatoichis displayed on a weapon stand. The house also has a medium health pack with a large ammo pack.
- C/D Connector: On the other side of the garden, across from the Katana Temple, is a hallway that loops back around to the Cherry Tree Yard and subsequently the final control point. Located above this hallway is RED's exit to point C from their second spawn.

Point C.

Sewer is located below the "D" arrow; behind this building is also the Cherry Tree Yard.
The Sewer (closed).

Behind the C Gate.

The Cherry Tree Yard.

The Forest Route.
The Katana Temple's upper floor.
The Katana Temple's lower floor.

The C/D Connector.


.png)


Point D
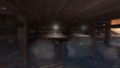
- Point D: The final point is located inside a large, octagonal arena surrounded by high ground on all sides. Filling out the floor of the area is boiling water that continuously damages players inside it but becomes harmless once Point A is captured. This point can be captured before A, B, and C.
- Greenhouse: On Point D's left side is an open area containing various plants and bamboos. It links up with RED team's Battlements via a pair of stairs.
- A/B Walkway: In between the final control point and the RED team's initial spawn is a wooden walkway that starts at the Lobby and ends at the Windows. The walkway is partially covered by metal walls hiding it from Point D, except for its middle section, from which a metal catwalk extends to the now elevated final point after Point C's capture.
- Second RED Spawn: This is the final spawn for RED following the capture of Point B. It has three exits, two of them head to the Battlements and one heads to the third control point in the Garden.
- Battlements: Located right outside the Second RED Spawn, opposite the A/B Walkway, is a white platform that overlooks the entire area. In addition to the two exits from RED spawn, the Battlements can also be accessed by stairs connecting it with the Greenhouse (on the far left) and with the C/D Connector (on the far right). There also exists a hidden space below the Battlements, featuring a large health pack and another pair of stairs that lead to the top.
Point D at the beginning, A/B Walkway on the right, and Battlements to the left.
Point D after A was captured (without boiling water).

Point D after Point B was captured.

Point D after Point C was captured.
The place where the Dropdown and Sewer tunnels meet.
The Greenhouse.

The A/B Walkway.

The Battlements outside Second RED spawn.
The large health pack below the Battlements.
Second RED spawn.

.png)


Strategy
 | “Sun Tzu's got nothing on us!” This map's Community strategy page is a stub. As such, it is not complete. You can help the Team Fortress Wiki Community Strategy Project by expanding it. Notes: None added |
Control Point timing
| Control Point | Multiplier | Seconds | ||
|---|---|---|---|---|
| Control Point A | ×1 |
| ||
| ×2 |
| |||
| ×3 |
| |||
| ×4 |
| |||
| Control Point B | ×1 |
| ||
| ×2 |
| |||
| ×3 |
| |||
| ×4 |
| |||
| Control Point C | ×1 |
| ||
| ×2 |
| |||
| ×3 |
| |||
| ×4 |
| |||
| Control Point D | ×1 |
| ||
| ×2 |
| |||
| ×3 |
| |||
| ×4 |
|
Update history
- Added Sulfur to the game.
- Fixed a case where Blu could win too well and lock the timer, not correctly allowing them to win when their timer hit 0 and they owned the main control point
- Fixed a case where Blu could contest their own win
- Fixed a case where you could build a teleporter under a platform and become trapped
- Altered Blu spawn positions to better lead players towards the point they should be attacking during different states of the game
- Altered Red spawn positons to spread them out when defending main point
- Lowered Red's initial time to defend slightly
- Convinced the boiling water to properly scald people that are submerged below the surface
- Gravity density in the potplants has been correctly calibrated
- Reduced time added to Red's clock when Blu captures A, B and C slightly - further calibration going forward
- B can no longer be capped from the outside of the building
- Area under Point A can no longer be accessed
- Fixed numerous perch points, clipping errors and small visual errors - special thanks to Wicket on Steam discussions for reporting most of these
Changelog
First Release (October 17, 2015)
Changelog A3 (November 19, 2015)
- Remade most of the map.
Changelog A4 (November 27, 2015)
- Remade D
- Remade area around B
- Remade area around A
- Widened C
Changelog A5 (November 28, 2015)
- Increased the cap time of D slightly
- Blue now gets reduced time to hold D on each external point capture
- Increased height of underwater passage exit at D to allow crouched movement
- Red forward spawn now barrs entry after B is capped
- Door to prevent people going into deadly superheated water passage before A is capped.
Changelog A6 (November 29, 2015)
- Added new route for blue to A
- Altered A to block sightlines
- Fixed Red not moving back spawns
- A door from red foward spawn now closes after A is capped
- Red can no longer get trapped in their forward spawn
Changelog A7 (December 3, 2015)
- Remade B point
- Added vantage point for blue to A
- Moved health pack near A back from red
- Tweaked cap times
- Remodelled(sic) blue spawn slightly
Changelog A8 (December 7, 2015)
- Modified water route near D to make it obvious that you need to crouch to get under the threshold
- Made it so red spawns facing the corresponding point they're meant to be attacking in the forward spawn
- Stickies now stick to all of the final point platform
- Final point platform is now nonbuildable
- Tweaked pickups around A to aid blue attacking
- Changed blue spawn slightly so they can't be directly attacked when they exit the A-side door
- Added another resupply locker in red's back spawn
- Remade the A-B connector
- Added a vantage point deck for red when defending B
Changelog A9 (December 9, 2015)
- Blue spawn now has blue signs
- Modified the runup area to A to improve blue's attacking capabilities
Changelog A9a (December 9, 2015)
- Quick fix for blue spawn door
Changelog A10 (December 10, 2015)
- Modified the A-B connector so it can't come out behind B
- Added a temporary-fix build uber area in blue spawn
- Red respawn time when blue caps C increased
- Consolodated(sic) B routes
- Gave blue an opposite-height over C
Changelog B1 (January 27, 2016)
- Artpass
- Some stuff that I forgot because I've been detailing this for literally months
Changelog B2 (January 28, 2016)
- Fixed building in blue spawn
- Clipped stairs missing clips
- Improved clipping
- Added the respawn door I forgot on red final spawn
- Fixed D door from red forward spawn not opening
- Fixed broken water door
- Brightened up dark corrodor(sic)
- Fixed map exit exploit
- Pit now has death trigger :)
- Nobuilded areas where sentries could be hidden
- Soundscapes
Changelog B3 (February 4, 2016)
- Clipping improvements
- Optimisation improvements
- 3d Skybox
- Finished detailing out of bound areas
- Fixed visual bugs
Changelog B4 (April 6, 2016)
- Fixed some visual inconsistencies
- Tried to fix the overtime spam bug again
- Added some new models from E-Arkham and Donhonk
Changelog RC1 (December 4, 2017)
- Fixed the overtime bug (Thanks Hydrogen, Benoist! Huge help!)
- Improved visuals of final point
- Swapped in new jungle foliage
- Added detail sprites (Why weren't these here before?)
- Other small visual tweaks
Changelog RC2 (May 22, 2018)
- Improved Visuals in many areas
- Water is expensive now (can be turned off in client settings)
- Fixed rocks not being vertex lit
- TREESWAY!
Changelog RC3 (July 13, 2023)
- Updated visuals
- Improved optimisation signifiantly(sic)
- Implemented vscript to fix gamemode bugs (thanks Sarex!)
- Hottub in spawn heals you
- Stickies now correctly parent to final CP when it moves
- Lowered time subtracted on blu capture of B by 30s
Trivia
- One of the posters found on the map advertises a gardening company named after Freyja, one of the map's developers.
- A secret room in the Storage building can be found containing that same map developer's name, "Freyja", alongside a cardboard cutout of a deer holding the Widowmaker and wearing the Macho Mann cosmetic. It can be reached by shooting the word "Freyja" on a poster in a building at Point C.[2]
- "Freya" also has a sign with their name written in Katakana.
- BLU spawn room has the famous Great Wave off Kanagawa painting near one of its exits.
- The map is named after the sulfur springs[3] which these facilities often use and which can be found dotted around the map, with some healing players while others damage them.
Gallery
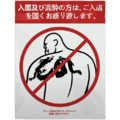
A poster stating: “We strictly prohibit entry to individuals with tattoos and those in a state of intoxication.”
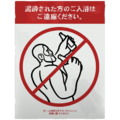
A poster stating, “Please refrain from bathing if you are intoxicated.”

Freyja's gardening suplies.
The hidden room located in the RED building next to Point A.

Freyja's name in Katakana.

The Great Wave off Kanagawa cutout.
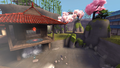
Scenery behind BLU spawn.

Steam Workshop thumbnail for Sulfur.


References
![]() When updates release, the code will likely have shifted a few lines or have moved somewhere else entirely.
When updates release, the code will likely have shifted a few lines or have moved somewhere else entirely.
- ↑ sulfur/bath_heal-nut:L4
- ↑ Easter egg video.
- ↑ Creator confirming the reference
| ||||||||||||||||||||||