Difference between revisions of "Community Wutville strategy"
m (Auto: EnforceCapitalization(Scout), EnforceCapitalization(Medic), EnforceCapitalization(Sniper), EnforceCapitalization(Engineers), EnforceCapitalization(Snipers), WordFilter(Sentry Guns/Sentries(?!\s+Gun) → Sentry Guns) (Review RC#2972998)) |
GrampaSwood (talk | contribs) m (Undo edit by The Fiend (Talk) All of these are very generic strategies that can be used on any map. This adds further to the problem outlined in the stub template. Removed some other strats) (Tag: Undo) |
||
| Line 28: | Line 28: | ||
== General Strategy == | == General Strategy == | ||
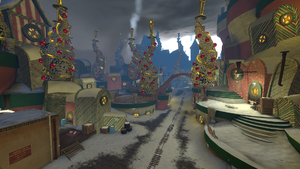
| − | Wutville's layout is a long narrow corridor with a lot of choke points, | + | Wutville's layout is a long narrow corridor with a lot of choke points, with a few tunnels which go to different places, away from the Payload track. Due to this design, Sentry Guns and Sticky Traps are all great tools for the defending team due to the narrowness of the map. |
| − | The final point provides high ground and | + | The final point provides high ground and plenty of Health and Ammo packs to the attacking team, should they push up the left flank, securing this route can easily turn the tide. |
| − | == Class specific strategy == | + | == Class-specific strategy == |
| + | |||
| + | === {{class link|Scout}} === | ||
| + | |||
| + | === {{class link|Soldier}} === | ||
| + | |||
| + | === {{class link|Pyro}} === | ||
| + | |||
| + | === {{class link|Demoman}} === | ||
| + | * The many long and straight angles available between chokes can be exploited by Demoknights. | ||
| + | |||
| + | === {{class link|Heavy}} === | ||
| + | |||
| + | === {{class link|Engineer}} === | ||
| + | |||
| + | === {{class link|Medic}} === | ||
| + | |||
| + | === {{class link|Sniper}} === | ||
| + | |||
| + | === {{class link|Spy}} === | ||
| − | |||
| − | |||
| − | |||
| − | |||
| − | |||
| − | |||
| − | |||
| − | |||
| − | |||
| − | |||
| − | |||
| − | |||
| − | |||
| − | |||
| − | |||
| − | |||
| − | |||
| − | |||
| − | |||
| − | |||
| − | |||
| − | |||
| − | |||
| − | |||
| − | |||
| − | |||
{{Map Strategy Nav}} | {{Map Strategy Nav}} | ||
Revision as of 19:17, 29 September 2021
| “Gotta move that gear up!” This article may contain content that is out of date. You can help improve this article by updating the content as necessary. See the wiki style guide. Notes: Incomplete |
| “Sun Tzu's got nothing on us!” This article is a Community strategy stub. As such, it is not complete. You can help the Team Fortress Wiki Community Strategy Project by expanding it. Notes: I've seen some problems with this community strategy page
|
| Community Wutville strategy | |
|---|---|

| |
| Basic Information | |
| Developer(s): | Unknown |
| Map Info | |
| Environment: | Smissmas |
| Setting: | Night, Town |
| Hazards: | Pitfalls, Payload Cart explosion |
| Map Photos | |
This article is about Community Wutville strategy.
Contents
General Strategy
Wutville's layout is a long narrow corridor with a lot of choke points, with a few tunnels which go to different places, away from the Payload track. Due to this design, Sentry Guns and Sticky Traps are all great tools for the defending team due to the narrowness of the map.
The final point provides high ground and plenty of Health and Ammo packs to the attacking team, should they push up the left flank, securing this route can easily turn the tide.
Class-specific strategy
 Scout
Scout
 Soldier
 Pyro
Pyro
 Demoman
- The many long and straight angles available between chokes can be exploited by Demoknights.
