Community Doomsday strategy
(Redirected from Doomsday strategy)
| Doomsday | |
|---|---|

| |
| Basic Information | |
| Map type: | Special Delivery |
| File name: | sd_doomsday
|
| Released: | June 27, 2012 Patch |
| Variants: | Carnival of Carnage |
| Developer(s): | Valve |
| Map Info | |
| Environment: | Desert |
| Setting: | Daylight, sunny |
| Hazards: | Pitfall, Rocket exhaust path |
| Deep Water: | Yes |
| Pyrovision Support: | Yes |
| Map Items | |
| Map Photos | |
| Map Overview | |
For strategy specific to the Halloween variant of Doomsday, see Community Carnival of Carnage strategy.
This article is about Community Doomsday strategy.
Note: It is recommended to read the main Doomsday article first to become familiar with the names of key map locations used in this article.
General strategy
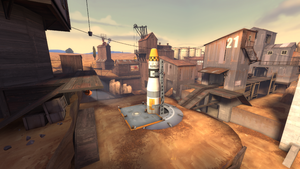
- The Australium carrier is particularly vulnerable when riding the lift, as they cannot hide from attacks. Killing the Australium carrier at this point can be enough to seriously set back the offensive team's progress.
- To counter this, the offensive team should try to get as many players as possible onto the lift, both to provide firepower and to block and deflect attacks ; the Australium carrier can also crouch close to the rocket to reduce their exposed hitbox, provided there are no Snipers with a line of sight to this point — if the other team has Snipers, the Australium carrier should keep moving as much as possible.
- An equally viable tactic for the team trying to deliver is to have only the carrier (and possibly a bodyguard) on the lift while his teammates try to occupy and hold the high ground around the rocket, gunning down any enemy trying to ascend the ridge to get a clear shot at the carrier. Watch for divebombing Soldiers, Demomen lobbing their explosives onto the lift from below and Pyros that can airblast the Australium carrier off of it if they manage to get to the top.
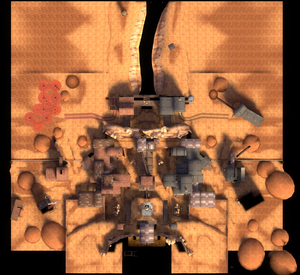
- The majority of the fighting on this map will take place in a large multi-level area around the rocket. Control of the high ground that the ridge overlooking the lift provides is crucial; it's very difficult to deliver the Australium if the enemy can attack its carrier freely from a high vantage point.
- Both teams should put a lot of pressure on enemy Snipers, as they can easily ruin your progress if left unchecked. Have your Scouts, Spies and Flare Gun, Detonator, or Scorch Shot Pyros constantly harass their known locations to kill them off or force them to retreat (all the best sniping spots are near the spawn exits).
- Snipers will often use the path between their spawn point and the Australium drop site as a safe place from which to snipe at players on or around the lift, which can be devastating to either team. This is a very good spot for an ambush—hide in the corner, where players exiting the spawn point cannot see you, and then take them out from behind. Spies equipped with the Cloak and Dagger can land a few easy backstabs while camping in this area.
- There is a bush on RED's side large enough to conceal Combat Mini-Sentry Guns, Snipers, and Spies.
Class-specific strategy
 Scout
Scout
- The Scout is a good class to carry the Australium, due to his speed and agility. A Scout can get the Australium to the rocket faster than any other class, at the expense of durability.
- Staying on the lift is quite difficult for a Scout due to his low health, but his small frame and good speed can make him a hard target for Snipers, while the ability to perform double jumps can save him from rockets and bombs by jumping from the platform at the right moment with the first jump and back to it with the second, or just using it to jump back and forth.
- An alternative is to pick up the Australium, bring it to the rocket, then drop the Australium (default press L) to pass it to a teammate with more health, such as a Heavy or Soldier, who can ride the rocket with less risk of dying and dropping the Australium.
 Soldier
- To make up for the lack of speed, rocket jumping can be used to great advantage — it may be useful to equip the Gunboats to counter the health loss. However, this comes at the expense of the Shotgun, which can be a useful alternative to the Rocket Launcher in the open spaces around the lift.
- You cannot carry the Australium with the Rocket Jumper equipped — instead of trying to make the winning capture, use your Shotgun and your increased mobility to harass enemies, especially Snipers.
- Rocket jumping allows a Soldier to deposit the Australium in the top of the rocket without waiting for the lift once its lid has been opened, which may be useful if the other team already opened the rocket's lid or if your team's progress was reset at the last minute.
- When on the lift, the Soldier can be a very strong class. His rockets' high damage, large splash radius, and strong knockback make them useful defensive weapons when crouching on the lift, though you need to be precise with them. Spamming the ground with rockets from here is a good tactic, if there are no Snipers on the enemy team or they can't hit you.
- Defensively, the Soldier can also be useful. The Rocket Launcher's high damage and large splash radius make it useful for damaging everyone on the lift at once, including the Australium carrier. Even more important is the knockback provided, which can push the carrier off the lift.
- The Australium carrier will probably keep moving as much as possible, often erratically, when not on the lift, so the Rocket Launcher is less useful against him — consider using a hitscan weapon such as the Shotgun at medium-to-close range.
- Since this map is based around a large open space, your rockets can damage enemy Engineer buildings outside the range of his Sentry Guns.
- Rockets are less effective against enemy players, who can easily dodge them, avoiding splash damage due to the open space. Therefore, this map tends to require Soldiers to get quite close to their targets. Rocket launchers with faster-moving projectiles, such as the Liberty Launcher or the Direct Hit can also be helpful (although the Direct Hit's lack of splash damage is a definite downside).
- When riding the lift, the Direct Hit and the Reserve Shooter are excellent utilities for preventing enemy Soldiers and Demomen from blast jumping onto the lift - shooting them midair with the Reserve Shooter will deal extra damage, often knocking the enemy away from you, while an airshot with the Direct Hit will usually kill them instantly.
 Pyro
Pyro
- Afterburn is less effective on the lift, since the lift heals all riders from the Australium carrier's team during its ascent.
- Utilizing the compression blast to push the Australium carrier off the lift can turn an assured victory into a plummet back to square one. It is also very useful to protect yourself and your teammates on the lift, both from projectiles and from enemies jumping onto it.
- The Scorch Shot can ignite nearly every enemy on the lift at once from a safe distance. Its knockback may also be enough to knock the Australium carrier off the lift, resetting his progress (and possibly causing fall damage if the lift is high enough).
- The Thermal Thruster can be used to rocket yourself on to the lift, letting you knock back enemies and contest the capture with your flames and compression blast. Be wary of the increased knockback while in flight, and consider taking off from a distance to ensure enough time to deploy your flamethrower before landing.
- The Gas Passer can ignite groups of enemies on the lift, or to soak the Australium pickup point during the initial fight.
 Demoman
- Stickybombs around the lift and on the side of the rocket are an obvious strategy when on the defense, but usually effective. They can blow up an unprepared Australium carrier and his teammates, or waste the carrier's time destroying or dispersing the bombs. Note that you can't put the stickybombs on the moving lift, but you can put them on the rocket itself. It is also a good idea to shoot the stickybombs and grenades upwards, almost directly from underneath the lift at the top, thus staying protected from the enemies above while damaging them.
- Sticky jumping can provide a speed boost to get the Australium to the lift faster, or can be used to bypass the lift entirely if the lid of the rocket is already open. This comes at the expense of more health than the Soldier's rocket jump, however.
- You are not the best class for carrying the Australium - your slower movement speed and only slightly above-average health makes it easy for enemy Snipers to kill you.
 Heavy
Heavy
- Offensively, the Heavy can use his health and firepower to his advantage, without worrying about his speed, by standing on the lift and defending the Australium carrier.
- Defensively, the Heavy is very good at clearing the lift by standing on one of the raised platforms nearby and attacking the enemies below with his Minigun (which does not require reloading). However, this leaves him vulnerable, both to Spies trying to land an easy backstab and to Snipers.
- When riding the lift, jump and crouch randomly to throw off enemy Snipers’ aim. Keep an eye on the ledge above the lift - enemies will use this high ground to take you out.
 Engineer
- Doomsday is not the easiest map for a classic, Wrench-wielding Engineer, due to its small size and wide open spaces. However, a level 3 Sentry Gun on one of the raised platforms near the Australium pickup point is enough to dispatch any enemy who may attempt to pick it up, leaving it clear for your team when the Australium is reset.
- Another good place for a sentry when playing defensively is on one of the raised platforms near the lift, especially shielded by one of the doorways, from where it can easily fire at any enemy standing on the lift. However, it is likely to take significant damage here, so an Engineer will need to actively defend it, and stay nearby to ward off Spies, all while dodging Sniper shots.
- Gunslinger Engineers, on the other hand, thrive on this map, as the easily replaceable Mini-Sentry Guns deployed in the open space around the lift can cover a large area and score plenty of kills and assists on the many distracted enemies trying to ascend and wrestle control of the area from you. The intense action will make sure there are usually plenty of dropped weapons lying around, so you should have enough metal to replace lost Sentry Guns regularly. Expect to become a high-value target, however, as the enemy will quickly become frustrated and may target you.
 Medic
Medic
- Doomsday's open nature and lack of 'safe' places can prove difficult to charge a ÜberCharge. However, if your team can provide a decent defense for you, healing and charging naturally becomes easier.
- Due to the hectic nature and attraction to the launchpad for both teams, it is best to heal from a good distance and not to cluster near your patients. If you ever need to heal anyone actively capturing the point, it is best to not jump on and risk losing ÜberCharge to any stray shots or explosives.
- An ÜberCharge from the Kritzkrieg can be devastating when used on large groups of enemies riding the lift. If there are any on your team, it is best to apply the charge to Demomen or Soldiers, whose critical grenades and rockets will either kill enemies outright or send them flying off the lift.
- The Vaccinator is especially useful on this map, as it does not require a full Übercharge to deploy a shield. It can charge a shield faster than any other Medi Gun, and the Bullet resistance can be used to protect yourself from Sniper headshots.
- If you are unable to gain a full Übercharge without dying, consider equipping the Vita-Saw or Ubersaw. A few melee strikes with the Vita-Saw will save much of your Übercharge for your next life, while a single attack with the Ubersaw will instantly give you 25% Übercharge.
 Sniper
- The Sniper is very good at defending the Australium pickup point — the raised platforms provide a good position from which to land an easy headshot, and anyone wanting to pick up the Australium will have to pass the same point.
- It can also be easy to pick off the Australium carrier with a headshot from one of the raised platforms near the lift.
- The elevated path from the far spawn exit to the Australium pickup point provides a good place to snipe from, but you need to be aware of your surroundings and very cautious since it's not protected from enemies in any way. Either the SMG or the Jarate/Bushwhacka combo can protect you somewhat from nearby enemies, while your team's spawn room is not too far away to run to avoid ranged attackers.
- The Machina can be extra-useful on Doomsday. Since it can penetrate the enemy, you can use it to kill both the Australium carrier and his buddies to prevent the latter from picking up the Australium; it can be fairly simple when they're all bunched up on the lift's platform, as they can't move around much. However, trying to line up your shots for penetration kills should not happen at the expense of taking down the carrier as quickly as possible.
 Spy
Spy
- The Spy can be the both teams' primary defense against Snipers, who are most likely to be found on one of the raised platforms near the Australium pickup point or the lift, depending on the stage of the game, or on the path between their base and the Australium pickup point.
- Another use for the Spy is cloaking on the lift and landing a well-timed backstab on the Australium carrier (the Cloak and Dagger is useful for this). This is a risky strategy, though, as the inevitable firefight that will ensue at this point in the game is very likely to reveal the Spy. Land the backstab fast, before you are discovered.
- If his team is on the offensive, a Spy can be handy to take down hardy classes like the Heavy or the Soldier, who are more likely to be concentrating on the lift rather than watching their backs. The passageways leading from ground level up to these platforms are low-traffic areas, and make it easier to go unnoticed, as well as providing a place to quietly recharge the Cloak and Dagger.
- You can try to dispatch much of enemy team at the beginning of the round by running around the central tower and going to the Australium pickup point through the enemy's entrance. This is a risky strategy, as you are likely to be overwhelmed as soon as you are discovered, due to the large number of enemies and the small space. Your Eternal Reward can allow you to quietly disguise as the players at the back of the group if used well, while the Dead Ringer can help you escape if you are noticed.

