Difference between revisions of "Meet Your Match Update"
(→Disgaea promotional items) |
BrazilianNut (talk | contribs) m (→Additions) |
||
| Line 11: | Line 11: | ||
{{main|Cosmetic items}} | {{main|Cosmetic items}} | ||
{| class="wikitable collapsible" cellpadding=2 style="text-align:center;" | {| class="wikitable collapsible" cellpadding=2 style="text-align:center;" | ||
| + | | width="80px" style="background:#d3d3d3;" rowspan="6" | '''{{class link|All Classes|br=yes|color=white}}''' | ||
| + | | style="background:#E4E4E4;" | {{Icon item|Altruist's Adornment|75px}} | ||
| + | | style="background:#FFFCF7;" | '''{{item link|Altruist's Adornment}}''' | ||
|- | |- | ||
| − | | style="background: # | + | | style="background:#e4e4e4;" | {{Icon item|Civilian Grade JACK Hat|75px}} |
| − | + | | style="background:#FFFCF7;" | '''{{item link|Civilian Grade JACK Hat}}''' | |
| − | | style="background: #FFFCF7 " | '''{{item link| | ||
|- | |- | ||
| − | | | + | | style="background:#e4e4e4;" | {{Icon item|Military Grade JACK Hat|75px}} |
| − | | style="background: #FFFCF7 "| '''{{item link| | + | | style="background:#FFFCF7;" | '''{{item link|Military Grade JACK Hat}}''' |
|- | |- | ||
| − | | | + | | style="background:#e4e4e4;" | {{Icon item|PASS Time Early Participation Pin|75px}} |
| − | | style="background: #FFFCF7 "| '''{{item link| | + | | style="background:#FFFCF7;" | '''{{item link|PASS Time Early Participation Pin}}''' |
|- | |- | ||
| − | | | + | | style="background:#e4e4e4;" | {{Icon item|PASS Time Miniature Half JACK|75px}} |
| − | | style="background: #FFFCF7 "| '''{{item link|PASS Time | + | | style="background:#FFFCF7;" | '''{{item link|PASS Time Miniature Half JACK}}''' |
|- | |- | ||
| − | | | + | | style="background:#e4e4e4;" | {{Icon item|TF2Maps 72hr TF2Jam Participant|75px}} |
| − | + | | style="background:#FFFCF7;" | '''{{item link|TF2Maps 72hr TF2Jam Participant}}''' | |
| − | |||
| − | |||
| − | | style="background: #FFFCF7 "| '''{{item link|TF2Maps 72hr TF2Jam Participant}}''' | ||
|} | |} | ||
=== Disgaea promotional items === | === Disgaea promotional items === | ||
{| class="wikitable collapsible" cellpadding="2" style="text-align:center;" | {| class="wikitable collapsible" cellpadding="2" style="text-align:center;" | ||
| − | | width="80px" style="background:#d3d3d3;" | + | | width="80px" style="background:#d3d3d3;" rowspan="2" | '''{{class link|All Classes|br=yes|color=white}}''' |
| − | | | + | | style="background:#e4e4e4;" | {{Icon item|Prinny Hat|75px}} |
| − | + | | '''{{item link|Prinny Hat}}''' | |
|- | |- | ||
| − | | | + | | style="background:#e4e4e4;" | {{Icon item|Prinny Pouch|75px}} |
| − | + | | '''{{item link|Prinny Pouch}}''' | |
|- | |- | ||
| − | | | + | | style="background:#d3d3d3;" | '''{{class link|All Classes|br=yes|color=white}}''' |
| − | | | + | | style="background:#e4e4e4;" | {{Icon item|Prinny Machete|75px}} |
| − | + | | '''{{item link|Prinny Machete}}''' | |
|} | |} | ||
| Line 49: | Line 48: | ||
=== Taunts === | === Taunts === | ||
| + | {{main|Taunts}} | ||
{| class="wikitable collapsible" cellpadding=2 style="text-align:center;" | {| class="wikitable collapsible" cellpadding=2 style="text-align:center;" | ||
| + | | width="80px" style="background:#d3d3d3;" rowspan="1" | '''{{class link|Scout|br=yes|color=white}}''' | ||
| + | | style="background:#e4e4e4;" | {{Icon item|Carlton|75px}} | ||
| + | | style="background:#FFFCF7;" | '''{{item link|Carlton}}''' | ||
|- | |- | ||
| − | | style="background: #d3d3d3 | + | | style="background:#d3d3d3;" rowspan="1" | '''{{class link|Soldier|br=yes|color=white}}''' |
| − | | | + | | style="background:#e4e4e4;" | {{Icon item|Fubar Fanfare|75px}} |
| − | | style="background: #FFFCF7 "| '''{{item link| | + | | style="background:#FFFCF7;" | '''{{item link|Fubar Fanfare}}''' |
|- | |- | ||
| − | | style="background: #d3d3d3 | + | | style="background:#d3d3d3;" rowspan="1" | '''{{class link|Pyro|br=yes|color=white}}''' |
| − | | | + | | style="background:#e4e4e4;" | {{Icon item|Balloonibouncer|75px}} |
| − | | style="background: #FFFCF7 "| '''{{item link| | + | | style="background:#FFFCF7;" | '''{{item link|Balloonibouncer}}''' |
|- | |- | ||
| − | | style="background: #d3d3d3 | + | | style="background:#d3d3d3;" rowspan="1" | '''{{class link|Spy|br=yes|color=white}}''' |
| − | | | + | | style="background:#e4e4e4;" | {{Icon item|Disco Fever|75px}} |
| − | + | | style="background:#FFFCF7;" | '''{{item link|Disco Fever}}''' | |
| − | |||
| − | | style="background: # | ||
| − | |||
| − | | style="background: #FFFCF7 "| '''{{item link|Disco Fever}}''' | ||
|} | |} | ||
| Line 71: | Line 70: | ||
{{main|Tools}} | {{main|Tools}} | ||
{| class="wikitable collapsible" cellpadding="3" style="text-align:center;" | {| class="wikitable collapsible" cellpadding="3" style="text-align:center;" | ||
| − | | | + | | width="80px" style="background:#d3d3d3;" | {{Icon item|Competitive Matchmaking Pass|75px}} |
| − | | style="background: #e4e4e4 "| '''{{item link|Competitive Matchmaking Pass}}''' | + | | style="background:#e4e4e4;" | '''{{item link|Competitive Matchmaking Pass}}''' |
|- | |- | ||
| − | | | + | | style="background:#d3d3d3;" | {{Icon item|Unlocked Cosmetic Crate Scout|75px}} |
| − | | style="background: #e4e4e4 "| '''{{item link|Unlocked Cosmetic Crate Scout}}''' | + | | style="background:#e4e4e4;" | '''{{item link|Unlocked Cosmetic Crate Scout}}''' |
|- | |- | ||
| − | | | + | | style="background:#d3d3d3;" | {{Icon item|Unlocked Cosmetic Crate Soldier|75px}} |
| − | | style="background: #e4e4e4 "| '''{{item link|Unlocked Cosmetic Crate Soldier}}''' | + | | style="background:#e4e4e4;" | '''{{item link|Unlocked Cosmetic Crate Soldier}}''' |
|- | |- | ||
| − | | | + | | style="background:#d3d3d3;" | {{Icon item|Unlocked Cosmetic Crate Pyro|75px}} |
| − | | style="background: #e4e4e4 "| '''{{item link|Unlocked Cosmetic Crate Pyro}}''' | + | | style="background:#e4e4e4;" | '''{{item link|Unlocked Cosmetic Crate Pyro}}''' |
|- | |- | ||
| − | | | + | | style="background:#d3d3d3;" | {{Icon item|Unlocked Cosmetic Crate Demo|75px}} |
| − | | style="background: #e4e4e4 "| '''{{item link|Unlocked Cosmetic Crate Demo}}''' | + | | style="background:#e4e4e4;" | '''{{item link|Unlocked Cosmetic Crate Demo}}''' |
|- | |- | ||
| − | | | + | | style="background:#d3d3d3;" | {{Icon item|Unlocked Cosmetic Crate Heavy|75px}} |
| − | | style="background: #e4e4e4 "| '''{{item link|Unlocked Cosmetic Crate Heavy}}''' | + | | style="background:#e4e4e4;" | '''{{item link|Unlocked Cosmetic Crate Heavy}}''' |
|- | |- | ||
| − | | | + | | style="background:#d3d3d3;" | {{Icon item|Unlocked Cosmetic Crate Engineer|75px}} |
| − | | style="background: #e4e4e4 "| '''{{item link|Unlocked Cosmetic Crate Engineer}}''' | + | | style="background:#e4e4e4;" | '''{{item link|Unlocked Cosmetic Crate Engineer}}''' |
|- | |- | ||
| − | | | + | | style="background:#d3d3d3;" | {{Icon item|Unlocked Cosmetic Crate Medic|75px}} |
| − | | style="background: #e4e4e4 "| '''{{item link|Unlocked Cosmetic Crate Medic}}''' | + | | style="background:#e4e4e4;" | '''{{item link|Unlocked Cosmetic Crate Medic}}''' |
|- | |- | ||
| − | | | + | | style="background:#d3d3d3;" | {{Icon item|Unlocked Cosmetic Crate Sniper|75px}} |
| − | | style="background: #e4e4e4 "| '''{{item link|Unlocked Cosmetic Crate Sniper}}''' | + | | style="background:#e4e4e4;" | '''{{item link|Unlocked Cosmetic Crate Sniper}}''' |
|- | |- | ||
| − | | | + | | style="background:#d3d3d3;" | {{Icon item|Unlocked Cosmetic Crate Spy|75px}} |
| − | | style="background: #e4e4e4 "| '''{{item link|Unlocked Cosmetic Crate Spy}}''' | + | | style="background:#e4e4e4;" | '''{{item link|Unlocked Cosmetic Crate Spy}}''' |
|- | |- | ||
| − | | | + | | style="background:#d3d3d3;" | {{Icon item|Unlocked Cosmetic Crate Multi-Class|75px}} |
| − | | style="background: #e4e4e4 "| '''{{item link|Unlocked Cosmetic Crate Multi-Class}}''' | + | | style="background:#e4e4e4;" | '''{{item link|Unlocked Cosmetic Crate Multi-Class}}''' |
|} | |} | ||
=== Maps === | === Maps === | ||
| + | {{main|List of maps}} | ||
{| class="wikitable" cellpadding=2 style="text-align:center;" | {| class="wikitable" cellpadding=2 style="text-align:center;" | ||
|- style="height: 20px;" | |- style="height: 20px;" | ||
| − | ! class="header" style="background-color:#d3d3d3;" |Name | + | ! class="header" style="background-color:#d3d3d3;color:#FFFFFF" | Name |
| − | ! class="header" style="background-color:#d3d3d3;" |Picture | + | ! class="header" style="background-color:#d3d3d3;color:#FFFFFF" | Picture |
| − | ! class="header" style="background-color:#d3d3d3;" |Game mode | + | ! class="header" style="background-color:#d3d3d3;color:#FFFFFF" | Game mode |
| − | ! class="header" style="background-color:#d3d3d3;" |File name | + | ! class="header" style="background-color:#d3d3d3;color:#FFFFFF" | File name |
|- | |- | ||
| − | |style="background | + | | width="80px" style="background:#e4e4e4;" | '''[[District]]''' |
| − | + | | [[File:Pass district.jpg|160px|link=District]] | |
| − | + | | '''[[PASS Time]]'''<br>[[File:Jack Neutral.png|50px|link=PASS Time]] | |
| − | + | | {{code|pass_district}} | |
|- | |- | ||
| − | |style="background | + | | style="background:#e4e4e4;" | '''[[Metalworks]]''' |
| − | + | | [[File:Cp_metalworks_b22_5.jpg|160px|link=Metalworks]] | |
| − | + | | '''[[Control Point (game mode)|Control Point]]'''<br>[[File:Controlpoint.png|50px|link=Control Point (game mode)]] | |
| − | + | | {{code|cp_metalworks}} | |
|- | |- | ||
| − | |style="background | + | | style="background:#e4e4e4;" | '''[[Sunshine]]''' |
| − | + | | [[File:Sunshine main.jpg|160px|link=Sunshine]] | |
| − | + | | '''[[Control Point (game mode)|Control Point]]'''<br>[[File:Controlpoint.png|50px|link=Control Point (game mode)]] | |
| − | + | | {{code|cp_sunshine}} | |
|- | |- | ||
| − | |style="background | + | | style="background:#e4e4e4;" | '''[[Swiftwater]]''' |
| − | + | | [[File:Pl swiftwater.jpg|160px|link=Swiftwater]] | |
| − | + | | '''[[Payload]]'''<br>[[File:BLU_Bombcart.png|50px|link=Payload]] | |
| − | + | | {{code|pl_swiftwater}} | |
|} | |} | ||
| − | ===Tweaked Classes=== | + | === Tweaked Classes === |
{| class="wikitable" | {| class="wikitable" | ||
| − | ! style="background: #d3d3d3;" class="header" | Class | + | ! style="background:#d3d3d3;color:#FFFFFF" class="header" | Class |
| − | ! style="background: #d3d3d3;" class="header" | Changes | + | ! style="background:#d3d3d3;color:#FFFFFF" class="header" | Changes |
|- | |- | ||
| − | ! style="background: #e4e4e4;" rowspan="1" | {{ | + | ! width="80px" style="background:#e4e4e4;" rowspan="1" | {{class link|Pyro|br=yes}} |
| {{c|+|Added:}} All flamethrowers' direct damage reduces Medi Gun healing and resist shield effects by 25% | | {{c|+|Added:}} All flamethrowers' direct damage reduces Medi Gun healing and resist shield effects by 25% | ||
|- | |- | ||
| − | ! style="background: #e4e4e4;" rowspan="1" | {{ | + | ! style="background:#e4e4e4;" rowspan="1" | {{class link|Demoman|br=yes}} |
| {{c|-|Changed:}} All boots now require a shield to activate any move speed bonus listed on the item. | | {{c|-|Changed:}} All boots now require a shield to activate any move speed bonus listed on the item. | ||
|- | |- | ||
| − | ! style="background: #e4e4e4;" rowspan="1" | {{ | + | ! style="background:#e4e4e4;" rowspan="1" | {{class link|Engineer|br=yes}} |
| {{c|+|Changed:}} Level 1 Teleporters now cost 50 metal. (from 125) | | {{c|+|Changed:}} Level 1 Teleporters now cost 50 metal. (from 125) | ||
|- | |- | ||
| − | ! style="background: #e4e4e4;" rowspan="2" | {{ | + | ! style="background:#e4e4e4;" rowspan="2" | {{class link|Medic|br=yes}} |
| {{c|+|Changed:}} All Mediguns allow the Medic to match the speed of their heal target. (Previously only available on the Quick-Fix) | | {{c|+|Changed:}} All Mediguns allow the Medic to match the speed of their heal target. (Previously only available on the Quick-Fix) | ||
|- | |- | ||
| {{c|=|Changed:}} Stored ÜberCharge begins to decay over time after coming to rest. | | {{c|=|Changed:}} Stored ÜberCharge begins to decay over time after coming to rest. | ||
|- | |- | ||
| − | ! style="background: #e4e4e4;" rowspan="1" | {{ | + | ! style="background:#e4e4e4;" rowspan="1" | {{class link|Spy|br=yes}} |
| {{c|+|Changed:}} Max speed increased to 320 HU/s (from 300 HU/s) | | {{c|+|Changed:}} Max speed increased to 320 HU/s (from 300 HU/s) | ||
|} | |} | ||
| Line 159: | Line 159: | ||
=== Tweaked Weapons === | === Tweaked Weapons === | ||
{| class="wikitable" | {| class="wikitable" | ||
| − | ! style="background: #d3d3d3;" class="header" | <span style="color: white;"> Class | + | ! style="background:#d3d3d3;color:#FFFFFF" class="header" | <span style="color: white;"> Class |
| − | ! style="background: #d3d3d3;" class="header" | <span style="color: white;"> Weapon | + | ! style="background:#d3d3d3;color:#FFFFFF" class="header" | <span style="color: white;"> Weapon |
| − | ! style="background: #d3d3d3;" class="header" | <span style="color: white;"> Changes | + | ! style="background:#d3d3d3;color:#FFFFFF" class="header" | <span style="color: white;"> Changes |
|- | |- | ||
| − | ! style="background: #e4e4e4;" rowspan=7| {{ | + | ! width="80px" style="background:#e4e4e4;" rowspan=7 | {{class link|Scout|br=yes}} |
! rowspan=3 | {{Icon item|Shortstop|icon-size=75px}} <br /> {{item link|Shortstop}} | ! rowspan=3 | {{Icon item|Shortstop|icon-size=75px}} <br /> {{item link|Shortstop}} | ||
| {{c|+|Added:}} Alt-fire attack: reach out and shove someone! | | {{c|+|Added:}} Alt-fire attack: reach out and shove someone! | ||
| Line 182: | Line 182: | ||
| {{c|+|Added:}} 25% fire resistance while deployed | | {{c|+|Added:}} 25% fire resistance while deployed | ||
|- | |- | ||
| − | ! style="background: #e4e4e4;" rowspan=5 | {{ | + | ! style="background:#e4e4e4;" rowspan=5 | {{class link|Soldier|br=yes}} |
! rowspan=4 | {{Icon item|Righteous Bison|icon-size=75px}} <br /> {{item link|Righteous Bison}} | ! rowspan=4 | {{Icon item|Righteous Bison|icon-size=75px}} <br /> {{item link|Righteous Bison}} | ||
| {{c|=|Changed:}} Fixed a bug causing players to be hit by the same projectile multiple times, causing the damage dealt to vary wildly | | {{c|=|Changed:}} Fixed a bug causing players to be hit by the same projectile multiple times, causing the damage dealt to vary wildly | ||
| Line 195: | Line 195: | ||
| {{c|-|Changed:}} Reduced duration of speed bonus on teammates to 2 seconds (from 3) | | {{c|-|Changed:}} Reduced duration of speed bonus on teammates to 2 seconds (from 3) | ||
|- | |- | ||
| − | ! style="background: #e4e4e4;" rowspan=1 | {{ | + | ! style="background:#e4e4e4;" rowspan=1 | {{class link|Pyro|br=yes}} |
! rowspan=1 | {{Icon item|Manmelter|icon-size=75px}} <br /> {{item link|Manmelter}} | ! rowspan=1 | {{Icon item|Manmelter|icon-size=75px}} <br /> {{item link|Manmelter}} | ||
| {{c|+|Removed:}} Hidden 20% slower firing speed penalty | | {{c|+|Removed:}} Hidden 20% slower firing speed penalty | ||
|- | |- | ||
| − | ! style="background: #e4e4e4;" rowspan=5 | {{ | + | ! style="background:#e4e4e4;" rowspan=5 | {{class link|Demoman|br=yes}} |
! rowspan=1 | {{Icon item|Iron Bomber|icon-size=75px}} <br /> {{item link|Iron Bomber}} | ! rowspan=1 | {{Icon item|Iron Bomber|icon-size=75px}} <br /> {{item link|Iron Bomber}} | ||
| {{c|=|Changed:}} Decreased the fuse time to 1.4 seconds (from 2.0) | | {{c|=|Changed:}} Decreased the fuse time to 1.4 seconds (from 2.0) | ||
| Line 212: | Line 212: | ||
| {{c|-|Changed:}} Increased clip size penalty to -50% (from -25%) | | {{c|-|Changed:}} Increased clip size penalty to -50% (from -25%) | ||
|- | |- | ||
| − | ! style="background: #e4e4e4;" rowspan=6| {{ | + | ! style="background:#e4e4e4;" rowspan=6 | {{class link|Heavy|br=yes}} |
! rowspan=1 | {{Icon item|Natascha|icon-size=75px}} <br /> {{item link|Natascha}} | ! rowspan=1 | {{Icon item|Natascha|icon-size=75px}} <br /> {{item link|Natascha}} | ||
| {{c|-|Changed:}} 20% damage resistance now only applies when spun up and below 50% max health | | {{c|-|Changed:}} 20% damage resistance now only applies when spun up and below 50% max health | ||
| Line 228: | Line 228: | ||
| {{c|-|Changed:}} Reduced pulse damage from Ring of Fire to 12 (from 15) due to increased damage vs. burning players | | {{c|-|Changed:}} Reduced pulse damage from Ring of Fire to 12 (from 15) due to increased damage vs. burning players | ||
|- | |- | ||
| − | ! style="background: #e4e4e4;" rowspan=6| {{ | + | ! style="background:#e4e4e4;" rowspan=6 | {{class link|Engineer|br=yes}} |
! rowspan=1 | {{Icon item|Widowmaker|icon-size=75px}} <br /> {{item link|Widowmaker}} | ! rowspan=1 | {{Icon item|Widowmaker|icon-size=75px}} <br /> {{item link|Widowmaker}} | ||
| {{c|+|Added:}} +10% damage bonus when attacking the same target as your Sentry Gun | | {{c|+|Added:}} +10% damage bonus when attacking the same target as your Sentry Gun | ||
| Line 245: | Line 245: | ||
| {{c|+|Changed:}} Reduced less metal from Dispensers and Pickups to -20% (from -50%) | | {{c|+|Changed:}} Reduced less metal from Dispensers and Pickups to -20% (from -50%) | ||
|- | |- | ||
| − | + | ! style="background:#e4e4e4;" rowspan=3 | {{class link|Medic|br=yes}} | |
| − | ! style="background: #e4e4e4;" rowspan=3| {{ | ||
! rowspan=2 | {{Icon item|Overdose|icon-size=75px}} <br /> {{item link|Overdose}} | ! rowspan=2 | {{Icon item|Overdose|icon-size=75px}} <br /> {{item link|Overdose}} | ||
| {{c|+|Changed:}} Increased movement speed bonus to +20% (from +10%) | | {{c|+|Changed:}} Increased movement speed bonus to +20% (from +10%) | ||
| Line 255: | Line 254: | ||
| {{c|-|Changed:}} Reduced faster ÜberCharge build rate to +10% (from +25%) | | {{c|-|Changed:}} Reduced faster ÜberCharge build rate to +10% (from +25%) | ||
|- | |- | ||
| − | ! style="background: #e4e4e4;" rowspan=3| {{ | + | ! style="background:#e4e4e4;" rowspan=3 | {{class link|Sniper|br=yes}} |
! rowspan=2 | {{Icon item|Sydney Sleeper|icon-size=75px}} <br /> {{item link|Sydney Sleeper}} | ! rowspan=2 | {{Icon item|Sydney Sleeper|icon-size=75px}} <br /> {{item link|Sydney Sleeper}} | ||
| {{c|+|Added:}} Scoped shots now extinguish teammates | | {{c|+|Added:}} Scoped shots now extinguish teammates | ||
| Line 264: | Line 263: | ||
| {{c|-|Changed:}} Now requires a full charge to gain flinch resistance | | {{c|-|Changed:}} Now requires a full charge to gain flinch resistance | ||
|- | |- | ||
| − | ! style="background: #e4e4e4;" rowspan=1| {{ | + | ! style="background:#e4e4e4;" rowspan=1 | {{class link|Spy|br=yes}} |
! rowspan=1 | {{Icon item|Enforcer|icon-size=75px}} <br /> {{item link|Enforcer}} | ! rowspan=1 | {{Icon item|Enforcer|icon-size=75px}} <br /> {{item link|Enforcer}} | ||
| {{c|+|Added:}} Attacks pierce resist and absorb effects from all sources | | {{c|+|Added:}} Attacks pierce resist and absorb effects from all sources | ||
Revision as of 02:31, 25 November 2019

The Meet Your Match Update was a major update that saw the official release of Competitive Mode matchmaking and PASS Time, introduced Casual Mode matchmaking, four new maps, eight new cosmetics, an all class weapon, four new taunts, two achievements, and two startup themes.
Contents
Video
Additions
Cosmetics
| Altruist's Adornment | ||
| Civilian Grade JACK Hat | ||
| Military Grade JACK Hat | ||
| PASS Time Early Participation Pin | ||
| PASS Time Miniature Half JACK | ||
| TF2Maps 72hr TF2Jam Participant |
Disgaea promotional items
| Prinny Hat | ||
| Prinny Pouch | ||
| Prinny Machete |
These items are given to those who purchase Disgaea PC, or purchased through the Mann Co. Store.
Taunts
| Carlton | ||
| Fubar Fanfare | ||
| Balloonibouncer | ||
| Disco Fever |
Tools
Maps
| Name | Picture | Game mode | File name |
|---|---|---|---|
| District | 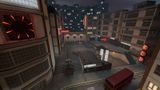
|
PASS Time
|
pass_district
|
| Metalworks | 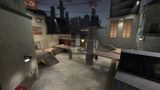
|
Control Point |
cp_metalworks
|
| Sunshine | 
|
Control Point |
cp_sunshine
|
| Swiftwater | 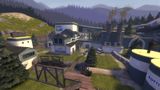
|
Payload
|
pl_swiftwater
|
Tweaked Classes
| Class | Changes |
|---|---|
Tweaked Weapons
| Class | Weapon | Changes |
|---|---|---|
Shortstop |
||
Soda Popper |
||
Crit-a-Cola |
||
Sun-on-a-Stick |
||
Righteous Bison |
||
Disciplinary Action |
||
Manmelter |
||
Iron Bomber |
||
Quickiebomb Launcher |
||
Natascha |
||
Brass Beast |
||
Huo-Long Heater |
||
Widowmaker |
||
Pomson 6000 |
||
Short Circuit |
||
Eureka Effect |
||
Overdose |
||
Quick-Fix |
||
Sydney Sleeper |
||
Cozy Camper |
||
Enforcer |
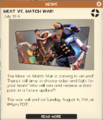
Heavy vs. Pyro
Announced with the Meet Your Match Update was the Heavy vs. Pyro war. As mentioned on Page 2 of the update, Heavy and Pyro were fighting for which class would be the first to receive a class-specific pack in a future update that would bring new rebalances, weapons, achievements and more. Upon launching the game after the July 7th, 2016 Patch, players were able to pick a side in the main menu. Scoring points as any class in either Casual Mode or Competitive Mode would count towards the player's "vote", whose total accumulation represented by a percentage for each side. The event started on July 7th and concluded on August 14th 11:59 PM.
At the conclusion of the event, Team Pyro won with 56% of the total votes while Team Heavy received 44%, thus guaranteeing that the Pyro would receive the first class pack. Over a year later, the Jungle Inferno Update released the new Pyro class pack.
Achievements
Two new achievements were introduced in this update.
|
|


Gallery
In-game notification about the release of the update.
In-game notification about the end of the war event.

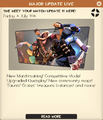
Screenshot of the update page of day 1.

Screenshot of the update page of day 2 (excluding patch notes).


External links
| |||||||||||||||||||||||||||||||||||||||||||||||||||||||||||||||||||||||||||||||||||||||||||||||