Difference between revisions of "User:Lolimsogreat21/Sandbox1"
(→Defense) |
(→{{class link|Heavy}}) |
||
| Line 105: | Line 105: | ||
=== {{class link|Heavy}} === | === {{class link|Heavy}} === | ||
| + | ==== Offense ==== | ||
| + | * It is of upmost importance that you provide suppressive fire to fellow attackers attempting to seize the Cliffs. | ||
| + | * Although [[Sniper]]s are not much of a threat on this map, they can still be lethal on the first control point, which is quite open. | ||
| + | * You can surprise your opponents on Control Point B by dropping through an opening in B Hut's roof. | ||
| + | * Red Snipers usually do not watch the Final point's right flank, giving you an opportunity to accomplish something. | ||
| + | ==== Defense ==== | ||
| + | * You will mostly encounter medium-range combat during the first part of Altitude, making the [[Tomislav]] a good choice here. | ||
| + | * Staying in the Warehouse is not recommended, since if you wish to retreat to Jenkin Coal.co, you will have to traverse a big sightline. | ||
| + | * As your team is retreating to Point B, you can act as a [https://en.wikipedia.org/wiki/Rearguard rear guard] by defending the Valley. | ||
| + | * Due to various flank routes present, the [[Buffalo Steak Sandvich]] can be used somewhat effectively around the area of Control Point B. | ||
=== {{class link|Engineer}}=== | === {{class link|Engineer}}=== | ||
Revision as of 20:22, 23 January 2022
| “Sun Tzu's got nothing on us!” This article is a Community strategy stub. As such, it is not complete. You can help the Team Fortress Wiki Community Strategy Project by expanding it. |
| Lolimsogreat21 | |
|---|---|

| |
| Basic Information | |
| Developer(s): | Unknown |
| Map Info | |
| Environment: | Alpine |
| Setting: | Daylight, snowy |
| Hazards: | Pitfalls |
| Map Photos | |
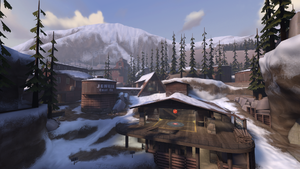
This article is about Community Altitude strategy.
Note: It is recommended to read the main Altitude article first to become familiar with the names of key map locations used in this article.
General Strategy
Offense
- Every control point has multiple flank routes leading up to it. If one particular path is not working out, then try another.
- However, these very same flank routes can be utilized by the defenders, so beware!
- Due to drastic variations in elevation, having the ability to quickly change one's vertical position is quite important for a successful assault.
- Certain locations, such as Cliffs, Warehouse or B Hut usually become the epicenters of Red defenses. As such, they need to be secured first, before checkpoints themselves.
- The Cliffs can be captured by either sneaking up to them from the left side, or by quickly Rocket jumping to their top.
- The Warehouse is prone to being cut of from the Rocks.inc, thus isolating its defenders.
- The B Hut has an opening in its roof, through which explosives can be hurled.
Defense
- If the opportunity is right, Red members can occasionally outflank the attackers by making use of the various flank routes present.
- Defensive strategies such as laying Sticky traps and Turtling, which may work on other maps, are not particularly effective here, due to a general lack of Chokepoints.
- A Red team should not rely on Snipers for defense, since good sightlines are often broken up by multiple pieces of cover.
- This map contains lots of nooks and crannies, which serve as excellent hiding places for ambushes. They include, but are not limited to:
- Top of a bookshelf inside the Side Building.
- Under the Water tower.
- Under a staircase in the B Hut.
Class-specific strategy
 Scout
Scout
Offense
- Sneaking through the Side Building will allow you to get behind the Cliffs.
- By reaching the Rocks.inc, you will be able to flank behind the Warehouse and subsequently its defenders.
- Having either the Soda Popper or the Atomizer equipped grants you ability to jump on the B Hut's roof.
- Avoid heading directly into the B Hut, due to its cramped interior and the usual presence of a Sentry Gun.
- Move carefully through the Cable Cars' terminal, as its enclosed and compact nature ensure that you are at a disadvantage.
- Bonk! Atomic Punch is useful for distracting Sentry Guns on the final point, which are numerous.* Sneaking through the Side Building will allow you to get behind the Cliffs.
Defense
- You can launch valleys of Mad Milk, as well as other projectiles, from the elevations of Cliffs.
- Counter-flanking the attackers can be achieved through the Side Building.
- The Gated Shortcut can be quickly ascended with the help of the Force-A-Nature's self-knockback.
- Blu attackers love to setup a forward base in the Server room. Although you cannot destroy it singlehandedly, you can still harass it by doing swift attacks from multiple sides.
- Particularly helpful here are weapons which can deal high burst damage, such as the Flying Guillotine, as these allow you to pull of hit-n-run tactics
 Soldier
Offense
- It is important that you contest the Cliff position immediately after exiting the spawn, due to its immense High ground advantage.
- You can do this by utilizing your Rocket jump ability.
- There is a small opening in the B Hut's top, through which it is possible to launch rockets onto the defenders below.
- Of course, this requires you to first take control over the B Hut's roof.
- Due to the abundance of Sentry Guns found on the last control point, it is advised to use the Direct Hit.
- The Battalion's Backup is also useful in this case.
- Approaching the Server room from the direction of Red's first spawn will put you at an advantage.
Defense
- Beware of enemy Soldiers attempting to steal your high ground on the Cliffs.
- Rocket jumping to the very top of B Hut will give you a good overview of the map, but will leave you exposed to enemy Snipers.
- The Gunboats are very effective in the middle part of the map, where there is plenty of space for Rocket jumping.
- Use your explosives to wreck havoc on Blu Sentry nests commonly positioned in the Server room.
- Equipping one of the Banners will significantly boost the defenses of the last control point, where team coordination is more important than individual performance.
- For example, a good Buff Banner charge can completely obliterate a push coming through the main Chokepoint.
 Pyro
Pyro
Offense
- Since the Blu team starts out in the low ground, Compression Blast will be needed in order to protect against incoming Red Projectiles.
- Using the Powerjack, a Pyro can swiftly flank through the Side Building and reach the Cliff's Rocks.inc.
- Due to a common Sentry position, it is advised against going directly in the B Hut. However, a simple ÜberCharge can solve this problem.
- It is possible to sneak up to the Red's final spawn from its left side, from which you can spam Flares onto the defenders below.
- This also allows you to blockade the Red spawn, all while avoiding the common Sentry positions around checkpoint C.
Defense
- Blu Spies like to infiltrate in through the Side Building, something you can put an immediate stop to.
- Once the Cliffs get captured, be prepared for a hail of Blu projectiles to be hurled against you and your teammates.
- The Cable Cars' terminal offer plenty of tight, congregated spaces which your shot-ranged flames can take advantage off.
- The Thermal Thruster is useful for quickly reaching the catwalks above the Server room.
 Demoman
Offense
- Use the arc of your projectiles in order to shower the Cliff in grenades.
- At control point A, You can block the Red team's escape route by laying sticky traps just in front of Blu's second spawn.
- Approaching the B hut from its left side will give you a good angle on the Sentry Guns within it.
- Just beware of that Pitfall on the side while doing this.
- Defenders will often fortify the final point by setting up a Sentry nest right below the Server room, making it hard to approach without an ÜberCharge.
- The compact nature of the Cable Cars' terminal allow your opponents to close the distance between you much faster. Something to be wary of.
Defense
- The Scottish Resistance is particularly effective on Control Point A, where you can overlook nearly all Blu spawn exit from the top of the Cliff's.
- The presence of various flank routes, combined with a general lack of Sentries, makes Demoknight a good pick on Altitude. Especially on defense.
- Trimping can be effectively performed on the B Hut's roof.
- Blu Engineers love to setup a Teleporter exit in the Gated Shortcut, whose gates you can then sticky trap.
- Although this map does not contain many Chokepoints, there are still some cramped areas through which attackers like funnel, such as: The Cliff's Rocks.inc building, the Triangular House, the Server Room and the chokepoint beneath it.
 Heavy
Heavy
Offense
- It is of upmost importance that you provide suppressive fire to fellow attackers attempting to seize the Cliffs.
- Although Snipers are not much of a threat on this map, they can still be lethal on the first control point, which is quite open.
- You can surprise your opponents on Control Point B by dropping through an opening in B Hut's roof.
- Red Snipers usually do not watch the Final point's right flank, giving you an opportunity to accomplish something.
Defense
- You will mostly encounter medium-range combat during the first part of Altitude, making the Tomislav a good choice here.
- Staying in the Warehouse is not recommended, since if you wish to retreat to Jenkin Coal.co, you will have to traverse a big sightline.
- As your team is retreating to Point B, you can act as a rear guard by defending the Valley.
- Due to various flank routes present, the Buffalo Steak Sandvich can be used somewhat effectively around the area of Control Point B.
