Difference between revisions of "Community Lazarus strategy"
m (→Class-specific strategy) |
m (Auto: Sync Map infobox) |
||
| (2 intermediate revisions by 2 users not shown) | |||
| Line 3: | Line 3: | ||
{{Map infobox | {{Map infobox | ||
| map-strategy = yes | | map-strategy = yes | ||
| − | | game-type | + | | map-status = community |
| − | | file-name | + | | map-name = Lazarus |
| + | | map-game-type = King of the Hill | ||
| + | | map-file-name = koth_lazarus | ||
| map-image = Lazarus main.jpg | | map-image = Lazarus main.jpg | ||
| − | | | + | | map-released = {{Patch name|10|20|2017}} |
| − | + | | map-released-major = Jungle Inferno Update | |
| − | | | ||
| map-environment = Jungle, tropical, industrial | | map-environment = Jungle, tropical, industrial | ||
| map-setting = Daylight, sunny | | map-setting = Daylight, sunny | ||
| + | | map-stamp-link = https://steamcommunity.com/stats/TF2/leaderboards/2240343 | ||
| map-hazards = [[Pitfall]]s | | map-hazards = [[Pitfall]]s | ||
| − | | map-health | + | | map-pickups-health-small = 6 |
| − | | map-health | + | | map-pickups-health-medium = 7 |
| − | | map-ammo | + | | map-pickups-ammo-small = 8 |
| − | | map-ammo | + | | map-pickups-ammo-medium = 6 |
| − | | map-ammo | + | | map-pickups-ammo-large = 2 |
| − | | map-bots = | + | | map-has-bots = yes |
}} | }} | ||
| Line 49: | Line 51: | ||
=== {{class link| Pyro }} === | === {{class link| Pyro }} === | ||
| − | * The alcoves are not the only locations from which to ambush enemy contesting the point. There are several other locations from which to ambush enemy players that are capping the point. | + | * The alcoves are not the only locations from which to ambush the enemy contesting the point. There are several other locations from which to ambush enemy players that are capping the point. |
* The Low Routes and Cliffside Routes offer a path for getting behind an enemy push onto the point. | * The Low Routes and Cliffside Routes offer a path for getting behind an enemy push onto the point. | ||
* These sunken routes are also paths for Spies to infiltrate your team’s positions, so be sure to Spy check these areas whenever you are there. | * These sunken routes are also paths for Spies to infiltrate your team’s positions, so be sure to Spy check these areas whenever you are there. | ||
| − | *As your team is about to capture the point, the enemy had likely been killed off from the High Route; take a chance on sweeping out the buildings in the enemy Digs, especially if | + | *As your team is about to capture the point, the enemy had likely been killed off from the High Route; take a chance on sweeping out the buildings in the enemy Digs, especially if an enemy Sentry Gun is down there. |
=== {{class link|Demoman}} === | === {{class link|Demoman}} === | ||
| Line 76: | Line 78: | ||
*The Garage offers a particularly wide sneak path into the enemy Yard. | *The Garage offers a particularly wide sneak path into the enemy Yard. | ||
* From the rocks in front, it is easy to look inside the enemy Spawn and see when no one is spawning and it is safe to sap the Teleporter entrance. | * From the rocks in front, it is easy to look inside the enemy Spawn and see when no one is spawning and it is safe to sap the Teleporter entrance. | ||
| + | |||
| + | {{Map Strategy Nav}} | ||
Latest revision as of 19:55, 20 January 2024
| “Sun Tzu's got nothing on us!” This article is a Community strategy stub. As such, it is not complete. You can help the Team Fortress Wiki Community Strategy Project by expanding it. Notes: Expand the General strategy some more, and add missing classes to Class strategy. |
| Lazarus | |
|---|---|

| |
| Basic Information | |
| Map type: | King of the Hill |
| File name: | koth_lazarus
|
| Released: | October 20, 2017 Patch (Jungle Inferno Update) |
| Developer(s): | Aeon "Void" Bollig Fuzzymellow Tim "SediSocks" Brown Lees Sky Benjamin "blaholtzen" Blåholtz Stiffy360 |
| Map Info | |
| Environment: | Jungle, tropical, industrial |
| Setting: | Daylight, sunny |
| Hazards: | Pitfalls |
| Bot support: | Yes |
| Map Items | |
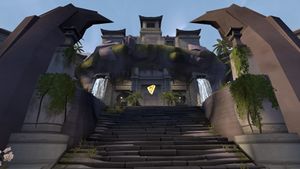
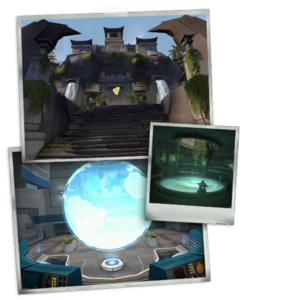
| Map Photos | |
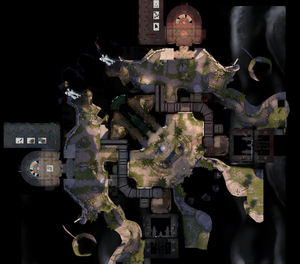
| Map Overview | |
This article is about Community Lazarus strategy.
Note: It is recommended to read the main Lazarus article first to become familiar with the names of key map locations used in this article.
General strategy
- Compared to some other King of the Hill maps, like Viaduct or Brazil, the point of Lazarus is much less exposed to long range fire, encouraging closer combat over the point. Other than the direct High Routes to the point, no distant position has a clear field of fire of the whole of the point. Most have a clear shot at half or less of the point. And with the symmetrical 90 degree Bend of the map at the point, players on one of the direct High Routes are blocked from firing directly on enemy approaching the point on the opposing High Route.
- A particular feature of this map is The Digs. These are relatively defensible positions for Engineer nests right on the point. With full teams on each side, victory can largely hinge on the adequacy of the Engineer nest in this position and the help teammates give to keep it safe.
- All teammates should share the responsibility of keeping the enemy away from the lower entrance.
- If the enemy has the point, not every player Teleporting into The Digs should jump out of the upper exit; several should take the lower exit, Spy checking on the way, and defend and fight from The Corridor.
- After capturing the point, your team should take out the nest in the enemy Digs and then fight past the point to at least control the enemy exits from their Corridor, while being careful not to overextend.
- The small Ammo and Health pickups in The Alcoves are really only for topping off: If you have a lot of damage, leave the Health pickups for less damaged teammates to use, and run back though the low entrance of The Digs and the nest there, which probably needs a Spy check anyway.
- The Alcoves are natural locations to wait in Ambush.
- The Alcove on the enemy’s side seems a natural place for attacking the backs of enemy running onto the point.
- However, some of the enemy know this and The Alcove on the enemy’s side can then be something of a trap.
- When attempting to retake The Corridor, The Subs end is harder for the enemy to attack. Secure that end first and then make a two or three prong attack to retake The Digs.
Class-specific strategy
 Scout
Scout
 Soldier
 Pyro
Pyro
- The alcoves are not the only locations from which to ambush the enemy contesting the point. There are several other locations from which to ambush enemy players that are capping the point.
- The Low Routes and Cliffside Routes offer a path for getting behind an enemy push onto the point.
- These sunken routes are also paths for Spies to infiltrate your team’s positions, so be sure to Spy check these areas whenever you are there.
- As your team is about to capture the point, the enemy had likely been killed off from the High Route; take a chance on sweeping out the buildings in the enemy Digs, especially if an enemy Sentry Gun is down there.
 Demoman
- You may want to throw Grenades into the upper exit of the enemy’s Digs, but don’t do that without anyone covering your back or from any position exposed to an active enemy Sniper.
 Heavy
Heavy
- Standing in the middle of the point you have already captured is a bit overexposed; defend from just outside the capture zone and fire from the corners where there is some cover and but still cover the whole point.
- Strike a position that can cover the point but not be hits from openings of the enemy's Corridor.
 Engineer
- The main location for a nest is The Digs; it is very close to the point but cannot be directly attacked from there.
- Buildings should be located so that they are not easily destroyed by Grenades spamming through either doorway.
- One Sentry Gun should be located to fire instantly on a Soldier landing in the upper exit, but not be placed so the Soldier has a clear shot the moment they land.
- A second nest can be set up in the protected corner in The Corridor between The Digs and the exit to the High Route. This give some defense-in-depth to the nest inside The Digs.
 Sniper
- The doorway at The Subs end is a natural camp, but is easily flanked by enemy that can pass beneath the notice of a scoped Sniper into the cave past The Subs to the back of the Sniper.
 Medic
Medic
- Keep in mind as Medic, you should try and attempt to stay out of long sightlines for enemy Snipers (of which there are a few onto the point, particularly from The Subs), and make sure the power classes such as Heavy, Demoman, and Soldier stay alive to keep control of the point.
 Spy
Spy
- The Garage offers a particularly wide sneak path into the enemy Yard.
- From the rocks in front, it is easy to look inside the enemy Spawn and see when no one is spawning and it is safe to sap the Teleporter entrance.

