Difference between revisions of "Upward (competitive)/es"
(translating) |
m (Auto: EnforceCapitalization(Dispenser), EnforceCapitalization(Payload), WordFilter([Üüu]ber(?!säge)(?!sage)(?! Entertainment)(?: ?charge)?s → ÜberCharges), WordFilter((?<!Mini.)(?<!Mah.)(?<!My.)Sentry(?![-\s]*(?:Gun|here|ahead|forward|up there|ri...) |
||
| (One intermediate revision by one other user not shown) | |||
| Line 1: | Line 1: | ||
| − | {{DISPLAYTITLE:Upward}} | + | {{DISPLAYTITLE:Upward (competitivo)}} |
{{competitive|generic=Upward}} | {{competitive|generic=Upward}} | ||
{{Map infobox | {{Map infobox | ||
| Line 24: | Line 24: | ||
*'''Barranco izquierdo:''' A small rocky platform which is a common place for the attacking [[Heavy]], [[Demoman]] and the [[Medic]] to push out from. | *'''Barranco izquierdo:''' A small rocky platform which is a common place for the attacking [[Heavy]], [[Demoman]] and the [[Medic]] to push out from. | ||
*'''Puente derecho:''' A wooden bridge which leads to the right flank, with a [[pitfall]] hazard to the far right. | *'''Puente derecho:''' A wooden bridge which leads to the right flank, with a [[pitfall]] hazard to the far right. | ||
| − | *'''El valle:''' Where the | + | *'''El valle:''' Where the Payload will be pushed down, the metal structure can be jumped on and is a common place for the [[Sniper]] to get picks. |
<gallery widths=140px heights=80px> | <gallery widths=140px heights=80px> | ||
Image:Upward1.png|Primer punto de control. | Image:Upward1.png|Primer punto de control. | ||
</gallery> | </gallery> | ||
=== Punto de control B === | === Punto de control B === | ||
| − | *'''La caseta de vigilancia''' (también llamado '''flanco derecho'''): is a wooden staircase which leads to an over-watch hut with open windows. This is a common place for the [[ | + | *'''La caseta de vigilancia''' (también llamado '''flanco derecho'''): is a wooden staircase which leads to an over-watch hut with open windows. This is a common place for the [[Combo (competitive) |combo]] to push from, especially an [[über]]ed Heavy. The defending Engineer is likely to set up underneath the hut near the "rolling-spawn" to defend Checkpoint B. |
| − | *'''El túnel:''' The | + | *'''El túnel:''' The Payload cart will be pushed out of this tunnel onto the point, the tunnel has wooden supports and two flanks on both the left and the right which lead up to the surface. Above the Tunnel is a wooden structure and a hill which is a very common place for defending [[Engineers]] to set up and defend Checkpoint A. The Tunnel also has a wooden balcony which is perfect for ambushing and the Blu teams next spawn point. |
<gallery> | <gallery> | ||
Image:Upward2.png|Segundo punto de control. | Image:Upward2.png|Segundo punto de control. | ||
| Line 37: | Line 37: | ||
=== Punto de control C === | === Punto de control C === | ||
*'''El balcón:''' The Balcony consists of a long wooden structure to a flanking root inside the house. It is common for the Blu team to push through this way and also underneath it. It also makes a good spot for the attacking Engineer to place a Teleporter and a Dispenser as it is close to an ammo pack and a [[health pack]]. The Balcony also allows the Blu team to flank behind the Red team too their last point. | *'''El balcón:''' The Balcony consists of a long wooden structure to a flanking root inside the house. It is common for the Blu team to push through this way and also underneath it. It also makes a good spot for the attacking Engineer to place a Teleporter and a Dispenser as it is close to an ammo pack and a [[health pack]]. The Balcony also allows the Blu team to flank behind the Red team too their last point. | ||
| − | *'''Andamio:''' The | + | *'''Andamio:''' The Payload cart will be pushed on this "wooden scaffolding" which is very close to point C and also has some small ramps which the Payload will slide down if not being pushed. Underneath allows players to drop onto a health kit which is used by defending [[Spy|Spies]] to escape. |
*'''La casa:''' The House is on the left flank, it is a small metal hut with an [[ammo pack]] leading to a health kit which is under the '''Scaffolding'''. It isn't used often as Demomen can easily spam into the house and kill anyone inside it. | *'''La casa:''' The House is on the left flank, it is a small metal hut with an [[ammo pack]] leading to a health kit which is under the '''Scaffolding'''. It isn't used often as Demomen can easily spam into the house and kill anyone inside it. | ||
<gallery> | <gallery> | ||
| Line 45: | Line 45: | ||
=== Punto de control D (último punto de control) === | === Punto de control D (último punto de control) === | ||
*'''El balcón:''' The Balcony is a long stretch of high ground opposite too the Red's final [[spawn room]]. It is a common place for the attacking combo too hold and allows for the attacking Sniper too have an over view of the enemy team. | *'''El balcón:''' The Balcony is a long stretch of high ground opposite too the Red's final [[spawn room]]. It is a common place for the attacking combo too hold and allows for the attacking Sniper too have an over view of the enemy team. | ||
| − | *'''Entrada principal:''' The | + | *'''Entrada principal:''' The Payload cart will come through this large entrance onto more scaffolding to be finally dropped into a large pitfall hazard. Attacking Scouts can easily push the cart into the pitfall without being damaged due to his small [[hitbox]] size. |
*'''Pasaje subterráneo:''' Underneath the '''main entrance''' is a small platform which leads too Checkpoint C, it is commonly used by Spies to escape or flank the opposing team. | *'''Pasaje subterráneo:''' Underneath the '''main entrance''' is a small platform which leads too Checkpoint C, it is commonly used by Spies to escape or flank the opposing team. | ||
<gallery> | <gallery> | ||
| Line 74: | Line 74: | ||
* Some of your team members should suicide on the hill top above the tunnel so the Engineer can build more quickly. | * Some of your team members should suicide on the hill top above the tunnel so the Engineer can build more quickly. | ||
* Hold on the left cliff with the combo, make sure your Soldier and your Scout watches the flanks. | * Hold on the left cliff with the combo, make sure your Soldier and your Scout watches the flanks. | ||
| − | * As Soldier, hiding behind the house is a good place to get a pick on the Medic before he | + | * As Soldier, hiding behind the house is a good place to get a pick on the Medic before he ÜberCharges. |
;Segundo punto | ;Segundo punto | ||
* Your Engineer should build underneath the hut. However, it should only be temporary as an über can easily dispose of your [[Sentry Gun]]. | * Your Engineer should build underneath the hut. However, it should only be temporary as an über can easily dispose of your [[Sentry Gun]]. | ||
| − | * Always watch the side-path as Snipers can easily pick off team mates out of the Sentry's range. | + | * Always watch the side-path as Snipers can easily pick off team mates out of the Sentry Gun's range. |
;Tercer punto | ;Tercer punto | ||
| Line 86: | Line 86: | ||
;Último punto | ;Último punto | ||
* As Sniper, watch for the enemy Sniper ''at all times'' as he is a large threat to your team mates. | * As Sniper, watch for the enemy Sniper ''at all times'' as he is a large threat to your team mates. | ||
| − | * A | + | * A Dispenser should be placed on the side to the entrance so your combo can easily get ammo and health. |
* Watch for Scouts hiding behind the cart as they won’t be spotted by the Sentry Gun. | * Watch for Scouts hiding behind the cart as they won’t be spotted by the Sentry Gun. | ||
Latest revision as of 13:00, 20 August 2024
El mundillo competitivo cambia y evoluciona con el paso del tiempo, puedes encontrar información desactualizada.
| Upward | |
|---|---|

| |
| Información básica | |
| Tipo de mapa: | Carga Explosiva |
| Nombre del archivo: | pl_upward
|
| Variantes: | Hassle Castle |
| Desarrollado por: | Valve |
| Información del mapa | |
| Entorno: | Desierto |
| Escenario: | Día, soleado |
| Peligros: | Pozo de la muerte |
| Objetos del mapa | |
| Imágenes del mapa | |
 | |
| Vista general | |
 | |
Upward es un mapa de Carga Explosiva de etapa única con 4 puntos, los cuales deben ser capturados para ganar y el equipo defensor tratará de evitar que los capturen hasta que se agote el tiempo. Con cada captura se añade tiempo al contador. Como en la mayoría de mapas, el equipo RED defiende y el equipo BLU ataca. Este mapa se juega competitivamente en Highlander y es de los más populares; aunque no es muy común, algúna vez se juega en 6c6.
Índice
Ubicaciones
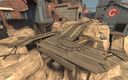
Punto de control A
- Barranco izquierdo: A small rocky platform which is a common place for the attacking Heavy, Demoman and the Medic to push out from.
- Puente derecho: A wooden bridge which leads to the right flank, with a pitfall hazard to the far right.
- El valle: Where the Payload will be pushed down, the metal structure can be jumped on and is a common place for the Sniper to get picks.
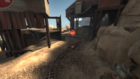
Primer punto de control.

Punto de control B
- La caseta de vigilancia (también llamado flanco derecho): is a wooden staircase which leads to an over-watch hut with open windows. This is a common place for the combo to push from, especially an übered Heavy. The defending Engineer is likely to set up underneath the hut near the "rolling-spawn" to defend Checkpoint B.
- El túnel: The Payload cart will be pushed out of this tunnel onto the point, the tunnel has wooden supports and two flanks on both the left and the right which lead up to the surface. Above the Tunnel is a wooden structure and a hill which is a very common place for defending Engineers to set up and defend Checkpoint A. The Tunnel also has a wooden balcony which is perfect for ambushing and the Blu teams next spawn point.
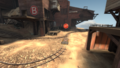
Segundo punto de control.

Punto de control C
- El balcón: The Balcony consists of a long wooden structure to a flanking root inside the house. It is common for the Blu team to push through this way and also underneath it. It also makes a good spot for the attacking Engineer to place a Teleporter and a Dispenser as it is close to an ammo pack and a health pack. The Balcony also allows the Blu team to flank behind the Red team too their last point.
- Andamio: The Payload cart will be pushed on this "wooden scaffolding" which is very close to point C and also has some small ramps which the Payload will slide down if not being pushed. Underneath allows players to drop onto a health kit which is used by defending Spies to escape.
- La casa: The House is on the left flank, it is a small metal hut with an ammo pack leading to a health kit which is under the Scaffolding. It isn't used often as Demomen can easily spam into the house and kill anyone inside it.
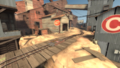
Tercer punto de control.

Punto de control D (último punto de control)
- El balcón: The Balcony is a long stretch of high ground opposite too the Red's final spawn room. It is a common place for the attacking combo too hold and allows for the attacking Sniper too have an over view of the enemy team.
- Entrada principal: The Payload cart will come through this large entrance onto more scaffolding to be finally dropped into a large pitfall hazard. Attacking Scouts can easily push the cart into the pitfall without being damaged due to his small hitbox size.
- Pasaje subterráneo: Underneath the main entrance is a small platform which leads too Checkpoint C, it is commonly used by Spies to escape or flank the opposing team.
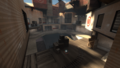
Punto final.

Estrategia
Atacando
- Primer punto
- Your Medic should stay in spawn until it is safe to prevent wasting an Übercharge.
- Pushing with an übered Demoman or Heavy is effective for this part as the defending team will usually be in tight spaces grouped together.
- Avoid pushing on the right flank near the bridge as a Pyro can easily dispatch of you by pushing you into the pitfall hazard.
- Segundo punto
- Pushing with an übered Heavy is extremely effective as the hut near the Red spawn room allows the Heavy to easily drop onto the Engineer's Sentry Gun and his team mates.
- Your Scout can hide behind the cart and not take damage if you can cover him, if he can capture the second point your team will spawn closer to them allowing you to put more pressure on them.
- Tercer punto
- Your Sniper should be able to get picks by hiding behind the cart whilst it goes up the scaffolding.
- Push through the house near the balcony on the left to close the distance between you and them.
- Último punto
- Use the balcony too hold as it gives you a height advantage.
- An Übercharged Demoman is more effective to push with.
Defendiendo
- Primer punto
- Some of your team members should suicide on the hill top above the tunnel so the Engineer can build more quickly.
- Hold on the left cliff with the combo, make sure your Soldier and your Scout watches the flanks.
- As Soldier, hiding behind the house is a good place to get a pick on the Medic before he ÜberCharges.
- Segundo punto
- Your Engineer should build underneath the hut. However, it should only be temporary as an über can easily dispose of your Sentry Gun.
- Always watch the side-path as Snipers can easily pick off team mates out of the Sentry Gun's range.
- Tercer punto
- As Engineer, try to get the Sentry Gun's range as close to the cart as possible to prevent the Sniper from peeking.
- Your combo should hold in the small house as it provides ammo, health cover and a height advantage.
- Último punto
- As Sniper, watch for the enemy Sniper at all times as he is a large threat to your team mates.
- A Dispenser should be placed on the side to the entrance so your combo can easily get ammo and health.
- Watch for Scouts hiding behind the cart as they won’t be spotted by the Sentry Gun.
Galería

Primer punto de control.

Segundo punto de control.
Tercer punto de control.

Último punto.


Salidas
- Demoman
La salida de Upward es muy fácil ya que son zonas abiertas y el límite del cielo está muy alto. El Demoman puede llegar a primera línea con 3 saltos o menos, cogiendo botiquines de camino, pero es recomendable no coger los de munición ya que algún Engineer puede necesitarlos.
- Soldier
Es similar a la del Demoman, saltando por la puerta y por el túnel hasta la base enemiga. Sin embargo, tardará más en llegar a la primera línea.
Véase también
| |||||||||||||||||||||||||||||||