Difference between revisions of "Scream Fortress 2018/pl"
BrazilianNut (talk | contribs) m |
BrazilianNut (talk | contribs) m (→Zawartość) |
||
| Line 13: | Line 13: | ||
{{main|Cosmetic items/pl|l1=Przedmioty ozdobne}} | {{main|Cosmetic items/pl|l1=Przedmioty ozdobne}} | ||
{| class="wikitable collapsible" cellpadding="3" style="text-align:center;" | {| class="wikitable collapsible" cellpadding="3" style="text-align:center;" | ||
| − | | width=" | + | | width="80px" style="background:#6A5587;" rowspan="3" | '''{{class link|scout|br=yes|color=white}}''' |
| − | | | + | | style="background:#8847FF;" | {{item icon|Athenian Attire|75px}} |
| − | | style="background: #F1ECF7;"| '''{{item link|Athenian Attire}}''' | + | | style="background:#F1ECF7;" | '''{{item link|Athenian Attire}}''' |
|- | |- | ||
| − | | | + | | style="background:#4B69FF;" | {{item icon|Hephaistos' Handcraft|75px}} |
| − | | style="background: #F1ECF7;"| '''{{item link|Hephaistos' Handcraft}}''' | + | | style="background:#F1ECF7;" | '''{{item link|Hephaistos' Handcraft}}''' |
|- | |- | ||
| − | | | + | | style="background:#4B69FF;" | {{item icon|Olympic Leapers|75px}} |
| − | | style="background: #F1ECF7;"| '''{{item link|Olympic Leapers}}''' | + | | style="background:#F1ECF7;" | '''{{item link|Olympic Leapers}}''' |
|- | |- | ||
| − | | | + | | style="background:#6A5587;" rowspan="2" | '''{{class link|soldier|br=yes|color=white}}''' |
| − | | | + | | style="background:#8847FF;" | {{item icon|Tank Top|75px}} |
| − | | style="background: #F1ECF7;"| '''{{item link|Tank Top}}''' | + | | style="background:#F1ECF7;" | '''{{item link|Tank Top}}''' |
|- | |- | ||
| − | | | + | | style="background:#4B69FF;" | {{item icon|Vampire Vanquisher|75px}} |
| − | | style="background: #F1ECF7;"| '''{{item link|Vampire Vanquisher}}''' | + | | style="background:#F1ECF7;" | '''{{item link|Vampire Vanquisher}}''' |
|- | |- | ||
| − | | | + | | style="background:#6A5587;" rowspan="3" | '''{{class link|pyro|br=yes|color=white}}''' |
| − | | | + | | style="background:#4B69FF;" | {{item icon|Arachno-Arsonist|75px}} |
| − | | style="background: #F1ECF7;"| '''{{item link|Arachno-Arsonist}}''' | + | | style="background:#F1ECF7;" | '''{{item link|Arachno-Arsonist}}''' |
|- | |- | ||
| − | | | + | | style="background:#D32CE6;" | {{item icon|Mr. Quackers|75px}} |
| − | | style="background: #F1ECF7;"| '''{{item link|Mr. Quackers}}''' | + | | style="background:#F1ECF7;" | '''{{item link|Mr. Quackers}}''' |
|- | |- | ||
| − | | | + | | style="background:#8847FF;" | {{item icon|Pyro in Chinatown|75px}} |
| − | | style="background: #F1ECF7;"| '''{{item link|Pyro in Chinatown}}''' | + | | style="background:#F1ECF7;" | '''{{item link|Pyro in Chinatown}}''' |
|- | |- | ||
| − | | | + | | style="background:#6A5587;" rowspan="1" | '''{{class link|demoman|br=yes|color=white}}''' |
| − | | | + | | style="background:#8847FF;" | {{item icon|Gaelic Glutton|75px}} |
| − | | style="background: #F1ECF7;"| '''{{item link|Gaelic Glutton}}''' | + | | style="background:#F1ECF7;" | '''{{item link|Gaelic Glutton}}''' |
|- | |- | ||
| − | | | + | | style="background:#6A5587;" rowspan="1" | '''{{class link|heavy|br=yes|color=white}}''' |
| − | | | + | | style="background:#4B69FF;" | {{item icon|Mann-O-War|75px}} |
| − | | style="background: #F1ECF7;"| '''{{item link|Mann-O-War}}''' | + | | style="background:#F1ECF7;" | '''{{item link|Mann-O-War}}''' |
|- | |- | ||
| − | | | + | | style="background:#6A5587;" rowspan="5" | '''{{class link|engineer|br=yes|color=white}}''' |
| − | | | + | | style="background:#8847FF;" | {{item icon|Aim Assistant|75px}} |
| − | | style="background: #F1ECF7;"| '''{{item link|Aim Assistant}}''' | + | | style="background:#F1ECF7;" | '''{{item link|Aim Assistant}}''' |
|- | |- | ||
| − | | | + | | style="background:#FFD700;" | {{item icon|A Shell of a Mann|75px}} |
| − | | style="background: #F1ECF7;"| '''{{item link|A Shell of a Mann}}''' | + | | style="background:#F1ECF7;" | '''{{item link|A Shell of a Mann}}''' |
|- | |- | ||
| − | | | + | | style="background:#D32CE6;" | {{item icon|Defragmenting Hard Hat 17%|75px}} |
| − | | style="background: #F1ECF7;"| '''{{item link|Defragmenting Hard Hat 17%}}''' | + | | style="background:#F1ECF7;" | '''{{item link|Defragmenting Hard Hat 17%}}''' |
|- | |- | ||
| − | | | + | | style="background:#FFD700;" | {{item icon|Dell in the Shell|75px}} |
| − | | style="background: #F1ECF7;"| '''{{item link|Dell in the Shell}}''' | + | | style="background:#F1ECF7;" | '''{{item link|Dell in the Shell}}''' |
|- | |- | ||
| − | | | + | | style="background:#4B69FF;" | {{item icon|Mini-Engy|75px}} |
| − | | style="background: #F1ECF7;"| '''{{item link|Mini-Engy}}''' | + | | style="background:#F1ECF7;" | '''{{item link|Mini-Engy}}''' |
|- | |- | ||
| − | | | + | | style="background:#6A5587;" rowspan="3" | '''{{class link|sniper|br=yes|color=white}}''' |
| − | | | + | | style="background:#FFD700;" | {{item icon|Crocodile Mun-Dee|75px}} |
| − | | style="background: #F1ECF7;"| '''{{item link|Crocodile Mun-Dee}}''' | + | | style="background:#F1ECF7;" | '''{{item link|Crocodile Mun-Dee}}''' |
|- | |- | ||
| − | | | + | | style="background:#4B69FF;" | {{item icon|Highway Star|75px}} |
| − | | style="background: #F1ECF7;"| '''{{item link|Highway Star}}''' | + | | style="background:#F1ECF7;" | '''{{item link|Highway Star}}''' |
|- | |- | ||
| − | | | + | | style="background:#FFD700;" | {{item icon|Scoper's Scales|75px}} |
| − | | style="background: #F1ECF7;"| '''{{item link|Scoper's Scales}}''' | + | | style="background:#F1ECF7;" | '''{{item link|Scoper's Scales}}''' |
|- | |- | ||
| − | | | + | | style="background:#6A5587;" rowspan="3" | '''{{class link|spy|br=yes|color=white}}''' |
| − | | | + | | style="background:#4B69FF;" | {{item icon|Bandit's Boots|75px}} |
| − | | style="background: #F1ECF7;"| '''{{item link|Bandit's Boots}}''' | + | | style="background:#F1ECF7;" | '''{{item link|Bandit's Boots}}''' |
|- | |- | ||
| − | | | + | | style="background:#8847FF;" | {{item icon|Dressperado|75px}} |
| − | | style="background: #F1ECF7;"| '''{{item link|Dressperado}}''' | + | | style="background:#F1ECF7;" | '''{{item link|Dressperado}}''' |
|- | |- | ||
| − | | | + | | style="background:#4B69FF;" | {{item icon|Murderer's Motif|75px}} |
| − | | style="background: #F1ECF7;"| '''{{item link|Murderer's Motif}}''' | + | | style="background:#F1ECF7;" | '''{{item link|Murderer's Motif}}''' |
|- | |- | ||
| − | | | + | | style="background:#6A5587;" rowspan="5" | '''{{class link|all classes|br=yes|color=white}}''' |
| − | | | + | | style="background:#4B69FF;" | {{item icon|Deadbeats|75px}} |
| − | | style="background: #F1ECF7;"| '''{{item link|Deadbeats}}''' | + | | style="background:#F1ECF7;" | '''{{item link|Deadbeats}}''' |
|- | |- | ||
| − | | | + | | style="background:#EB4B4B;" | {{item icon|Lucky Cat Hat|75px}} |
| − | | style="background: #F1ECF7;"| '''{{item link|Lucky Cat Hat}}''' | + | | style="background:#F1ECF7;" | '''{{item link|Lucky Cat Hat}}''' |
|- | |- | ||
| − | | | + | | style="background:#D32CE6;" | {{item icon|Terror-antula|75px}} |
| − | | style="background: #F1ECF7;"| '''{{item link|Terror-antula}}''' | + | | style="background:#F1ECF7;" | '''{{item link|Terror-antula}}''' |
|} | |} | ||
| Line 98: | Line 98: | ||
{{main|Taunts/pl|l1=Drwiny}} | {{main|Taunts/pl|l1=Drwiny}} | ||
{| class="wikitable collapsible" cellpadding=2 style="text-align:center;" | {| class="wikitable collapsible" cellpadding=2 style="text-align:center;" | ||
| − | | style="background | + | | width="80px" style="background:#6A5587;" | '''{{class link|scout|br=yes|color=white}}''' |
| − | | | + | | width="75px" style="background:#AD9DC3;" | {{Icon item|Scooty Scoot|75px}} |
| − | | style="background | + | | width="130px" style="background:#F1ECF7;" | '''{{item link|Scooty Scoot}}''' |
|- | |- | ||
| − | | style="background | + | | style="background:#6A5587;" | '''{{class link|soldier|br=yes|color=white}}''' |
| − | | | + | | style="background:#AD9DC3;" | {{Icon item|Panzer Pants|75px}} |
| − | | style="background | + | | style="background:#F1ECF7;" | '''{{item link|Panzer Pants}}''' |
|} | |} | ||
| Line 110: | Line 110: | ||
{{main|Tools/pl|l1=Narzędzia}} | {{main|Tools/pl|l1=Narzędzia}} | ||
{| class="wikitable collapsible" cellpadding="3" style="text-align:center;" | {| class="wikitable collapsible" cellpadding="3" style="text-align:center;" | ||
| − | | | + | | width="80px" style="background:#AD9DC3;" | {{item icon|Violet Vermin Case|75px}} |
| − | | style="background: #F1ECF7;"| '''{{item link|Violet Vermin Case}}''' | + | | width="215px" style="background:#F1ECF7;" | '''{{item link|Violet Vermin Case}}''' |
|- | |- | ||
| − | | | + | | style="background:#AD9DC3;" | {{item icon|Violet Vermin Key|75px}} |
| − | | style="background: #F1ECF7;"| '''{{item link|Violet Vermin Key}}''' | + | | style="background:#F1ECF7;" | '''{{item link|Violet Vermin Key}}''' |
|- | |- | ||
| − | | | + | | style="background:#AD9DC3;" | {{item icon|Scream Fortress X War Paint Case|75px}} |
| − | | style="background: #F1ECF7;"| '''{{item link|Scream Fortress X War Paint Case}}''' | + | | style="background:#F1ECF7;" | '''{{item link|Scream Fortress X War Paint Case}}''' |
|- | |- | ||
| − | | | + | | style="background:#AD9DC3;" | {{item icon|Scream Fortress X War Paint Key|75px}} |
| − | | style="background: #F1ECF7;"| '''{{item link|Scream Fortress X War Paint Key}}''' | + | | style="background:#F1ECF7;" | '''{{item link|Scream Fortress X War Paint Key}}''' |
|} | |} | ||
| Line 127: | Line 127: | ||
{|class="wikitable" cellpadding=2 style="text-align:center;" | {|class="wikitable" cellpadding=2 style="text-align:center;" | ||
|-style="height:20px;" | |-style="height:20px;" | ||
| − | !class="header" style="background-color:#6A5587;color:#FFFFFF;" |Nazwa | + | ! class="header" style="background-color:#6A5587;color:#FFFFFF;" | Nazwa |
| − | !class="header" style="background-color:#6A5587;color:#FFFFFF;" |Zdjęcie | + | ! class="header" style="background-color:#6A5587;color:#FFFFFF;" | Zdjęcie |
| − | !class="header" style="background-color:#6A5587;color:#FFFFFF;" |Tryb gry | + | ! class="header" style="background-color:#6A5587;color:#FFFFFF;" | Tryb gry |
| − | !class="header" style="background-color:#6A5587;color:#FFFFFF;" |Nazwa pliku | + | ! class="header" style="background-color:#6A5587;color:#FFFFFF;" | Nazwa pliku |
|- | |- | ||
| − | |style="background | + | | style="background:#AD9DC3;" | '''[[Cauldron/pl|<font color="white">Cauldron</font>]]''' |
| − | | | + | | style="background:#F1ECF7;" | [[File:Koth_bagel_event.png|160px|link=Cauldron/pl]] |
| − | | | + | | style="background:#F1ECF7;" | '''[[King of the Hill/pl|Król wzgórza]]'''<br>[[File:Controlpoint.png|50px|link=King of the Hill/pl]] |
| − | + | | {{code|koth_bagel_event}} | |
|- | |- | ||
| − | |style="background | + | | style="background:#AD9DC3;" | '''[[Cursed Cove/pl|<font color="white">Cursed Cove</font>]]''' |
| − | | | + | | style="background:#F1ECF7;" | [[File:Pd_cursed_cove_event.png|160px|link=Cursed Cove/pl]] |
| − | | | + | | style="background:#F1ECF7;" | '''[[Player Destruction/pl|Wyniszczenie]]'''<br>[[File:Hud_invasion_bottle.png|50px|link=Player Destruction/pl]] |
| − | + | | {{code|pd_cursed_cove_event}} | |
|- | |- | ||
| − | |style="background | + | | style="background:#AD9DC3;" | '''[[Gravestone/pl|<font color="white">Gravestone</font>]]''' |
| − | | | + | | style="background:#F1ECF7;" | [[File:Pl_rumble_event.png|160px|link=Gravestone/pl]] |
| − | | | + | | style="background:#F1ECF7;" | '''[[Payload/pl|Ładunek]]'''<br>[[File:Hoodoo Bombcart.png|50px|link=Payload/pl]] |
| − | + | | {{code|pl_rumble_event}} | |
|- | |- | ||
| − | |style="background | + | | style="background:#AD9DC3;" | '''[[Monster Bash/pl|<font color="white">Monster Bash</font>]]''' |
| − | | | + | | style="background:#F1ECF7;" | [[File:Pd_monster_bash.png|160px|link=Monster Bash/pl]] |
| − | | | + | | style="background:#F1ECF7;" | '''[[Player Destruction/pl|Wyniszczenie]]'''<br>[[File:Hud_invasion_bottle.png|50px|link=Player Destruction/pl]] |
| − | + | | {{code|pd_monster_bash}} | |
|- | |- | ||
| − | |style="background | + | | style="background:#AD9DC3;" | '''[[Slasher/pl|<font color="white">Slasher</font>]]''' |
| − | | | + | | style="background:#F1ECF7;" | [[File:Koth_slasher.png|160px|link=Slasher/pl]] |
| − | | | + | | style="background:#F1ECF7;" | '''[[King of the Hill/pl|Król wzgórza]]'''<br>[[File:Controlpoint.png|50px|link=King of the Hill/pl]] |
| − | + | | {{code|koth_slasher}} | |
|} | |} | ||
Revision as of 08:03, 27 November 2019
| „ | Ukończ nową porcję Merasmisji! Złóż w ofierze dusze dla Gargulca dusz! Zagraj w pięć nowych stworzonych przez społeczność halloweenowych map! Sprawdź nowe oficjalne drwiny, stworzone przez społeczność przedmioty ozdobne i barwy wojenne!
— Oficjalna strona TF2
|
” |
Scream Fortress 2018 było główną aktualizacją wydaną 19 października 2018. Aktualizacja dodała 2 drwiny, 5 map, 20 przedmiotów ozdobnych, 4 dostępne tylko w Halloween lub pełnię księżyca przedmioty ozdobne, 10 barw wojennych, 17 nietypowych efektów oraz dodała nowe halloweenowe kontrakty, które były bezpłatne dla wszystkich graczy za pośrednictwem ConTrackera.
Spis treści
Przebieg wydarzenia
Wydarzenie trwało od 19 października 2018 do 14 listopada 2018.
Zawartość
Przedmioty ozdobne
Drwiny
| Skauci skuter | ||
| Pancerne pantalony |
Narzędzia
| Skrzynia purpurowego pająka | |
| Klucz do skrzyni purpurowego pająka | |
| Skrzynia barw wojennych Scream Fortress X | |
| Klucz do skrzyni barw wojennych Scream Fortress X |
Mapy
| Nazwa | Zdjęcie | Tryb gry | Nazwa pliku |
|---|---|---|---|
| Cauldron | 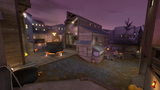
|
Król wzgórza |
koth_bagel_event
|
| Cursed Cove | 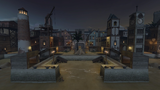
|
Wyniszczenie
|
pd_cursed_cove_event
|
| Gravestone | 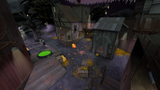
|
Ładunek
|
pl_rumble_event
|
| Monster Bash | 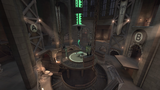
|
Wyniszczenie
|
pd_monster_bash
|
| Slasher | 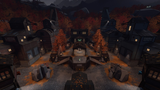
|
Król wzgórza |
koth_slasher
|
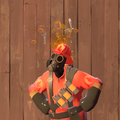
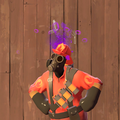
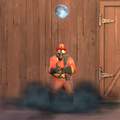
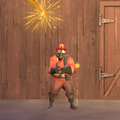
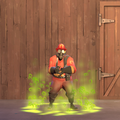
Nietypowe efekty

Drenaż mózgu
Otwarty umysł
Parująca głowa
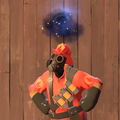
Galaktyczne przejście

Nadprzyrodzone przejście
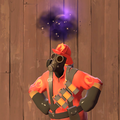
Mroczne przejście

Pierścień ognia

Błędne koło

Biała błyskawica

Kryształowa kula

Jasnowidzenie
Upiorna noc

Złowieszcza noc
Ryczące rakiety

Łatwopalne bąbelki uroku
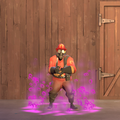
Trujące bąbelki żalu
Kwasowe bąbelki zazdrości


Galeria
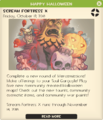
Powiadomienie w grze na temat rozpoczęcia wydarzenia.

Zobacz też
Linki zewnętrzne
- Scream Fortress X rozpoczęło się! (angielski)
| ||||||||||||||||||||||
| ||||||||||||||||||||||||||||||||||||||||||||||||||||||||||||||||||||||||||||||||||||||||||||||||||