Difference between revisions of "Community Byre strategy"
m |
m (Sync map infobox) |
||
| Line 6: | Line 6: | ||
| file-name = arena_byre | | file-name = arena_byre | ||
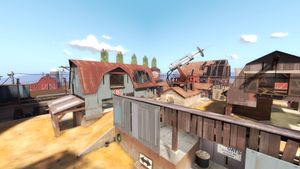
| map-image = Arena byre b40007.jpg | | map-image = Arena byre b40007.jpg | ||
| − | | developer = | + | <!--| release-date = October 5th, 2014--> |
| − | + | | developer = {{Steamid|76561197995198755|Ian "idolon" Spadin}}<br/>{{Steamid|76561197961622685|Gavin "Equinoxo" Sawford}}<br/>{{Steamid|76561197999837111|Guy "Gerbil" Ross}}<br/>{{Steamid|76561198002826921}}<br/>{{Steamid|76561197992729564|Kevin "Ravidge" Brook}}<br/>{{Steamid|76561197993205795|Matt "Boylee" Boyle}}<br/>{{Steamid|76561197990164810|Sebastian "Seba" Grus}}<br/>{{Steamid|76561197993770690|Umbratile}}<br/>{{Steamid|76561198026610207|The Ronin}} | |
| map-environment = Farmland/construction | | map-environment = Farmland/construction | ||
| map-setting = Daylight, sunny | | map-setting = Daylight, sunny | ||
Revision as of 13:41, 18 April 2021
| “Sun Tzu's got nothing on us!” This article is a Community strategy stub. As such, it is not complete. You can help the Team Fortress Wiki Community Strategy Project by expanding it. Notes: Expand the "General Strategy" section to cover map locations in more detail. Potentially look at the class-specific strategies as well. |
| Community Byre strategy | |
|---|---|

| |
| Basic Information | |
| Developer(s): | Unknown |
| Map Info | |
| Environment: | Farmland/construction |
| Setting: | Daylight, sunny |
This article is about Community Byre strategy.
Note: It is recommended to read the main Byre article first to become familiar with the names of key map locations used in this article.
General strategy
- Teams should focus their attention to the control points, capturing at least one before engaging the other team. As the map requires both points captured this will allow you to set up a defense against the enemy team.
- The drainage ditches are a great way to flank the enemy team protecting their point.
Class-specific strategy
 Scout
Scout
- Scouts can run from the drainage ditch for an ambush attack from behind.
- Due to lack of relative map size and distance compared to others, take advantage of vertical agility. Confuse your opponents' accuracy with sporadic jumps before landing a close "meatshot" with your Primary. The Atomizer can assist with this by granting triple jumps.
 Soldier
- With a quality rocket jump, you will have a good view of the enemy team to engage. Try to keep rocket jumping to a minimum as health is scarce, and the map lacks large distance to cover regardless.
- If you are cocksure of your accuracy with landing rockets, this is an ideal map to utilize the Direct Hit in.
- If you feel your team needs a defensive boost and the deathmatch will last longer than usual, consider using the Buff Banner or Battalion's Backup as a Secondary.
 Pyro
Pyro
- Pyros have great damage capabilities due to the map's small size, however this also means that there is less room to maneuver. The default Flamethrower is a reliable choice here.
- For similar reasons, use of the Shotgun is encouraged over long-range weapons like the Scorch Shot or Thermal Thruster.
 Demoman
- Bear in mind that with the double control points, the enemy team will have to work to get to your team's control point in order to win. This can lead to great opportunities to lay stickytraps.
- Demomen who are adept at spatial reasoning and timing may find great usage of the Scottish Resistance in this situation.
 Heavy
Heavy
- With the map's small size, Heavies can maneuver around offensively armed with a Shotgun or Family Business.
- Since you will not have a lunchbox item to heal others if you choose this strategy, if pocketed by a Medic, make sure to be extra aware and protective of your medical friend. Provide adequate cover but play assertively.
 Engineer
- Engineers should prioritize dropping their Dispenser ASAP to supply health to the rest of the team.
- Be wary of Sentry positions, as due to the lack of sufficient cover, a well-placed shot from a Soldier or Demoman can easily destroy it.
- The Jag can help quick setups in the likely case you find your buildings more easily destroyed in this sort of tighter map.
- For similar reasons, the Gunslinger may be a good choice if you are certain you can compensate for a weaker Sentry with offensive "Battle Engie" skills to clean up the enemy team with your Shotgun.
- Furthermore, the Eureka Effect is likely not a wise choice in this map in most situations.
 Medic
Medic
- Medics can turn the tide for your team. As health is scarce and far from the fight, Medics can keep your team's health stable in a firefight.
- The Kritzkrieg may be a prudent choice for brave Medics who want their patients to destroy the enemy with crit-filled ease.
 Sniper
- Despite not having any highground, the map has little cover, allowing for quick Snipers to pick off an enemy or two right at the start.
- The SMG can provide light offensive and defensive capability at a medium distance, when caught too off-guard to snipe an enemy in close quarters.
- Furthermore, the SMG can assist picking off the last opponent should you find yourself the last man on your team standing.
 Spy
Spy
- Although not an ideal map for Spies, due to the map's small size, a good Spy can catch the enemy team if they're in the middle of a firefight. Dodging and craftiness are essential to not be easily eliminated. Consider using the Diamondback and Cloak and Dagger to encourage an offensive yet tactical playstyle.
- Knives like the Big Earner and the Spycicle can fortify Spy's usefulness in this mode with opportunity for chain kills (via speed boost) in the former and survivability against Pyros in the latter.