Difference between revisions of "Smissmas 2014"
(infobox) |
BrazilianNut (talk | contribs) m (→Additions) |
||
| Line 17: | Line 17: | ||
{{main|Weapons}} | {{main|Weapons}} | ||
{| class="wikitable" cellpadding=2 style="text-align:center;" | {| class="wikitable" cellpadding=2 style="text-align:center;" | ||
| − | | width=" | + | | width="85px" style="background:#6B0000;" rowspan="2" | '''{{class link|Demoman|br=yes|color=white}}''' |
| − | | | + | | style="background:#990000;" | {{item icon|Iron Bomber|75px}} |
| − | | style="background: #FAE5E5;" | ''' | + | | style="background:#FAE5E5;" | '''{{item link|Iron Bomber}}''' |
|- | |- | ||
| − | | | + | | style="background:#990000;" | {{item icon|Quickiebomb Launcher|75px}} |
| − | | style="background: #FAE5E5;" | ''' | + | | style="background:#FAE5E5;" | '''{{item link|Quickiebomb Launcher}}''' |
| − | |||
| − | |||
| − | |||
| − | |||
|- | |- | ||
| + | | align="left" style="background:#6B0000;" | '''{{class link|Soldier|color=white}}'''<br/>'''{{class link|Pyro|color=white}}'''<br/>'''{{class link|Heavy|color=white}}'''<br/>'''{{class link|Engineer|color=white}}''' | ||
| + | | style="background:#990000;" | {{item icon|Panic Attack|75px}} | ||
| + | | style="background:#FAE5E5;" | '''{{item link|Panic Attack}}''' | ||
|} | |} | ||
=== Cosmetics === | === Cosmetics === | ||
| − | {{main| | + | {{main|Cosmetic items}} |
{| class="wikitable collapsible" cellpadding="3" style="text-align:center;" | {| class="wikitable collapsible" cellpadding="3" style="text-align:center;" | ||
| − | | width=" | + | | width="85px" style="background:#6B0000;" rowspan="3" | '''{{class link|Scout|br=yes|color=white}}''' |
| − | | | + | | style="background:#990000;" | {{item icon|Courtier's Collar|75px}} |
| − | | style="background: #FAE5E5;"| ''' | + | | style="background:#FAE5E5;" | '''{{item link|Courtier's Collar}}''' |
| − | |||
| − | |||
| − | |||
|- | |- | ||
| − | | | + | | style="background:#990000;" | {{item icon|Harlequin's Hooves|75px}} |
| − | | style="background: #FAE5E5;"| ''' | + | | style="background:#FAE5E5;" | '''{{item link|Harlequin's Hooves}}''' |
|- | |- | ||
| − | | | + | | style="background:#990000;" | {{item icon|Mountebank's Masque|75px}} |
| − | + | | style="background:#FAE5E5;" | '''{{item link|Mountebank's Masque}}''' | |
| − | | style="background: #FAE5E5;"| ''' | ||
|- | |- | ||
| − | | | + | | style="background:#6B0000;" | '''{{class link|Soldier|br=yes|color=white}}''' |
| − | | | + | | style="background:#990000;" | {{item icon|Skullcap|75px}} |
| − | | style="background: #FAE5E5;"| ''' | + | | style="background:#FAE5E5;" | '''{{item link|Skullcap}}''' |
|- | |- | ||
| − | | | + | | style="background:#6B0000;" rowspan="5" | '''{{class link|Pyro|br=yes|color=white}}''' |
| − | | style="background: #FAE5E5;"| ''' | + | | style="background:#990000;" | {{item icon|Black Knight's Bascinet|75px}} |
| + | | style="background:#FAE5E5;" | '''{{item link|Black Knight's Bascinet}}''' | ||
|- | |- | ||
| − | | | + | | style="background:#990000;" | {{item icon|Charred Chainmail|75px}} |
| − | | style="background: #FAE5E5;"| ''' | + | | style="background:#FAE5E5;" | '''{{item link|Charred Chainmail}}''' |
|- | |- | ||
| − | | | + | | style="background:#990000;" | {{item icon|Pyromancer's Hood|75px}} |
| − | | style="background: #FAE5E5;"| ''' | + | | style="background:#FAE5E5;" | '''{{item link|Pyromancer's Hood}}''' |
|- | |- | ||
| − | | | + | | style="background:#990000;" | {{item icon|Pyromancer's Raiments|75px}} |
| − | | style="background: #FAE5E5;"| ''' | + | | style="background:#FAE5E5;" | '''{{item link|Pyromancer's Raiments}}''' |
|- | |- | ||
| − | | | + | | style="background:#990000;" | {{item icon|Torcher's Tabard|75px}} |
| − | + | | style="background:#FAE5E5;" | '''{{item link|Torcher's Tabard}}''' | |
| − | | style="background: #FAE5E5;"| ''' | ||
|- | |- | ||
| − | | | + | | style="background:#6B0000;" rowspan="3" | '''{{class link|Demoman|br=yes|color=white}}''' |
| − | | style="background: #FAE5E5;"| ''' | + | | style="background:#990000;" | {{item icon|Scot Bonnet|75px}} |
| + | | style="background:#FAE5E5;" | '''{{item link|Scot Bonnet}}''' | ||
|- | |- | ||
| − | | | + | | style="background:#990000;" | {{item icon|Storm Stompers|75px}} |
| − | | style="background: #FAE5E5;"| ''' | + | | style="background:#FAE5E5;" | '''{{item link|Storm Stompers}}''' |
|- | |- | ||
| − | | | + | | style="background:#990000;" | {{item icon|Valhalla Helm|75px}} |
| − | + | | style="background:#FAE5E5;" | '''{{item link|Valhalla Helm}}''' | |
| − | | style="background: #FAE5E5;"| ''' | ||
|- | |- | ||
| − | | | + | | style="background:#6B0000;" rowspan="2" | '''{{class link|Heavy|br=yes|color=white}}''' |
| − | | style="background: #FAE5E5;"| ''' | + | | style="background:#990000;" | {{item icon|Old Man Frost|75px}} |
| + | | style="background:#FAE5E5;" | '''{{item link|Old Man Frost}}''' | ||
|- | |- | ||
| − | | | + | | style="background:#990000;" | {{item icon|Siberian Facehugger|75px}} |
| − | + | | style="background:#FAE5E5;" | '''{{item link|Siberian Facehugger}}''' | |
| − | | style="background: #FAE5E5;"| ''' | ||
|- | |- | ||
| − | | | + | | style="background:#6B0000;" rowspan="5" | '''{{class link|Engineer|br=yes|color=white}}''' |
| − | | style="background: #FAE5E5;"| ''' | + | | style="background:#990000;" | {{item icon|Clubsy The Seal|75px}} |
| + | | style="background:#FAE5E5;" | '''{{item link|Clubsy The Seal}}''' | ||
|- | |- | ||
| − | | | + | | style="background:#990000;" | {{item icon|Conagher's Combover|75px}} |
| − | | style="background: #FAE5E5;"| ''' | + | | style="background:#FAE5E5;" | '''{{item link|Conagher's Combover}}''' |
|- | |- | ||
| − | | | + | | style="background:#990000;" | {{item icon|Cop Caller|75px}} |
| − | | style="background: #FAE5E5;"| ''' | + | | style="background:#FAE5E5;" | '''{{item link|Cop Caller}}''' |
|- | |- | ||
| − | | | + | | style="background:#990000;" | {{item icon|Holstered Heaters|75px}} |
| − | | style="background: #FAE5E5;"| ''' | + | | style="background:#FAE5E5;" | '''{{item link|Holstered Heaters}}''' |
|- | |- | ||
| − | | | + | | style="background:#990000;" | {{item icon|Thermal Insulation Layer|75px}} |
| − | + | | style="background:#FAE5E5;" | '''{{item link|Thermal Insulation Layer}}''' | |
| − | | style="background: #FAE5E5;"| ''' | ||
|- | |- | ||
| − | | | + | | style="background:#6B0000;" rowspan="2" | '''{{class link|Medic|br=yes|color=white}}''' |
| − | | style="background: #FAE5E5;"| ''' | + | | style="background:#990000;" | {{item icon|Surgeon's Shako|75px}} |
| + | | style="background:#FAE5E5;" | '''{{item link|Surgeon's Shako}}''' | ||
|- | |- | ||
| − | | | + | | style="background:#990000;" | {{item icon|Unknown Mann|75px}} |
| − | + | | style="background:#FAE5E5;" | '''{{item link|Unknown Mann}}''' | |
| − | | style="background: #FAE5E5;"| ''' | ||
|- | |- | ||
| − | | | + | | style="background:#6B0000;" rowspan="4" | '''{{class link|Sniper|br=yes|color=white}}''' |
| − | | style="background: #FAE5E5;"| ''' | + | | style="background:#990000;" | {{item icon|Bushman's Bristles|75px}} |
| + | | style="background:#FAE5E5;" | '''{{item link|Bushman's Bristles}}''' | ||
|- | |- | ||
| − | | | + | | style="background:#990000;" | {{item icon|Marksman's Mohair|75px}} |
| − | | style="background: #FAE5E5;"| ''' | + | | style="background:#FAE5E5;" | '''{{item link|Marksman's Mohair}}''' |
|- | |- | ||
| − | | | + | | style="background:#990000;" | {{item icon|Professional's Ushanka|75px}} |
| − | | style="background: #FAE5E5;"| ''' | + | | style="background:#FAE5E5;" | '''{{item link|Professional's Ushanka}}''' |
|- | |- | ||
| − | | | + | | style="background:#990000;" | {{item icon|Wally Pocket|75px}} |
| − | + | | style="background:#FAE5E5;" | '''{{item link|Wally Pocket}}''' | |
| − | | style="background: #FAE5E5;"| ''' | ||
|- | |- | ||
| − | | | + | | style="background:#6B0000;" rowspan="3" | '''{{class link|Spy|br=yes|color=white}}''' |
| − | | style="background: #FAE5E5;"| ''' | + | | style="background:#990000;" | {{item icon|Pocket Momma|75px}} |
| + | | style="background:#FAE5E5;" | '''{{item link|Pocket Momma}}''' | ||
|- | |- | ||
| − | | | + | | style="background:#990000;" | {{item icon|Puffy Provocateur|75px}} |
| − | | style="background: #FAE5E5;"| ''' | + | | style="background:#FAE5E5;" | '''{{item link|Puffy Provocateur}}''' |
|- | |- | ||
| − | | | + | | style="background:#990000;" | {{item icon|Stealthy Scarf|75px}} |
| − | + | | style="background:#FAE5E5;" | '''{{item link|Stealthy Scarf}}''' | |
| − | | style="background: #FAE5E5;"| ''' | ||
|- | |- | ||
| + | | style="background:#6B0000;" | '''{{class link|All Classes|br=yes|color=white}}''' | ||
| + | | style="background:#990000;" | {{item icon|Co-Pilot|75px}} | ||
| + | | style="background:#FAE5E5;" | '''{{item link|Co-Pilot}}''' | ||
|} | |} | ||
| Line 135: | Line 133: | ||
{{main|Festive weapons}} | {{main|Festive weapons}} | ||
{| class="wikitable collapsible" cellpadding="3" style="text-align:center;" | {| class="wikitable collapsible" cellpadding="3" style="text-align:center;" | ||
| − | | width=" | + | | width="85px" style="background:#6B0000;" | '''{{class link|Scout|br=yes|color=white}}''' |
| − | | | + | | style="background:#990000;" | {{item icon|Festive Bonk! Atomic Punch|75px}} |
| − | | style="background: #FAE5E5;"| ''' | + | | style="background:#FAE5E5;" | '''{{item link|Festive Bonk! Atomic Punch}}''' |
| − | |||
| − | |||
| − | |||
| − | |||
|- | |- | ||
| − | | | + | | style="background:#6B0000;" | '''{{class link|Pyro|br=yes|color=white}}''' |
| − | | | + | | style="background:#990000;" | {{item icon|Festive Backburner|75px}} |
| − | | style="background: #FAE5E5;"| ''' | + | | style="background:#FAE5E5;"| '''{{item link|Festive Backburner}}''' |
|- | |- | ||
| − | | | + | | style="background:#6B0000;" | '''{{class link|Demoman|br=yes|color=white}}''' |
| − | | | + | | style="background:#990000;" | {{item icon|Festive Chargin' Targe|75px}} |
| − | | style="background: #FAE5E5;"| ''' | + | | style="background:#FAE5E5;"| '''{{item link|Festive Chargin' Targe}}''' |
|- | |- | ||
| − | | | + | | style="background:#6B0000;" | '''{{class link|Medic|br=yes|color=white}}''' |
| − | | | + | | style="background:#990000;" | {{item icon|Festive Bonesaw|75px}} |
| − | | style="background: #FAE5E5;"| ''' | + | | style="background:#FAE5E5;"| '''{{item link|Festive Bonesaw}}''' |
|- | |- | ||
| − | | | + | | style="background:#6B0000;" | '''{{class link|Sniper|br=yes|color=white}}''' |
| − | | | + | | style="background:#990000;" | {{item icon|Festive SMG|75px}} |
| − | | style="background: #FAE5E5;"| ''' | + | | style="background:#FAE5E5;"| '''{{item link|Festive SMG}}''' |
|- | |- | ||
| − | | | + | | style="background:#6B0000;" | '''{{class link|Spy|br=yes|color=white}}''' |
| − | | | + | | style="background:#990000;" | {{item icon|Festive Revolver|75px}} |
| − | | style="background: #FAE5E5;"| ''' | + | | style="background:#FAE5E5;"| '''{{item link|Festive Revolver}}''' |
|- | |- | ||
| + | | align="left" style="background:#6B0000;" | '''{{class link|Soldier|color=white}}'''<br/>'''{{class link|Pyro|color=white}}'''<br/>'''{{class link|Heavy|color=white}}'''<br/>'''{{class link|Engineer|color=white}}''' | ||
| + | | style="background:#990000;" | {{item icon|Festive Shotgun|75px}} | ||
| + | | style="background:#FAE5E5;"| '''{{item link|Festive Shotgun}}''' | ||
|} | |} | ||
| Line 168: | Line 165: | ||
{{main|Tools}} | {{main|Tools}} | ||
{| class="wikitable collapsible" cellpadding="3" style="text-align:center;" | {| class="wikitable collapsible" cellpadding="3" style="text-align:center;" | ||
| − | | | + | | style="background:#6B0000;" | {{Icon item|Naughty Winter Crate 2014|75px}} |
| − | | | + | | style="background:#990000;" | '''[[Nice Winter Crate 2014|<span style="color: #FFF;">Naughty Winter Crate 2014</span>]]''' |
| − | + | | style="background:#FAE5E5;" | | |
| − | |||
| − | |||
| − | | style="background: #FAE5E5;"| | ||
|- | |- | ||
| − | | | + | | style="background:#6B0000;" | {{Icon item|Naughty Winter Crate Key 2014|75px}} |
| − | | | + | | style="background:#990000;" | '''[[Nice Winter Crate 2014|<span style="color: #FFF;">Naughty Winter Crate Key 2014</span>]]''' |
| + | | style="background:#FAE5E5;" | Used to open the [[Naughty Winter Crate 2014]]. This key will not open Nice crates. After 2/16/2015 this turned into a normal key. | ||
|- | |- | ||
| − | | | + | | style="background:#6B0000;" | {{Icon item|Nice Winter Crate 2014|75px}} |
| − | | | + | | style="background:#990000;" | '''[[Nice Winter Crate 2014|<span style="color: #FFF;">Nice Winter Crate 2014</span>]]''' |
| − | | style="background: #FAE5E5;"| | + | | style="background:#FAE5E5;" | |
|- | |- | ||
| + | | style="background:#6B0000;" | {{Icon item|Nice Winter Crate Key 2014|75px}} | ||
| + | | style="background:#990000;" | '''[[Nice Winter Crate 2014|<span style="color: #FFF;">Nice Winter Crate Key 2014</span>]]''' | ||
| + | | style="background:#FAE5E5;" | Used to open [[Nice Winter Crate 2014]]. This key will not open Naughty crates. After 2/16/2015 this turned into a normal key. | ||
|} | |} | ||
Revision as of 11:38, 22 November 2019
This article is for content released in the update. For the patch itself, see December 22, 2014 Patch.
|

| “ | Smissmas is almost upon us, and everybody here on the TF2 team's been busy getting gifts ready and standing as a group under the Valve mistletoe. The smooch count's currently at zero, but we're in this for the long haul. That's right, we'll stand here all damn week if there's some make-outs in it for us. Just try and get past us, DOTA2 team. You too, CS:GO.
— TF2 Blog
|
” |
The Smissmas 2014 update was a major content update for Team Fortress 2, released on December 22, 2014 Patch. It was a sequel of past community-made updates before, by Valve's request in coincidence of the Christmas Workshop submissions.
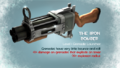
The update added 29 new Winter-themed cosmetics and 7 new Festive weapons. The highlights of the update were a new beta game mode, Mannpower, along with two new beta maps, Foundry (Capture the Flag) and Gorge (Capture the Flag). Many already existing Demoman weapons had changes in their functions. Also added were three entirely new weapons, the Quickiebomb Launcher, the Iron Bomber, and the Panic Attack.
Contents
Additions
Weapon
Main article: Weapons
| Iron Bomber | ||
| Quickiebomb Launcher | ||
| Panic Attack |
Cosmetics
Main article: Cosmetic items
Festive weapons
Main article: Festive weapons
| Festive Bonk! Atomic Punch | ||
| Festive Backburner | ||
| Festive Chargin' Targe | ||
| Festive Bonesaw | ||
| Festive SMG | ||
| Festive Revolver | ||
| Festive Shotgun |
Tools
Main article: Tools
| Naughty Winter Crate 2014 | ||
| Naughty Winter Crate Key 2014 | Used to open the Naughty Winter Crate 2014. This key will not open Nice crates. After 2/16/2015 this turned into a normal key. | |
| Nice Winter Crate 2014 | ||
| Nice Winter Crate Key 2014 | Used to open Nice Winter Crate 2014. This key will not open Naughty crates. After 2/16/2015 this turned into a normal key. |
Action items
| Grappling Hook |
Maps
| Name | Picture | Game mode | File name |
|---|---|---|---|
| Foundry (Capture the Flag) | 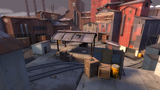
|
Mannpower |
ctf_foundry
|
| Gorge (Capture the Flag) | 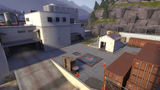
|
Mannpower |
ctf_gorge
|
Tweaked Weapons
| Class | Weapon | Changes | |
|---|---|---|---|
Demoman |
All explosive primary and secondary weapons |
||
Grenade Launcher |
|||
Loose Cannon |
|||
Loch-n-Load |
|||
Ali Baba's Wee Booties |
Bootlegger |
||
Stickybomb Launcher |
|||
Scottish Resistance |
|||
Tide Turner |
|||
Scotsman's Skullcutter |
|||
Claidheamh Mòr |
|||
Gallery
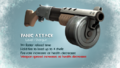
The Panic Attack in TF2 Blog.
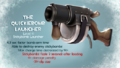
The 'Quickiebomb Launcher in TF2 Blog.
The Iron Bomber in TF2 Blog.


External links
| |||||
| ||||||||||||||||||||||||||||||||||||||||||||||||||||||||||||||||||||||||||||||||||||||||||||||||||