Difference between revisions of "Scream Fortress 2016/da"
m (→Udsædvanlige effekter) |
BrazilianNut (talk | contribs) m (→Tilføjelser) |
||
| (2 intermediate revisions by the same user not shown) | |||
| Line 10: | Line 10: | ||
== Tilføjelser == | == Tilføjelser == | ||
| − | === | + | === Kosmetik genstande === |
| − | {{main|Cosmetic items/da|l1= | + | {{main|Cosmetic items/da|l1=Kosmetik genstande}} |
{| class="wikitable collapsible" cellpadding="3" style="text-align:center;" | {| class="wikitable collapsible" cellpadding="3" style="text-align:center;" | ||
| − | | width=" | + | | width="80px" style="background:#6A5587;" rowspan="1" | '''{{class link|Scout|color=white|br=yes}}''' |
| − | | | + | | style="background:#4B69FF;" | {{item icon|Wing Mann|75px}} |
| − | | style="background: #F1ECF7;"| '''{{item link|Wing Mann}}''' | + | | style="background:#F1ECF7;" | '''{{item link|Wing Mann}}''' |
|- | |- | ||
| − | | | + | | style="background:#6A5587;" rowspan="3" | '''{{class link|Pyro|color=white|br=yes}}''' |
| − | | | + | | style="background:#EB4B4B;" | {{item icon|Combustible Cutie|75px}} |
| − | | style="background: #F1ECF7;"| '''{{item link|Combustible Cutie}}''' | + | | style="background:#F1ECF7;" | '''{{item link|Combustible Cutie}}''' |
|- | |- | ||
| − | | | + | | style="background:#4B69FF;" | {{item icon|Cranial Carcharodon|75px}} |
| − | | style="background: #F1ECF7;"| '''{{item link|Cranial Carcharodon}}''' | + | | style="background:#F1ECF7;" | '''{{item link|Cranial Carcharodon}}''' |
|- | |- | ||
| − | | | + | | style="background:#FFD700;" | {{item icon|Hovering Hotshot|75px}} |
| − | | style="background: #F1ECF7;"| '''{{item link|Hovering Hotshot}}''' | + | | style="background:#F1ECF7;" | '''{{item link|Hovering Hotshot}}''' |
|- | |- | ||
| − | | | + | | style="background:#6A5587;" rowspan="2" | '''{{class link|Demoman|color=white|br=yes}}''' |
| − | | | + | | style="background:#FFD700;" | {{item icon|Aerobatics Demonstrator|75px}} |
| − | | style="background: #F1ECF7;"| '''{{item link|Aerobatics Demonstrator}}''' | + | | style="background:#F1ECF7;" | '''{{item link|Aerobatics Demonstrator}}''' |
|- | |- | ||
| − | | | + | | style="background:#8847FF;" | {{item icon|Spirit of the Bombing Past|75px}} |
| − | | style="background: #F1ECF7;"| '''{{item link|Spirit of the Bombing Past}}''' | + | | style="background:#F1ECF7;" | '''{{item link|Spirit of the Bombing Past}}''' |
|- | |- | ||
| − | | | + | | style="background:#6A5587;" rowspan="3" | '''{{class link|Heavy|color=white|br=yes}}''' |
| − | | | + | | style="background:#8847FF;" | {{item icon|Heavy Tourism|75px}} |
| − | | style="background: #F1ECF7;"| '''{{item link|Heavy Tourism}}''' | + | | style="background:#F1ECF7;" | '''{{item link|Heavy Tourism}}''' |
|- | |- | ||
| − | | | + | | style="background:#4B69FF;" | {{item icon|Mad Mask|75px}} |
| − | | style="background: #F1ECF7;"| '''{{item link|Mad Mask}}''' | + | | style="background:#F1ECF7;" | '''{{item link|Mad Mask}}''' |
|- | |- | ||
| − | | | + | | style="background:#D32CE6;" | {{item icon|Mo'Horn|75px}} |
| − | | style="background: #F1ECF7;"| '''{{item link|Mo'Horn}}''' | + | | style="background:#F1ECF7;" | '''{{item link|Mo'Horn}}''' |
|- | |- | ||
| − | | | + | | style="background:#6A5587;" rowspan="4" | '''{{class link|Engineer|color=white|br=yes}}''' |
| − | | | + | | style="background:#8847FF;" | {{item icon|Corpus Christi Cranium|75px}} |
| − | | style="background: #F1ECF7;"| '''{{item link|Corpus Christi Cranium}}''' | + | | style="background:#F1ECF7;" | '''{{item link|Corpus Christi Cranium}}''' |
|- | |- | ||
| − | | | + | | style="background:#4B69FF;" | {{item icon|El Paso Poncho|75px}} |
| − | | style="background: #F1ECF7;"| '''{{item link|El Paso Poncho}}''' | + | | style="background:#F1ECF7;" | '''{{item link|El Paso Poncho}}''' |
|- | |- | ||
| − | | | + | | style="background:#FFD700;" | {{item icon|Final Frontier Freighter|75px}} |
| − | | style="background: #F1ECF7;"| '''{{item link|Final Frontier Freighter}}''' | + | | style="background:#F1ECF7;" | '''{{item link|Final Frontier Freighter}}''' |
|- | |- | ||
| − | | | + | | style="background:#4B69FF;" | {{item icon|Wide-Brimmed Bandito|75px}} |
| − | | style="background: #F1ECF7;"| '''{{item link|Wide-Brimmed Bandito}}''' | + | | style="background:#F1ECF7;" | '''{{item link|Wide-Brimmed Bandito}}''' |
|- | |- | ||
| − | | | + | | style="background:#6A5587;" rowspan="3" | '''{{class link|Medic|color=white|br=yes}}''' |
| − | | | + | | style="background:#D32CE6;" | {{item icon|Burly Beast|75px}} |
| − | | style="background: #F1ECF7;"| '''{{item link|Burly Beast}}''' | + | | style="background:#F1ECF7;" | '''{{item link|Burly Beast}}''' |
|- | |- | ||
| − | | | + | | style="background:#4B69FF;" | {{item icon|Colossal Cranium|75px}} |
| − | | style="background: #F1ECF7;"| '''{{item link|Colossal Cranium}}''' | + | | style="background:#F1ECF7;" | '''{{item link|Colossal Cranium}}''' |
|- | |- | ||
| − | | | + | | style="background:#4B69FF;" | {{item icon|Surgeon's Sidearms|75px}} |
| − | | style="background: #F1ECF7;"| '''{{item link|Surgeon's Sidearms}}''' | + | | style="background:#F1ECF7;" | '''{{item link|Surgeon's Sidearms}}''' |
|- | |- | ||
| − | | | + | | style="background:#6A5587;" rowspan="2" | '''{{class link|Spy|color=white|br=yes}}''' |
| − | | | + | | style="background:#8847FF;" | {{item icon|Big Topper|75px}} |
| − | | style="background: #F1ECF7;"| '''{{item link|Big Topper}}''' | + | | style="background:#F1ECF7;" | '''{{item link|Big Topper}}''' |
|- | |- | ||
| − | | | + | | style="background:#4B69FF;" | {{item icon|Showstopper|75px}} |
| − | | style="background: #F1ECF7;"| '''{{item link|Showstopper}}''' | + | | style="background:#F1ECF7;" | '''{{item link|Showstopper}}''' |
|- | |- | ||
| − | | | + | | align="left" style="background: #6A5587;" rowspan="1" | <!-- |
| − | | | + | -->'''{{class link|Scout|color=white}}'''<br><!-- |
| − | | style="background: #F1ECF7;"| '''{{item link|Pestering Jester}}''' | + | -->'''{{class link|Soldier|color=white}}'''<br><!-- |
| + | -->'''{{class link|Pyro|color=white}}'''<br><!-- | ||
| + | -->'''{{class link|Heavy|color=white}}''' | ||
| + | | style="background:#D32CE6;" | {{item icon|Pestering Jester|75px}} | ||
| + | | style="background:#F1ECF7;" | '''{{item link|Pestering Jester}}''' | ||
|- | |- | ||
| − | | | + | | style="background:#6A5587;" rowspan="5" | '''{{class link|All Classes|color=white|br=yes}}''' |
| − | | | + | | style="background:#EB4B4B;" | {{item icon|Class Crown|75px}} |
| − | | style="background: #F1ECF7;"| '''{{item link|Class Crown}}''' | + | | style="background:#F1ECF7;" | '''{{item link|Class Crown}}''' |
|- | |- | ||
| − | | | + | | style="background:#8847FF;" | {{item icon|Lil' Bitey|75px}} |
| − | | style="background: #F1ECF7;"| '''{{item link|Lil' Bitey}}''' | + | | style="background:#F1ECF7;" | '''{{item link|Lil' Bitey}}''' |
|- | |- | ||
| − | | | + | | style="background:#4B69FF;" | {{item icon|Nasty Norsemann|75px}} |
| − | | style="background: #F1ECF7;"| '''{{item link|Nasty Norsemann}}''' | + | | style="background:#F1ECF7;" | '''{{item link|Nasty Norsemann}}''' |
|- | |- | ||
| − | | | + | | style="background:#4B69FF;" | {{item icon|Spooktacles|75px}} |
| − | | style="background: #F1ECF7;"| '''{{item link|Spooktacles | + | | style="background:#F1ECF7;" | '''{{item link|Spooktacles}}''' |
| − | |||
| − | |||
| − | |||
|- | |- | ||
| + | | style="background:#8847FF;" | {{item icon|Toadstool Topper|75px}} | ||
| + | | style="background:#F1ECF7;" | '''{{item link|Toadstool Topper}}''' | ||
|} | |} | ||
| Line 99: | Line 102: | ||
{{main|Taunts/da|l1=Hån}} | {{main|Taunts/da|l1=Hån}} | ||
{| class="wikitable collapsible" cellpadding=2 style="text-align:center;" | {| class="wikitable collapsible" cellpadding=2 style="text-align:center;" | ||
| − | | style="background | + | | width="80px" style="background:#6A5587;" rowspan="2"| '''{{class link|All Classes|br=yes|color=white}}''' |
| − | | | + | | style="background:#AD9DC3;" | {{Icon item|Second Rate Sorcery|75px}} |
| − | | style="background | + | | style="background:#F1ECF7;" | '''{{item link|Second Rate Sorcery}}''' |
|- | |- | ||
| − | | | + | | style="background:#AD9DC3;" | {{Icon item|Victory Lap|75px}} |
| − | | style="background | + | | style="background:#F1ECF7;" | '''{{item link|Victory Lap}}''' |
| − | |||
|} | |} | ||
| Line 111: | Line 113: | ||
{{main|Tools/da|l1=Værktøj}} | {{main|Tools/da|l1=Værktøj}} | ||
{| class="wikitable collapsible" cellpadding="3" style="text-align:center;" | {| class="wikitable collapsible" cellpadding="3" style="text-align:center;" | ||
| − | | | + | | width="80px" style="background:#AD9DC3;" | {{item icon|Creepy Crawly Case|75px}} |
| − | | style="background: #F1ECF7;"| '''{{item link|Creepy Crawly Case | + | | style="background:#F1ECF7;" | '''{{item link|Creepy Crawly Case}}''' |
| − | |||
| − | |||
| − | |||
|- | |- | ||
| − | | | + | | style="background:#AD9DC3;" | {{item icon|Creepy Crawly Key|75px}} |
| − | | style="background: #F1ECF7;"| '''{{item link| | + | | style="background:#F1ECF7;" | '''{{item link|Creepy Crawly Key}}''' |
|- | |- | ||
| + | | style="background:#AD9DC3;" | {{item icon|Unusualifier|75px}} | ||
| + | | style="background:#F1ECF7;" | '''{{item link|Unusualifier}}''' | ||
|} | |} | ||
| Line 126: | Line 127: | ||
{|class="wikitable" cellpadding=2 style="text-align:center;" | {|class="wikitable" cellpadding=2 style="text-align:center;" | ||
|-style="height:20px;" | |-style="height:20px;" | ||
| − | !class="header" style="background-color:#6A5587;color:#FFFFFF;" |Navn | + | ! class="header" style="background-color:#6A5587;color:#FFFFFF;" | Navn |
| − | !class="header" style="background-color:#6A5587;color:#FFFFFF;" |Billede | + | ! class="header" style="background-color:#6A5587;color:#FFFFFF;" | Billede |
| − | !class="header" style="background-color:#6A5587;color:#FFFFFF;" |Spiltilstand | + | ! class="header" style="background-color:#6A5587;color:#FFFFFF;" | Spiltilstand |
| − | !class="header" style="background-color:#6A5587;color:#FFFFFF;" |Filnavn | + | ! class="header" style="background-color:#6A5587;color:#FFFFFF;" | Filnavn |
|- | |- | ||
| − | |style="background | + | | style="background:#AD9DC3;" | '''[[Brimstone (map)/da|Brimstone]]''' |
| − | | | + | | style="background:#F1ECF7;" | [[File:Pl_fifthcurve_event.png|160px|link=Brimstone (map)/da]] |
| − | | | + | | style="background:#F1ECF7;" | '''[[Payload/da|Last]]'''<br>[[File:Hoodoo Bombcart.png|50px|link=Payload/da]] |
| − | + | | {{code|pl_fifthcurve_event}} | |
|- | |- | ||
| − | |style="background | + | | style="background:#AD9DC3;" | '''[[Maple Ridge Event/da|Maple Ridge Event]]''' |
| − | | | + | | style="background:#F1ECF7;" | [[File:Koth_maple_ridge_event.png|160px|link=Maple Ridge Event/da]] |
| − | | | + | | style="background:#F1ECF7;" | '''[[King of the Hill/da|Konge af bakken]]'''<br>[[File:Controlpoint.png|50px|link=King of the Hill/da]] |
| − | + | | {{code|koth_maple_ridge_event}} | |
|- | |- | ||
| − | |style="background | + | | style="background:#AD9DC3;" | '''[[Pit of Death/da|Pit of Death]]''' |
| − | | | + | | style="background:#F1ECF7;" | [[File:Pd_pit_of_death_event.png|160px|link=Pit of Death/da]] |
| − | | | + | | style="background:#F1ECF7;" | '''[[Player Destruction/da|Spillerdestruktion]]'''<br>[[File:Hud_invasion_bottle.png|50px|link=Player Destruction/da]] |
| − | + | | {{code|pd_pit_of_death_event}} | |
|} | |} | ||
| Line 165: | Line 166: | ||
File:News item 2016-10-25 Scream Fortress Extended!.png|Notifikation fra spillet om udvidelsen. | File:News item 2016-10-25 Scream Fortress Extended!.png|Notifikation fra spillet om udvidelsen. | ||
</gallery> | </gallery> | ||
| − | + | <!-- | |
| + | File:User Twolfe Halloween2016.png|Pre-event teaser picture. | ||
| + | --> | ||
{{Scream Fortress 2016 Nav}} | {{Scream Fortress 2016 Nav}} | ||
| + | {{Scream Fortress Events Nav}} | ||
{{Major updates nav}} | {{Major updates nav}} | ||
Latest revision as of 12:52, 27 November 2019

Denne artikel er om indhold udgivet i en større opdatering. For selve opdateringen, se 21. oktober 2016-opdateringen.
Scream Fortress 2016 var en stor opdatering udgivet den 21. oktober 2016. Opdateringen tilføjede 2 nye hån, 3 nye baner, 24 nye beklædningsgenstande, et værktøj og en ny kampagne, og inkluderede tilbagekomsten af Merasmissions fra sidste års begivenhed.
Indholdsfortegnelse
Tidslinje
Begivenheden varede oprindeligt fra den 21. oktober til den 9. november 2016, men blev forlænget til slutningen af den 16. november 2016.
Tilføjelser
Kosmetik genstande
Hovedartikel: Kosmetik genstande
Hån
Hovedartikel: Hån
| Andenrangsmagi | ||
| Sejrsomgangen |
Værktøjer
Hovedartikel: Værktøj
| Kryble Kravle-kasse | |
| Kryble Kravle-nøgle | |
| Usædvanliggører |
Baner
Hovedartikel: Liste over baner
| Navn | Billede | Spiltilstand | Filnavn |
|---|---|---|---|
| Brimstone | 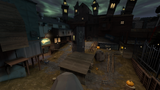
|
Last
|
pl_fifthcurve_event
|
| Maple Ridge Event | 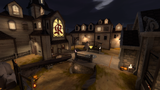
|
Konge af bakken |
koth_maple_ridge_event
|
| Pit of Death | 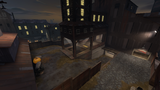
|
Spillerdestruktion
|
pd_pit_of_death_event
|
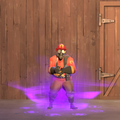
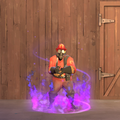
Udsædvanlige effekter
Hovedartikel: Udsædvanlige effekter

Neutronstjerne

Tesla-spole

Stjernestormsøvnløshed
Stjernestormslummer

Helvedsild
Spektralsk Hvirvel
Infernalske Flammer

Infernalsk Røg


Galleri
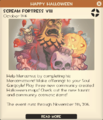
Notifikation fra spillet om begyndelsen af begivenheden.
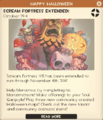
Notifikation fra spillet om udvidelsen.


| |||||
| |||||||||||||||||||||||||||||||||||||||||||||||||||||||||||||||||||||||||||||||||||||||||||||||