Difference between revisions of "Scream Fortress 2018/da"
BrazilianNut (talk | contribs) m (→Udsædvanlige effekter) |
BrazilianNut (talk | contribs) m (→Tilføjelser) |
||
| Line 13: | Line 13: | ||
{{main|Cosmetic items{{if lang}}|l1={{common string|Cosmetic items}}}} | {{main|Cosmetic items{{if lang}}|l1={{common string|Cosmetic items}}}} | ||
{| class="wikitable collapsible" cellpadding="3" style="text-align:center;" | {| class="wikitable collapsible" cellpadding="3" style="text-align:center;" | ||
| − | | width=" | + | | width="80px" style="background:#6A5587;" rowspan="3" | '''{{class link|scout|br=yes|color=white}}''' |
| − | | | + | | style="background:#8847FF;" | {{item icon|Athenian Attire|75px}} |
| − | | style="background: #F1ECF7;"| '''{{item link|Athenian Attire}}''' | + | | style="background:#F1ECF7;" | '''{{item link|Athenian Attire}}''' |
|- | |- | ||
| − | | | + | | style="background:#4B69FF;" | {{item icon|Hephaistos' Handcraft|75px}} |
| − | | style="background: #F1ECF7;"| '''{{item link|Hephaistos' Handcraft}}''' | + | | style="background:#F1ECF7;" | '''{{item link|Hephaistos' Handcraft}}''' |
|- | |- | ||
| − | | | + | | style="background:#4B69FF;" | {{item icon|Olympic Leapers|75px}} |
| − | | style="background: #F1ECF7;"| '''{{item link|Olympic Leapers}}''' | + | | style="background:#F1ECF7;" | '''{{item link|Olympic Leapers}}''' |
|- | |- | ||
| − | | | + | | style="background:#6A5587;" rowspan="2" | '''{{class link|soldier|br=yes|color=white}}''' |
| − | | | + | | style="background:#8847FF;" | {{item icon|Tank Top|75px}} |
| − | | style="background: #F1ECF7;"| '''{{item link|Tank Top}}''' | + | | style="background:#F1ECF7;" | '''{{item link|Tank Top}}''' |
|- | |- | ||
| − | | | + | | style="background:#4B69FF;" | {{item icon|Vampire Vanquisher|75px}} |
| − | | style="background: #F1ECF7;"| '''{{item link|Vampire Vanquisher}}''' | + | | style="background:#F1ECF7;" | '''{{item link|Vampire Vanquisher}}''' |
|- | |- | ||
| − | | | + | | style="background:#6A5587;" rowspan="3" | '''{{class link|pyro|br=yes|color=white}}''' |
| − | | | + | | style="background:#4B69FF;" | {{item icon|Arachno-Arsonist|75px}} |
| − | | style="background: #F1ECF7;"| '''{{item link|Arachno-Arsonist}}''' | + | | style="background:#F1ECF7;" | '''{{item link|Arachno-Arsonist}}''' |
|- | |- | ||
| − | | | + | | style="background:#D32CE6;" | {{item icon|Mr. Quackers|75px}} |
| − | | style="background: #F1ECF7;"| '''{{item link|Mr. Quackers}}''' | + | | style="background:#F1ECF7;" | '''{{item link|Mr. Quackers}}''' |
|- | |- | ||
| − | | | + | | style="background:#8847FF;" | {{item icon|Pyro in Chinatown|75px}} |
| − | | style="background: #F1ECF7;"| '''{{item link|Pyro in Chinatown}}''' | + | | style="background:#F1ECF7;" | '''{{item link|Pyro in Chinatown}}''' |
|- | |- | ||
| − | | | + | | style="background:#6A5587;" rowspan="1" | '''{{class link|demoman|br=yes|color=white}}''' |
| − | | | + | | style="background:#8847FF;" | {{item icon|Gaelic Glutton|75px}} |
| − | | style="background: #F1ECF7;"| '''{{item link|Gaelic Glutton}}''' | + | | style="background:#F1ECF7;" | '''{{item link|Gaelic Glutton}}''' |
|- | |- | ||
| − | | | + | | style="background:#6A5587;" rowspan="1" | '''{{class link|heavy|br=yes|color=white}}''' |
| − | | | + | | style="background:#4B69FF;" | {{item icon|Mann-O-War|75px}} |
| − | | style="background: #F1ECF7;"| '''{{item link|Mann-O-War}}''' | + | | style="background:#F1ECF7;" | '''{{item link|Mann-O-War}}''' |
|- | |- | ||
| − | | | + | | style="background:#6A5587;" rowspan="5" | '''{{class link|engineer|br=yes|color=white}}''' |
| − | | | + | | style="background:#8847FF;" | {{item icon|Aim Assistant|75px}} |
| − | | style="background: #F1ECF7;"| '''{{item link|Aim Assistant}}''' | + | | style="background:#F1ECF7;" | '''{{item link|Aim Assistant}}''' |
|- | |- | ||
| − | | | + | | style="background:#FFD700;" | {{item icon|A Shell of a Mann|75px}} |
| − | | style="background: #F1ECF7;"| '''{{item link|A Shell of a Mann}}''' | + | | style="background:#F1ECF7;" | '''{{item link|A Shell of a Mann}}''' |
|- | |- | ||
| − | | | + | | style="background:#D32CE6;" | {{item icon|Defragmenting Hard Hat 17%|75px}} |
| − | | style="background: #F1ECF7;"| '''{{item link|Defragmenting Hard Hat 17%}}''' | + | | style="background:#F1ECF7;" | '''{{item link|Defragmenting Hard Hat 17%}}''' |
|- | |- | ||
| − | | | + | | style="background:#FFD700;" | {{item icon|Dell in the Shell|75px}} |
| − | | style="background: #F1ECF7;"| '''{{item link|Dell in the Shell}}''' | + | | style="background:#F1ECF7;" | '''{{item link|Dell in the Shell}}''' |
|- | |- | ||
| − | | | + | | style="background:#4B69FF;" | {{item icon|Mini-Engy|75px}} |
| − | | style="background: #F1ECF7;"| '''{{item link|Mini-Engy}}''' | + | | style="background:#F1ECF7;" | '''{{item link|Mini-Engy}}''' |
|- | |- | ||
| − | | | + | | style="background:#6A5587;" rowspan="3" | '''{{class link|sniper|br=yes|color=white}}''' |
| − | | | + | | style="background:#FFD700;" | {{item icon|Crocodile Mun-Dee|75px}} |
| − | | style="background: #F1ECF7;"| '''{{item link|Crocodile Mun-Dee}}''' | + | | style="background:#F1ECF7;" | '''{{item link|Crocodile Mun-Dee}}''' |
|- | |- | ||
| − | | | + | | style="background:#4B69FF;" | {{item icon|Highway Star|75px}} |
| − | | style="background: #F1ECF7;"| '''{{item link|Highway Star}}''' | + | | style="background:#F1ECF7;" | '''{{item link|Highway Star}}''' |
|- | |- | ||
| − | | | + | | style="background:#FFD700;" | {{item icon|Scoper's Scales|75px}} |
| − | | style="background: #F1ECF7;"| '''{{item link|Scoper's Scales}}''' | + | | style="background:#F1ECF7;" | '''{{item link|Scoper's Scales}}''' |
|- | |- | ||
| − | | | + | | style="background:#6A5587;" rowspan="3" | '''{{class link|spy|br=yes|color=white}}''' |
| − | | | + | | style="background:#4B69FF;" | {{item icon|Bandit's Boots|75px}} |
| − | | style="background: #F1ECF7;"| '''{{item link|Bandit's Boots}}''' | + | | style="background:#F1ECF7;" | '''{{item link|Bandit's Boots}}''' |
|- | |- | ||
| − | | | + | | style="background:#8847FF;" | {{item icon|Dressperado|75px}} |
| − | | style="background: #F1ECF7;"| '''{{item link|Dressperado}}''' | + | | style="background:#F1ECF7;" | '''{{item link|Dressperado}}''' |
|- | |- | ||
| − | | | + | | style="background:#4B69FF;" | {{item icon|Murderer's Motif|75px}} |
| − | | style="background: #F1ECF7;"| '''{{item link|Murderer's Motif}}''' | + | | style="background:#F1ECF7;" | '''{{item link|Murderer's Motif}}''' |
|- | |- | ||
| − | | | + | | style="background:#6A5587;" rowspan="5" | '''{{class link|all classes|br=yes|color=white}}''' |
| − | | | + | | style="background:#4B69FF;" | {{item icon|Deadbeats|75px}} |
| − | | style="background: #F1ECF7;"| '''{{item link|Deadbeats}}''' | + | | style="background:#F1ECF7;" | '''{{item link|Deadbeats}}''' |
|- | |- | ||
| − | | | + | | style="background:#EB4B4B;" | {{item icon|Lucky Cat Hat|75px}} |
| − | | style="background: #F1ECF7;"| '''{{item link|Lucky Cat Hat}}''' | + | | style="background:#F1ECF7;" | '''{{item link|Lucky Cat Hat}}''' |
|- | |- | ||
| − | | | + | | style="background:#D32CE6;" | {{item icon|Terror-antula|75px}} |
| − | | style="background: #F1ECF7;"| '''{{item link|Terror-antula}}''' | + | | style="background:#F1ECF7;" | '''{{item link|Terror-antula}}''' |
|} | |} | ||
| Line 98: | Line 98: | ||
{{main|Taunts/da|l1=Hån}} | {{main|Taunts/da|l1=Hån}} | ||
{| class="wikitable collapsible" cellpadding=2 style="text-align:center;" | {| class="wikitable collapsible" cellpadding=2 style="text-align:center;" | ||
| − | | style="background-color:#6A5587; | + | | width="80px" style="background-color:#6A5587;" | '''{{class link|scout|br=yes|color=white}}''' |
| − | | | + | | style="background:#AD9DC3;" | {{Icon item|Scooty Scoot|75px}} |
| − | | style="background-color:#F1ECF7;"| '''{{item link|Scooty Scoot}}''' | + | | width="130px" style="background-color:#F1ECF7;" | '''{{item link|Scooty Scoot}}''' |
|- | |- | ||
| − | | style="background | + | | style="background:#6A5587;" | '''{{class link|soldier|br=yes|color=white}}''' |
| − | | | + | | style="background:#AD9DC3;" | {{Icon item|Panzer Pants|75px}} |
| − | | style="background | + | | style="background:#F1ECF7;"| '''{{item link|Panzer Pants}}''' |
|} | |} | ||
| Line 110: | Line 110: | ||
{{main|Tools/da|l1=Værktøj}} | {{main|Tools/da|l1=Værktøj}} | ||
{| class="wikitable collapsible" cellpadding="3" style="text-align:center;" | {| class="wikitable collapsible" cellpadding="3" style="text-align:center;" | ||
| − | | | + | | width="80px" style="background:#AD9DC3;" | {{item icon|Violet Vermin Case|75px}} |
| − | | style="background: #F1ECF7;"| '''{{item link|Violet Vermin Case}}''' | + | | style="background:#F1ECF7;" | '''{{item link|Violet Vermin Case}}''' |
|- | |- | ||
| − | | | + | | style="background:#AD9DC3;" | {{item icon|Violet Vermin Key|75px}} |
| − | | style="background: #F1ECF7;"| '''{{item link|Violet Vermin Key}}''' | + | | style="background:#F1ECF7;" | '''{{item link|Violet Vermin Key}}''' |
|- | |- | ||
| − | | | + | | style="background:#AD9DC3;" | {{item icon|Scream Fortress X War Paint Case|75px}} |
| − | | style="background: #F1ECF7;"| '''{{item link|Scream Fortress X War Paint Case}}''' | + | | style="background:#F1ECF7;" | '''{{item link|Scream Fortress X War Paint Case}}''' |
|- | |- | ||
| − | | | + | | style="background:#AD9DC3;" | {{item icon|Scream Fortress X War Paint Key|75px}} |
| − | | style="background: #F1ECF7;"| '''{{item link|Scream Fortress X War Paint Key}}''' | + | | style="background:#F1ECF7;" | '''{{item link|Scream Fortress X War Paint Key}}''' |
|} | |} | ||
| Line 127: | Line 127: | ||
{|class="wikitable" cellpadding=2 style="text-align:center;" | {|class="wikitable" cellpadding=2 style="text-align:center;" | ||
|-style="height:20px;" | |-style="height:20px;" | ||
| − | !class="header" style="background-color:#6A5587;color:#FFFFFF;" |Navn | + | ! class="header" style="background-color:#6A5587;color:#FFFFFF;" |Navn |
| − | !class="header" style="background-color:#6A5587;color:#FFFFFF;" |Billede | + | ! class="header" style="background-color:#6A5587;color:#FFFFFF;" |Billede |
| − | !class="header" style="background-color:#6A5587;color:#FFFFFF;" |Spiltilstand | + | ! class="header" style="background-color:#6A5587;color:#FFFFFF;" |Spiltilstand |
| − | !class="header" style="background-color:#6A5587;color:#FFFFFF;" |Filnavn | + | ! class="header" style="background-color:#6A5587;color:#FFFFFF;" |Filnavn |
|- | |- | ||
| − | |style="background | + | | style="background:#AD9DC3;" | '''[[Cauldron/da|<font color="white">Cauldron</font>]]''' |
| − | | | + | | style="background:#F1ECF7;" | [[File:Koth_bagel_event.png|160px|link=Cauldron/da]] |
| − | | | + | | style="background:#F1ECF7;" | '''[[King of the Hill/da|Konge af bakken]]'''<br>[[File:Controlpoint.png|50px|link=King of the Hill/da]] |
| − | + | | {{code|koth_bagel_event}} | |
|- | |- | ||
| − | |style="background | + | | style="background:#AD9DC3;" | '''[[Cursed Cove/da|<font color="white">Cursed Cove</font>]]''' |
| − | | | + | | style="background:#F1ECF7;" | [[File:Pd_cursed_cove_event.png|160px|link=Cursed Cove/da]] |
| − | | | + | | style="background:#F1ECF7;" | '''[[Player Destruction/da|Spillerdestruktion]]'''<br>[[File:Hud_invasion_bottle.png|50px|link=Player Destruction/da]] |
| − | + | | {{code|pd_cursed_cove_event}} | |
|- | |- | ||
| − | |style="background | + | | style="background:#AD9DC3;" | '''[[Gravestone/da|<font color="white">Gravestone</font>]]''' |
| − | | | + | | style="background:#F1ECF7;" | [[File:Pl_rumble_event.png|160px|link=Gravestone/da]] |
| − | | | + | | style="background:#F1ECF7;" | '''[[Payload/da|Last]]'''<br>[[File:Hoodoo Bombcart.png|50px|link=Payload/da]] |
| − | + | | {{code|pl_rumble_event}} | |
|- | |- | ||
| − | |style="background | + | | style="background:#AD9DC3;" | '''[[Monster Bash/da|<font color="white">Monster Bash</font>]]''' |
| − | | | + | | style="background:#F1ECF7;" | [[File:Pd_monster_bash.png|160px|link=Monster Bash/da]] |
| − | | | + | | style="background:#F1ECF7;" | '''[[Player Destruction/da|Spillerdestruktion]]'''<br>[[File:Hud_invasion_bottle.png|50px|link=Player Destruction/da]] |
| − | + | | {{code|pd_monster_bash}} | |
|- | |- | ||
| − | |style="background | + | | style="background:#AD9DC3;" | '''[[Slasher/da|<font color="white">Slasher</font>]]''' |
| − | | | + | | style="background:#F1ECF7;" | [[File:Koth_slasher.png|160px|link=Slasher/da]] |
| − | | | + | | style="background:#F1ECF7;" | '''[[King of the Hill/da|Konge af bakken]]'''<br>[[File:Controlpoint.png|50px|link=King of the Hill/da]] |
| − | + | | {{code|koth_slasher}} | |
|} | |} | ||
Revision as of 07:28, 27 November 2019
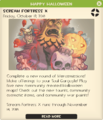
| “ | Fuldfør en ny omgang Meramissioner! Ofre ting til din Sjælgargoil! Spil på fem nye fællesskabsskabte Halloween-baner! Se de nye officielle hån, og nyd de nye fællesskabsskabte kosmetikgenstande og krigsmalinger!
— TF2's Officielle Hjemmeside
|
” |
Scream Fortress 2018 var en stor opdatering til Team Fortress 2, udgivet den 19. oktober, 2018. Opdateringen tilføjede 2 nye hån, 5 nye fællesskabsskabte baner, 24 nye fællesskabsskabte kosmetikgenstande; hvoraf 4 er højtidsbegrænset, 10 nye Krigsmalinger og 17 nye Udsædvanlige effekter. Derudover blev Halloween-kontrakter, der var tilgængelige for alle spillere ved brug af KonSporen, udvidet.
Indholdsfortegnelse
Tidslinje
Begivenheden varede fra den 19. oktober, 2018 til den 14. november, 2018.
Tilføjelser
Kosmetik genstande
Hån
| Kikset Knallert | ||
| Pansret Personbil |
Værktøjer
| Violet Væver-kasse | |
| Violet Væver-nøgle | |
| Scream Fortress X-krigsmalingskasse | |
| Scream Fortress X-krigsmalingsnøgle |
Baner
| Navn | Billede | Spiltilstand | Filnavn |
|---|---|---|---|
| Cauldron | 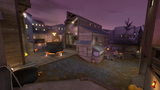
|
Konge af bakken |
koth_bagel_event
|
| Cursed Cove | 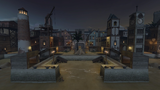
|
Spillerdestruktion
|
pd_cursed_cove_event
|
| Gravestone | 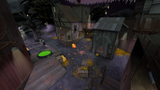
|
Last
|
pl_rumble_event
|
| Monster Bash | 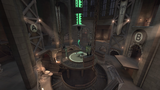
|
Spillerdestruktion
|
pd_monster_bash
|
| Slasher | 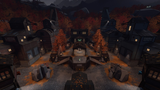
|
Konge af bakken |
koth_slasher
|
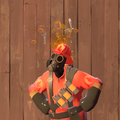
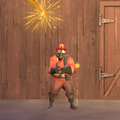
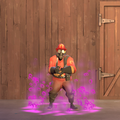
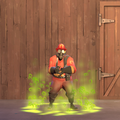
Udsædvanlige effekter

Hjernevrider
Åbent Sind

Damphoved

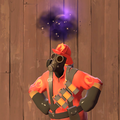
Galaktik Port

Den Uhyggelige Åbning
Den Dunkle Døråbning

Ring af Ild

Ondartet Cirkel

Hvide Lyn

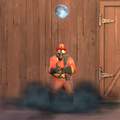
Altseende Krystalkugle

Clairvoyance
Uhyggelig Nat

Ildevarslende Nat
Rumsterende Raketter

Attraktive Brandbobler
Fortrydelsens Giftbobler
Jalousiens Syrebobler


Galleri
Notifikation fra spillet om begivenhedens begyndelse.

Se også
Eksterne links
- "Scream Fortress X er ankommet! (Engelsk)", TF2's Officielle Hjemmeside, den 19. oktober, 2018.
| ||||||||||||||||||||||
| ||||||||||||||||||||||||||||||||||||||||||||||||||||||||||||||||||||||||||||||||||||||||||||||||||