Difference between revisions of "Rocket Launcher/ko"
Eldkfwkd321 (talk | contribs) (오역 수정) |
|||
| Line 16: | Line 16: | ||
{{Quotation|'''솔져'''|나는 너희들 같은 바보들을 족치기 위해 이 팀에 들어왔다!|sound=Soldier_taunts13.wav}} | {{Quotation|'''솔져'''|나는 너희들 같은 바보들을 족치기 위해 이 팀에 들어왔다!|sound=Soldier_taunts13.wav}} | ||
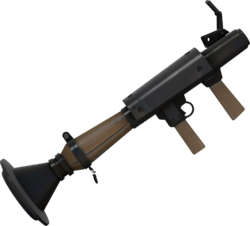
| − | '''로켓 발사기'''는 [[ | + | '''로켓 발사기'''는 [[솔저]]의 기본 [[주무기]]입니다. 이것은 전형적인 로켓 추진 장치로, 돌출된 측면의 금속판과 넓은 배기구를 지녔습니다. |
| − | + | 발사기는 4발의 로켓을 장전및 발사할 수 있으며, 로켓은 [[발사체]]로 초당 1100 [[해머 단위]], 약 시속 47마일의 속도로 발사됩니다. The trajectory of these rockets are not affected by gravity; they will travel in a straight line until exploding on contact with any surface or opponent. Rockets inflict damage in a set splash radius; damage inflicted decreases the further the distance from the center of the explosion. Normal rockets have significant damage falloff over long distances, while [[critical]] rockets suffer no such falloff. Upon a kill, players will most likely explode into [[gibs]]. | |
| − | + | As the explosion from rockets causes [[knockback]] on enemies, an experienced player can [[juggling|juggle]] opponents. Doing so can deal [[fall damage]] to these enemies when they land. The player can use the knockback effect on themselves in order to perform a [[Jumping#Rocket jumps|rocket jump]] by firing at the ground beneath them and catapulting themselves upwards. Simultaneously crouching increases the height and length of the jump. This technique can be used to reach areas not accessible to other classes. | |
| − | == | + | == 피해량과 공격 속도 == |
| − | {{ | + | {{Damage table |
| − | + | | type = [[발사체]] | |
| − | + | | damage = yes | |
| − | + | | base = 90 | |
| − | + | | ramp up % = 125 | |
| − | + | | ramp up = 112 | |
| − | + | | fall off = 48 | |
| − | + | | fall off % = 53 | |
| − | + | | point blank = 105-112 | |
| − | + | | medium range = 50-90 | |
| − | + | | long range = 45-60 | |
| − | + | | minicrit = 122 | |
| + | | crit = 270 | ||
| + | | splash damage = yes | ||
| + | | splash min % = 50 | ||
| + | | splash radius = 9 ft | ||
| + | | splash reduction = 1% / {{Tooltip|2.88|해머 단위}} | ||
| + | | selfdamage = 27-89 | ||
| + | | selfdamage jump = 27-46 | ||
| − | + | | function times = yes | |
| − | + | | attack interval = 0.8초 | |
| − | + | | reload first = 0.8초 | |
| − | + | | reload more = 0.92초 | |
| − | + | }} | |
| − | |||
| − | |||
| − | |||
| − | |||
| − | |||
| − | |||
| − | |||
| − | |||
{{Weapon Demonstration}} | {{Weapon Demonstration}} | ||
Revision as of 01:25, 2 June 2011
| 이 페이지는 한국어로 번역 중입니다. 한국어를 능숙하게 하신다면 토론 페이지에 글을 남기거나 문서 역사를 참고하여 문서 번역에 참여한 번역가들과 이를 상의하시기 바랍니다. |
| “ | 나는 너희들 같은 바보들을 족치기 위해 이 팀에 들어왔다!
클릭하시면 들을 수 있습니다
— 솔져
|
” |
로켓 발사기는 솔저의 기본 주무기입니다. 이것은 전형적인 로켓 추진 장치로, 돌출된 측면의 금속판과 넓은 배기구를 지녔습니다.
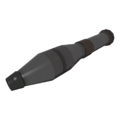
발사기는 4발의 로켓을 장전및 발사할 수 있으며, 로켓은 발사체로 초당 1100 해머 단위, 약 시속 47마일의 속도로 발사됩니다. The trajectory of these rockets are not affected by gravity; they will travel in a straight line until exploding on contact with any surface or opponent. Rockets inflict damage in a set splash radius; damage inflicted decreases the further the distance from the center of the explosion. Normal rockets have significant damage falloff over long distances, while critical rockets suffer no such falloff. Upon a kill, players will most likely explode into gibs.
As the explosion from rockets causes knockback on enemies, an experienced player can juggle opponents. Doing so can deal fall damage to these enemies when they land. The player can use the knockback effect on themselves in order to perform a rocket jump by firing at the ground beneath them and catapulting themselves upwards. Simultaneously crouching increases the height and length of the jump. This technique can be used to reach areas not accessible to other classes.
피해량과 공격 속도
| 피해량 및 기능별 소요시간 | ||
|---|---|---|
| 피격 방식 | 발사체 | |
| 피해량 | ||
| 최대 피해량 | 125% | 112 |
| 기본 피해량 | 100% | 90 |
| 최소 피해량 | 53% | 48 |
| 근거리 | 105-112 | |
| 중거리 | 50-90 | |
| 장거리 | 45-60 | |
| 치명타 | 270 | |
| 소형 치명타 | 122 | |
| 확산 피해 | ||
| 최소 확산 피해 | 50% | 9 ft |
| 피해량 감소 | 1% / 2.88 | |
| 자가 피해 | 27-89 | |
| 자가 피해 (로켓 점프) | 27-46 | |
| 기능별 소요시간 | ||
| 공격 간격 | 0.8초 | |
| 재장전 (최초) | 0.8초 | |
| 재장전 (연속) | 0.92초 | |
| 모든 수치는 커뮤니티에서 측정한 근삿값입니다. | ||
시연 영상
관련 도전과제
 솔저
솔저
|
|
 파이로
파이로
|
 헤비
헤비
|
업데이트 목록
- 솔져의 최대 로켓 보유량이 36에서 16으로 하향되었습니다.
- 솔져의 최대 탄약 보유량이 16에서 20으로 상향되었습니다.
- Fixed rocket explosions being able to impart damage through thin ceilings.
- Fixed Rocket trail effects sometimes existing permanently in world.
- Fixed critical modifier for explosive weapons (rockets, pipe bombs) increasing critical chance more than intended.
- This weapon's kill icon was updated.
- [언급되지 않음] Several particle effects, including critical rockets, pipes, and stickies, were altered to appear brighter. These changes do not apply to ATi graphics card users and some others.
상식
- The weapon seems to be a heavily stylized RPG-7. The handle and the grip have been switched around, the rear exhaust port and the sights are cartoonishly oversized and it seems to fire modified PG-2 HEAT grenades. Certain attributes of its design are based, like many weapons in the game, on musical instruments.
- Contrary to what many people think, it actually is possible to hold 4 rockets in a real Rocket Launcher at one time. However, the launchers that can do this are modern designs with a protruding "magazine", not the traditional World War 2 era "Bazooka" one the Soldier uses; these could only hold one rocket at a time.
- Upon comparing the Rocket Launcher seen in the original Team Fortress 2 trailers to the current in-game Rocket Launcher, it can be seen that the trigger was originally placed on the front handle of the launcher and that rockets were loaded at the muzzle. In-game, the trigger is located on the rear of the two handles, and rockets are now loaded directly into the barrel.
- The Rocket Launcher was originally single-rocket loaded, like in TFC. An animation of this still exists in the game files (seen in the gallery below).
- Despite the kill notification of the Rocket Launcher showing a checkered rocket as the kill icon, the rocket in game has no checkered pattern.


