Difference between revisions of "Gun Mettle Update/fi"
m (Auto: EnforceCapitalization(Invis Watch), EnforceCapitalization(Jarate), EnforceCapitalization(Wrench), EnforceCapitalization(Medic), EnforceCapitalization(Dispensers), WordFilter(Sentry Guns/Sentries(?!\s+Gun) → Sentry Guns), WordFilter(Minicrit ...) |
m (Auto: WordFilter(Minicrit → Mini-Crit) (Review RC#2470152)) |
||
| (4 intermediate revisions by 3 users not shown) | |||
| Line 1: | Line 1: | ||
| + | {{trans}} | ||
| + | |||
{{DISPLAYTITLE:Gun Mettle Update}} | {{DISPLAYTITLE:Gun Mettle Update}} | ||
{{patch info|7|2|2015}} | {{patch info|7|2|2015}} | ||
| Line 7: | Line 9: | ||
==Lisäykset== | ==Lisäykset== | ||
=== Kartat === | === Kartat === | ||
| + | {{main|List of maps/fi|l1=Luettelo kartoista}} | ||
{| class="wikitable" cellpadding=2 style="text-align:center;" | {| class="wikitable" cellpadding=2 style="text-align:center;" | ||
|- style="height: 20px;" | |- style="height: 20px;" | ||
| − | ! class="header" style="background-color:#9a909c;" | | + | ! class="header" style="background-color:#9a909c;" | <span style="color:white;"> Nimi |
| − | ! class="header" style="background-color:#9a909c;" | | + | ! class="header" style="background-color:#9a909c;" | <span style="color:white;"> Kuva |
| − | ! class="header" style="background-color:#9a909c;" | | + | ! class="header" style="background-color:#9a909c;" | <span style="color:white;"> Pelimoodi |
| − | ! class="header" style="background-color:#9a909c;" | | + | ! class="header" style="background-color:#9a909c;" | <span style="color:white;"> Tiedostonimi |
|- | |- | ||
| − | |style="background | + | | width="85px" style="background:#b7a2ba;" | '''[[Borneo{{if lang}}|<span style="color:white;"> Borneo </span>]]''' |
| − | | | + | | style="background:#F2F2F2;" | [[File:Pl_Borneo.jpg|160px|link=Borneo{{if lang}}]] |
| − | + | | '''[[Payload{{if lang}}|{{common string|Payload}}]]'''<br>[[File:BLU_Bombcart.png|50px|link=Payload{{if lang}}]] | |
| − | + | | {{code|pl_borneo}} | |
|- | |- | ||
| − | |style="background | + | | style="background:#b7a2ba;" | '''[[Powerhouse{{if lang}}|<span style="color:white;"> Powerhouse </span>]]''' |
| − | | | + | | style="background:#F2F2F2;" | [[File:Cp_powerhouse.png|160px|link=Powerhouse{{if lang}}]] |
| − | + | | '''[[Control Point (game mode){{if lang}}|{{common string|Control Point}}]]'''<br>[[File:Controlpoint.png|50px|link=Control Point (game mode){{if lang}}]] | |
| − | + | | {{code|cp_powerhouse}} | |
|- | |- | ||
| − | |style="background | + | | style="background:#b7a2ba;" | '''[[Snowplow{{if lang}}|<span style="color:white;"> Snowplow </span>]]''' |
| − | | | + | | style="background:#F2F2F2;" | [[File:Cp_snowplow.jpg|160px|link=Snowplow{{if lang}}]] |
| − | + | | '''[[Control Point (game mode){{if lang}}|{{common string|Control Point}}]]'''<br>[[File:Controlpoint.png|50px|link=Control Point (game mode){{if lang}}]] | |
| − | + | | {{code|cp_snowplow}} | |
|- | |- | ||
| − | |style="background | + | | style="background:#b7a2ba;" | '''[[Suijin{{if lang}}|<span style="color:white;"> Suijin </span>]]''' |
| − | | | + | | style="background:#F2F2F2;" | [[File:Suijin_main.jpg|160px|link=Suijin{{if lang}}]] |
| − | + | | '''[[King of the Hill{{if lang}}|{{common string|King of the Hill}}]]'''<br>[[File:Controlpoint.png|50px|link=King of the Hill{{if lang}}]] | |
| − | + | | {{code|koth_suijin}} | |
|} | |} | ||
=== Kosmetiikka === | === Kosmetiikka === | ||
| − | {{main|Cosmetic items/fi|Kosmeettiset esineet}} | + | {{main|Cosmetic items/fi|l1=Kosmeettiset esineet}} |
{{hatnote|Added in {{Patch name|8|27|2015}}}} | {{hatnote|Added in {{Patch name|8|27|2015}}}} | ||
{| class="wikitable collapsible" cellpadding=2 style="text-align:center;" | {| class="wikitable collapsible" cellpadding=2 style="text-align:center;" | ||
|- | |- | ||
| − | | style="background: #b7a2ba | + | | width="85px" style="background:#b7a2ba;" rowspan="2" | '''{{class link|Scout|br=yes|color=white}}''' |
| − | | | + | | style="background:#8847FF;" | {{Icon item|Fortunate Son|75px}} |
| − | + | | '''{{item link|Fortunate Son}}''' | |
|- | |- | ||
| − | | | + | | style="background:#4B69FF;" | {{Icon item|Flak Jack|75px}} |
| − | + | | '''{{item link|Flak Jack}}''' | |
|- | |- | ||
| − | | style="background: #b7a2ba | + | | style="background:#b7a2ba;" rowspan="2" | '''{{class link|Demoman|br=yes|color=white}}''' |
| − | | | + | | style="background:#D32CE6;" | {{Icon item|Bruce's Bonnet|75px}} |
| − | + | | '''{{item link|Bruce's Bonnet}}''' | |
|- | |- | ||
| − | | | + | | style="background:#8847FF;" | {{Icon item|Outta' Sight|75px}} |
| − | + | | '''{{item link|Outta' Sight}}''' | |
|- | |- | ||
| − | | style="background: #b7a2ba | + | | style="background:#b7a2ba;" rowspan="3" | '''{{class link|Heavy|br=yes|color=white}}''' |
| − | | | + | | style="background:#4B69FF;" | {{Icon item|Commissar's Coat|75px}} |
| − | + | | '''{{item link|Commissar's Coat}}''' | |
|- | |- | ||
| − | | | + | | style="background:#8847FF;" | {{Icon item|White Russian|75px}} |
| − | + | | '''{{item link|White Russian}}''' | |
|- | |- | ||
| − | | | + | | style="background:#D32CE6;" | {{Icon item|El Duderino|75px}} |
| − | + | | '''{{item link|El Duderino}}''' | |
|- | |- | ||
| − | | style="background: #b7a2ba | + | | style="background:#b7a2ba;" rowspan="2" | '''{{class link|Engineer|br=yes|color=white}}''' |
| − | | | + | | style="background:#D32CE6;" | {{Icon item|Sheriff's Stetson|75px}} |
| − | + | | '''{{item link|Sheriff's Stetson}}''' | |
|- | |- | ||
| − | | | + | | style="background:#4B69FF " | {{Icon item|Wild West Waistcoat|75px}} |
| − | + | | '''{{item link|Wild West Waistcoat}}''' | |
|- | |- | ||
| − | | style="background: #b7a2ba | + | | style="background:#b7a2ba;" rowspan="2" | '''{{class link|Medic|br=yes|color=white}}''' |
| − | | | + | | style="background:#8847FF;" | {{Icon item|Physician's Protector|75px}} |
| − | + | | '''{{item link|Physician's Protector}}''' | |
|- | |- | ||
| − | | | + | | style="background:#4B69FF;" | {{Icon item|Vascular Vestment|75px}} |
| − | + | | '''{{item link|Vascular Vestment}}''' | |
|- | |- | ||
| − | | style="background: #b7a2ba | + | | style="background:#b7a2ba;" rowspan="1" | '''{{class link|Spy|br=yes|color=white}}''' |
| − | | | + | | style="background:#4B69FF;" | {{Icon item|Lurker's Leathers|75px}} |
| − | + | | '''{{item link|Lurker's Leathers}}''' | |
|- | |- | ||
| − | | style="background: #b7a2ba | + | | align="left" style="background:#b7a2ba;" rowspan="1" | '''{{class link|Engineer|color=white}}{{class link|Sniper|color=white}}''' |
| − | | | + | | style="background:#4B69FF;" | {{Icon item|Support Spurs|75px}} |
| − | + | | '''{{item link|Support Spurs}}''' | |
|- | |- | ||
| − | | style="background: #b7a2ba | + | | style="background:#b7a2ba;" rowspan="3" | '''{{class link|All Classes|br=yes|color=white}}''' |
| − | | | + | | style="background:#EB4B4B;" | {{Icon item|Captain Cardbeard Cutthroat|75px}} |
| − | + | | '''{{item link|Captain Cardbeard Cutthroat}}''' | |
|- | |- | ||
| − | | | + | | style="background:#4B69FF;" | {{Icon item|Rotation Sensation|75px}} |
| − | + | | '''{{item link|Rotation Sensation}}''' | |
|- | |- | ||
| − | | | + | | style="background:#EB4B4B;" | {{Icon item|Potassium Bonnett|75px}} |
| − | + | | '''{{item link|Potassium Bonnett}}''' | |
|} | |} | ||
=== Pilkat === | === Pilkat === | ||
| + | {{main|Taunts/fi|l1=Pilkat}} | ||
{| class="wikitable collapsible" cellpadding=2 style="text-align:center;" | {| class="wikitable collapsible" cellpadding=2 style="text-align:center;" | ||
| + | | width="85px" style="background:#b7a2ba;" rowspan="1" | '''{{class link|Heavy|br=yes|color=white}}''' | ||
| + | | style="background:#F2F2F2;" | {{Icon item|Proletariat Posedown|75px}} | ||
| + | | '''{{item link|Proletariat Posedown}}''' | ||
|- | |- | ||
| − | | style="background: #b7a2ba | + | | style="background:#b7a2ba;" rowspan="1" | '''{{class link|Spy|br=yes|color=white}}''' |
| − | | | + | | style="background:#F2F2F2;" | {{Icon item|Box Trot|75px}} |
| − | + | | '''{{item link|Box Trot}}''' | |
|- | |- | ||
| − | | style="background: #b7a2ba | + | | style="background:#b7a2ba;" rowspan="1" | '''{{class link|All Classes|br=yes|color=white}}''' |
| − | | | + | | style="background:#F2F2F2;" | {{Icon item|Kazotsky Kick|75px}} |
| − | + | | '''{{item link|Kazotsky Kick}}''' | |
| − | |||
| − | | style="background: # | ||
| − | |||
| − | |||
|} | |} | ||
=== Esineet === | === Esineet === | ||
| − | {{main|Tools}} | + | {{main|Tools/fi|l1=Työkalut}} |
{| class="wikitable collapsible" cellpadding="3" style="text-align:center;" | {| class="wikitable collapsible" cellpadding="3" style="text-align:center;" | ||
| − | | | + | | width="85px" style="background:#F2F2F2;" | {{Icon item|Competitive Matchmaking Beta Pass|75px}} |
| − | + | | '''{{item link|Competitive Matchmaking Beta Pass}}''' | |
|- | |- | ||
| − | | | + | | style="background:#F2F2F2;" | {{Icon item|Concealed Killer Weapons Case|75px}} |
| − | + | | '''{{item link|Concealed Killer Weapons Case}}''' | |
|- | |- | ||
| − | | | + | | style="background:#F2F2F2;" | {{Icon item|Gun Mettle Campaign Coin|75px}} |
| − | + | | '''{{item link|Gun Mettle Campaign Coin}}''' | |
|- | |- | ||
| − | | | + | | style="background:#F2F2F2;" | {{Icon item|Gun Mettle Key|75px}} |
| − | + | | '''{{item link|Gun Mettle Key}}''' | |
|- | |- | ||
| − | | | + | | style="background:#F2F2F2;" | {{Icon item|Gun Mettle Campaign Pass|75px}} |
| − | + | | '''{{item link|Gun Mettle Campaign Pass}}''' | |
|- | |- | ||
| − | | | + | | style="background:#F2F2F2;" | {{Icon item|Powerhouse Weapons Case|75px}} |
| − | + | | '''{{item link|Powerhouse Weapons Case}}''' | |
|- | |- | ||
| − | | | + | | style="background:#F2F2F2;" | {{Icon item|Gun Mettle Cosmetic Case|75px}} |
| − | + | | '''{{item link|Gun Mettle Cosmetic Case}}'''<sup>†</sup> | |
|- | |- | ||
| − | | | + | | style="background:#F2F2F2;" | {{Icon item|Gun Mettle Cosmetic Key|75px}} |
| − | | style="background: # | + | | '''{{item link|Gun Mettle Cosmetic Key}}'''<sup>†</sup> |
| + | |- | ||
| + | | style="background:#F2F2F2" | '''Huomiot''' | ||
| + | | style="background:#F2F2F2" | <sup>†</sup> Added in the {{Patch name|8|27|2015}}. | ||
|} | |} | ||
| − | ===Tweaked Classes=== | + | === Epätavalliset tehosteet === |
| + | {{main|Unusual effects/fi|l1=Epätavalliset tehosteet}} | ||
| + | <gallery perrow="4"> | ||
| + | File:Unusual_Cool.png| {{item name|Cool}} | ||
| + | File:Unusual_Energy_Orb.png| {{item name|Energy Orb}} | ||
| + | File:Unusual_Hot.png| {{item name|Hot}} | ||
| + | File:Unusual_Isotope.png| {{item name|Isotope}} | ||
| + | </gallery> | ||
| + | ''Note: As of the [[Jungle Inferno Update]], the Energy Orb effect is no longer obtainable.'' | ||
| + | |||
| + | === Tweaked Classes === | ||
{| class="wikitable" | {| class="wikitable" | ||
| − | ! style="background: #9a909c;" class="header" | <span style="color: white;"> Class | + | ! style="background:#9a909c;" class="header" | <span style="color:white;"> Class |
| − | ! style="background: #9a909c;" class="header" | <span style="color: white;"> Changes | + | ! style="background:#9a909c;" class="header" | <span style="color:white;"> Changes |
|- | |- | ||
| − | ! style="background: #b7a2ba;" | {{ | + | ! width="85px" style="background:#b7a2ba;" | {{class link|Heavy|br=yes|color=white}} |
| − | | {{c|+|Changed:}} [[Weapons# | + | | {{c|+|Changed:}} [[Weapons#Heavy|Minigun]] damage penalty on Level 2 and Level 3 Sentry Guns slightly decreased. Level 2 Sentry resistance changed from 20% to 15% and Level 3 changed from 33% to 20%. |
|- | |- | ||
| − | ! style="background: #b7a2ba;" rowspan="6" | {{ | + | ! style="background:#b7a2ba;" rowspan="6" | {{class link|Engineer|br=yes|color=white}} |
| {{c|=|Changed:}} Construction boosts (Wrench hits, redeploys) from multiple sources is now additive instead of multiplicative. Calculations are based around a 1x base building speed. | | {{c|=|Changed:}} Construction boosts (Wrench hits, redeploys) from multiple sources is now additive instead of multiplicative. Calculations are based around a 1x base building speed. | ||
|- | |- | ||
| Line 162: | Line 178: | ||
| {{c|-|Changed:}} Building repair costs increased from 20 metal to 33 metal to repair 100hp per Wrench hit (from 5HP per metal to 3HP per metal). | | {{c|-|Changed:}} Building repair costs increased from 20 metal to 33 metal to repair 100hp per Wrench hit (from 5HP per metal to 3HP per metal). | ||
|- | |- | ||
| − | ! style="background: #b7a2ba;" rowspan="5" | {{ | + | ! style="background:#b7a2ba;" rowspan="5" | {{class link|Spy|br=yes|color=white}} |
| − | | {{c|+|Changed:}} The [[Weapons# | + | | {{c|+|Changed:}} The [[Weapons#Spy|Revolver]]'s reload animation now no longer obstructs its user's aim. |
|- | |- | ||
| {{c|+|Changed:}} Changing to a new disguise now takes only 0.5 seconds, instead of 2 seconds. | | {{c|+|Changed:}} Changing to a new disguise now takes only 0.5 seconds, instead of 2 seconds. | ||
| Line 174: | Line 190: | ||
|} | |} | ||
| − | ===Tweaked Weapons=== | + | === Tweaked Weapons === |
{| class="wikitable" | {| class="wikitable" | ||
| − | ! style="background: #9a909c; | + | ! class="header" style="background:#9a909c;width:85px" | <span style="color:white;"> Class |
| − | ! style="background: #9a909c;" | + | ! class="header" style="background:#9a909c;" colspan=2 | <span style="color:white;"> Weapon |
| − | ! style="background: #9a909c;" | + | ! class="header" style="background:#9a909c;" colspan=1 | <span style="color:white;"> Changes |
|- | |- | ||
| − | ! style="background: #b7a2ba;" rowspan=10 | {{ | + | ! style="background:#b7a2ba;" colspan=1 rowspan=10| {{class link|Scout|br=yes|color=white}} |
| − | ! style="background: ;" rowspan=2 | {{Icon item|Baby Face's Blaster|icon-size=75px}} <br /> {{item link|Baby Face's Blaster}} | + | ! style="background:#F2F2F2;" colspan=2 rowspan=2 | {{Icon item|Baby Face's Blaster|icon-size=75px}} <br /> {{item link|Baby Face's Blaster}} |
| − | | {{c|-|Added:}} | + | | {{c|-|Added:}} Boost reduced on taking damage |
|- | |- | ||
| − | | {{c|-|Changed:}} Increased amount of Boost lost on air jump | + | | {{c|-|Changed:}} Increased amount of Boost lost on air jump to 75% (from 50%) |
|- | |- | ||
| − | ! style="background: ;" rowspan=2 | {{Icon item|Shortstop|icon-size=75px}} <br /> {{item link|Shortstop}} | + | ! style="background:#F2F2F2;" colspan=2 rowspan=2 | {{Icon item|Shortstop|icon-size=75px}} <br /> {{item link|Shortstop}} |
| {{c|=|Changed:}} No longer uses secondary ammo and now uses primary ammo instead | | {{c|=|Changed:}} No longer uses secondary ammo and now uses primary ammo instead | ||
|- | |- | ||
| − | | {{c| | + | | {{c|=|Changed:}} Healing and knockback passives are only active when weapon is deployed |
|- | |- | ||
| − | ! style="background: ;" rowspan= | + | ! style="background:#F2F2F2;" colspan=2 rowspan=4 | {{Icon item|Pretty Boy's Pocket Pistol|icon-size=75px}} <br /> {{item link|Pretty Boy's Pocket Pistol}} |
| − | | {{c|+|Added:}} | + | | {{c|+|Added:}} Up to +3 health per hit |
|- | |- | ||
| − | | {{c| | + | | {{c|=|Changed:}} Damage vulnerability from +50% fire to +20% all sources while active |
|- | |- | ||
| − | |||
| {{c|-|Changed:}} Passive effects on the Pretty Boy's Pocket Pistol are only in effect when the weapon is deployed | | {{c|-|Changed:}} Passive effects on the Pretty Boy's Pocket Pistol are only in effect when the weapon is deployed | ||
|- | |- | ||
| − | | {{c|-| | + | | {{c|-|Removed:}} +15 max health on wearer |
|- | |- | ||
| − | | {{c|+|Added:}} | + | ! style="background:#F2F2F2;" colspan=2 rowspan=2 | {{Icon item|Fan O'War|icon-size=75px}} <br /> {{item link|Fan O'War}} |
| + | | {{c|+|Added:}} Crits whenever it would normally mini-crit | ||
|- | |- | ||
| − | | {{c| | + | | {{c|+|Changed:}} Reduced damage penalty to 75% (from 90%) |
|- | |- | ||
| − | ! style="background: #b7a2ba;" rowspan=8 | {{ | + | ! style="background:#b7a2ba;" colspan=1 rowspan=8 | {{class link|Soldier|br=yes|color=white}} |
| − | ! style="background: ;" rowspan=4 | {{Icon item|Air Strike|icon-size=75px}} <br /> {{item link|Air Strike}} | + | ! style="background:#F2F2F2;" colspan=2 rowspan=4 | {{Icon item|Air Strike|icon-size=75px}} <br /> {{item link|Air Strike}} |
| − | | {{c|+|Removed:}} | + | | {{c|+|Removed:}} Clip size penalty |
|- | |- | ||
| − | | {{c|+|Changed:}} Reduced radius penalty from | + | | {{c|+|Changed:}} Reduced blast radius penalty to 10% (from 15%) |
|- | |- | ||
| − | | {{c|+|Changed:}} Reduced damage penalty from | + | | {{c|+|Changed:}} Reduced damage penalty to 15% (from 25%) |
|- | |- | ||
| − | | {{c|-|Changed:}} | + | | {{c|-|Changed:}} Reduced self blast damage reduction to 15% (from 25%) |
|- | |- | ||
| − | ! style="background: ;" rowspan= | + | ! style="background:#F2F2F2;" colspan=2 rowspan=2 | {{Icon item|Black Box|icon-size=75px}} <br /> {{item link|Black Box}} |
| − | | {{c| | + | | {{c|=|Changed:}} +15 health on hit to +20 health on hit per attack |
|- | |- | ||
| − | + | | {{c|=|Changed:}} Changed how health on hit works for radius damage. Is now capped per attack and scales with total damage done relative to base damage. (i.e. doing 45 damage nets +10 health on hit as base damage is 90. Hitting 3 enemies for 45 each for a total of 135 damage only returns +20 health) | |
| − | |||
|- | |- | ||
| − | | {{c| | + | ! style="background:#F2F2F2;" colspan=2 rowspan=1 | {{Icon item|Liberty Launcher|icon-size=75px}} <br /> {{item link|Liberty Launcher}} |
| + | | {{c|+|Added:}} +25% clip size | ||
|- | |- | ||
| − | !style="background: ;" rowspan=1 | {{Icon item| | + | ! style="background:#F2F2F2;" rowspan=1 | {{Icon item|Escape Plan|icon-size=75px}} <br /> {{item link|Escape Plan}} |
| − | | {{c|+| | + | ! style="background:#F2F2F2;" rowspan=1 | {{Icon item|Equalizer|icon-size=75px}} <br /> {{item link|Equalizer}} |
| + | | {{c|+|Changed:}} No healing penalty to 90% less healing from Medics while active | ||
|- | |- | ||
| − | ! style="background: #b7a2ba;" rowspan=12 | {{ | + | ! style="background:#b7a2ba;" colspan=1 rowspan=12 | {{class link|Pyro|br=yes|color=white}} |
| − | !style="background: ;" rowspan=1 | {{Icon item|Flare Gun|icon-size=75px}} <br /> {{item link|Flare Gun}} | + | ! style="background:#F2F2F2;" colspan=2 rowspan=1 | {{Icon item|Flare Gun|icon-size=75px}} <br /> {{item link|Flare Gun}} |
| {{c|=|Added:}} Added text to describe 100% critical hits on burning targets | | {{c|=|Added:}} Added text to describe 100% critical hits on burning targets | ||
|- | |- | ||
| − | !style="background: ;" rowspan=4 | {{Icon item|Scorch Shot|icon-size=75px}} <br /> {{item link|Scorch Shot}} | + | ! style="background:#F2F2F2;" colspan=2 rowspan=4 | {{Icon item|Scorch Shot|icon-size=75px}} <br /> {{item link|Scorch Shot}} |
| − | | {{c|+|Changed:}} Reduced damage penalty from | + | | {{c|+|Changed:}} Reduced damage penalty to 35% (from 50%) |
|- | |- | ||
| − | | {{c|+|Added:}} | + | | {{c|+|Added:}} Increased knock back on burning targets |
|- | |- | ||
| {{c|+|Changed:}} Increased the blast radius from flares from 92Hu to 110Hu | | {{c|+|Changed:}} Increased the blast radius from flares from 92Hu to 110Hu | ||
|- | |- | ||
| − | | {{c|+|Added:}} | + | | {{c|+|Added:}} 100% Mini-Crit chance vs burning targets |
| + | |- | ||
| + | ! style="background:#F2F2F2;" colspan=2 rowspan=6 | {{Icon item|Detonator|icon-size=75px}} <br /> {{item link|Detonator}} | ||
| + | | {{c|+|Changed:}} Slightly increased blast jump height when doing a Detonator jump | ||
| + | |- | ||
| + | | {{c|+|Changed:}} Increased blast radius to 110Hu (from 92Hu) | ||
| + | |- | ||
| + | | {{c|+|Changed:}} Detonated explosions now also Mini-Crit burning targets | ||
|- | |- | ||
| − | |||
| {{c|=|Added:}} Added text to describe 100% Mini-Crits on burning targets | | {{c|=|Added:}} Added text to describe 100% Mini-Crits on burning targets | ||
|- | |- | ||
| − | | {{c| | + | | {{c|-|Changed:}} Increased damage penalty to -25% |
| + | |- | ||
| + | | {{c|-|Changed:}} Increased self-damage penalty to 50% (from 25%) | ||
|- | |- | ||
| − | | {{c| | + | ! style="background:#F2F2F2;" colspan=2 rowspan=1 | {{Icon item|Powerjack|icon-size=75px}} <br /> {{item link|Powerjack}} |
| + | | {{c|-|Changed:}} Reduced health gained on kill to 25 (from 75) | ||
|- | |- | ||
| − | | {{c|+|Added:}} | + | ! style="background:#b7a2ba;" rowspan=12 | {{class link|Demoman|br=yes|color=white}} |
| + | ! style="background:#F2F2F2;" rowspan=2 | {{Icon item|Ali Baba's Wee Booties|icon-size=75px}} <br /> {{item link|Ali Baba's Wee Booties}} | ||
| + | ! style="background:#F2F2F2;" rowspan=2 | {{Icon item|Bootlegger|icon-size=75px}} <br /> {{item link|Bootlegger}} | ||
| + | | {{c|+|Added:}} Added +10% [[Classes#speed|movement speed]] bonus | ||
|- | |- | ||
| − | | {{c| | + | | {{c|=|Changed:}} Changed +25% charge on charge kill to +25% charge on melee kill |
| + | |- | ||
| + | ! style="background:#F2F2F2;" colspan=2 rowspan=1 | {{Icon item|Loch-n-Load|icon-size=75px}} <br /> {{item link|Loch-n-Load}} | ||
| + | | {{c|-|Changed:}} Damage bonus now only applies to buildings | ||
|- | |- | ||
| − | | {{c| | + | ! style="background:#F2F2F2;" colspan=2 rowspan=2 | {{Icon item|Iron Bomber|icon-size=75px}} <br /> {{item link|Iron Bomber}} |
| + | | {{c|+|Removed:}} Damage penalty on self-detonate | ||
|- | |- | ||
| − | + | | {{c|+|Changed:}} Reduced radius penalty to 15% (from 20%) | |
| − | | {{c| | ||
|- | |- | ||
| − | ! style="background: # | + | ! style="background:#F2F2F2;" colspan=2 rowspan=3 | {{Icon item|Tide Turner|icon-size=75px}} <br /> {{item link|Tide Turner}} |
| − | |||
| {{c|+|Changed:}} Self damage will no longer decrease charge when charging | | {{c|+|Changed:}} Self damage will no longer decrease charge when charging | ||
|- | |- | ||
| {{c|+|Changed:}} Fall damage will no longer decrease charge when charging | | {{c|+|Changed:}} Fall damage will no longer decrease charge when charging | ||
|- | |- | ||
| − | | {{c|+|Changed:}} | + | | {{c|+|Changed:}} Reduced amount of charge taken away on damage when charging reduced to 1 per point of damage (from 3) |
|- | |- | ||
| − | !style="background: ;" | + | ! style="background:#F2F2F2;" colspan=2 rowspan=1 | {{Icon item|Quickiebomb Launcher|icon-size=75px}} <br /> {{item link|Quickiebomb Launcher}} |
| − | | {{c|+| | + | | {{c|+|Changed:}} Damage is now increased based on charge amount when the bomb is fired. |
|- | |- | ||
| − | | {{c| | + | ! style="background:#F2F2F2;" colspan=2 rowspan=2 | {{Icon item|Ullapool Caber|icon-size=75px}} <br /> {{item link|Ullapool Caber}} |
| + | | {{c|-|Changed:}} Reduced explosion base damage to 75 (from 100) | ||
|- | |- | ||
| − | + | | {{c|-|Changed:}} Reduced damage ramp up bonus for close range attacks, now the same as other explosive weapons | |
| − | |||
|- | |- | ||
| − | !style="background: ;" rowspan=1 | {{Icon item| | + | ! style="background:#F2F2F2;" colspan=2 rowspan=1 | {{Icon item|Claidheamh Mòr|icon-size=75px}} <br /> {{item link|Claidheamh Mòr}} |
| − | | {{c|-|Changed:}} | + | | {{c|-|Changed:}} +25% charge on charge kill to +25% charge on melee kill |
|- | |- | ||
| − | !style="background: ;" rowspan=2 | {{Icon item| | + | ! style="background:#b7a2ba;" coslpan=1 rowspan=11 | {{class link|Heavy|br=yes|color=white}} |
| − | | {{c|+| | + | ! style="background:#F2F2F2;" colspan=2 rowspan=1 | {{Icon item|Brass Beast|icon-size=75px}} <br /> {{item link|Brass Beast}} |
| + | | {{c|+|Added:}} 20% damage resistance while spun up | ||
|- | |- | ||
| − | | {{c|+| | + | ! style="background:#F2F2F2;" colspan=2 rowspan=2 | {{Icon item|Tomislav|icon-size=75px}} <br /> {{item link|Tomislav}} |
| + | | {{c|+|Added:}} 20% more accurate (less spread) | ||
|- | |- | ||
| − | + | | {{c|+|Changed:}} Increased faster spin up speed to 20% (from 10%) | |
| − | | {{c| | ||
|- | |- | ||
| − | !style="background: ;" rowspan=2 | {{Icon item| | + | ! style="background:#F2F2F2;" colspan=2 rowspan=2 | {{Icon item|Natascha|icon-size=75px}} <br /> {{item link|Natascha}} |
| − | | {{c| | + | | {{c|+|Added:}} 20% damage resistance while spun up |
|- | |- | ||
| − | | {{c|-| | + | | {{c|-|Added:}} Stun amount now has distance falloff, decreases starting at 512hu down to zero stun at 1536Hu |
|- | |- | ||
| − | ! style="background: # | + | ! style="background:#F2F2F2;" colspan=2 rowspan=1 | {{Icon item|Family Business|icon-size=75px}} <br /> {{item link|Family Business}} |
| − | + | | {{c|+|Added:}} +15% faster firing speed | |
| − | | {{c|+|Added:}} | ||
|- | |- | ||
| − | ! style="background: ;" rowspan= | + | ! style="background:#F2F2F2;" colspan=2 rowspan=3 | {{Icon item|Dalokohs Bar|icon-size=75px}} <br /> {{item link|Dalokohs Bar}} |
| − | | {{c|+| | + | | {{c|+|Changed:}} Can now overheal up to 400hp |
|- | |- | ||
| − | | {{c|+|Added:}} | + | | {{c|+|Added:}} Alt-fire to throw and share as a small medkit for other players to use |
|- | |- | ||
| − | + | | {{c|-|Added:}} 10 second cool down on use | |
| − | |||
|- | |- | ||
| − | | {{c| | + | ! style="background:#F2F2F2;" colspan=2 rowspan=1 | {{Icon item|Warrior's Spirit|icon-size=75px}} <br /> {{item link|Warrior's Spirit}} |
| + | | {{c|+|Added:}} +10 health on hit | ||
|- | |- | ||
| − | ! style="background: ;" rowspan=1 | {{Icon item| | + | ! style="background:#F2F2F2;" colspan=2 rowspan=1 | {{Icon item|Eviction Notice|icon-size=75px}} <br /> {{item link|Eviction Notice}} |
| − | | {{c|+|Added:}} | + | | {{c|+|Added:}} 3 second speed boost on hit |
| + | |- | ||
| + | ! style="background:#b7a2ba;" colspan=1 rowspan=17 | {{class link|Engineer|br=yes|color=white}} | ||
| + | ! style="background:#F2F2F2;" colspan=2 rowspan=1 | {{Icon item|Pomson 6000|icon-size=75px}} <br /> {{item link|Pomson 6000}} | ||
| + | | {{c|-|Changed:}} Uber and Cloak drain decreases over distance from target, decreases start at 512hu from target and reaches 0 drain at 1536hu | ||
|- | |- | ||
| − | ! style="background: ;" rowspan=1 | {{Icon item| | + | ! style="background:#F2F2F2;" colspan=2 rowspan=1 | {{Icon item|Rescue Ranger|icon-size=75px}} <br /> {{item link|Rescue Ranger}} |
| − | | {{c|+| | + | | {{c|+|Changed:}} Reduced cost of long range building pick up to 100 metal (from 130 metal) |
|- | |- | ||
| − | ! style="background: ;" rowspan= | + | ! style="background:#F2F2F2;" colspan=2 rowspan=2 | {{Icon item|Wrangler|icon-size=75px}} <br /> {{item link|Wrangler}} |
| − | | {{c| | + | | {{c|-|Changed:}} Ammo and repair given to a shielded Sentry is reduced by the strength of the shield (66% reduced) when shield is active |
|- | |- | ||
| − | + | | {{c|-|Changed:}} Engineer death keeps the Wrangled sentry shielded and disabled for 3 seconds, same as when Wrangler is switched away. (Previously Engineer death caused disable state for only 1 second) | |
| − | | {{c|-| | ||
|- | |- | ||
| − | |{{c| | + | ! style="background:#F2F2F2;" colspan=2 rowspan=2 | {{Icon item|Short Circuit|icon-size=75px}} <br /> {{item link|Short Circuit}} |
| + | | {{c|=|Added:}} Projectile destruction has been moved to alt-fire at the cost of -15 per shot. There is a 0.5s cool down between attempts and refire | ||
|- | |- | ||
| − | | {{c| | + | | {{c|-|Added:}} Cannot pick up buildings when the Short Circuit is deployed |
|- | |- | ||
| − | ! style="background: # | + | ! style="background:#F2F2F2;" colspan=2 rowspan=5 | {{Icon item|Gunslinger|icon-size=75px}} <br /> {{item link|Gunslinger}} |
| − | + | | {{c|+|Changed:}} Mini Sentry Guns can now be repaired | |
| − | | {{c|+| | ||
|- | |- | ||
| {{c|+|Changed:}} Mini Sentry Guns can now be Wrench construction boosted | | {{c|+|Changed:}} Mini Sentry Guns can now be Wrench construction boosted | ||
|- | |- | ||
| − | | {{c|-|Changed:}} Mini Sentry base build speed decreased. Mini Sentry Guns that are Wrench boosted build slightly faster than previously | + | | {{c|-|Changed:}} Mini Sentry base build speed decreased. Mini Sentry Guns that are Wrench boosted build slightly faster than previously |
|- | |- | ||
| {{c|-|Changed:}} Mini Sentry Guns start at 50% health on construction and gain health during construction instead of starting at 100% | | {{c|-|Changed:}} Mini Sentry Guns start at 50% health on construction and gain health during construction instead of starting at 100% | ||
|- | |- | ||
| − | | {{c|-|Changed:}} Metal gibs from destroyed Mini Sentry Guns no longer grant any | + | | {{c|-|Changed:}} Metal gibs from destroyed Mini Sentry Guns no longer grant any metal |
| − | |||
| − | |||
| − | |||
| − | |||
| − | |||
| − | |||
|- | |- | ||
| − | !style="background: ;" rowspan= | + | ! style="background:#F2F2F2;" colspan=2 rowspan=3 | {{Icon item|Jag|icon-size=75px}} <br /> {{item link|Jag}} |
| − | | {{c| | + | | {{c|+|Added:}} +15% swing speed |
|- | |- | ||
| − | | {{c| | + | | {{c|=|Changed:}} With the change to Base Construction boost, Jag bonus has improved. 30% increase of 1.5x makes a total of 1.95x (total of 2.95x when base speed is added) |
|- | |- | ||
| − | + | | {{c|-|Added:}} 20% repair penalty (Repairs will give up to 80hp per swing instead 100hp per swing) | |
| − | |||
|- | |- | ||
| − | | {{c| | + | ! style="background:#F2F2F2;" colspan=2 rowspan=3 | {{Icon item|Eureka Effect|icon-size=75px}} <br /> {{item link|Eureka Effect}} |
| + | | {{c|=|Changed:}} Previous penalties have been removed and replaced with the following: | ||
|- | |- | ||
| − | | {{c|-|Added:}} | + | | {{c|-|Added:}} Construction hit speed boost decreased by 50% |
|- | |- | ||
| − | + | | {{c|-|Added:}} 50% less metal from pickups and Dispensers | |
| − | |||
|- | |- | ||
| − | | {{c| | + | ! style="background:#b7a2ba;" coslpan=1 rowspan=6 | {{class link|Medic|br=yes|color=white}} |
| + | ! style="background:#F2F2F2;" colspan=2 rowspan=5 | {{Icon item|Vaccinator|icon-size=75px}} <br /> {{item link|Vaccinator}} | ||
| + | | {{c|+|Added:}} Vaccinator Über deploys now always take exactly 1 bar of Übercharge. | ||
|- | |- | ||
| − | + | | {{c|+|Added:}} Vaccinator Über deploys give the patient a 2.5 second bubble of 75% damage resistance of the current resist type and full crit resistance to that type. These bubbles do not disappear if the Medic stops targeting the current patient. Multiple bubbles of different types can be applied to the same patient or multiple patients given the same resist Über each consuming 1 charge. | |
| − | | {{c| | ||
|- | |- | ||
| − | | {{c| | + | | {{c|-|Changed:}} Vaccinator Über build now suffers the same penalties as other Mediguns when it comes to multiple Medics on the same target and max overhealed patients |
|- | |- | ||
| − | | {{c|-| | + | | {{c|-|Changed:}} Reduced the bonus healing a Medic received for properly selecting the right damage resistance type from 25% of incoming damage to 10% of incoming damage |
|- | |- | ||
| − | + | | {{c|-|Added:}} Penalty of 66% decreased Übercharge build rate while healing a overhealed patient | |
| − | |||
| − | |||
|- | |- | ||
| − | + | ! style="background:#F2F2F2;" colspan=2 rowspan=1 | {{Icon item|Solemn Vow|icon-size=75px}} <br /> {{item link|Solemn Vow}} | |
| − | |||
| − | |||
| − | |||
| − | |||
| − | |||
| − | |||
| − | |||
| − | ! style="background: ;" rowspan=1 | {{Icon item|Solemn Vow|icon-size=75px}} <br /> {{item link|Solemn Vow}} | ||
| {{c|-|Added:}} Added 10% attack speed penalty | | {{c|-|Added:}} Added 10% attack speed penalty | ||
|- | |- | ||
| − | ! style="background: #b7a2ba;" rowspan=8 | {{ | + | ! style="background:#b7a2ba;" colspan=1 rowspan=8 | {{class link|Sniper|br=yes|color=white}} |
| − | ! style="background: ;" rowspan=1 | {{Icon item|Sydney Sleeper|icon-size=75px}} <br /> {{item link|Sydney Sleeper}} | + | ! style="background:#F2F2F2;" colspan=2 rowspan=1 | {{Icon item|Sydney Sleeper|icon-size=75px}} <br /> {{item link|Sydney Sleeper}} |
| − | | {{c|+| | + | | {{c|+|Changed:}} Jarate now applies on all scoped shots, duration scales with charge duration (2 to 8 seconds) |
|- | |- | ||
| − | ! style="background: ;" rowspan=5 | {{Icon item|Bazaar Bargain|icon-size=75px}} <br /> {{item link|Bazaar Bargain}} | + | ! style="background:#F2F2F2;" colspan=2 rowspan=5 | {{Icon item|Bazaar Bargain|icon-size=75px}} <br /> {{item link|Bazaar Bargain}} |
| − | | {{c|+| | + | | {{c|+|Changed:}} No longer lose heads on miss |
|- | |- | ||
| − | | {{c| | + | | {{c|+|Changed:}} Now requires 2 headshot kills to be back at base speed and 6 kills for 200% charge rate |
|- | |- | ||
| {{c|=|Changed:}} Each head boosts charge rate by 25% up to 200% | | {{c|=|Changed:}} Each head boosts charge rate by 25% up to 200% | ||
|- | |- | ||
| − | | {{c|-|Changed:}} | + | | {{c|-|Changed:}} Collecting a head requires a headshot kill and not just a headshot |
|- | |- | ||
| − | | {{c| | + | | {{c|-|Changed:}} Increased charge rate penalty changed to 50% (from 25%) |
|- | |- | ||
| − | !style="background: ;" rowspan=1 | {{Icon item|Cozy Camper|icon-size=75px}} <br /> {{item link|Cozy Camper}} | + | ! style="background:#F2F2F2;" colspan=2 rowspan=1 | {{Icon item|Cozy Camper|icon-size=75px}} <br /> {{item link|Cozy Camper}} |
| − | | {{c|+| | + | | {{c|+|Removed:}} Increased damage taken penalty |
|- | |- | ||
| − | ! style="background: ;" rowspan=1 | {{Icon item|Bushwacka|icon-size=75px}} <br /> {{item link|Bushwacka}} | + | ! style="background:#F2F2F2;" colspan=2 rowspan=1 | {{Icon item|Bushwacka|icon-size=75px}} <br /> {{item link|Bushwacka}} |
| − | | {{c| | + | | {{c|=|Changed:}} Changed penalty from +20% fire vulnerability to +20% damage vulnerability while active |
|- | |- | ||
| − | ! style="background: #b7a2ba;" rowspan=19 | {{ | + | ! style="background:#b7a2ba;" colspan=1 rowspan=19 | {{class link|Spy|br=yes|color=white}} |
| − | ! style="background: ;" rowspan= | + | ! style="background:#F2F2F2;" colspan=2 rowspan=1 | {{Icon item|Enforcer|icon-size=75px}} <br /> {{item link|Enforcer}} |
| − | | {{c| | + | | {{c|-|Changed:}} +20% damage bonus while undisguised to +20% damage bonus while disguised |
|- | |- | ||
| − | | {{c| | + | ! style="background:#F2F2F2;" colspan=2 rowspan=3 | {{Icon item|Spy-cicle|icon-size=75px}} <br /> {{item link|Spy-cicle}} |
| + | | {{c|+|Added:}} Spy-cicle recharge timer can now be reduced by picking up ammo boxes | ||
|- | |- | ||
| − | | {{c| | + | | {{c|=|Changed:}} Changed fire immunity for 3 seconds to fire immunity for 1 second and 10 seconds of afterburn immunity |
|- | |- | ||
| − | + | | {{c|-|Removed:}} Silent killer attribute | |
| − | | {{c|-| | ||
|- | |- | ||
| − | ! style="background: ;" rowspan=1 | {{Icon item|Big Earner|icon-size=75px}} <br /> {{item link|Big Earner}} | + | ! style="background:#F2F2F2;" colspan=2 rowspan=1 | {{Icon item|Big Earner|icon-size=75px}} <br /> {{item link|Big Earner}} |
| − | | {{c|+|Added:}} | + | | {{c|+|Added:}} 3 second speed gain on kill |
|- | |- | ||
| − | ! style="background: ;" rowspan=3 | {{Icon item|Conniver's Kunai|icon-size=75px}} <br /> {{item link|Conniver's Kunai}} | + | ! style="background:#F2F2F2;" colspan=2 rowspan=3 | {{Icon item|Conniver's Kunai|icon-size=75px}} <br /> {{item link|Conniver's Kunai}} |
| − | | {{c|+|Changed:}} | + | | {{c|+|Changed:}} Reduced health penalty reduced to -55 health (from -65 health) |
|- | |- | ||
| − | | {{c|+|Changed:}} | + | | {{c|+|Changed:}} Increased minimum health gain of 75 on kill |
|- | |- | ||
| − | |{{c|+|Changed:}} | + | | {{c|+|Changed:}} Increased maximum overheal from Kunai increased to 210 (from 195) |
|- | |- | ||
| − | ! style="background: ;" rowspan=1 | {{Icon item|Cloak and Dagger|icon-size=75px}} <br /> {{item link|Cloak and Dagger}} | + | ! style="background:#F2F2F2;" colspan=2 rowspan=1 | {{Icon item|Cloak and Dagger|icon-size=75px}} <br /> {{item link|Cloak and Dagger}} |
| {{c|+|Added:}} Can now pick up ammo kits for cloak meter while visible. Previously could not pick up ammo packs for cloak. Cloak gain is at a reduced rate when compared to stock Invis Watch on ammo pick up | | {{c|+|Added:}} Can now pick up ammo kits for cloak meter while visible. Previously could not pick up ammo packs for cloak. Cloak gain is at a reduced rate when compared to stock Invis Watch on ammo pick up | ||
|- | |- | ||
| − | ! style="background: ;" rowspan=9 | {{Icon item|Dead Ringer|icon-size=75px}} <br /> {{item link|Dead Ringer}} | + | ! style="background:#F2F2F2;" colspan=2 rowspan=9 | {{Icon item|Dead Ringer|icon-size=75px}} <br /> {{item link|Dead Ringer}} |
| − | | {{c| | + | | {{c|+|Added:}} When Feign Death is triggered, the Spy receives a 3 second speed boost |
|- | |- | ||
| − | | {{c| | + | | {{c|+|Changed:}} Initial attack that triggers feign death has its damage reduced by 50% |
|- | |- | ||
| − | | {{c| | + | | {{c|+|Changed:}} Feign Death stealth has no bump shimmer for 3 seconds |
|- | |- | ||
| − | | {{c| | + | | {{c|=|Changed:}} Increased drain rate to a decreased drain rate. Overall duration of invisibility is still 7 seconds when accounting for initial spend of 50% cloak meter for triggering Feign Death |
|- | |- | ||
| − | |{{c| | + | | {{c|-|Changed:}} Reduced cloak regen rate from to 50% faster (from 80%) |
|- | |- | ||
| − | |{{c|-| | + | | {{c|-|Added:}} Triggering Feign Death instantly removes 50% cloak meter |
|- | |- | ||
| − | |{{c|-|Changed:}} | + | | {{c|-|Changed:}} Damage resistance on triggering feign death scales over time. 65% to 20% over 3 seconds |
|- | |- | ||
| − | |{{c|-|Changed:}} 3 seconds after triggering Feign Death, the Spy is under normal invisible conditions (20% armor and shimmers if bumped or shot) | + | | {{c|-|Changed:}} 3 seconds after triggering Feign Death, the Spy is under normal invisible conditions (20% armor and shimmers if bumped or shot) |
|- | |- | ||
| − | |{{c|-|Changed:}} Can no longer pick up ammo for cloak meter while cloaked | + | | {{c|-|Changed:}} Can no longer pick up ammo for cloak meter while cloaked |
|- | |- | ||
| − | ! style="background: ;" | {{Icon item|Disguise Kit|icon-size=75px}} <br /> {{item link|Disguise Kit}} | + | ! style="background:#F2F2F2;" colspan=2 rowspan=1 | {{Icon item|Disguise Kit|icon-size=75px}} <br /> {{item link|Disguise Kit}} |
| {{c|+|Added:}} Pressing 'reload' (Default bind: {{Key|R}} ) also toggles the disguise team. | | {{c|+|Added:}} Pressing 'reload' (Default bind: {{Key|R}} ) also toggles the disguise team. | ||
|- | |- | ||
| − | ! style="background: #b7a2ba;" rowspan= | + | ! style="background:#b7a2ba; text-align:left;" rowspan=3 | {{class link|Soldier|color=white}}<br/>{{class link|Pyro|color=white}}<br/>{{class link|Heavy|color=white}}<br/>{{class link|Engineer|color=white}} |
| − | ! style="background: ;" rowspan=3 | {{Icon item|Panic Attack|icon-size=75px}} <br /> {{item link|Panic Attack}} | + | ! style="background: ;" colspan=2 rowspan=3 | {{Icon item|Panic Attack|icon-size=75px}} <br /> {{item link|Panic Attack}} |
| − | | {{c|+|Changed:}} | + | | {{c|+|Changed:}} Increased base fire rate to 30% (from 15%) |
|- | |- | ||
| − | | {{c|+|Added:}} | + | | {{c|+|Added:}} 50% faster switch to speed |
|- | |- | ||
| − | | {{c|+|Changed:}} | + | | {{c|+|Changed:}} Increased base reload speed to 50% faster (from 33%) |
|} | |} | ||
| − | ==Saavutukset== | + | == Saavutukset == |
Tässä päivityksessä tuli viisi uutta saavutusta. | Tässä päivityksessä tuli viisi uutta saavutusta. | ||
{{Powerhouse achievement list}} | {{Powerhouse achievement list}} | ||
| − | == | + | == Gallery == |
<gallery> | <gallery> | ||
File:Gun Mettle Update Page Part1.jpg|The update page for part 1 | File:Gun Mettle Update Page Part1.jpg|The update page for part 1 | ||
| Line 467: | Line 485: | ||
== Aiheesta muualla == | == Aiheesta muualla == | ||
| − | *[http://www.teamfortress.com/post.php?id=17401 Gun Mettle update] | + | *[http://www.teamfortress.com/post.php?id=17401 Gun Mettle update] {{lang icon|en}} |
| − | *[http://www.teamfortress.com/gunmettle/ Päivityssivu] | + | *[http://www.teamfortress.com/gunmettle/ Päivityssivu] {{lang icon|en}} |
| − | *[http://www.teamfortress.com/gunmettle/powerhouse.php The Gun Mettle Update] | + | *[http://www.teamfortress.com/gunmettle/powerhouse.php The Gun Mettle Update] {{lang icon|en}} |
| + | |||
{{Gun Mettle Update Nav}} | {{Gun Mettle Update Nav}} | ||
{{Major updates nav}} | {{Major updates nav}} | ||
Latest revision as of 05:00, 31 December 2019
 | Tätä sivua ollaan kääntämässä suomeksi. Jos pystyt puhumaan suomea, kirjoita keskustelusivulle tai puhu niille jotka ovat parantaneet sivua (katsomalla sivuhistoriaa). |

Gun Mettle Update oli merkittävä päivitys, jonka mukana tulivat aseiden ulkoasut, 4 uutta karttaa ja 3 uutta pilkkaa. Lisäksi se esitteli Gun Mettle-kampanjan, kolmen kuukauden tapahtuma joka antaa pelaajien suorittaa taitoon perustuvia haasteita ainutlaatuisia aseita ja eksklusiivisia asepakkauksia. Pelaajien on ostettava Gun Mettle-kampanjan vapaalipun päästäkseen mukaan tapahtumaan.
Sisällysluettelo
Lisäykset
Kartat
| Nimi | Kuva | Pelimoodi | Tiedostonimi |
|---|---|---|---|
| Borneo | 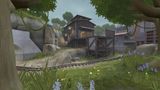
|
Pommilasti
|
pl_borneo
|
| Powerhouse | 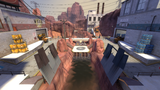
|
Komentopisteet |
cp_powerhouse
|
| Snowplow | 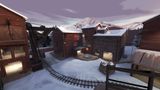
|
Komentopisteet |
cp_snowplow
|
| Suijin | 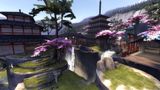
|
Kukkulan kuningas |
koth_suijin
|
Kosmetiikka
Pilkat
| Marxilainen malli | ||
| Hiivintätehtävä | ||
| Ripaska |
Esineet
Epätavalliset tehosteet
Viileä
Energiapallo
Kuuma
Isotooppi


Note: As of the Jungle Inferno Update, the Energy Orb effect is no longer obtainable.
Tweaked Classes
| Class | Changes |
|---|---|
Tweaked Weapons
| Class | Weapon | Changes | |
|---|---|---|---|
Pikkupojan paukkurauta |
|||
Pysäyttäjä |
|||
Söpönassun sormipyssy |
|||
Sotaviuhka |
|||
Ilmatuki |
|||
Musta laatikko |
|||
Vapaudenheitin |
|||
Pakosuunnitelma |
Tasoittaja |
||
Valopistooli |
|||
Korvennuskanuuna |
|||
Sytytin |
|||
Tunkki |
|||
Ali Baban pikku poposet |
Piraatin puujalka |
||
Lataus ja Laattaus |
|||
Rautapommittaja |
|||
Aallonmurtaja |
|||
Pikapomminheitin |
|||
Ullapoolin tukki |
|||
Claidheamh Mòr |
|||
Messinkipeto |
|||
Tomislav |
|||
Natasha |
|||
Perheyritys |
|||
Suklaalevy |
|||
Soturin sielu |
|||
Häätöilmoitus |
|||
Pomson 6000 |
|||
Pelastuspartiolainen |
|||
Kaukopaimen |
|||
Pallosalama |
|||
Karjakoura |
|||
Väkänen |
|||
Ahaa-elämys |
|||
Rokottaja |
|||
Vakava vala |
|||
Nukutuskivääri |
|||
Toritarjous |
|||
Tyytyväinen telttailija |
|||
Puskanpätkijä |
|||
Luottomies |
|||
Jääpuukko |
|||
Palkkapussin kasvattaja |
|||
Kieroilijan kunai |
|||
Viitta ja tikari |
|||
Kuolemankello |
|||
Valepukuvalikko |
|||
Paniikkikohtaus |
|||
Saavutukset
Tässä päivityksessä tuli viisi uutta saavutusta.
|
|


Gallery
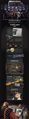
The update page for part 1
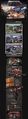
The update page for part 2, without the list of class and weapon tweaks
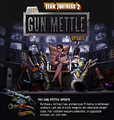
Steam popup advertising the Gun Mettle Update.
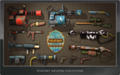
A gallery of the Teufort weapon collection.
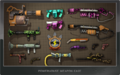
A gallery of the Powerhouse weapon collection.
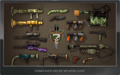
A gallery of the Concealed Killer weapon collection.
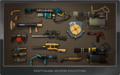
A gallery of the Craftsmann weapon collection.


Aiheesta muualla
- Gun Mettle update (englanniksi)
- Päivityssivu (englanniksi)
- The Gun Mettle Update (englanniksi)
| ||||||||||||||||||||||||||||||||||||||||
| ||||||||||||||||||||||||||||||||||||||||||||||||||||||||||||||||||||||||||||||||||||||||||||||||||