Difference between revisions of "Sawmill (Capture the Flag)"
(Added see also) |
(adding to locations) |
||
| Line 26: | Line 26: | ||
|medium2=4 | |medium2=4 | ||
|large2=0}} | |large2=0}} | ||
| − | *''' | + | |
| − | *''' | + | *'''Center Shed:''' The center of the map is dominated by a large shed that houses multiple entries for either team. Within the center of the shed is the map's control point(boarded off and unusable in this version). Large circular saws move linear to the control point, generate large amounts of noise, and serve as deadly obstacles to players as they attempt to capture the point. Logs are suspended above the area. |
| + | *'''Log Shed:''' On the right hand side of [[BLU]]'s spawn area is a wide shed, full of timber, standing over a flooded ditch. Another mini health kit sits on a pile of planks within the shed. The far side towards RED's yard is boarded off in the CTF version. | ||
*'''Intelligence room:''' Tucked in the basement of one of the buildings across from the spawn room, and also accessible from a caved-in portion of an adjacent building. The room is completely flooded. | *'''Intelligence room:''' Tucked in the basement of one of the buildings across from the spawn room, and also accessible from a caved-in portion of an adjacent building. The room is completely flooded. | ||
| + | *'''Waterfall:''' Located on the right hand side of [[RED]]'s spawn area, a titular waterfall flows down from a gray cliff into the center of a [[Water|large pool]]. Logs form a floating path across the pool, although the water itself is not too deep. A mini health kit can be found in the center of the logs. There is also an obvious 'hidden' path that goes behind the waterfall that can be used in case of watchful enemy eyes. In the CTF version the far entrance to the BLU yard is boarded off. | ||
| + | * '''The Cave''' - A cavern makes a wide loop around one side of the map behind the waterfall, and can be defended at either end. | ||
| + | * '''Rooftops''' - Outside each [[spawn room]] are walkways which lead to the roof of the building directly across from them. Another wooden plank connects these rooftops to the Alcoves inside The Mill. | ||
| + | * '''The Alcoves''' - On either side of the control point, perpendicular to the sides dominated by the blades, are two windowed ledges, with stairs leading down to the ground floor. These small 'rooms' can be defended by a determined [[Engineer]], if he sets up a [[Buildings|Sentry nest]] early. | ||
| + | |||
| + | <gallery widths=150px heights=80px> | ||
| + | File:CTF Sawmill Center.png|Center Shed (CTF) | ||
| + | File:CTF Sawmill Intelligence.png|Red Intelligence Room | ||
| + | File:ctfsawmill intel1.jpg|Main Entrance to intel room. | ||
| + | File:ctfsawmill intel2.jpg|Side Entrance to intel room. | ||
| + | File:ctfsawmill shed.jpg|Shed Area <br><sub>''note: the far entrance is boarded off.''</sub> | ||
| + | File:ctfsawmill waterfall.jpg|Waterfall Area <br><sub>''note: the far entrance is boarded off.''</sub> | ||
| + | File:ctfsawmill spawn.jpg|Spawn Area. | ||
| + | File:CTF Sawmill Overview.png|Overview of Sawmill (CTF). | ||
| + | </gallery> | ||
== Strategy == | == Strategy == | ||
| Line 46: | Line 62: | ||
* Just like in [[Lumberyard]] and the Arena version of Sawmill, there is a missile silo underneath the capture point. | * Just like in [[Lumberyard]] and the Arena version of Sawmill, there is a missile silo underneath the capture point. | ||
* The waterfall and lake side routes have been blocked off, but it is still possible to get past that way by jumping on the metal sheets on the wall and jumping onto the main shed roof. | * The waterfall and lake side routes have been blocked off, but it is still possible to get past that way by jumping on the metal sheets on the wall and jumping onto the main shed roof. | ||
| − | |||
| − | |||
| − | |||
| − | |||
| − | |||
| − | |||
| − | |||
| − | |||
| − | |||
| − | |||
| − | |||
| − | |||
== See also == | == See also == | ||
Revision as of 07:28, 16 February 2011
| Sawmill (Capture the Flag) | |
|---|---|

| |
| Basic Information | |
| Variants: | Arena, King of the Hill, SnowVille and Soul-Mill |
| Developer(s): | {{{map-developer}}} |
| Map Photos | |
 | |
| Map Overview | |
_overview.png) | |
| “ | Seriously... is there anything this map can't do?
Arena Sawmill has been re-worked to function as the third official Valve ‘Capture the Flag’ map. Two side access routes have been blocked off to concentrate gameplay, and a building near each spawn point is now accessible. These lead to a flooded underground stronghold that holds the enemy’s top secret intelligence—a flag made entirely out of microfilm. Or possibly nylon. Either way, yoink!
|
” |
Sawmill is a Capture the Flag map and was released with the Classless Update as an official map. Sawmill (Capture the Flag) offers an almost identical layout to its Arena and King of the Hill variations, the only major differences include addition of intelligence rooms for each team, and blocking off the shed access to each side area. The control point is replaced by a small health pack.
To win your team must capture the opposing team's intelligence continuously until you reach the game's capture limit (default limit is 3) whilst preventing the enemy from achieving the same.
Locations
- Center Shed: The center of the map is dominated by a large shed that houses multiple entries for either team. Within the center of the shed is the map's control point(boarded off and unusable in this version). Large circular saws move linear to the control point, generate large amounts of noise, and serve as deadly obstacles to players as they attempt to capture the point. Logs are suspended above the area.
- Log Shed: On the right hand side of BLU's spawn area is a wide shed, full of timber, standing over a flooded ditch. Another mini health kit sits on a pile of planks within the shed. The far side towards RED's yard is boarded off in the CTF version.
- Intelligence room: Tucked in the basement of one of the buildings across from the spawn room, and also accessible from a caved-in portion of an adjacent building. The room is completely flooded.
- Waterfall: Located on the right hand side of RED's spawn area, a titular waterfall flows down from a gray cliff into the center of a large pool. Logs form a floating path across the pool, although the water itself is not too deep. A mini health kit can be found in the center of the logs. There is also an obvious 'hidden' path that goes behind the waterfall that can be used in case of watchful enemy eyes. In the CTF version the far entrance to the BLU yard is boarded off.
- The Cave - A cavern makes a wide loop around one side of the map behind the waterfall, and can be defended at either end.
- Rooftops - Outside each spawn room are walkways which lead to the roof of the building directly across from them. Another wooden plank connects these rooftops to the Alcoves inside The Mill.
- The Alcoves - On either side of the control point, perpendicular to the sides dominated by the blades, are two windowed ledges, with stairs leading down to the ground floor. These small 'rooms' can be defended by a determined Engineer, if he sets up a Sentry nest early.
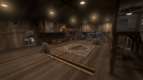
Center Shed (CTF)
- CTF Sawmill Intelligence.png
Red Intelligence Room
- Ctfsawmill intel1.jpg
Main Entrance to intel room.
- Ctfsawmill intel2.jpg
Side Entrance to intel room.
- Ctfsawmill shed.jpg
Shed Area
note: the far entrance is boarded off. - Ctfsawmill waterfall.jpg
Waterfall Area
note: the far entrance is boarded off. - Ctfsawmill spawn.jpg
Spawn Area.

Overview of Sawmill (CTF).

Strategy
- Use the rooftops to give yourself the high ground advantage. The tops of the stairs in the central area are also good for picking off enemies down on the main point.
- Remember, instant kill for anyone who stands in front of (or is pushed next to) the 2 giant saws in the middle. Gain the advantage with knockback weapons (FaN, Sentry Guns and explosives.)
- Scouts work wonders here, use the rooftops and you will be on the enemy's Intelligence room in a blast.
- The stairways from either spawn to the control point make for excellent sentry spots, especially useful to set up a quick sentry in time for a push onto the point.
- Demomen with the Scottish Resistance can place stickies on the intelligence while continuing to defend other spots. This is incredibly powerful for a steady defense on the intelligence while retaining chokepoint defense.
Update history
- Fixed CTF_Sawmill not ending the map when mp_timelimit hits during the middle of a round.
- Fixed Engineer exploit.
Trivia
- Just like in Lumberyard and the Arena version of Sawmill, there is a missile silo underneath the capture point.
- The waterfall and lake side routes have been blocked off, but it is still possible to get past that way by jumping on the metal sheets on the wall and jumping onto the main shed roof.
See also
External links
| ||||||||||||||||||||||||||||||||||||||||||||||||||||||||||||||||