Difference between revisions of "Smissmas 2014/es"
m |
BrazilianNut (talk | contribs) m (→Cambios en armas) |
||
| (6 intermediate revisions by 4 users not shown) | |||
| Line 1: | Line 1: | ||
| − | {{ | + | {{update trans}} |
| + | {{DISPLAYTITLE:{{update name|Smissmas 2014}}}} | ||
{{patch info|12|22|2014}} | {{patch info|12|22|2014}} | ||
| + | {{Infobox | ||
| + | | title = {{update name|Smissmas 2014}} | ||
| + | | image = Smissmas14 Cup.png | ||
| + | | imagewidth = 380px | ||
| + | }} | ||
{{Quotation | {{Quotation | ||
| '''El Blog de TF2''' | | '''El Blog de TF2''' | ||
| Line 7: | Line 13: | ||
}} | }} | ||
| − | [[ | + | La actualización '''{{update name|Smissmas 2014}}''' (''Smissmas 2014'', en inglés) fue una actualización de [[Patches/es#MU|mayor contenido]] para ''[[Team Fortress 2/es|Team Fortress 2]]'', realizada el {{Patch name|12|22|2014}}. Fue una secuela de la actualización [[Steam Workshop/es|creada por la comunidad]] anterior, solicitada por Valve en coincidencia de las presentaciones en el Workshop Navideño. |
| − | La actualización | + | La actualización añadió 28 nuevos [[Cosmetic items/es|cosméticos]] Invernales y 7 nuevas [[Festive weapons/es|armas Festivas]]. El reflejo de la actualización fue el nuevo [[List of game modes/es|modo de juego]] [[Mann Co. Beta Maps/es|beta]], ''[[Mannpower/es|Mannpower]]'', junto a dos nuevos mapas beta, [[Foundry (Capture the Flag)/es|Foundry (Capturar la bandera)]] y [[Gorge (Capture the Flag)/es|Gorge (Capturar la bandera)]]. Muchas de las ya existentes armas del [[Demoman/es|Demoman]] han sufrido cambios en sus funciones. También se han añadido tres armas completamente nuevas, el ''{{item link|Quickiebomb Launcher}}'', el ''{{item link|Iron Bomber}}'', y el ''{{item link|Panic Attack}}''. |
| − | + | == Adiciones == | |
| + | === Mapas === | ||
| + | {{main|List of maps/es|l1=Lista de mapas}} | ||
| + | {| class="wikitable" cellpadding=2 style="text-align:center;" | ||
| + | |- style="height: 20px;" | ||
| + | ! class="header" style="background:#6B0000; color:#FFFFFF" | {{common string|Name}} | ||
| + | ! class="header" style="background:#6B0000; color:#FFFFFF" | {{common string|Picture}} | ||
| + | ! class="header" style="background:#6B0000; color:#FFFFFF" | {{common string|Game mode}} | ||
| + | ! class="header" style="background:#6B0000; color:#FFFFFF" | {{common string|File name}} | ||
| + | |- | ||
| + | | style="background:#990000;" | '''[[Foundry (Capture the Flag){{if lang}}|<span style="color:#FFF;">Foundry<br/>{{parenthesis|{{gamemode name|Capture the Flag}}}}</span>]]''' | ||
| + | | style="background:#FAE5E5;" | [[File:Ctf_foundry.jpg|160px|link=Foundry (Capture the Flag){{if lang}}]] | ||
| + | | style="background:#FAE5E5;" | '''{{gamemode link|Mannpower}}'''<br>[[File:Backpack Grappling Hook.png|50px|link=Mannpower{{if lang}}]] | ||
| + | | style="background:#FAE5E5;" | {{code|ctf_foundry}} | ||
| + | |- | ||
| + | | style="background:#990000;" | '''[[Gorge (Capture the Flag){{if lang}}|<span style="color:#FFF;">Gorge<br/>{{parenthesis|{{gamemode name|Capture the Flag}}}}</span>]]''' | ||
| + | | style="background:#FAE5E5;" | [[File:Ctf gorge.jpg|160px|link=Gorge (Capture the Flag){{if lang}}]] | ||
| + | | style="background:#FAE5E5;" | '''{{gamemode link|Mannpower}}'''<br>[[File:Backpack Grappling Hook.png|50px|link=Mannpower{{if lang}}]] | ||
| + | | style="background:#FAE5E5;" | {{code|ctf_gorge}} | ||
| + | |} | ||
| − | |||
=== Armas === | === Armas === | ||
{{main|Weapons/es|l1=Armas}} | {{main|Weapons/es|l1=Armas}} | ||
{| class="wikitable" cellpadding=2 style="text-align:center;" | {| class="wikitable" cellpadding=2 style="text-align:center;" | ||
| − | | width=" | + | | width="85px" style="background:#6B0000;" rowspan="2" | '''{{class link|Demoman|br=yes|color=white}}''' |
| − | | | + | | style="background:#990000;" | {{item icon|Iron Bomber|75px}} |
| − | | style="background: #FAE5E5;" | '''{{item link|Iron Bomber | + | | style="background:#FAE5E5;" | '''{{item link|Iron Bomber}}''' |
| − | |||
| − | |||
| − | |||
|- | |- | ||
| − | | | + | | style="background:#990000;" | {{item icon|Quickiebomb Launcher|75px}} |
| − | + | | style="background:#FAE5E5;" | '''{{item link|Quickiebomb Launcher}}''' | |
| − | | style="background: #FAE5E5;" | '''{{item link| | ||
|- | |- | ||
| + | | align="left" style="background:#6B0000;" | '''{{class link|Soldier|color=white}}'''<br/>'''{{class link|Pyro|color=white}}'''<br/>'''{{class link|Heavy|color=white}}'''<br/>'''{{class link|Engineer|color=white}}''' | ||
| + | | style="background:#990000;" | {{item icon|Panic Attack|75px}} | ||
| + | | style="background:#FAE5E5;" | '''{{item link|Panic Attack}}''' | ||
|} | |} | ||
| − | === | + | === Armas Festivas === |
| − | {{main| | + | {{main|Festive weapons/es|l1=Armas Festivas}} |
{| class="wikitable collapsible" cellpadding="3" style="text-align:center;" | {| class="wikitable collapsible" cellpadding="3" style="text-align:center;" | ||
| − | | width=" | + | | width="85px" style="background:#6B0000;" | '''{{class link|Scout|br=yes|color=white}}''' |
| − | | | + | | style="background:#990000;" | {{item icon|Festive Bonk! Atomic Punch|75px}} |
| − | | style="background: #FAE5E5;"| '''{{item link| | + | | style="background:#FAE5E5;" | '''{{item link|Festive Bonk! Atomic Punch}}''' |
|- | |- | ||
| − | | | + | | style="background:#6B0000;" | '''{{class link|Pyro|br=yes|color=white}}''' |
| − | | style="background: #FAE5E5;"| '''{{item link| | + | | style="background:#990000;" | {{item icon|Festive Backburner|75px}} |
| + | | style="background:#FAE5E5;" | '''{{item link|Festive Backburner}}''' | ||
|- | |- | ||
| − | | | + | | style="background:#6B0000;" | '''{{class link|Demoman|br=yes|color=white}}''' |
| − | | style="background: #FAE5E5;"| '''{{item link| | + | | style="background:#990000;" | {{item icon|Festive Chargin' Targe|75px}} |
| + | | style="background:#FAE5E5;" | '''{{item link|Festive Chargin' Targe}}''' | ||
|- | |- | ||
| − | | | + | | style="background:#6B0000;" | '''{{class link|Medic|br=yes|color=white}}''' |
| − | | style="background: #FAE5E5;"| '''{{item link| | + | | style="background:#990000;" | {{item icon|Festive Bonesaw|75px}} |
| + | | style="background:#FAE5E5;" | '''{{item link|Festive Bonesaw}}''' | ||
|- | |- | ||
| − | | | + | | style="background:#6B0000;" | '''{{class link|Sniper|br=yes|color=white}}''' |
| − | | | + | | style="background:#990000;" | {{item icon|Festive SMG|75px}} |
| − | | style="background: #FAE5E5;"| '''{{item link| | + | | style="background:#FAE5E5;" | '''{{item link|Festive SMG}}''' |
|- | |- | ||
| − | | | + | | style="background:#6B0000;" | '''{{class link|Spy|br=yes|color=white}}''' |
| − | | | + | | style="background:#990000;" | {{item icon|Festive Revolver|75px}} |
| − | | style="background: #FAE5E5;"| '''{{item link| | + | | style="background:#FAE5E5;" | '''{{item link|Festive Revolver}}''' |
|- | |- | ||
| − | | align=" | + | | align="left" style="background:#6B0000;" | '''{{class link|Soldier|color=white}}'''<br/>'''{{class link|Pyro|color=white}}'''<br/>'''{{class link|Heavy|color=white}}'''<br/>'''{{class link|Engineer|color=white}}''' |
| − | | | + | | style="background:#990000;" | {{item icon|Festive Shotgun|75px}} |
| − | | | + | | style="background:#FAE5E5;" | '''{{item link|Festive Shotgun}}''' |
| − | + | |} | |
| − | | style="background: #FAE5E5;"| '''{{item link| | + | |
| − | |- | + | === Cosméticos === |
| − | | | + | {{main|Cosmetic items/es|l1=Artículos cosméticos}} |
| − | | style="background: #FAE5E5;"| '''{{item link| | + | {| class="wikitable collapsible" cellpadding="3" style="text-align:center;" |
| + | | width="85px" style="background:#6B0000;" rowspan="3" | '''{{class link|Scout|br=yes|color=white}}''' | ||
| + | | style="background:#990000;" | {{item icon|Courtier's Collar|75px}} | ||
| + | | style="background:#FAE5E5;" | '''{{item link|Courtier's Collar}}''' | ||
|- | |- | ||
| − | | | + | | style="background:#990000;" | {{item icon|Harlequin's Hooves|75px}} |
| − | | style="background: #FAE5E5;"| '''{{item link| | + | | style="background:#FAE5E5;" | '''{{item link|Harlequin's Hooves}}''' |
|- | |- | ||
| − | | | + | | style="background:#990000;" | {{item icon|Mountebank's Masque|75px}} |
| − | + | | style="background:#FAE5E5;" | '''{{item link|Mountebank's Masque}}''' | |
| − | | style="background: #FAE5E5;"| '''{{item link| | ||
|- | |- | ||
| − | | | + | | style="background:#6B0000;" | '''{{class link|Soldier|br=yes|color=white}}''' |
| − | | style="background: #FAE5E5;"| '''{{item link| | + | | style="background:#990000;" | {{item icon|Skullcap|75px}} |
| + | | style="background:#FAE5E5;" | '''{{item link|Skullcap}}''' | ||
|- | |- | ||
| − | | | + | | style="background:#6B0000;" rowspan="5" | '''{{class link|Pyro|br=yes|color=white}}''' |
| − | | style="background: #FAE5E5;"| '''{{item link| | + | | style="background:#990000;" | {{item icon|Black Knight's Bascinet|75px}} |
| + | | style="background:#FAE5E5;" | '''{{item link|Black Knight's Bascinet}}''' | ||
|- | |- | ||
| − | | | + | | style="background:#990000;" | {{item icon|Charred Chainmail|75px}} |
| − | + | | style="background:#FAE5E5;" | '''{{item link|Charred Chainmail}}''' | |
| − | | style="background: #FAE5E5;"| '''{{item link| | ||
|- | |- | ||
| − | | | + | | style="background:#990000;" | {{item icon|Pyromancer's Hood|75px}} |
| − | | style="background: #FAE5E5;"| '''{{item link| | + | | style="background:#FAE5E5;" | '''{{item link|Pyromancer's Hood}}''' |
|- | |- | ||
| − | | | + | | style="background:#990000;" | {{item icon|Pyromancer's Raiments|75px}} |
| − | + | | style="background:#FAE5E5;" | '''{{item link|Pyromancer's Raiments}}''' | |
| − | | style="background: #FAE5E5;"| '''{{item link| | ||
|- | |- | ||
| − | | | + | | style="background:#990000;" | {{item icon|Torcher's Tabard|75px}} |
| − | | style="background: #FAE5E5;"| '''{{item link| | + | | style="background:#FAE5E5;" | '''{{item link|Torcher's Tabard}}''' |
|- | |- | ||
| − | | | + | | style="background:#6B0000;" rowspan="3" | '''{{class link|Demoman|br=yes|color=white}}''' |
| − | | style="background: #FAE5E5;"| '''{{item link| | + | | style="background:#990000;" | {{item icon|Scot Bonnet|75px}} |
| + | | style="background:#FAE5E5;" | '''{{item link|Scot Bonnet}}''' | ||
|- | |- | ||
| − | | | + | | style="background:#990000;" | {{item icon|Storm Stompers|75px}} |
| − | | style="background: #FAE5E5;"| '''{{item link| | + | | style="background:#FAE5E5;" | '''{{item link|Storm Stompers}}''' |
|- | |- | ||
| − | | | + | | style="background:#990000;" | {{item icon|Valhalla Helm|75px}} |
| − | | style="background: #FAE5E5;"| '''{{item link| | + | | style="background:#FAE5E5;" | '''{{item link|Valhalla Helm}}''' |
|- | |- | ||
| − | | | + | | style="background:#6B0000;" rowspan="2" | '''{{class link|Heavy|br=yes|color=white}}''' |
| − | | | + | | style="background:#990000;" | {{item icon|Old Man Frost|75px}} |
| − | | style="background: #FAE5E5;"| '''{{item link| | + | | style="background:#FAE5E5;" | '''{{item link|Old Man Frost}}''' |
|- | |- | ||
| − | | | + | | style="background:#990000;" | {{item icon|Siberian Facehugger|75px}} |
| − | | style="background: #FAE5E5;"| '''{{item link| | + | | style="background:#FAE5E5;" | '''{{item link|Siberian Facehugger}}''' |
|- | |- | ||
| − | | | + | | style="background:#6B0000;" rowspan="5" | '''{{class link|Engineer|br=yes|color=white}}''' |
| − | | | + | | style="background:#990000;" | {{item icon|Clubsy The Seal|75px}} |
| − | | style="background: #FAE5E5;"| '''{{item link| | + | | style="background:#FAE5E5;" | '''{{item link|Clubsy The Seal}}''' |
|- | |- | ||
| − | | | + | | style="background:#990000;" | {{item icon|Conagher's Combover|75px}} |
| − | | style="background: #FAE5E5;"| '''{{item link| | + | | style="background:#FAE5E5;" | '''{{item link|Conagher's Combover}}''' |
|- | |- | ||
| − | | | + | | style="background:#990000;" | {{item icon|Cop Caller|75px}} |
| − | | style="background: #FAE5E5;"| '''{{item link| | + | | style="background:#FAE5E5;" | '''{{item link|Cop Caller}}''' |
|- | |- | ||
| − | | | + | | style="background:#990000;" | {{item icon|Holstered Heaters|75px}} |
| − | | style="background: #FAE5E5;"| '''{{item link| | + | | style="background:#FAE5E5;" | '''{{item link|Holstered Heaters}}''' |
|- | |- | ||
| − | | | + | | style="background:#990000;" | {{item icon|Thermal Insulation Layer|75px}} |
| − | + | | style="background:#FAE5E5;" | '''{{item link|Thermal Insulation Layer}}''' | |
| − | | style="background: #FAE5E5;"| '''{{item link| | ||
|- | |- | ||
| − | | | + | | style="background:#6B0000;" rowspan="2" | '''{{class link|Medic|br=yes|color=white}}''' |
| − | | style="background: #FAE5E5;"| '''{{item link| | + | | style="background:#990000;" | {{item icon|Surgeon's Shako|75px}} |
| + | | style="background:#FAE5E5;" | '''{{item link|Surgeon's Shako}}''' | ||
|- | |- | ||
| − | | | + | | style="background:#990000;" | {{item icon|Unknown Mann|75px}} |
| − | | style="background: #FAE5E5;"| '''{{item link| | + | | style="background:#FAE5E5;" | '''{{item link|Unknown Mann}}''' |
|- | |- | ||
| − | | | + | | style="background:#6B0000;" rowspan="4" | '''{{class link|Sniper|br=yes|color=white}}''' |
| − | + | | style="background:#990000;" | {{item icon|Bushman's Bristles|75px}} | |
| − | + | | style="background:#FAE5E5;" | '''{{item link|Bushman's Bristles}}''' | |
| − | |||
| − | |||
| − | |||
| − | | | ||
| − | | style="background: #FAE5E5;"| '''{{item link| | ||
|- | |- | ||
| − | | | + | | style="background:#990000;" | {{item icon|Marksman's Mohair|75px}} |
| − | + | | style="background:#FAE5E5;" | '''{{item link|Marksman's Mohair}}''' | |
| − | | style="background: #FAE5E5;"| '''{{item link| | ||
|- | |- | ||
| − | | | + | | style="background:#990000;" | {{item icon|Professional's Ushanka|75px}} |
| − | + | | style="background:#FAE5E5;" | '''{{item link|Professional's Ushanka}}''' | |
| − | | style="background: #FAE5E5;"| '''{{item link| | ||
|- | |- | ||
| − | | | + | | style="background:#990000;" | {{item icon|Wally Pocket|75px}} |
| − | + | | style="background:#FAE5E5;" | '''{{item link|Wally Pocket}}''' | |
| − | | style="background: #FAE5E5;"| '''{{item link| | ||
|- | |- | ||
| − | | | + | | style="background:#6B0000;" rowspan="3" | '''{{class link|Spy|br=yes|color=white}}''' |
| − | | | + | | style="background:#990000;" | {{item icon|Pocket Momma|75px}} |
| − | | style="background: #FAE5E5;"| '''{{item link| | + | | style="background:#FAE5E5;" | '''{{item link|Pocket Momma}}''' |
|- | |- | ||
| − | | | + | | style="background:#990000;" | {{item icon|Puffy Provocateur|75px}} |
| − | + | | style="background:#FAE5E5;" | '''{{item link|Puffy Provocateur}}''' | |
| − | | style="background: #FAE5E5;"| '''{{item link| | ||
|- | |- | ||
| − | | | + | | style="background:#990000;" | {{item icon|Stealthy Scarf|75px}} |
| − | + | | style="background:#FAE5E5;" | '''{{item link|Stealthy Scarf}}''' | |
| − | | style="background: #FAE5E5;"| '''{{item link| | ||
|- | |- | ||
| + | | style="background:#6B0000;" | '''{{class link|All Classes|br=yes|color=white}}''' | ||
| + | | style="background:#990000;" | {{item icon|Co-Pilot|75px}} | ||
| + | | style="background:#FAE5E5;" | '''{{item link|Co-Pilot}}''' | ||
|} | |} | ||
| Line 167: | Line 189: | ||
{{main|Tools/es|l1=Herramientas}} | {{main|Tools/es|l1=Herramientas}} | ||
{| class="wikitable collapsible" cellpadding="3" style="text-align:center;" | {| class="wikitable collapsible" cellpadding="3" style="text-align:center;" | ||
| − | | | + | | style="background:#6B0000;" | {{Icon item|Naughty Winter Crate Key 2014|75px}} |
| − | | | + | | style="background:#990000;" | '''[[Naughty Winter Crate Key 2014{{if lang}}|<font color="white">{{item name|Naughty Winter Crate Key 2014}}]]''' |
| − | | style="background: #FAE5E5;"| Se usa para abrir [[Naughty Winter Crate 2014/es|Cajas Navideñas Malas 2014]]. Esta llave no abre cajas Buenas. Después del 16/2/2015 esta llave se transformará en una llave normal. | + | | style="background:#FAE5E5;" align="left" | Se usa para abrir [[Naughty Winter Crate 2014/es|Cajas Navideñas Malas 2014]]. Esta llave no abre cajas Buenas. Después del 16/2/2015 esta llave se transformará en una llave normal. |
|- | |- | ||
| − | | | + | | style="background:#6B0000;" | {{Icon item|Nice Winter Crate Key 2014|75px}} |
| − | | | + | | style="background:#990000;" | '''[[Nice Winter Crate Key 2014{{if lang}}|<font color="white">{{item name|Nice Winter Crate Key 2014}}]]''' |
| − | | style="background: #FAE5E5;"| Se usa para abrir [[Nice Winter Crate 2014/es|Cajas Navideñas Buenas 2014]]. Esta llave no abre cajas Malas. Después del 16/2/2015 esta llave se transformará en una llave normal. | + | | style="background:#FAE5E5;" align="left" | Se usa para abrir [[Nice Winter Crate 2014/es|Cajas Navideñas Buenas 2014]]. Esta llave no abre cajas Malas. Después del 16/2/2015 esta llave se transformará en una llave normal. |
|- | |- | ||
|} | |} | ||
| − | === | + | === Artículos de acción === |
| + | {{main|Action items/es|l1=Artículos de acción}} | ||
{| class="wikitable collapsible" cellpadding=2 style="text-align:center;" | {| class="wikitable collapsible" cellpadding=2 style="text-align:center;" | ||
| − | | | + | | width="85px" style="background: #990000;" | {{Icon item|Grappling Hook|75px}} |
| − | | style="background: #FAE5E5;" | ''' | + | | style="background:#FAE5E5;" | '''{{item link|Grappling Hook}}''' |
| − | |||
| − | |||
| − | |||
| − | { | ||
| − | |||
| − | |||
| − | |||
| − | |||
| − | |||
| − | |||
| − | |||
| − | |||
| − | |||
| − | |||
| − | |||
| − | |||
| − | |||
| − | |||
| − | |||
|} | |} | ||
| Line 208: | Line 212: | ||
! style="background: #6B0000;" class="header" | <span style="color: white;"> Cambios | ! style="background: #6B0000;" class="header" | <span style="color: white;"> Cambios | ||
|- | |- | ||
| − | ! style="background: #990000;" rowspan=20 | {{ | + | ! width="85px" style="background:#990000;" rowspan=20 | {{class link|Demoman|br=yes|color=white}} |
! style="background: #FAE5E5;" rowspan=2 | Todas las armas explosivas<br> primarias y secundarias | ! style="background: #FAE5E5;" rowspan=2 | Todas las armas explosivas<br> primarias y secundarias | ||
|- | |- | ||
| Line 262: | Line 266: | ||
== Galería == | == Galería == | ||
<gallery> | <gallery> | ||
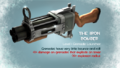
| − | File:S14 Panic Attack blog.png| | + | File:S14 Panic Attack blog.png|El ''{{item link|Panic Attack}}'' en el [[TF2 Official Website/es#Blog|Blog de TF2]]. |
| − | File:S14 Quickiebomb Launcher blog.png| | + | File:S14 Quickiebomb Launcher blog.png|El ''{{item link|Quickiebomb Launcher}}'' en el Blog de TF2. |
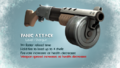
| − | File:S14 Iron Bomber blog.png| | + | File:S14 Iron Bomber blog.png|El ''{{item link|Iron Bomber}}'' en el Blog de TF2. |
</gallery> | </gallery> | ||
== Enlaces externos == | == Enlaces externos == | ||
| − | * [ | + | * [https://www.teamfortress.com/post.php?id=15304 Merry Smissmas, Everyone!] {{lang icon|en}} |
{{Smissmas 2014 Nav}} | {{Smissmas 2014 Nav}} | ||
| − | {{ | + | {{Smissmas Events Nav}} |
| − | + | {{Major Updates Nav}} | |
| − | |||
| − | |||
Latest revision as of 00:13, 22 January 2025
| La traducción de este artículo requiere ser actualizada. Puedes ayudar a mejorar esta página editándola y actualizándola con contenido de Smissmas 2014 (ver fuente). Véase también Guía de traducción (Inglés). |
|

| « | La navidad se acerca, y aquí todo el equipo de TF2 hemos estado ocupados preparando los regalos y siendo un grupo bajo el muérdago de Valve. El recuento de besuqueos aún está en cero, pero estamos aquí para el largo plazo. Es verdad, estaremos aquí toda la maldita semana si es necesario. Tan solo intentad pasar por delante de nosotros, equipo de DOTA2. Vosotros también, CS:GO.
— El Blog de TF2
|
» |
La actualización Navidad 2014 (Smissmas 2014, en inglés) fue una actualización de mayor contenido para Team Fortress 2, realizada el Parche del 22 de diciembre de 2014. Fue una secuela de la actualización creada por la comunidad anterior, solicitada por Valve en coincidencia de las presentaciones en el Workshop Navideño.
La actualización añadió 28 nuevos cosméticos Invernales y 7 nuevas armas Festivas. El reflejo de la actualización fue el nuevo modo de juego beta, Mannpower, junto a dos nuevos mapas beta, Foundry (Capturar la bandera) y Gorge (Capturar la bandera). Muchas de las ya existentes armas del Demoman han sufrido cambios en sus funciones. También se han añadido tres armas completamente nuevas, el Lanzabombas Rápido, el Bombardero de Acero, y el Ataque de Pánico.
Índice
Adiciones
Mapas
| Nombre | Imagen | Modo de juego | Nombre del archivo |
|---|---|---|---|
| Foundry (Capturar la Bandera) |
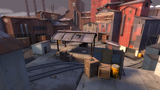
|
Mannpower
|
ctf_foundry
|
| Gorge (Capturar la Bandera) |
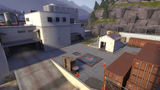
|
Mannpower
|
ctf_gorge
|
Armas
| Bombardero de Acero | ||
| Lanzabombas Rápido | ||
| Ataque de Pánico |
Armas Festivas
| ¡Bonk! La Bebida Salvavidas Festiva | ||
| Tuestalomos Festivo | ||
| Targe de Carga Festivo | ||
| Serrucho Festivo | ||
| Metralleta Festiva | ||
| Revólver Festivo | ||
| Escopeta Festiva |
Cosméticos
Herramientas
| Llave de Caja Navideña Mala 2014 | Se usa para abrir Cajas Navideñas Malas 2014. Esta llave no abre cajas Buenas. Después del 16/2/2015 esta llave se transformará en una llave normal. | |
| Llave de Caja Navideña Buena 2014 | Se usa para abrir Cajas Navideñas Buenas 2014. Esta llave no abre cajas Malas. Después del 16/2/2015 esta llave se transformará en una llave normal. |
Artículos de acción
| Garfio Arrojadizo |
Cambios en armas
| Clase | Arma | Cambios |
|---|---|---|
| Todas las armas explosivas primarias y secundarias | ||
| ||
Lanzagranadas | ||
Lanzabombas lapa | ||
| ||
Bala Perdida | ||
| ||
El Bombstruo del Lago Ness | ||
| ||
Babuchas de Alí Babá Patapalo | ||
Tuerceolas | ||
| ||
Resistencia Escocesa | ||
Corta-cráneos Escocés | ||
Claidheamh Mòr | ||
Galería
El Ataque de Pánico en el Blog de TF2.
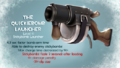
El Lanzabombas Rápido en el Blog de TF2.
El Bombardero de Acero en el Blog de TF2.


Enlaces externos
- Merry Smissmas, Everyone! (Inglés)
| |||||
| ||||||||||||||||||||||||||||||||||||||||||||||||||||||||||||||||||||||||||||||||||||||||||||||||||