Difference between revisions of "Jungle Inferno Update/ja"
BrazilianNut (talk | contribs) m (Added See also section with link to Jungle Inferno Contracts Pass.) |
BrazilianNut (talk | contribs) m (→装飾アイテム) |
||
| Line 100: | Line 100: | ||
Jungle Inferno キャンペーンは{{item link|Jungle Inferno Campaign Pass}}を購入することで参加出来ます。The [[ConTracker/ja|ConTracker]] PDA has also been introduced, which allows customized contract progression and the Mercenary Park Gift Shop. Friendly Fire is a new feature accompanied by the campaign and the party system, which allows players to play with/against their friends and help each other in completing contracts if the two players are in a party. | Jungle Inferno キャンペーンは{{item link|Jungle Inferno Campaign Pass}}を購入することで参加出来ます。The [[ConTracker/ja|ConTracker]] PDA has also been introduced, which allows customized contract progression and the Mercenary Park Gift Shop. Friendly Fire is a new feature accompanied by the campaign and the party system, which allows players to play with/against their friends and help each other in completing contracts if the two players are in a party. | ||
| − | ==== | + | ==== {{common string|Cosmetic items}} ==== |
| − | {{main|Cosmetic items | + | {{main|Cosmetic items{{if lang}}|l1={{common string|Cosmetic items}}}} |
{| class="wikitable collapsible" cellpadding=2 style="text-align:center;" | {| class="wikitable collapsible" cellpadding=2 style="text-align:center;" | ||
|- | |- | ||
| − | | style="background: #b5b85c; width:90px;" rowspan="3" | {{icon class|Scout}}<br/>'''[[Scout{{if lang}}|<span style="color: #000;"> | + | | style="background: #b5b85c; width:90px;" rowspan="3" | {{icon class|Scout}}<br/>'''[[Scout{{if lang}}|<span style="color: #000;">{{class name|Scout}}</span>]]''' |
| − | | align="center" style="background: # | + | | align="center" style="background: #4B69FF "| {{Icon item|Forest Footwear|75px}} |
| style="background: #f8e2a1 "| '''{{item link|Forest Footwear}}''' | | style="background: #f8e2a1 "| '''{{item link|Forest Footwear}}''' | ||
|- | |- | ||
| − | | align="center" style="background: # | + | | align="center" style="background: #D32CE6 " | {{Icon item|Jungle Jersey|75px}} |
| style="background: #f8e2a1 "| '''{{item link|Jungle Jersey}}''' | | style="background: #f8e2a1 "| '''{{item link|Jungle Jersey}}''' | ||
|- | |- | ||
| − | | align="center" style="background: # | + | | align="center" style="background: #8847FF " | {{Icon item|Transparent Trousers|75px}} |
| style="background: #f8e2a1 "| '''{{item link|Transparent Trousers}}''' | | style="background: #f8e2a1 "| '''{{item link|Transparent Trousers}}''' | ||
|- | |- | ||
| − | | style="background: #b5b85c; width:90px;" rowspan="4" | {{icon class|Soldier}}<br/>'''[[Soldier{{if lang}}|<span style="color: #000;"> | + | | style="background: #b5b85c; width:90px;" rowspan="4" | {{icon class|Soldier}}<br/>'''[[Soldier{{if lang}}|<span style="color: #000;">{{class name|Soldier}}</span>]]''' |
| − | | align="center" style="background: # | + | | align="center" style="background: #4B69FF "| {{Icon item|Attack Packs|75px}} |
| style="background: #f8e2a1 "| '''{{item link|Attack Packs}}''' | | style="background: #f8e2a1 "| '''{{item link|Attack Packs}}''' | ||
|- | |- | ||
| − | | align="center" style="background: # | + | | align="center" style="background: #8847FF " | {{Icon item|Crit Cloak|75px}} |
| style="background: #f8e2a1 "| '''{{item link|Crit Cloak}}''' | | style="background: #f8e2a1 "| '''{{item link|Crit Cloak}}''' | ||
|- | |- | ||
| − | | align="center" style="background: # | + | | align="center" style="background: #4B69FF " | {{Icon item|Sharp Chest Pain|75px}} |
| style="background: #f8e2a1 "| '''{{item link|Sharp Chest Pain}}''' | | style="background: #f8e2a1 "| '''{{item link|Sharp Chest Pain}}''' | ||
|- | |- | ||
| − | | align="center" style="background: # | + | | align="center" style="background: #4B69FF " | {{Icon item|Shellmet|75px}} |
| style="background: #f8e2a1 "| '''{{item link|Shellmet}}''' | | style="background: #f8e2a1 "| '''{{item link|Shellmet}}''' | ||
|- | |- | ||
| − | | style="background: #b5b85c; width:90px;" rowspan="6" | {{icon class|Pyro}}<br/>'''[[Pyro{{if lang}}|<span style="color: #000;"> | + | | style="background: #b5b85c; width:90px;" rowspan="6" | {{icon class|Pyro}}<br/>'''[[Pyro{{if lang}}|<span style="color: #000;">{{class name|Pyro}}</span>]]''' |
| − | | align="center" style="background: # | + | | align="center" style="background: #4B69FF "| {{Icon item|Deity's Dress|75px}} |
| style="background: #f8e2a1 "| '''{{item link|Deity's Dress}}''' | | style="background: #f8e2a1 "| '''{{item link|Deity's Dress}}''' | ||
|- | |- | ||
| − | | align="center" style="background: # | + | | align="center" style="background: #8847FF " | {{Icon item|D-eye-monds|75px}} |
| style="background: #f8e2a1 "| '''{{item link|D-eye-monds}}''' | | style="background: #f8e2a1 "| '''{{item link|D-eye-monds}}''' | ||
|- | |- | ||
| − | | align="center" style="background: # | + | | align="center" style="background: #8847FF " | {{Icon item|Feathered Fiend|75px}} |
| style="background: #f8e2a1 "| '''{{item link|Feathered Fiend}}''' | | style="background: #f8e2a1 "| '''{{item link|Feathered Fiend}}''' | ||
|- | |- | ||
| − | | align="center" style="background: # | + | | align="center" style="background: #4B69FF " | {{Icon item|Fireman's Essentials|75px}} |
| style="background: #f8e2a1 "| '''{{item link|Fireman's Essentials}}''' | | style="background: #f8e2a1 "| '''{{item link|Fireman's Essentials}}''' | ||
|- | |- | ||
| − | | align="center" style="background: # | + | | align="center" style="background: #8847FF " | {{Icon item|Hot Huaraches|75px}} |
| style="background: #f8e2a1 "| '''{{item link|Hot Huaraches}}''' | | style="background: #f8e2a1 "| '''{{item link|Hot Huaraches}}''' | ||
|- | |- | ||
| − | | align="center" style="background: # | + | | align="center" style="background: #D32CE6 " | {{Icon item|Sacrificial Stone|75px}} |
| style="background: #f8e2a1 "| '''{{item link|Sacrificial Stone}}''' | | style="background: #f8e2a1 "| '''{{item link|Sacrificial Stone}}''' | ||
|- | |- | ||
| − | | style="background: #b5b85c; width:90px;" rowspan="8" | {{icon class|Heavy}}<br/>'''[[Heavy{{if lang}}|<span style="color: #000;"> | + | | style="background: #b5b85c; width:90px;" rowspan="8" | {{icon class|Heavy}}<br/>'''[[Heavy{{if lang}}|<span style="color: #000;">{{class name|Heavy}}</span>]]''' |
| − | | align="center" style="background: # | + | | align="center" style="background: #FFD700 "| {{Icon item|Abominable Snow Pants|75px}} |
| style="background: #f8e2a1 "| '''{{item link|Abominable Snow Pants}}''' | | style="background: #f8e2a1 "| '''{{item link|Abominable Snow Pants}}''' | ||
|- | |- | ||
| − | | align="center" style="background: # | + | | align="center" style="background: #D32CE6 " | {{Icon item|Aztec Aggressor|75px}} |
| style="background: #f8e2a1 "| '''{{item link|Aztec Aggressor}}''' | | style="background: #f8e2a1 "| '''{{item link|Aztec Aggressor}}''' | ||
|- | |- | ||
| − | | align="center" style="background: # | + | | align="center" style="background: #4B69FF " | {{Icon item|Commando Elite|75px}} |
| style="background: #f8e2a1 "| '''{{item link|Commando Elite}}''' | | style="background: #f8e2a1 "| '''{{item link|Commando Elite}}''' | ||
|- | |- | ||
| − | | align="center" style="background: # | + | | align="center" style="background: #4B69FF " | {{Icon item|Fat Man's Field Cap|75px}} |
| style="background: #f8e2a1 "| '''{{item link|Fat Man's Field Cap}}''' | | style="background: #f8e2a1 "| '''{{item link|Fat Man's Field Cap}}''' | ||
|- | |- | ||
| − | | align="center" style="background: # | + | | align="center" style="background: #4B69FF " | {{Icon item|Heavy Harness|75px}} |
| style="background: #f8e2a1 "| '''{{item link|Heavy Harness}}''' | | style="background: #f8e2a1 "| '''{{item link|Heavy Harness}}''' | ||
|- | |- | ||
| − | | align="center" style="background: # | + | | align="center" style="background: #FFD700 " | {{Icon item|Himalayan Hair Shirt|75px}} |
| style="background: #f8e2a1 "| '''{{item link|Himalayan Hair Shirt}}''' | | style="background: #f8e2a1 "| '''{{item link|Himalayan Hair Shirt}}''' | ||
|- | |- | ||
| − | | align="center" style="background: # | + | | align="center" style="background: #FFD700 " | {{Icon item|Kathman-Hairdo|75px}} |
| style="background: #f8e2a1 "| '''{{item link|Kathman-Hairdo}}''' | | style="background: #f8e2a1 "| '''{{item link|Kathman-Hairdo}}''' | ||
|- | |- | ||
| − | | align="center" style="background: # | + | | align="center" style="background: #4B69FF " | {{Icon item|Siberian Tigerstripe|75px}} |
| style="background: #f8e2a1 "| '''{{item link|Siberian Tigerstripe}}''' | | style="background: #f8e2a1 "| '''{{item link|Siberian Tigerstripe}}''' | ||
|- | |- | ||
| − | | style="background: #b5b85c; width:90px;" rowspan="2" | {{icon class|Engineer}}<br/>'''[[Engineer{{if lang}}|<span style="color: #000;"> | + | | style="background: #b5b85c; width:90px;" rowspan="2" | {{icon class|Engineer}}<br/>'''[[Engineer{{if lang}}|<span style="color: #000;">{{class name|Engineer}}</span>]]''' |
| − | | align="center" style="background: # | + | | align="center" style="background: #4B69FF "| {{Icon item|Conaghers' Utility Idol|75px}} |
| style="background: #f8e2a1 "| '''{{item link|Conaghers' Utility Idol}}''' | | style="background: #f8e2a1 "| '''{{item link|Conaghers' Utility Idol}}''' | ||
|- | |- | ||
| − | | align="center" style="background: # | + | | align="center" style="background: #D32CE6 " | {{Icon item|Tropical Toad|75px}} |
| style="background: #f8e2a1 "| '''{{item link|Tropical Toad}}''' | | style="background: #f8e2a1 "| '''{{item link|Tropical Toad}}''' | ||
|- | |- | ||
| − | | style="background: #b5b85c; width:90px;" rowspan="6" | {{icon class|Sniper}}<br/>'''[[Sniper{{if lang}}|<span style="color: #000;"> | + | | style="background: #b5b85c; width:90px;" rowspan="2" | {{icon class|Medic}}<br/>'''[[Medic{{if lang}}|<span style="color: #000;">{{class name|Medic}}</span>]]''' |
| − | | align="center" style="background: # | + | | align="center" style="background: #4B69FF "| {{Icon item|Battle Boonie|75px}} |
| + | | style="background: #f8e2a1 "| '''{{item link|Battle Boonie}}''' | ||
| + | |- | ||
| + | | align="center" style="background: #4B69FF " | {{Icon item|Vitals Vest|75px}} | ||
| + | | style="background: #f8e2a1 "| '''{{item link|Vitals Vest}}''' | ||
| + | |- | ||
| + | | style="background: #b5b85c; width:90px;" rowspan="6" | {{icon class|Sniper}}<br/>'''[[Sniper{{if lang}}|<span style="color: #000;">{{class name|Sniper}}</span>]]''' | ||
| + | | align="center" style="background: #4B69FF "| {{Icon item|Bait and Bite|75px}} | ||
| style="background: #f8e2a1 "| '''{{item link|Bait and Bite}}''' | | style="background: #f8e2a1 "| '''{{item link|Bait and Bite}}''' | ||
|- | |- | ||
| − | | align="center" style="background: # | + | | align="center" style="background: #4B69FF " | {{Icon item|Cammy Jammies|75px}} |
| style="background: #f8e2a1 "| '''{{item link|Cammy Jammies}}''' | | style="background: #f8e2a1 "| '''{{item link|Cammy Jammies}}''' | ||
|- | |- | ||
| − | | align="center" style="background: # | + | | align="center" style="background: #4B69FF " | {{Icon item|Classy Capper|75px}} |
| style="background: #f8e2a1 "| '''{{item link|Classy Capper}}''' | | style="background: #f8e2a1 "| '''{{item link|Classy Capper}}''' | ||
|- | |- | ||
| − | | align="center" style="background: # | + | | align="center" style="background: #8847FF " | {{Icon item|Conspicuous Camouflage|75px}} |
| style="background: #f8e2a1 "| '''{{item link|Conspicuous Camouflage}}''' | | style="background: #f8e2a1 "| '''{{item link|Conspicuous Camouflage}}''' | ||
|- | |- | ||
| − | | align="center" style="background: # | + | | align="center" style="background: #4B69FF " | {{Icon item|Most Dangerous Mane|75px}} |
| style="background: #f8e2a1 "| '''{{item link|Most Dangerous Mane}}''' | | style="background: #f8e2a1 "| '''{{item link|Most Dangerous Mane}}''' | ||
|- | |- | ||
| − | | align="center" style="background: # | + | | align="center" style="background: #8847FF " | {{Icon item|Rifleman's Regalia|75px}} |
| style="background: #f8e2a1 "| '''{{item link|Rifleman's Regalia}}''' | | style="background: #f8e2a1 "| '''{{item link|Rifleman's Regalia}}''' | ||
|- | |- | ||
| style="background: #b5b85c; width:90px;" | '''{{Class link|Scout|color=black}}'''<br/>'''{{Class link|Engineer|color=black}}'''<br/>'''{{Class link|Spy|color=black}}''' | | style="background: #b5b85c; width:90px;" | '''{{Class link|Scout|color=black}}'''<br/>'''{{Class link|Engineer|color=black}}'''<br/>'''{{Class link|Spy|color=black}}''' | ||
| − | | align="center" style="background: # | + | | align="center" style="background: #4B69FF; " | {{Icon item|Aloha Apparel|75px}} |
| style="background: #f8e2a1; " | '''{{item link|Aloha Apparel}}''' | | style="background: #f8e2a1; " | '''{{item link|Aloha Apparel}}''' | ||
|- | |- | ||
| style="background: #b5b85c; width:90px;" | '''{{Class link|Soldier|color=black}}'''<br/>'''{{Class link|Pyro|color=black}}'''<br/>'''{{Class link|Demoman|color=black}}''' | | style="background: #b5b85c; width:90px;" | '''{{Class link|Soldier|color=black}}'''<br/>'''{{Class link|Pyro|color=black}}'''<br/>'''{{Class link|Demoman|color=black}}''' | ||
| − | | align="center" style="background: # | + | | align="center" style="background: #D32CE6; " | {{Icon item|Bananades|75px}} |
| style="background: #f8e2a1; " | '''{{item link|Bananades}}''' | | style="background: #f8e2a1; " | '''{{item link|Bananades}}''' | ||
| + | |- | ||
| + | | style="background: #b5b85c; width:90px;" | '''{{Class link|Soldier|color=black}}'''<br/>'''{{Class link|Demoman|color=black}}'''<br/>'''{{Class link|Heavy|color=black}}''' | ||
| + | | align="center" style="background: #EB4B4B; " | {{Icon item|War Eagle|75px}} | ||
| + | | style="background: #f8e2a1; " | '''{{item link|War Eagle}}''' | ||
|- | |- | ||
| style="background: #b5b85c; width:90px;" | '''{{Class link|Soldier|color=black}}'''<br/>'''{{Class link|Heavy|color=black}}''' | | style="background: #b5b85c; width:90px;" | '''{{Class link|Soldier|color=black}}'''<br/>'''{{Class link|Heavy|color=black}}''' | ||
| − | | align="center" style="background: # | + | | align="center" style="background: #4B69FF; " | {{Icon item|Nuke|75px}} |
| style="background: #f8e2a1; " | '''{{item link|Nuke}}''' | | style="background: #f8e2a1; " | '''{{item link|Nuke}}''' | ||
|- | |- | ||
| − | + | | style="background: #b5b85c; width:90px;" rowspan="14" | {{icon class|All Classes}}<br/>'''[[Classes{{if lang}}|<span style="color: #000;">{{class name|All Classes}}</span>]]''' | |
| − | + | | align="center" style="background: #EB4B4B " | {{Icon item|Aztec Warrior|75px}} | |
| − | |||
| − | |||
| − | | style="background: #b5b85c; width:90px;" rowspan=" | ||
| − | | align="center" style="background: # | ||
| style="background: #f8e2a1 "| '''{{item link|Aztec Warrior}}''' | | style="background: #f8e2a1 "| '''{{item link|Aztec Warrior}}''' | ||
|- | |- | ||
| − | | align="center" style="background: # | + | | align="center" style="background: #8847FF " | {{Icon item|Croaking Hazard|75px}} |
| style="background: #f8e2a1 "| '''{{item link|Croaking Hazard}}''' | | style="background: #f8e2a1 "| '''{{item link|Croaking Hazard}}''' | ||
|- | |- | ||
| − | | align="center" style="background: # | + | | align="center" style="background: #8847FF " | {{Icon item|Hunter in Darkness|75px}} |
| style="background: #f8e2a1 "| '''{{item link|Hunter in Darkness}}''' | | style="background: #f8e2a1 "| '''{{item link|Hunter in Darkness}}''' | ||
|- | |- | ||
| − | | align="center" style="background: # | + | | align="center" style="background: #D32CE6 " | {{Icon item|Jungle Wreath|75px}} |
| style="background: #f8e2a1 "| '''{{item link|Jungle Wreath}}''' | | style="background: #f8e2a1 "| '''{{item link|Jungle Wreath}}''' | ||
|- | |- | ||
| − | | align="center" style="background: # | + | | align="center" style="background: #FFD700 " | {{Icon item|Mannanas Hat|75px}} |
| + | | style="background: #f8e2a1 "| '''{{item link|Mannanas Hat}}''' | ||
| + | |- | ||
| + | | align="center" style="background: #FFD700 " | {{Icon item|Mercenary Park|75px}} | ||
| + | | style="background: #f8e2a1 "| '''{{item link|Mercenary Park}}''' | ||
| + | |- | ||
| + | | align="center" style="background: #FFD700 " | {{Icon item|Monstrous Memento|75px}} | ||
| style="background: #f8e2a1 "| '''{{item link|Monstrous Memento}}''' | | style="background: #f8e2a1 "| '''{{item link|Monstrous Memento}}''' | ||
|- | |- | ||
| − | | align="center" style="background: # | + | | align="center" style="background: #FFD700 " | {{Icon item|Never Forget Hat|75px}} |
| + | | style="background: #f8e2a1 "| '''{{item link|Never Forget Hat}}''' | ||
| + | |- | ||
| + | | align="center" style="background: #4B69FF " | {{Icon item|Pithy Professional|75px}} | ||
| style="background: #f8e2a1 "| '''{{item link|Pithy Professional}}''' | | style="background: #f8e2a1 "| '''{{item link|Pithy Professional}}''' | ||
|- | |- | ||
| − | | align="center" style="background: # | + | | align="center" style="background: #8847FF " | {{Icon item|Pocket Saxton|75px}} |
| style="background: #f8e2a1 "| '''{{item link|Pocket Saxton}}''' | | style="background: #f8e2a1 "| '''{{item link|Pocket Saxton}}''' | ||
|- | |- | ||
| − | | align="center" style="background: # | + | | align="center" style="background: #EB4B4B " | {{Icon item|Quizzical Quetzal|75px}} |
| style="background: #f8e2a1 "| '''{{item link|Quizzical Quetzal}}''' | | style="background: #f8e2a1 "| '''{{item link|Quizzical Quetzal}}''' | ||
|- | |- | ||
| − | | align="center" style="background: # | + | | align="center" style="background: #FFD700 " | {{Icon item|Saxton|75px}} |
| style="background: #f8e2a1 "| '''{{item link|Saxton}}''' | | style="background: #f8e2a1 "| '''{{item link|Saxton}}''' | ||
|- | |- | ||
| − | | align="center" style="background: # | + | | align="center" style="background: #EB4B4B " | {{Icon item|Slithering Scarf|75px}} |
| style="background: #f8e2a1 "| '''{{item link|Slithering Scarf}}''' | | style="background: #f8e2a1 "| '''{{item link|Slithering Scarf}}''' | ||
| + | |- | ||
| + | | align="center" style="background: #FFD700 " | {{Icon item|Yeti Park Hardhat|75px}} | ||
| + | | style="background: #f8e2a1 "| '''{{item link|Yeti Park Hardhat}}''' | ||
|} | |} | ||
Revision as of 00:45, 4 November 2019
 | このページの内容は日本語へ翻訳中です。 もしあなたが日本語話者で編集して頂ける場合は、トークページにその旨を記していただくか(編集履歴のページを参照して)このページを過去に編集した人たちと話してください。 |

| 「 | If Jurassic Park taught us one thing, it's life finds a way. If Jurassic Park taught us two things, it's life finds a way and Jurassic Park is a good idea to steal for an update. And if Valve's legal team has taught us one thing, it was by screaming at us about not telling you the second thing Jurassic Park taught us.
If people screaming at us has taught us one thing, it's that loud noises make us so anxious we forget where the backspace key is, so we're just plowing ahead and are happy to announce our wholly original update about deadly animals escaping from a theme park. Because life finds a way, which is the only thing we — TF2 公式Webサイト
|
」 |
ジャングル・インフェルノ アップデートは2017年の10月16日から20日までの4日間に渡って情報公開され、その翌日に配信された、Team Fortress 2大型アップデートです。このアップデートでは新要素として、5つの武器、5つのコミュニティ製マップ、1つのValve製マップ、7つの挑発、1つのキル時挑発、40以上の装飾アイテムが追加されたほか、パイロを中心に既存の多くの武器が性能調整されました。また、これまでの契約システムを改良したConTrackerシステムや、武器スキンのWar Paintが導入されました。
目次
動画
告知
ジャングル・インフェルノ アップデートのページは2017年10月16日に、TF2公式ブログにて"Welcome to... Mercenary Park!"enの投稿とともに公開されました。
アップデートの進行
ジャングル・インフェルノ アップデートは4日間に渡って情報が公開されました。
- 1日目には7つの新挑発、6つの新マップ、SFMのショートトレーラー動画が公開されました。
- 2日目にはWar Paintと新たな契約システムが公開されました。新たな契約には無料のものと有料のものがあり、無料の契約では新たに追加された武器を入手でき、有料のものではBlood moneyおよびWar paint、新たな装飾アイテムを入手できます。
- 3日目には新しい武器が公開されました:Dragon's Fury(火炎放射器/メイン武器)、Thermal Thruster(ジェットパック/サブ武器/Gas Blastというキル可能な挑発)、Gas Passer(有毒かつ可燃性のガス/サブ武器)、Hot Hand(加速可能なグローブ/近接武器)。
- 最終日の4日目には、ブログにて完全なパッチノートが公開され、配信を1日延期することが発表されました。
1日目
ジャングル・インフェルノ アップデートの1日目は、Valve製の新マップ1つとコミュニティ製の新マップ5つ、Valve製の新挑発2つとコミュニティ製の新挑発5つが公開されました。
マップ
| マップ名 | 画像 | ゲームモード | ファイル名 |
|---|---|---|---|
| Banana Bay | 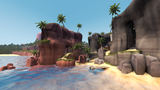
|
ペイロードレース |
plr_bananabay
|
| Brazil | 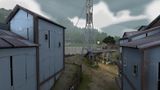
|
キング・オブ・ザ・ヒル |
koth_brazil
|
| Enclosure | 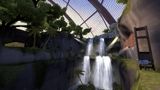
|
ペイロード
|
pl_enclosure_final
|
| Lazarus | 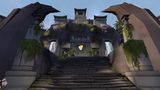
|
キング・オブ・ザ・ヒル |
koth_lazarus
|
| Mercenary Park | 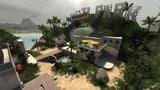
|
攻撃/防御 |
cp_mercenarypark
|
| Mossrock | 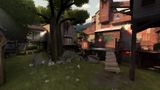
|
攻撃/防御 |
cp_mossrock
|
挑発
パイロ |
Headcase | |
ヘビー |
Russian Arms Race | |
| Soviet Strongarm | ||
エンジニア |
Dueling Banjo | |
| Jumping Jack | ||
全クラス |
Yeti Punch | |
| Yeti Smash |
2日目
2日目には、新たなキャンペーンシステムのJungle Inferno Campaignと、キャンペーン中にドロップするWar Paintケース、2種類の装飾アイテムケースが公開されました。今回のキャンペーンではco-opモードで達成できる36種類の契約が含まれています。各契約を完了させる毎に、キャンペーン限定アイテムか"Blood Money"を入手できます。これはWar Paintやケースと交換することが出来ます。
キャンペーン
Jungle Inferno キャンペーンはJungle Inferno Campaign Passを購入することで参加出来ます。The ConTracker PDA has also been introduced, which allows customized contract progression and the Mercenary Park Gift Shop. Friendly Fire is a new feature accompanied by the campaign and the party system, which allows players to play with/against their friends and help each other in completing contracts if the two players are in a party.
装飾アイテム
工具アイテム
| Abominable Cosmetic Case | |
| Unleash the Beast Cosmetic Case | |
| Jungle Inferno Campaign Pass | |
| Jungle Inferno ConTracker |
3日目
3日目にはパイロ用の4つの新武器と新しい挑発(Thermal Thruster用)、ヘビー用のランチボックス系アイテムが公開され、また火炎放射器系アイテムの変更点が発表されました。
武器
パイロ |
Dragon's Fury | |
| Gas Passer | ||
| Hot Hand | ||
| Thermal Thruster | ||
ヘビー |
Second Banana |
クラスの変更点
| クラス | 変更点 |
|---|---|
パイロ |
|
武器の変更点
| クラス | 武器 | 変更点 |
|---|---|---|
パイロ |
火炎放射器 + リスキン |
|
4日目
4日目に公開されたパッチノートでは、多くの武器の性能調整や、新武器の詳細、マッチメイキングシステムに関するバグの修正などが公開された。また、全ての武器に一人称視点での鑑賞機能が追加された。
クラスの変更点
| クラス | 変更点 |
|---|---|
ヘビー |
|
エンジニア |
武器の変更点
| クラス | 武器 | 変更点 | |
|---|---|---|---|
スカウト |
喉ごしガツン! アトミックパンチ |
||
クリティコーラ |
|||
Pretty Boy's Pocket Pistol |
|||
Flying Guillotine |
|||
Sandman |
|||
ソルジャー |
Cow Mangler 5000 |
||
Mantreads |
|||
Righteous Bison |
|||
デモマン |
Claidheamh Mòr |
||
ヘビー |
Gloves of Running Urgently |
Bread Bite |
|
Fists of Steel |
|||
Eviction Notice |
|||
エンジニア |
Rescue Ranger |
||
メディック |
Crusader's Crossbow |
||
Vita-Saw |
|||
スナイパー |
Razorback |
||
Darwin's Danger Shield |
|||
スパイ |
Ambassador |
||
Your Eternal Reward |
Wanga Prick |
||
Dead Ringer |
|||
ソルジャー パイロ |
Reserve Shooter |
||
ソルジャー デモマン |
B.A.S.E. Jumper |
||
ソルジャー パイロ ヘビー エンジニア |
Panic Attack |
||
アップデートの遅延
アップデートの配信は4日目と思われていましたが、ブログ記事によって、TFチームがさらなるストレステストを必要とすることから、公開が1日遅れることが発表されました。
トリビア
- 4日間に渡る公開システムをとったのは、2011年のÜber アップデート以来です。
- 本アップデートはスミスマス 2016以来10ヶ月29日(272日)ぶりのアップデートとなり、TF2史上最も長く間隔の開いたアップデートとなりました。
- いくつかの新武器は、本公開よりも前にこっそりと公開されていました:
- 1日目のアップデートページの最下部に、地面に横たわるGas Passerや、背景でThermal Thrusterを使って空を飛ぶパイロが描かれています。
- 2日目には、War Paintが適用できる武器の山の中に、Dragon's Furyが混じっています。また、新しい装飾アイテムを着たチームの中に、Dragon's Furyを構えたパイロとSecond Bananaを持ったヘビーがいます。
- 2日目のアップデートページの最下部にいるサクストン・ヘイルがConTrackerを持っています。その画面には"Mercenary Park"と"Pyroland"という2つの名前が表示されています。後に、プレイヤーは"Pyroland"オプションを選択することで6つの無料契約を受領し、パイロとヘビーの新武器全てを入手できることが公開されました。
- 2日目のページ最下部のサクストン・ヘイルの肩にオウムが止まっていますが、その頭部をクリックするかマウスオーバーすると爆発します。
ギャラリー

ゲーム内のアップデート配信告知

1日目 マップと挑発

2日目 キャンペーンパスと装飾アイテム

4日目 最後のパッチノート

関連項目
外部リンク
- Welcome to... Mercenary Park!
- Jungle Inferno Update Day 1
- Hit the Campaign Trail!
- Update Day 2
- Hot Stuff!
- Update Day 3
- We're Almost Live!
- Update Day 4
- Jungle Inferno is Live!
| ||||||||||||||||||||||||||||||||||||||||||||||||||||
| ||||||||||||||||||||||||||||||||||||||||||||||||||||||||||||||||||||||||||||||||||||||||||||||||||