Difference between revisions of "Hydro/ja"
< Hydro
(BLU CP2の部分を翻訳しました。) |
(場所の説明部分ほとんど翻訳できました。) |
||
| Line 33: | Line 33: | ||
*'''大水エリアからの入り口''': レーダーアンテナと大水エリアはトンネルにより繋がっています。 | *'''大水エリアからの入り口''': レーダーアンテナと大水エリアはトンネルにより繋がっています。 | ||
*'''タビーン室からの入り口''': タビーン室とレーダーアンテナは大きい岩層により繋がっています。この岩層は二つの道に分けています。その二つの道の間には穴があります。 | *'''タビーン室からの入り口''': タビーン室とレーダーアンテナは大きい岩層により繋がっています。この岩層は二つの道に分けています。その二つの道の間には穴があります。 | ||
| − | *'''端エリアからの入り口''': | + | *'''端エリアからの入り口''': レーダーアンテナから橋エリアへの道三つあります。最初の道はマップの右側にあります。その他の二つは左に行く地面かキャットウォークで終わる道と橋エリアの岩棚に直接繋ぐ道。 |
*'''階段の下''': このエリアにある階段全部玉通り過ぎれます。 | *'''階段の下''': このエリアにある階段全部玉通り過ぎれます。 | ||
=== BLU CP1: 発電所 === | === BLU CP1: 発電所 === | ||
[[Image:Hydro turbine.jpg|thumb|タビーン室コントロールポイント]] | [[Image:Hydro turbine.jpg|thumb|タビーン室コントロールポイント]] | ||
| − | + | タービン室コントロールポイントは建物の中にある橋にあります。 | |
| − | *'''大水エリアからの入り口''': | + | *'''大水エリアからの入り口''': 大水エリアからタビーン室への道三つあります。左側にある二つの道はタビーン室の外にある広い場所に繋がります、そしてその場から建物の一階とパイプの部屋に入れます。右側の道は水のある場所から小さなトンネルを通って左側の下側の道と繋がります。 |
| − | *''' | + | *'''橋エリアからの入り口''': タビーン室は道路、下水道と空気口により橋エリアと繋がっています。道路はタービン室の外にある広い場所まで行くんです。この広い場所から建物の一階か二階に移動できます。下水道は橋エリアをタビーン室の一階を繋がります、そして空気口は橋エリアの屋根とパイプ部屋を繋がるのです。 |
| − | *'''レーダーアンテナからの入り口''': | + | *'''レーダーアンテナからの入り口''': レーダーアンテナは岩層によりタビーン室と繋がっています。タビーンの建物に入るとタビーン室の二階への階段とコントロールポイントの上にあるキャットウォークの出口あります。 |
*'''Service room''': There is a small windowed room that is next to the bridge. This room is often used as a hiding place for Engineers as it allows them to see attackers without being shot at. | *'''Service room''': There is a small windowed room that is next to the bridge. This room is often used as a hiding place for Engineers as it allows them to see attackers without being shot at. | ||
| Line 49: | Line 49: | ||
大水エリアのコントロールポイントは広い水のある場所のコンクリートブロックの上にあります。 | 大水エリアのコントロールポイントは広い水のある場所のコンクリートブロックの上にあります。 | ||
| − | *''' | + | *'''橋エリアからの入り口''' 橋エリアは二つの道により大水エリアと繋がっています。上側と下側の道あります。両方岩屋に着き、そこから上側の道、下側の道と下水道に渡ります。上側の道は橋を見下ろしてる岩棚に繋がる。下側の道はその岩棚の下にある水を伝います。下水道の道は橋の近くにあるトラックの前に出ます。 |
| + | |||
*'''レーダーアンテナからの入り口''': The flood area is connected to the radar dish by a pair of small tunnels. One tunnel comes out near the flood area spawn room, while the other comes out behind the flood area point. | *'''レーダーアンテナからの入り口''': The flood area is connected to the radar dish by a pair of small tunnels. One tunnel comes out near the flood area spawn room, while the other comes out behind the flood area point. | ||
| − | *'''タビーン室からの入り口''': | + | |
| − | *''' | + | *'''タビーン室からの入り口''': タビーン室から大水エリアへの道三つあります。右側の道は地面から大水エリアの長い階段まで行きます。左側の道を辿ると地面から離れずに進めまられる、それか階段上れます。最後のみちは左側の道から分けて、大水エリアのコントロールポイントの辺りに繋がるトンネルにを通ります。 |
| + | *'''二階の窓''': 大水エリアのスポンルームの二階には窓のある部屋あります。この部屋はスナイパーにとても便利です。 | ||
=== BLU CP2: 倉庫 === | === BLU CP2: 倉庫 === | ||
| − | [[Image:Hydro bridge.jpg|thumb| | + | [[Image:Hydro bridge.jpg|thumb|橋コントロールポイント]] |
| − | + | 橋エリアのコントロールポイントは大きい建物の外にある低いコンクリート端にあります。 | |
*'''レーダーアンテナからの入り口''': 端からレーダーアンテナへの道三つあります。最初の道はマップの左側にあります。その他の二つは端の岩棚からレーダーアンテナエリアの道と右にあるレーダーアンテナ近くの岩棚の道。 | *'''レーダーアンテナからの入り口''': 端からレーダーアンテナへの道三つあります。最初の道はマップの左側にあります。その他の二つは端の岩棚からレーダーアンテナエリアの道と右にあるレーダーアンテナ近くの岩棚の道。 | ||
Revision as of 15:19, 20 June 2011
| このページの内容は日本語へ翻訳中です。 もしあなたが日本語話者で編集して頂ける場合は、トークページにその旨を記していただくか(編集履歴のページを参照して)このページを過去に編集した人たちと話してください。 |
| Hydro | |
|---|---|
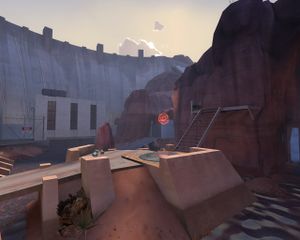
| |
| インフォメーション | |
| 製作者 | 未知 |
| マップ情報 | |
| 環境 | インダストリアル |
| 時間帯・天気: | 晴れてる |
| 危険箇所 | 落とし穴 |
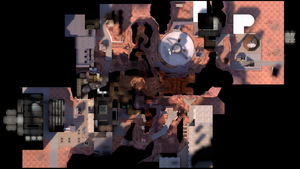
| マップ画像 | |
| マップ俯瞰図 | |
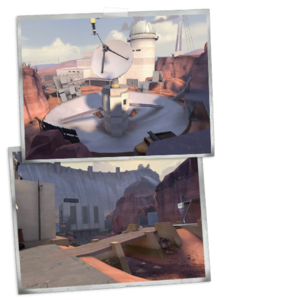
ハイドロはゲーム発売とともにリリースされた六つのマップの一つです。今までハイドロ以外のオフィシャルテリトリコントロールマップはないのです。
ハイドロの目的はテリトリを捕らえてマップを全部占領する事。マップ始まるとサーバは六つのレイアウトから選び、REDとBLUの攻防をスタートします。自分のチームのコントロールポイント守りながら相手のコントロールポイントを捕らえなっきゃ勝てません。ベース以外のコントロールポイント捕らえた後、両チーム他のテリトリに移動して次のラウンドが始まります。REDかBLUが四つのテリトリ支配できたら相手チームのベースを攻撃します。そのベースのコントロールポイント捕らえたら、ゲーム終了します。
ベース攻撃ラウンドじゃない場合、8分間にラウンド終わってないならゲームはサドンデスに進みます。
目次
紹介ビデオ
場所
RED CP1: レーダーアンテナ
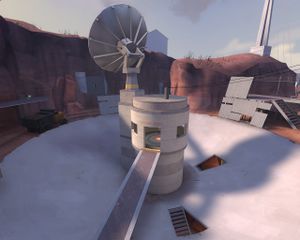
大きいレーダーアンテナです。 アンテナのなかにコントロールポイントあります。
- 大水エリアからの入り口: レーダーアンテナと大水エリアはトンネルにより繋がっています。
- タビーン室からの入り口: タビーン室とレーダーアンテナは大きい岩層により繋がっています。この岩層は二つの道に分けています。その二つの道の間には穴があります。
- 端エリアからの入り口: レーダーアンテナから橋エリアへの道三つあります。最初の道はマップの右側にあります。その他の二つは左に行く地面かキャットウォークで終わる道と橋エリアの岩棚に直接繋ぐ道。
- 階段の下: このエリアにある階段全部玉通り過ぎれます。
BLU CP1: 発電所
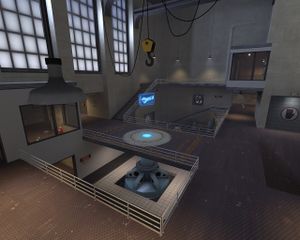
タービン室コントロールポイントは建物の中にある橋にあります。
- 大水エリアからの入り口: 大水エリアからタビーン室への道三つあります。左側にある二つの道はタビーン室の外にある広い場所に繋がります、そしてその場から建物の一階とパイプの部屋に入れます。右側の道は水のある場所から小さなトンネルを通って左側の下側の道と繋がります。
- 橋エリアからの入り口: タビーン室は道路、下水道と空気口により橋エリアと繋がっています。道路はタービン室の外にある広い場所まで行くんです。この広い場所から建物の一階か二階に移動できます。下水道は橋エリアをタビーン室の一階を繋がります、そして空気口は橋エリアの屋根とパイプ部屋を繋がるのです。
- レーダーアンテナからの入り口: レーダーアンテナは岩層によりタビーン室と繋がっています。タビーンの建物に入るとタビーン室の二階への階段とコントロールポイントの上にあるキャットウォークの出口あります。
- Service room: There is a small windowed room that is next to the bridge. This room is often used as a hiding place for Engineers as it allows them to see attackers without being shot at.
RED CP2: ダム
大水エリアのコントロールポイントは広い水のある場所のコンクリートブロックの上にあります。
- 橋エリアからの入り口 橋エリアは二つの道により大水エリアと繋がっています。上側と下側の道あります。両方岩屋に着き、そこから上側の道、下側の道と下水道に渡ります。上側の道は橋を見下ろしてる岩棚に繋がる。下側の道はその岩棚の下にある水を伝います。下水道の道は橋の近くにあるトラックの前に出ます。
- レーダーアンテナからの入り口: The flood area is connected to the radar dish by a pair of small tunnels. One tunnel comes out near the flood area spawn room, while the other comes out behind the flood area point.
- タビーン室からの入り口: タビーン室から大水エリアへの道三つあります。右側の道は地面から大水エリアの長い階段まで行きます。左側の道を辿ると地面から離れずに進めまられる、それか階段上れます。最後のみちは左側の道から分けて、大水エリアのコントロールポイントの辺りに繋がるトンネルにを通ります。
- 二階の窓: 大水エリアのスポンルームの二階には窓のある部屋あります。この部屋はスナイパーにとても便利です。
BLU CP2: 倉庫
橋エリアのコントロールポイントは大きい建物の外にある低いコンクリート端にあります。
- レーダーアンテナからの入り口: 端からレーダーアンテナへの道三つあります。最初の道はマップの左側にあります。その他の二つは端の岩棚からレーダーアンテナエリアの道と右にあるレーダーアンテナ近くの岩棚の道。
- 大水エリアからの入り口: 端エリアから大水エリアへの道二つあります。上側の道は大水エリアのコントロールポイントの上で終わります。下側の道はコントロールポイントの後ろにある水で終わります。
- タビーン室からの入り口: 端エリアからタビーン室への道三つあります。道路を辿ると小さなタビーン室の一階と二階を繋ぐ場所に着きます。下水道を辿るとタビーン室の一階に着きます。空気口はタビーンの入っている大きい部屋の隣にあるパイプの入っている部屋に繋がります。
BLUとREDベース
戦略
一つ一つのエリアの戦略
倉庫 (BLU)
- Attackers: This is a very good area for Spies. There are several parts of this area that serve little interest to the enemy team, and thus are rarely paid any attention to when not in use, not to mention that there are several areas in this part of the map where Snipers particularly like to feel nice and cozy in, making it easy for you to backstab them.
- Defenders: Engineers can build a Sentry Gun next to the small raised ledge. This way, they are protected from enemy fire outside of the Sentry Gun's sensor range.
ダム (RED)
- Attackers: With its little use to the enemy team, aside from Snipers, Spies tend to uncloak in the area behind the enemy spawn. Unless you are taking out Snipers, do not do so. The enemy team will be VERY suspicious of any class in that area and will instantly Spy-check you if they see you coming from behind the spawn, even more so than the other areas on the map.
- Defenders: A good Sentry spot is behind the rocks near the CP. It allows your Sentry to cover the CP while being out of sight of the enemy team; however, in that location it is easy to take down after they know where it is.
レーダーアンテナ (RED)
- Attackers: Despite all the advice given below, the enemy team tends to not guard the point, but to guard the entrances to the Radar Dish. As a Spy, you can slip past their defenses easy enough and decloak and undisguise when you're standing on the point, and you should capture the point for a few seconds, if not capturing the whole point. This Strategy works better with the Cloak and Dagger. Should there be Stickies in the way, try to target Demoman as backstab victims. The Stickies will disappear when their owner is killed.
- Defenders: In addition to placing sticky bombs on the ceiling, Demomen can position themselves on one of the raised steel platforms (see picture) where they can easily take cover from opposing fire whilst being in a good position to fire pipe bombs through the windows of the CP.
- Defenders: Soldiers and Demomen can rocket/sticky bomb jump onto the top of the CP, and are able to take easy shots at oncoming enemies. Be aware though, you are also more exposed to well placed shots from oncoming Snipers and Heavies here.
発電所 (BLU)
- Defenders: It is possible, as a Soldier or a Demoman, to rocket/sticky bomb jump onto the topmost entrance to the room (the one which has the door to the upper half and the staircase down to the CP). From here, you have a perfect view of the capture point and can easily take out enemies that enter the room. If you have two of you get up there then you can watch over both entrances for total security.
コントロールポイントタイミング
| コントロールポイント | キャプチャー人数 | 秒 | ||
|---|---|---|---|---|
| コントロールポイント(最終以外) | ×1 |
| ||
| ×2 |
| |||
| ×3 |
| |||
| ×4 |
| |||
| 最終コントロールポイント | ×1 |
| ||
| ×2 |
| |||
| ×3 |
| |||
| ×4 |
|
関連実績
 General
|
|
これまでの変更点
- Fixed a case where players could get stuck in
tc_hydro
- Fixed issues on Hydro that could occur when a server emptied in the middle of a round.
- Fixed an exploit that would allow players to jump out of the map.
- Added respawn time advantages when a team begins to cap any point. Resets when the cap progress resets.
- Fixed various nobuild and playerclip issues reported by the community.
- Removed logic that reduced spawn times based on roundtime.
関連項目
