| Yukon
|

|
| 基本信息
|
| 开发者: |
未知
|
| 地图资料
|
| 环境: |
工业风
|
| 设定: |
白昼,晴天
|
| 地图照片
|
|
|
| 地图俯视图
|
|
|
| “ |
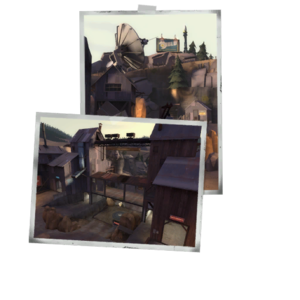
This abandoned mountaintop coalmine was repurposed by shadowy operatives into a top secret surveillance outpost—one which also, so nobody gets wise, insidiously continues to mine coal. There is also a log hanging in the center of the map—possibly as an example to other logs. Logs that said too much.
Five control points promise a lot of momentum swings in this compact outdoor map, with plenty of tunnels and rocky outcroppings. Plenty of alternate routes ensure that if you can’t get past a well-placed Engineer through one tunnel, you might be able to sneak up behind them through another.
|
” |
Yukon 是一张 标准控制点地图。该地图是被Valve选中的社区地图之一,并于无差别兵种更新中因其出色的品质被添加到游戏中作为官方地图。
Yukon 曾是最受欢迎的6v6竞技模式地图。
地点
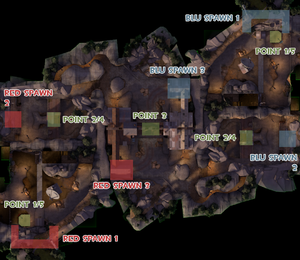
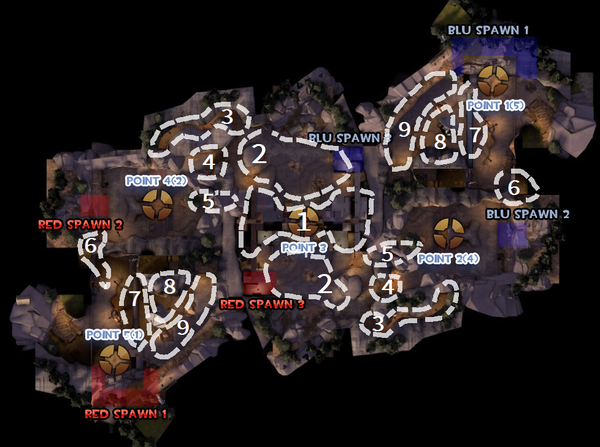
注:如果你无法找到下方列出的位置,你可以向下滚动到辅助俯瞰图部分,以查看它们在地图上所标记的确切位置。
第一&第五控制点
- Bridge: The bridge is located at the swing door directly across from the capture point. It spans across the whole area above the basin and leads to the control point.
- Right Path: The right path(from a defender's perspective) runs along the rock wall around the basin from the tunnel. It leads all the way to the small shack beside the control point and the end of the bridge. There is a small bush next to a rocky outcrop with a medium health pack next to it along the path.
- Dirt Ramp: The ramp starts at the entrance of the lower tunnels across from the swing door. It stretches up along the fenced wall all the way up to the control point and the lower spawn exit.
- Basin: The basin lays in the middle of the area. There is a tall radio tower in its center next to the right path. Next to the tower is a pile of rocks used to climb to the path. On the other side the ramp runs down into the basin next to the lower tunnel and next to that the bridge stretches across over.
- Tunnel: At the end of the right path and across from the bridge is the tunnel. It enters from the second point bridge and stretches down to the swing door and across to the right path entrance.
Swing Door & Lower Tunnel
第二&第四控制点
- House: The house is located in the center of the bridge. It is connected to the bridge on both sides and has dirt ramps leading up to its entrances. This capture point is enclosed, allowing skilled classes to land on the roof and barrage those contesting or capturing the point.
- Back Path: The back path is the path that bends around the main path and directly exits out across from the bridge. It is entered from going right when the path from mid forks.
- Main Path: The main path is the direct path to the point. It is entered from going left when the path from mid forks. There is a sign above the path which is a common spot for sticky traps.
- Bridge: The bridge stretches across the area from the ends of the paths to the tunnel entrance. There are multiple ramps on both sides which lead up to the bridge. It has two underpasses, one of which has a medium healthpack, and the other has a medium ammo pack. In the center of the bridge is the control point house.
- Lower Tunnel: The lower tunnel is located at the far wall in the basin under the bridge. It ramps up then down into the path below the middle point building. The lower tunnel is a popular spot for back-flanking.
第三控制点
- Bridge Building: The bridge building is the marks this area. It has four entrances, two at the ends of the building for each team, both of which are across from each other. These enter into hallways containing medium health packs and the entrance to the central part of the bridge which houses the control point. The control point area is open on both sides.
- Roof: The roof of the bridge building is accessible by Soldiers or Demomen, and is a popular spot for barraging the enemy as the entire area can be seen from the roof.
- Valley: The valley is the area that dips down below the bridge. Other than the bridge building this is the other spot where most of the fighting will occur.
- Yard: The yards are where the paths from the second exit out to. They are located far back along the fenced walls. The yards are a popular spot for Snipers.
Spawn Locations
- Base: Players begin the game spawning at their base.
- First Forward: When they capture the middle point, their spawn is moved below their second capture point.
- Second Forward: When they capture the enemy's second point, their spawn is moved mid-map, enemy side, in a large shed.
辅助俯瞰图
1.Bridge Building
2.Valley
3.Back Path
4.Main Path
5.Lower Tunnel
6.Side Tunnel
7.Bridge
8.Basin
9.Right Path
策略
 | “孙武没告诉咱们该咋做!”
这张地图的社区战术(英语)页面是个小条目,它的内容还有待完善。 你可以通过扩充它来为军团要塞官方维基的社区战术计划出一份力。
附注:未添加附注
|
控制点占领时间
| 控制点 1 和 5
|
×1
|
|
| ×2
|
|
| ×3
|
|
| ×4
|
|
| 控制点 2 和 4
|
×1
|
|
| ×2
|
|
| ×3
|
|
| ×4
|
|
| 控制点 3
|
×1
|
|
| ×2
|
|
| ×3
|
|
| ×4
|
|
更新历史
2009年8月13日补丁 (
Classless Update)
2010年8月25日补丁
- Fixed an exploit where players could get outside of the gameplay space.
2011年1月19日补丁
- Middle Control Point moved up to the bridge.
- Bridge expanded.
- Several sticky failures fixed.
- Bridge flat added onto the pipes of the first control point.
- [未记载] Capture time reduced in the last control points from 4s to 3.8s.
2011年3月11日补丁
注释
- The picture of the map during the loading screen and on the map's official stamp still shows the central control point under the bridge, despite its subsequent move onto the bridge.
细枝末节
- Yukon is a Canadian territory.
外部链接


