Cashworks
| Cashworks | |
|---|---|

| |
| Basic Information | |
| Map type: | Payload |
| File name: | pl_cashworks
|
| Released: | July 12, 2023 Patch (Summer 2023 Update) |
| Developer(s): | Wojciech "eerieone" Michalak Moritz "moe012" Horn Sean "Artesia" Pennock |
| Map Info | |
| Environment: | Alpine |
| Setting: | Daylight, sunny |
| Hazards: | Pitfall, Saw blades |
| Bot support: | Yes |
| Map Items | |
| Map Photos | |
 | |
| Map Overview | |
 | |
| Map Stamp | |
| Supporters Leaderboard | |
Cashworks is a community-created Payload map added in the Summer 2023 Update. It is set in a mountainous sawmill with a large vault located at the end of the map. The vault is blown open upon final Checkpoint capture, revealing a stash of Australium inside.
Cashworks was contributed to the Steam Workshop.
Contents
Locations
Checkpoint A (Loading Dock)
The first checkpoint, nicknamed the Loading Dock, is situated beneath a tall building. It is also located just after a narrow downhill section buttressed by the Overlooking Barn and a rock wall with a retaining wall/platform built against it.
- Crossing: Right outside the Blu spawn, a small concrete platform serves as the Cart's starting position
- Ravine: The Crossing passes over a small depression in the ground, which serves as one of the Blu's spawn exits.
- Overlooking Barn: As the Cart crosses the Ravine on its way to the first checkpoint, it will inevitably pass by the Overlooking Barn, a large two story structure which overlooks vast parts of point A.
- Loading Dock: A set of logs pilled on top of each other, waiting for a crane (which is high above the Overlooking barn) to pick them up and carry them away.
- Underpass: The place where Checkpoint A is located. It is a small depression in the ground underneath the base of the A Building, essentially forming a sort of a semi-tunnel
- Left Flank: To the left of the Underpass and separated from it by a concrete wall is the Left Flank, a similar sloped depression which passes underneath the A Building.
- Shortcut: Unlike the previous two paths which go below the A building, the Shortcut cuts straight through it, leading almost directly to the first Red spawn.

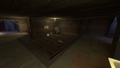
BLU's first spawn area.
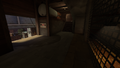
The interior of the water pipe building.

The hill leading to checkpoint A

The first checkpoint, Loading Dock.

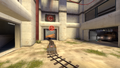
RED's first spawn area near checkpoint A.


Checkpoint B (Serpentines)
The second checkpoint, located at the bottom of a long hill that the track winds through like a serpent on BLU's side. The area features several high ledges and upper paths and is very narrow in comparison to other parts of the map, opening onto a larger open space after the point.
- Serpentine Descent After passing the Overpass, the Cart will make a sudden turn to the right and start descending down the Serpentine Descent, a series of cliffs that will take the Cart down a winding path to Checkpoint B.
- Tunnel Dugout: Running parallel with the Serpentine Descent is a small tunnel that burrows into the surrounding cliffs and briefly intersects with an inaccessible Train Tunnel, before linking up with the Tall Silo.
- Tall Silo: After the cart has finished its serpentine descent, it will reach the Tall Silo, a high multi story building that overlooks parts of Checkpoint B and even reaches the Overpass.
- Overpass/Sawmill conveyor belt: Located directly above Checkpoint A, and hence forming an overpass over it, is a structure housing a moving saw, as well as stacks of wooden logs. The entire Serpentine Descent can be overviewed from the Overpass.

The path leading to checkpoint B.
The cave area to the right.

A dropdown onto the saw area to the left.

The moving sawblade above checkpoint B.
The flank route at the corner of checkpoint B.

The second checkpoint, Serpentines.

RED's second spawn area near checkpoint B, and the path to checkpoint C.


Checkpoint C (Power Station)
The third checkpoint, Power Station, is just before a wooden bridge leading to the final capture point. There are large gorges just beyond the point that can be used to push enemies into. The cart passes through the interior of the Workshop, up a slight incline and underneath a bridge connecting the Grain Deposit buildings in order to reach this point.
- Central Hub: Accessible from the Overpass, the Central Hub is a large room which connects Blu's second spawn to various parts of the map
- Hallway to point B: Branching to the right of the Central Hub is a hallway which leads to a clearing slightly behind Checkpoint B, often used by BLU to flank RED defenders.
- Hallway to Workshop: Going left and then turning right leads one to a balcony on the Workshop.
- Hallway to point C: Proceeding straight-on to the left hallway leads one to the Grain Deposits, an area before Checkpoint C
- Workshop: After passing Checkpoint B, the Cart will make a turn to the left and go directly to the Workshop, a large transitional building between the areas of Checkpoint B and Checkpoint C. It has two levels, the lower one which the Cart uses and an upper balcony which overlooks the Grain Deposits and is accessible from the Central Hub.
- Transformers: Once it has cleared the Workshop, the Cart will climb a gentle slope and pass by a set of transformers on its right side.
- Grain Deposits: After climbing the slope, the cart will begin weaving between two separate metallic buildings on which large mounds of grain had accumulated.

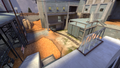
BLU's second spawn area.

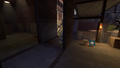
The connector hallways between B and C.
The power transformer area.

The construction area before checkpoint C.

Interiors of the construction area buildings.
The third checkpoint, Power Station.


Final Checkpoint (Vault)
- Truck Garage: Directly adjacent to the right of Checkpoint C is a small wooden shed housing a truck.
- Wooden Foot bridge: Accessible from the Truck Garage is a foot-bridge which connects two sides of the Gorge.
- Gorge: Between the Checkpoint C and Checkpoint D is a large valley into which water from the Water Powerplant is drained into, it serves as a Pitfall.
- Main Bridge: Running parallel to the Wooden Foot Bridge is the Main Bridge, over which Cart passes on its way to the final checkpoint.
- Water Powerplant: Another way to cross the Gorge is through the Water Powerplant, a large linear building on the right side of the Gorge.
- Chicken-wire Platform Overlooking the Checkpoint D is a large platform made out of chicken-wire fencing.
The final checkpoint, placed just in front of RED's large vault, which opens after the final explosion. BLU must push the cart across the Main Bridge and through RED's final spawn area to reach the vault.

The bridges leading to the Vault.

The hallways leading to the right of the bridge.

The alternate path to the right of the gate.

The backroom accessible to the left of the Vault.

The upper deck above the gate.

RED's third spawn and the final checkpoint, the Vault.


Strategy
 | “Sun Tzu's got nothing on us!” This map's Community strategy page is a stub. As such, it is not complete. You can help the Team Fortress Wiki Community Strategy Project by expanding it. Notes: None added |
Update history
- Added Cashworks to the game.
July 12, 2023 Patch #2
- Fixed Red being able to enter the Blu spawn room on
pl_cashworks
July 18, 2024 Patch #1 (Summer 2024 Update)
- Area 1 / Loading Dock
- BLU Spawn 1:
- Solved several clipping issues at doors and stairs.
- Mitigated line of sight into spawn room.
- Added alternative exit from spawn room to the right.
- RED Spawn 1:
- Reworked to have two exits.
- Area Changes:
- Changed terrain around bridge to be easier to maneuver and to prevent getting stuck.
- Changed munition pack at building 01 to large.
- Possible spots beneath bridge for teleporter-traps eliminated.
- Shuffled some big rocks to block off Sniper lanes.
- Cut center building Sniper lane, left alley visually blocked off from dock area.
- Cut center building top Sniper lane, less easy to get a good view.
- Changed out of bounds building left of BLU spawn, added spinning sawblade.
- Opened up a third passage to allow for an additional flanking option for BLU and RED.
- BLU Spawn 1:
- Area 2 / Serpentines
- RED Spawn 2:
- Reworked 2nd RED spawn entirely.
- New spawn has two exits, locks and teleports after B is capped.
- Area Changes:
- Balconies blocked off visually and physically.
- Additional visual blocker at the top of the serpentines to allow for a more secure crossing.
- Long tunnel leading through the RED building to a staircase at the foot of the hill.
- Added deadly and moving sawblade for spicy danger, with sparks and fumes.
- Closed off BLU balcony at the end of the hill.
- Changed raised platform to be only accessible from RED side.
- Reroutes:
- Deleted BLU gates at flanking route after B is capped.
- Flanking route has an additional exit towards C, leading through BLU building.
- BLU building interiors reworked and expanded.
- Balcony-drop doesn't injure the player any more.
- RED Spawn 2:
- Area 3 / Construction Site
- BLU Spawn 2:
- New stairway leading to balcony.
- Wider exit from big building after CP3 capture.
- Area Changes:
- Widened area at the generators and on the 2nd level.
- Changed the direction of the drop-in to C, leading into the hydroelectric building.
- Widened exit from BLU spawn into Area 3.
- BLU Spawn 2:
- Area 4 / Vault
- Area Changes:
- Added gates opening at the gatehouse after CP3 is captured.
- Alternative passageway through gatehouse while gates are closed pre CP3.
- Rebuild bridge to be convex, obscuring a long Sniper lane.
- Wonky bridge rewards with a branching access next to the vault building, allowing for BLU flanks.
- Area Changes:
- Global Changes
- Solved a ton of clipping.
- Rebuilt and edited navmesh, with defined sentry and Sniper positions and varying gameplay.
- Adjusted func_doors at spawn to span to every solid.
- Changed clipping on cart, now jumpable.
- Increased fog distance and lowered density.
- Exchanged glass-textures from the green to the clear version.
- Stairs and hanging bridge are now bullet-blocked for more predictable projectile bounces.
- Updated menu photo to match map changes
- Removed strange texture glitch at RED spawn 1.
- Added shutter for drop exit at RED spawn 1.
- RED spawn 2 big door can't be stickied anymore.
- Removed collision on some lamps.
- Added minor visual changes in BLU spawn and final cap side route.
- Fixed minor clipping issues.
Gallery
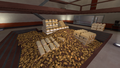
The prize BLU is fighting for.
Backwoods Logging Union sign.
Rapid Effective Deforestation sign.

Fortress Builders sign.

"TF2Maps.net" sign.
Steam Workshop thumbnail for Cashworks.


| ||||||||||||||||||||||