Hadal
| Hadal | |
|---|---|

| |
| Basic Information | |
| Map type: | Attack/Defend |
| File name: | cp_hadal
|
| Released: | July 18, 2024 Patch (Summer 2024 Update) |
| Developer(s): | Juha "Jusa" Kuoppala Maxime "Fubar" Dupuis |
| Map Info | |
| Environment: | Research technologies |
| Setting: | Inside |
| Map Items | |
| Map Photos | |
 | |
| Map overview | |
 | |
| Map Stamp | |
| Supporters Leaderboard | |
| “ | Scientists were so preoccupied with whether or not they could build an underwater research facility, they didn’t stop to think if they should.
— Hadal publicity blurb
|
” |
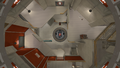
Hadal is a community-created Attack/Defend Control Point map added in the Summer 2024 Update. The action takes place inside an underwater research center that was built by scientists. There are four control points on the map, with the Main Core control point always being active. If the Main Core control point is captured at any point, the round ends immediately. After each control point is captured, various labelled doors around the map open to allow BLU additional routes of exploration whilst limiting access for RED, and the Main Core control point is gradually raised up.
The setup timer is 60 seconds.
Hadal was contributed to the Steam Workshop.
Contents
Locations
![]() The following locations are described from the BLU perspective.
The following locations are described from the BLU perspective.
Spawn areas
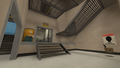
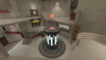
- BLU Spawn: The room is located at the beginning of the underwater research facility and has a total of five exits. The spawn room also features a submarine and a map blueprint. On the left side of the spawn there are three exits that lead to Sector A. On the right side of the spawn there are two exits that lead to Sector B.
- RED Spawn: The room is located almost in the center of the map and has six exits in total; it also has a lift to the top and map blueprint. There are two exits on the ground floor. The first exit leads to Sector A and Main Core, and the second exit leads to Sector B. The remaining four exits are located on the second floor, which lead to Sector C and the Main Core. As the points are captured, the central platform raises for faster access to the later control points, whilst limiting access to earlier control points; first by closing off the exit towards Sector A, then the one to Sector B, then two exits to Sector C; leaving only an exit to the Main Core.

BLU spawn room.

BLU spawn room from the other side.

BLU spawn's thee exits towards Sector A.

BLU spawn's two exits into Sector B.

RED spawn room.

RED spawn room from the other side.

RED spawn room after Sector A was captured.

RED spawn after Sector B was captured; the elevator has completely ascended by this point.


Sector A
- Dropdown: The right most exit from BLU spawn towards this sector leads to a tall summit that ends in a sharp drop-off.
- Transfer: A flanking room for BLU, that has a large health pack and medium ammo pack respectively, also leads to the Catwalk.
- Catwalk: A strip of area upon the Route that has a spot for cover and a direct line-of-sight to the control point.
- Backroom: A side corridor behind the control point that leads to the A/B Connector, as well as a side path leading to A/Main Connector. Behind the control point itself is a medium health and ammo pack.
- Point A: The first point is located on an elevated platform overlooking Sector A.
- A/B Connector: A hallway that connects Sectors A to the Upper Flank on Sector B. Located to the right of the Backroom. It starts out locked and closed, but eventually opens up after Sector A's capture.
- A/Main Connector: Near the A/B hallway is another corridor, this one leading to the Main Core. Found here is one of the exits from the RED spawn, which becomes closed off after Sector A is captured. Also apart of it is a staircase to the Sewers.

Overview of Sector A.

The Dropdown.

The Catwalk.

The Transfer.

The Backroom.

The A/B Connector (closed).

Inside the A/B Connector.

The A/Main Connector.

Exit from the A/Main Connector.


.png)


Sector B
- Upper Flank: A room linking up with the A/B Connector, containing a medium health and ammo pack. It offers an additional route after the first point is captured for BLU to attack from.
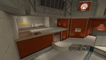
- Showers: A set of rooms accessible from BLU spawn, allowing access to the main Sector B room, the Upper Flank above, and a 'shower' room sightline of the point. Contains a large ammo pack.
- Fuel Oil: A side area connecting Sector B to both the Main Core and RED spawn, containing a large ammo pack and a small room with a medium health pack. The upper doorway become closed off after Sector B's control point has been captured.
- Point B: The second control point is found up against a curved wall. Above and behind it is a short metal catwalk with a small health and ammo pack as well as a doorway leading to the Plants.

Overview of Sector B.

The Upper flanking room.

The other side of the Upper Flank.
The Showers.
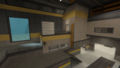
Exterior of the Showers.

The Fuel Oil area.
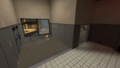
Inside the Fuel Oil area.

Control point B and the catwalk above it.


Sector C
- Plants: A room that opens after Sector B has been captured, connecting it to Sector C and offering multiple routes into the Main Core. Contains a medium ammo and health pack.
- Shortcut: Found within the Plants room is a tiny hallway that leads to the Upper Balconies overlooking the Main Core. It starts out closed, unlocking when Sector C has been captured.
- Pipeline: One of the two corridors connecting the Plants to the Sector C. The one on the right descends down, almost to the same level as the Sewer Flank, passing by an oil pipeline.
- Tower: A small, slender building directly behind the control point, containing a medium ammo pack on the upper floor and a medium health pack on the lower floor, as well as a sightline to the Main Core.
- Sewer Flank: Accessible from either a small room adjacent to the A/Main Connector, or from the Pipeline on the other side of Sector C, this V-shaped flank offers access to Sector C from both a lower and an upper path. The uppeer path contains a large ammo and medium health pack. The Sewer flank is wholly flooded with knee-deep water, which isn't deep enough to drown or extinguish players.

Overview of Sector C.

Control point C.

The Plants.

The Shortcut.

The Pipeline.

The Tower.

The Tower's lower floor.

The Sewer flank entrance from A/Main Connector.

The Sewer Flank.


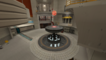
Main Core
- Lower Floor: The bottom floor of the Main Core, with doorways leading directly to Sectors A and B, as well as access to the lower half of Sector C. A stairway near to a pair of medium health and ammo packs leads to the Upper Balconies.
- Upper Balconies: Elevated floors featuring various doorways for RED spawn, alongside routes into Sector B and the upper portion of Sector C. Two of the balconies each offer a medium ammo and small health pack.
- Extended Bridge: Separating Sector C from the Main Core's Upper Balconies is a hole leading back to the Sewer Flank. However, once Sector C is captured, a catwalk extends from Sector C that bridges the gap between it and the Upper Balconies.
- Junction: A small room connecting the Main Core to Sector B and the Plants room, containing a medium health pack.

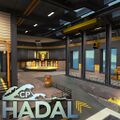
Overview of the Main Core, when no control points have been captured.
The Main Core, after Sector A was captured.
The Main Core, after Sectors A and B have been captured.

Overview of the Main Core, when all prior control points have been captured.

Lower floor.
Upper balconies.

The place over which the Extended Bridge appears.

The Extended Bridge after fully extending.

Junction.


.png)


Strategy
 | “Sun Tzu's got nothing on us!” This map's Community strategy page is a stub. As such, it is not complete. You can help the Team Fortress Wiki Community Strategy Project by expanding it. Notes: None added |
Control Point timing
| Control Point | Multiplier | Seconds | ||
|---|---|---|---|---|
| Control Point A | ×1 |
| ||
| ×2 |
| |||
| ×3 |
| |||
| ×4 |
| |||
| Control Point B | ×1 |
| ||
| ×2 |
| |||
| ×3 |
| |||
| ×4 |
| |||
| Control Point C | ×1 |
| ||
| ×2 |
| |||
| ×3 |
| |||
| ×4 |
| |||
| Control Point D | ×1 |
| ||
| ×2 |
| |||
| ×3 |
| |||
| ×4 |
|
Update history
July 18, 2024 Patch 1 (Summer 2024 Update)
- Added Hadal to the game.
- Fixed control point capture messages
- Fixed door locking in RED spawn after C capture
- Removed unintended buildable areas
- Increased capture time on final point
- Improved directions around the map
Changelog
- Raised ammo/health height
- Filesize optimization
- Performance optimization
- Improved effects
- Improved lighting
- Geometry cleanup
- Fixed faulty assets
- Added 2d skybox
- Improved 3d skybox
November 27, 2016
- (quickfixes)
- -removed invisible geometry
- -clipping
- -other small visual issues
- saving other feedback for later**
November 22, 2016
- longer final point capture time
- modeled last point platform
- modeled spawn submarine
- artpassed B to C connector
- added soundscapes
- reworked skybox
- updated overview map
- various aesthetic tweaks
November 5, 2016
- redesigned area connecting B to C
- combined 2 paths leading from E into B to C connector
- removed one path leading into upper area at E
- redimensioned the area around E to be larger
- many areas surrounding E have been slightly lowered to avoid unneeded height differences
- more blue spawn detailing
- detailing for A to B connector
November 1, 2016
- redesigned red spawn
- redesigned blu spawn
- redesigned A>B connector
- redesigned A control point
October 21, 2016
- fixed clipping issues
- reworked lighting in A to C connector
October 17, 2016
- fixed stopwatch timer
October 14, 2016
- fixed minor b7 issues
- more detailing of D
- refined lighting on B>C
- clipping
October 6, 2016
- redesigned A to C connector
- one way doors have been replaced with one way drops
- reworked B to C connector to make the geometry read better
- added color coded hud icons for each control points
- new pipe models
- new arrow materials
- new spawn doors with blocked signs
July 30, 2016
- streamlined the connector between B and C
- new C artpass
April 5th, 2016
- fixed blu spawn door opening during setup time
- new path up to red spawn on E
- 2 new paths to E upper area
- path connecting E and A becomes a one way after A
March 26th, 2016
- redesigned C
- reworked A-C connector
- redesigned blu's B exit
- visual rework of E
- new path leading up from E's lower area
- redesigned backside of B
February 4th, 2016
- 2nd artpass
February 1st, 2016
- complete artpass
- C capture time lowered to 15
- faster blu spawn on A
January 18th, 2016'
- redone red's defensive area on E
- further detailing of C and E
January 11th, 2016
- tweaked spawntimes for C
- changed A>C connector
- starting artpass on A and B
January 2nd, 2016
- added skybox
December 30th, 2015
- redid B>C path to be more safe on offense
- B point texturing
December 28th, 2015
- layout tweaks on E
- fixed blu spawn respawn visualiser
- tweaked red spawn times
- quick artpass on blu spawn
December 20th, 2015
- spawns rework
- spawntime adjustments
- detail geometry
December 9th, 2015
- added overlays and pipes for direction
- inverted the direction of the final point
- fleshed out C point
Bugs
- It is possible to see out-of-bounds in a pathway from Sector A into upper Sector C / Main Core.
Trivia
- Between B and C there is a vent that goes out of bounds that features a symbol from the Half-Life series of video games with the number 3 and a crowbar. This is a reference to Half-Life 3.[1]
- The submarine in BLU spawn is modeled after a submarine from a leaked Half-Life game.[1]
- In RED's first spawn area there is an orange toolbox with an emblem similar to the Half-Life 2 logo. This is a reference to "The Orange Toolbox" a collection of mapping utilities developed by one of the map's creators, "Fubar".[2]
- Hadal refers to the hadal zone, the deepest know layer of the sea.
Gallery
Steam Workshop thumbnail for Hadal.

Diagram for the map in BLU spawn.
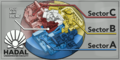
Diagram for the map in RED spawn.
The developer signature above the main control point.
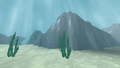
What the skybox looks like outside the map.

The Half-Life 3 easter egg.

The orange toolbox in RED spawn.


References
- ↑ a b Half Life trivia confirmation.
- ↑ Orange Toolbox confirmation.
| |||||||||||||||||||||||||||||||||||||||||||||||||||||||||||||||||||||