Difference between revisions of "Healing"
(→Overheal) |
GrampaSwood (talk | contribs) (→Overheal: Seems like an odd detail to mention) |
||
| (184 intermediate revisions by more than 100 users not shown) | |||
| Line 1: | Line 1: | ||
| − | |||
| − | [[ | + | [[File:Kingofthehill 1600x1200.png|thumb|right|300px|A [[RED]] team [[Medic]] healing a RED [[Heavy]].]] |
| − | {{Quotation|'''The Scout'''|Alright, I feel good!|sound= | + | {{Quotation|'''The Scout'''|Alright, I feel good!|sound=Scout thanksfortheheal01.wav}} |
| − | '''Healing''' is an ability primarily possessed by the [[Medic]] class while using | + | '''Healing''' is an ability primarily possessed by the [[Medic]] class while using his [[Medi Gun]], [[Kritzkrieg]], [[Quick-Fix]], or [[Vaccinator]]. By training his healing beam on an ally (or a disguised enemy [[Spy]]), the Medic can actively restore the player's [[health]]. In addition to restoring health, healing also enables the Medic to fill up his [[ÜberCharge]] bar. The Medic cannot heal [[buildings]], which must be repaired using an [[Engineer]]'s melee weapon, such as the [[Wrench]]. |
| − | + | == Healing and ÜberCharge rates == | |
| + | A Medic's healing rate is linearly based upon how long ago the target was last damaged. If the target was damaged less than 10 seconds ago, then they are healed at the normal rate of 24 health per second. From 10 to 15 seconds, this rate increases linearly from 24 up to a maximum of 72 health per second. This mechanic, often referred to as "'''crit healing'''" or "'''out-of-combat healing'''", is in place to encourage falling back to heal, as without the boosted healing rate, players often found that fighting, dying, and respawning was quicker than falling back, being healed to full, then re-engaging.<ref>[http://www.teamfortress.com/post.php?id=1656 Blog post] on crit heals.</ref> | ||
| − | + | [[File:Crit Heals Graph for Mediguns.png|right|500px|thumb|This graph shows how Medic's healing rate changes for different mediguns based on how long it has been since his target last took damage.]] | |
| − | + | ÜberCharge building rate is halved if the target is at 142.5% health or above. If more than one Medic is healing the target, charge building speed is divided by a factor of the number of Medics healing that target.<ref>https://web.archive.org/web/20101119142145/http://forums.steampowered.com/forums/showpost.php?p=11342109&postcount=1530</ref> Dispensers and Payload Carts also reduce the charge rate when healing the same target. | |
| − | |||
| − | + | For exact timings, see [[Ubercharge#Rates|Ubercharge Rates]]. | |
| − | + | == Overheal == | |
| + | {{Redirects here|Overheal|Magic spells#Overheal|l1=the Overheal magic spell}} | ||
| + | An '''overheal''' (commonly referred to as a "'''buff'''") indicates a player's health is up to 150% above their maximum HP (half of the player's normal health added on). Medics can overheal players with any secondary healing tool except for the Quick-Fix, which can only overheal up to 125%. Overheal is granted at the same rates as regular health. The player's health cross on the [[HUD]] will glow more brightly as they are more overhealed. A [[Particle effects#Overheal|particle effect]] consisting of small team-colored health symbols will surround an overhealed player. | ||
| − | + | A [[Heavy]] wielding the [[Fists of Steel]] has 40% less maximum overheal, while a [[Sniper]] wearing the [[Razorback]] can't be overhealed. | |
| − | |||
| − | |||
| − | |||
| − | |||
| − | |||
| − | |||
| − | |||
| − | |||
| − | |||
| − | |||
| − | |||
| − | |||
| − | |||
| − | |||
| − | |||
| − | |||
| − | |||
| − | |||
| − | |||
| − | |||
| − | |||
| − | |||
| − | |||
| − | |||
| − | |||
| − | |||
| − | |||
| − | |||
| − | |||
| − | |||
| − | |||
| − | |||
| − | |||
| − | |||
| − | |||
| − | |||
| − | |||
| − | |||
| − | |||
| − | |||
| − | |||
| − | |||
| − | |||
| − | |||
| − | |||
| − | |||
| − | |||
| − | |||
| − | |||
| − | |||
| − | |||
| − | |||
| − | |||
| − | |||
| − | |||
| − | |||
| − | |||
| − | |||
| − | |||
| − | |||
| − | |||
| − | + | A full overheal will fade away in exactly 15 seconds for all classes, provided that the player does not take additional damage. While the Heavy's health can be boosted to 450, it will return to its base of 300 in the same time as the [[Scout]], whose health can be boosted from 125 to 185. The amount of overheal decaying per second is proportional to maximum health. Unlockable weapons which affect maximum health (such as the [[Conniver's Kunai]] or the [[Gunslinger]]) also affect the amount of overheal which decays per second. Weapons which reduce overheal (such as the [[Fists of Steel]] or the [[Quick-Fix]]) do not affect the amount of overheal decaying per second. | |
| − | + | During [[setup time]], or while approaching an objective, a Medic can keep multiple teammates on the front line overhealed instead of only their primary healing target. This also increases the speed at which the ÜberCharge bar rises (ÜberCharge rate is not affected during setup time). | |
| − | [[ | ||
| − | + | Overheal will be retained if a player is being healed by a Quick-Fix. | |
| − | + | Max overheal is rounded down to the nearest multiple of 5, i.e., 175 → 262.5 would be changed to 260. | |
| − | |||
| − | |||
| − | |||
| − | |||
| − | |||
| − | + | {{Class health pack and overheal table|overheal}} | |
| − | |||
| − | { | + | {{clr}} |
| − | |||
| − | |||
| − | |||
| − | + | == Related achievements == | |
| − | | | + | === [[File:Achieved.png|20px|link=Achievements]] [[achievements|General]] === |
| − | + | {{Achievement table | |
| − | + | | 1 = {{Show achievement|General|Master of Disguise}} | |
| + | | 2 = {{Show achievement|General|Team Doctor}} | ||
| + | }} | ||
| − | === | + | === {{class link|Scout}} === |
| + | {{Show achievement|Scout|I'm Bat Man|width=50%}} | ||
| − | {| | + | === {{class link|Soldier}} === |
| − | | | + | {{Show achievement|Soldier|War Crime and Punishment|width=50%}} |
| − | | | ||
| − | |||
| − | |} | ||
| − | === Pyro === | + | === {{class link|Pyro}} === |
| − | {| | + | {{Show achievement|Pyro|Next of Kindling|width=50%}} |
| − | |||
| − | | | ||
| − | |||
| − | |} | ||
| − | === Heavy === | + | === {{class link|Heavy}} === |
| + | {{Achievement table | ||
| + | | 1 = {{Show achievement|Heavy|Class Struggle}} | ||
| + | {{Show achievement|Heavy|Factory Worker}} | ||
| + | | 2 = {{Show achievement|Heavy|Redistribution of Health}} | ||
| + | }} | ||
| − | {| | + | === {{class link|Engineer}} === |
| − | | | + | {{Achievement table |
| − | | | + | | 1 = {{Show achievement|Engineer|(Not So) Lonely Are the Brave}} |
| − | + | {{Show achievement|Engineer|Doc, Stock and Barrel}} | |
| + | | 2 = {{Show achievement|Engineer|Drugstore Cowboy}} | ||
| + | {{Show achievement|Engineer|Doc Holiday}} | ||
| + | }} | ||
| − | | | + | === {{class link|Medic}} === |
| − | | | + | {{Achievement table |
| − | + | | 1 = {{Show achievement|Medic|Bedside Manner}} | |
| + | {{Show achievement|Medic|Grand Rounds}} | ||
| + | {{Show achievement|Medic|Infernal Medicine}} | ||
| + | {{Show achievement|Medic|Intern}} | ||
| + | {{Show achievement|Medic|Midwife Crisis}} | ||
| + | | 2 = {{Show achievement|Medic|Quadruple Bypass}} | ||
| + | {{Show achievement|Medic|Chief of Staff}} | ||
| + | {{Show achievement|Medic|Hypocritical Oath}} | ||
| + | {{Show achievement|Medic|Specialist}} | ||
| + | {{Show achievement|Medic|Play Doctor}} | ||
| + | }} | ||
| − | | | + | === {{class link|Sniper}} === |
| + | {{Achievement table | ||
| + | | 1 = {{Show achievement|Sniper|Rain on Their Parade}} | ||
| + | | 2 = {{Show achievement|Sniper|Beaux and Arrows}} | ||
| + | }} | ||
| − | | | + | === {{class link|Spy}} === |
| − | | | + | {{Achievement table |
| − | + | | 1 = {{Show achievement|Spy|FYI I am a Spy}} | |
| − | |} | + | {{Show achievement|Spy|Insurance Fraud}} |
| + | | 2 = {{Show achievement|Spy|May I Cut In?}} | ||
| + | }} | ||
| − | === | + | == Bugs == |
| − | + | * Overheal health can sometimes reach 1-2 more health than the normal limit due to the rounding of health. | |
| − | |||
| − | |||
| − | |||
| − | + | == Gallery == | |
| − | + | <gallery perrow=4> | |
| − | + | File:Speech_mediccall.png|"Medic!" bubble (health at or above 100%) | |
| − | + | File:Speech_mediccall_hurt.png|"Medic!" bubble, when hurt (health below 100%). The bubble becomes redder as the player takes more damage. | |
| − | + | File:Speech_mediccall_bleed.png|"Medic!" bubble, player [[Bleed|bleeding]] (health at or above 100%) | |
| − | + | File:Speech_mediccall_hurt_bleed.png|"Medic!" bubble, when bleeding and hurt (health below 100%). The bubble becomes redder as the player takes more damage. | |
| − | + | File:Speech_mediccall_fire.png|"Medic!" bubble when on [[fire]] (health at or above 100%) | |
| − | + | File:Speech_mediccall_fire_hurt.png|"Medic!" bubble, when on [[fire]] and hurt (health below 100%). The bubble becomes redder as the player takes more damage. | |
| − | + | File:Speech_mediccall_attention.png|Automatic Medic notification bubble (depends on the player's [[Multiplayer options#Advanced multiplayer options|advanced multiplayer options]]) | |
| − | + | </gallery> | |
| − | |||
| − | |||
| − | |||
| − | |||
| − | |||
| − | = | ||
| − | |||
| − | |||
| − | |||
| − | |||
| − | |||
| − | |||
| − | |||
| − | |||
| − | |||
| − | |||
| − | |||
| − | |||
| − | |||
| − | |||
| − | |||
| − | |||
| − | |||
| − | |||
| − | |||
| − | |||
| − | |||
| − | |||
| − | |||
| − | |||
| − | |||
| − | |||
| − | |||
| − | |||
| − | |||
| − | |||
| − | |||
| − | |||
| − | |||
| − | |||
| − | |||
| − | |||
| − | |||
| − | |||
| − | |||
| − | |||
| − | |||
| − | |||
| − | |||
| − | |||
| − | |||
| − | |||
| − | |||
| − | |||
| − | |||
| − | |||
| − | |||
| − | |||
| − | |||
| − | == | + | == See also == |
| + | * [[Health]] | ||
| + | * [[ÜberCharge]] | ||
| − | + | == External links == | |
| − | + | * [http://www.teamfortress.com/post.php?id=1656 TF2 Official Blog- The Medigun Healing Ramp]. | |
| − | |||
| − | |||
| − | + | == References == | |
| − | + | <references /> | |
| − | |||
| − | |||
| − | + | {{Mechanics Nav}} | |
| − | |||
| − | |||
| − | |||
| − | |||
| − | |||
| − | |||
| − | |||
| − | |||
| − | |||
| − | |||
| − | |||
| − | |||
| − | |||
| − | |||
| − | |||
| − | |||
| − | |||
| − | |||
| − | {{ | ||
| − | |||
{{Medic Nav}} | {{Medic Nav}} | ||
| − | |||
[[Category:Gameplay]] | [[Category:Gameplay]] | ||
[[Category:Strategy]] | [[Category:Strategy]] | ||
Latest revision as of 20:53, 28 November 2024
| “ | Alright, I feel good!
Click to listen
— The Scout
|
” |
Healing is an ability primarily possessed by the Medic class while using his Medi Gun, Kritzkrieg, Quick-Fix, or Vaccinator. By training his healing beam on an ally (or a disguised enemy Spy), the Medic can actively restore the player's health. In addition to restoring health, healing also enables the Medic to fill up his ÜberCharge bar. The Medic cannot heal buildings, which must be repaired using an Engineer's melee weapon, such as the Wrench.
Contents
Healing and ÜberCharge rates
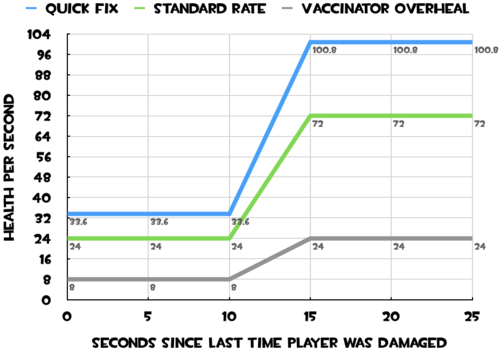
A Medic's healing rate is linearly based upon how long ago the target was last damaged. If the target was damaged less than 10 seconds ago, then they are healed at the normal rate of 24 health per second. From 10 to 15 seconds, this rate increases linearly from 24 up to a maximum of 72 health per second. This mechanic, often referred to as "crit healing" or "out-of-combat healing", is in place to encourage falling back to heal, as without the boosted healing rate, players often found that fighting, dying, and respawning was quicker than falling back, being healed to full, then re-engaging.[1]
ÜberCharge building rate is halved if the target is at 142.5% health or above. If more than one Medic is healing the target, charge building speed is divided by a factor of the number of Medics healing that target.[2] Dispensers and Payload Carts also reduce the charge rate when healing the same target.
For exact timings, see Ubercharge Rates.
Overheal
An overheal (commonly referred to as a "buff") indicates a player's health is up to 150% above their maximum HP (half of the player's normal health added on). Medics can overheal players with any secondary healing tool except for the Quick-Fix, which can only overheal up to 125%. Overheal is granted at the same rates as regular health. The player's health cross on the HUD will glow more brightly as they are more overhealed. A particle effect consisting of small team-colored health symbols will surround an overhealed player.
A Heavy wielding the Fists of Steel has 40% less maximum overheal, while a Sniper wearing the Razorback can't be overhealed.
A full overheal will fade away in exactly 15 seconds for all classes, provided that the player does not take additional damage. While the Heavy's health can be boosted to 450, it will return to its base of 300 in the same time as the Scout, whose health can be boosted from 125 to 185. The amount of overheal decaying per second is proportional to maximum health. Unlockable weapons which affect maximum health (such as the Conniver's Kunai or the Gunslinger) also affect the amount of overheal which decays per second. Weapons which reduce overheal (such as the Fists of Steel or the Quick-Fix) do not affect the amount of overheal decaying per second.
During setup time, or while approaching an objective, a Medic can keep multiple teammates on the front line overhealed instead of only their primary healing target. This also increases the speed at which the ÜberCharge bar rises (ÜberCharge rate is not affected during setup time).
Overheal will be retained if a player is being healed by a Quick-Fix.
Max overheal is rounded down to the nearest multiple of 5, i.e., 175 → 262.5 would be changed to 260.
| Class | Health | Overheal | Quick-Fix Overheal |
|---|---|---|---|
| 125 | 185 | 158 | |
| With the Sandman equipped | 110 | 165 | 139 |
| 200 | 300 | 251 | |
| With the Battalion's Backup equipped | 220 | 330 | 276 |
| 175 | 260 | 220 | |
| 175 | 260 | 220 | |
| With weapon slot boots equipped | 200 | 300 | 251 |
| With a head-taking melee weapon equipped with 0 heads | 150 | 225 | 189 |
| With a head-taking melee weapon equipped with 1 head | 165 | 245 | 208 |
| With a head-taking melee weapon equipped with 2 heads | 180 | 270 | 226 |
| With a head-taking melee weapon equipped with 3 heads | 195 | 290 | 245 |
| With a head-taking melee weapon with 4 or more heads | 210 | 315 | 264 |
| With weapon slot boots and a head-taking melee weapon equipped with 0 heads | 175 | 260 | 220 |
| With weapon slot boots and a head-taking melee weapon equipped with 1 head | 190 | 285 | 239 |
| With weapon slot boots and a head-taking melee weapon equipped with 2 heads | 205 | 305 | 258 |
| With weapon slot boots and a head-taking melee weapon equipped with 3 heads | 220 | 330 | 276 |
| With weapon slot boots and a head-taking melee weapon equipped with 4 or more heads | 235 | 350 | 295 |
| 300 | 450 | 376 | |
| Under the effects of the Dalokohs Bar or Fishcake | 350 | 500† | 426 |
| With the Fists of Steel equipped | 300 | 390 | 346 |
| With the Fists of Steel equipped and while under the effects of the Dalokohs Bar or Fishcake | 350 | 440 | 396 |
| 125 | 185 | 158 | |
| With the Gunslinger equipped | 150 | 225 | 189 |
| 150 | 225 | 189 | |
| With the Vita-Saw equipped | 140 | 210 | 176 |
| 125 | 185 | 158 | |
| 125 | 185 | 158 | |
| With the Big Earner equipped | 100 | 150 | 126 |
| With Conniver's Kunai equipped | 70 | 105 | 89 |
| Maximum overheal from Conniver's Kunai backstabs | N/A | 210 | N/A |
†Theoretical value. Overheal does not exceed 150% of the classes' maximum health.
Related achievements
 General
|
|
 Scout
Scout
| I'm Bat Man Survive 500 damage in one life. |
 Soldier
| War Crime and Punishment In a single life, kill 3 enemies who have damaged a Medic that is healing you. |
 Pyro
Pyro
| Next of Kindling Ignite an enemy, and the Medic healing him. |
 Heavy
Heavy
|
|
 Engineer
|
|
 Medic
Medic
|
|
 Sniper
|
|
 Spy
Spy
|
|
Bugs
- Overheal health can sometimes reach 1-2 more health than the normal limit due to the rounding of health.
Gallery
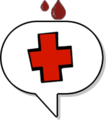
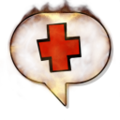
"Medic!" bubble, player bleeding (health at or above 100%)
"Medic!" bubble when on fire (health at or above 100%)
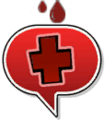
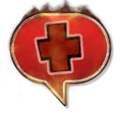
"Medic!" bubble, when on fire and hurt (health below 100%). The bubble becomes redder as the player takes more damage.
Automatic Medic notification bubble (depends on the player's advanced multiplayer options)
See also
External links
References
| ||||||||||||||

