Difference between revisions of "Thunder Mountain (Capture the Flag)"
Boogie Bunny (talk | contribs) m (→See also) |
(Added Hellfire to the "See also" list, as it was the only one of the 4 Mannpower maps not listed) |
||
| (41 intermediate revisions by 23 users not shown) | |||
| Line 1: | Line 1: | ||
| − | |||
| − | |||
{{Map infobox | {{Map infobox | ||
| − | | game-type | + | | map-status = official |
| − | | file-name | + | | map-game-type = Capture the Flag (mannpower) |
| + | | map-file-name = ctf_thundermountain | ||
| map-image = Ctf_thundermountain.jpg | | map-image = Ctf_thundermountain.jpg | ||
| − | | | + | | map-released = {{Patch name|3|12|2015}} |
| − | + | | map-environment = Alpine | |
| − | | map-environment = Alpine | + | | map-setting = Daylight, raining |
| − | | map-setting = Daylight, raining | + | | map-hazards = [[Environmental_death#Pitfalls|Pitfall]] |
| − | | map-hazards = [[Environmental_death#Pitfalls|Pitfall]] | + | | map-pickups-health-small = 25 |
| − | | map-health | + | | map-pickups-health-medium = 24 |
| − | | map-health-pickups- | + | | map-pickups-health-large = 0 |
| − | | map-ammo | + | | map-pickups-ammo-small = 7 |
| − | | map-ammo | + | | map-pickups-ammo-medium = 9 |
| − | | map-ammo | + | | map-pickups-ammo-large = 21 |
}} | }} | ||
| − | '''Thunder Mountain (Capture the Flag)''' is a | + | {{Quotation|'''The Engineer''', on the easily-defendable capture zone|Whoooowee, would ya look at that!|sound=Engineer_specialcompleted01.wav}} |
| + | |||
| + | '''Thunder Mountain (Capture the Flag)''' is a [[Mannpower]] map added in the {{Patch name|3|12|2015}}. The layout of this map is essentially two copies of stage A from the [[Payload]] version of the map. A passage only reachable via [[Grappling Hook]] or [[Jumping]] connects the two endpoints. The briefcases are located near the spawns, on platforms that cannot be reached by foot. | ||
| + | |||
| + | == Locations == | ||
| + | |||
| + | === Team Sides === | ||
| + | Both sides of the map are complete copies of the Stage A area of the original Thunder Mountain. All the cart tracks have been removed, as well as certain map features that required the cart. | ||
| + | |||
| + | * '''Intelligence Platform''': Above the death cliff next to each team's spawn is their respective Intelligence sitting on top of a small towering platform. The only way to access it is by using the Grappling Hook or Jumping methods (such as [[Rocket Jump]]) to safely cross the pitfall. | ||
| + | * '''Courtyard''': Just outside spawn is a courtyard that resembles Thunder Mountain's Stage A, Checkpoint 1. The area has no changes from its Payload counterpart outside of the removal of the cart tracks. | ||
| + | * '''Bridge Spot''': At the end of the Courtyard is a small, tighter section of woodwork. The unraised bridge from the Payload version of the map has been removed. | ||
| + | * '''Ramp Structures''': Up the first ramp to where Checkpoint 1 used to be are several interior structures. To the left on the ground level is an entrance where the second floor can be accessed by grappling. The second and third floors, their catwalks, and their front and rear entrances can be used for combat advantage. | ||
| + | * '''Rail Path''': The former Payload rail path has several structures on the sides that contain kits as well as alternate paths around the area. | ||
| + | |||
| + | <gallery widths=160px heights=90px> | ||
| + | File:Thunder Mountain CTF Intel.png|The Death Cliff with the Intelligence hovering over it. | ||
| + | File:Thunder Mountain CTF Old Checkpoint 1.png|The main courtyard area. | ||
| + | File:Thunder Mountain CTF Old Checkpoint 2.png|The path past the former bridge. | ||
| + | </gallery> | ||
| + | |||
| + | === Crossover === | ||
| + | The two sides are blocked off by a large wall of buildings. To get across to the other side, players have one of two options. | ||
| + | |||
| + | * '''Center Opening''': The building with the garage door that opened up Stage B has been replaced with a larger structure that shows the corresponding team's logo. Near the top is an opening that players can grapple to. Inside the open are medium health and ammo kits. | ||
| + | * '''Side Hallways''': On both opposite sides there are entrances to inner hallways for players who wish to travel on foot. Inside is a max ammo kit and a small health kit. | ||
| + | |||
| + | <gallery widths=160px heights=90px> | ||
| + | File:Thunder Mountain CTF Crossover Overview.png|An overview of the crossover area. | ||
| + | File:Thunder Mountain CTF Crossover Closeup.png|A closeup of the center opening. | ||
| + | </gallery> | ||
| + | |||
| + | == Strategy == | ||
| + | {{Community strategy stub link}} | ||
| + | {{main|Community Thunder Mountain (Capture the Flag) strategy}} | ||
== Update history == | == Update history == | ||
| − | '''{{ | + | '''{{Patch name|3|12|2015}}''' |
* Added new map {{code|ctf_thundermountain}}. | * Added new map {{code|ctf_thundermountain}}. | ||
| + | |||
| + | '''{{patch name|3|18|2015}}''' | ||
| + | * Fixed being able to get to rocks in the death cliff Intelligence areas | ||
| + | * Fixed being able to escape the playable part of the map | ||
| + | * Fixed being able to get on top of the center tower roof | ||
| + | |||
| + | '''{{patch name|10|28|2015}}''' ([[Scream Fortress 2015]]) | ||
| + | * No longer in Beta. | ||
| + | |||
| + | '''{{patch name|3|17|2016}}''' | ||
| + | * Fixed being able to build on rocks outside of the fence by the capture points. | ||
| + | |||
| + | '''{{Patch name|10|1|2020}}''' ([[Scream Fortress 2020]]) | ||
| + | * Flag return time increased from 15 to 30 seconds. | ||
| + | * Removed a fence top ledge that Snipers could exploit. | ||
| + | |||
| + | == Bugs == | ||
| + | * On the RED side near the Intelligence platform, the forest skybox is missing. | ||
| + | |||
| + | == Gallery == | ||
| + | Since the Stage A area is an exact copy, the RED and BLU character appearances and the train are present. | ||
| + | |||
| + | <gallery widths=150px heights=90px> | ||
| + | File:Pl_thundermountainst1blu.png|The BLU characters as seen on Thunder Mountain inside both RED and BLU spawn. | ||
| + | File:Pl_thundermountainst1.png|The train as seen near BLU spawn of Thunder Mountain. | ||
| + | </gallery> | ||
== See also == | == See also == | ||
| − | * [[Thunder Mountain | + | * [[Foundry (Capture the Flag)]] |
| + | * [[Gorge (Capture the Flag)]] | ||
| + | * [[Hellfire]] | ||
| + | * [[Thunder Mountain]] | ||
| + | |||
| − | {{Maps}} | + | {{Maps Nav}} |
Latest revision as of 20:42, 18 January 2025
| Thunder Mountain (Capture the Flag) | |
|---|---|

| |
| Basic Information | |
| Map type: | Mannpower |
| File name: | ctf_thundermountain
|
| Released: | March 12, 2015 Patch |
| Variants: | Payload |
| Developer(s): | Valve |
| Map Info | |
| Environment: | Alpine |
| Setting: | Daylight, raining |
| Hazards: | Pitfall |
| Map Items | |
| Map Overview | |
| “ | Whoooowee, would ya look at that!
Click to listen
— The Engineer, on the easily-defendable capture zone
|
” |
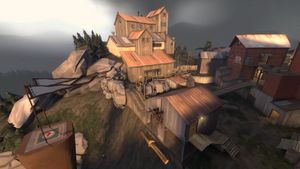
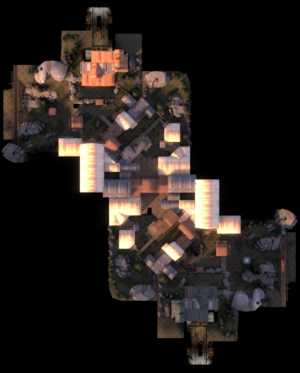
Thunder Mountain (Capture the Flag) is a Mannpower map added in the March 12, 2015 Patch. The layout of this map is essentially two copies of stage A from the Payload version of the map. A passage only reachable via Grappling Hook or Jumping connects the two endpoints. The briefcases are located near the spawns, on platforms that cannot be reached by foot.
Contents
Locations
Team Sides
Both sides of the map are complete copies of the Stage A area of the original Thunder Mountain. All the cart tracks have been removed, as well as certain map features that required the cart.
- Intelligence Platform: Above the death cliff next to each team's spawn is their respective Intelligence sitting on top of a small towering platform. The only way to access it is by using the Grappling Hook or Jumping methods (such as Rocket Jump) to safely cross the pitfall.
- Courtyard: Just outside spawn is a courtyard that resembles Thunder Mountain's Stage A, Checkpoint 1. The area has no changes from its Payload counterpart outside of the removal of the cart tracks.
- Bridge Spot: At the end of the Courtyard is a small, tighter section of woodwork. The unraised bridge from the Payload version of the map has been removed.
- Ramp Structures: Up the first ramp to where Checkpoint 1 used to be are several interior structures. To the left on the ground level is an entrance where the second floor can be accessed by grappling. The second and third floors, their catwalks, and their front and rear entrances can be used for combat advantage.
- Rail Path: The former Payload rail path has several structures on the sides that contain kits as well as alternate paths around the area.
Crossover
The two sides are blocked off by a large wall of buildings. To get across to the other side, players have one of two options.
- Center Opening: The building with the garage door that opened up Stage B has been replaced with a larger structure that shows the corresponding team's logo. Near the top is an opening that players can grapple to. Inside the open are medium health and ammo kits.
- Side Hallways: On both opposite sides there are entrances to inner hallways for players who wish to travel on foot. Inside is a max ammo kit and a small health kit.
Strategy
 | “Sun Tzu's got nothing on us!” This map's Community strategy page is a stub. As such, it is not complete. You can help the Team Fortress Wiki Community Strategy Project by expanding it. Notes: None added |
Update history
- Added new map
ctf_thundermountain.
- Fixed being able to get to rocks in the death cliff Intelligence areas
- Fixed being able to escape the playable part of the map
- Fixed being able to get on top of the center tower roof
October 28, 2015 Patch (Scream Fortress 2015)
- No longer in Beta.
- Fixed being able to build on rocks outside of the fence by the capture points.
October 1, 2020 Patch (Scream Fortress 2020)
- Flag return time increased from 15 to 30 seconds.
- Removed a fence top ledge that Snipers could exploit.
Bugs
- On the RED side near the Intelligence platform, the forest skybox is missing.
Gallery
Since the Stage A area is an exact copy, the RED and BLU character appearances and the train are present.
See also


