Difference between revisions of "Snowycoast"
m |
m |
||
| (43 intermediate revisions by 25 users not shown) | |||
| Line 1: | Line 1: | ||
{{Map infobox | {{Map infobox | ||
| − | | game-type | + | | map-status = community |
| − | | file-name | + | | map-game-type = Payload |
| + | | map-file-name = pl_snowycoast | ||
| map-image = Pl_snowycoast.jpg | | map-image = Pl_snowycoast.jpg | ||
| − | | | + | | map-released = {{Patch name|12|17|2015}} |
| − | + | | map-released-major = Tough Break Update | |
| − | | | ||
| − | |||
| map-environment = Snow | | map-environment = Snow | ||
| map-setting = Snowing, Nighttime | | map-setting = Snowing, Nighttime | ||
| − | | map- | + | | map-stamp-link = https://steamcommunity.com/stats/TF2/leaderboards/1098377 |
| − | | map-health | + | | map-hazards = [[Environmental_death#Pitfalls|Pitfall]] |
| − | | map-health | + | | map-pickups-health-small = 10 |
| − | | map-ammo | + | | map-pickups-health-medium = 9 |
| − | | map-ammo | + | | map-pickups-health-large = 3 |
| − | | map-ammo | + | | map-pickups-ammo-small = 1 |
| + | | map-pickups-ammo-medium = 16 | ||
| + | | map-pickups-ammo-large = 5 | ||
}} | }} | ||
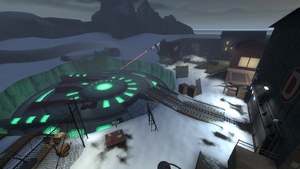
| − | '''Snowycoast''' is a | + | '''Snowycoast''' is a single-stage snow-themed [[Steam workshop|community-made]] [[Payload]] map that was originally part of the [[Mercs vs. Aliens]] contest that took place before the [[Invasion Community Update|Invasion Update]]. The map features 4 Checkpoints, two additional capture zones, and a variety of changing passageways and flank routes. Many alien-related objects and scenes are seen around the map (as the map was intended for the Invasion Update). It is mostly a wide-open map with only a few buildings and mineshafts breaking up the path along the way. The final Checkpoint is an alien flying saucer excavation, which BLU must destroy with the bomb cart to win the round. |
Snowycoast was made an official map in the [[Tough Break Update]]. | Snowycoast was made an official map in the [[Tough Break Update]]. | ||
| + | |||
| + | Snowycoast was [https://steamcommunity.com/sharedfiles/filedetails/?id=469072819 contributed] to the Steam Workshop. | ||
== Locations == | == Locations == | ||
| + | {{HelpfulOverviewNote}} | ||
| + | {{anchor|Checkpoint A}} | ||
| + | === Checkpoint A / Radio Tower === | ||
| + | * '''BLU Spawn''': BLU's first spawn has three exits: Gate 1 flank on the right, Gate 2 on the front with the Track, and Gate 3, a defilade exit facing the cart. | ||
| + | * '''Fence''': An obstruction between BLU Spawn and the first Checkpoint with two side routes around the ends of the fence: '''Truck''' and '''Track'''. | ||
| + | * '''Incline''': The incline cart path on the left beyond the Fence. | ||
| + | * '''Side Structure''': A flank through the '''Sea Side Exports''' building around first checkpoint. | ||
| + | * '''Underground Path''': A path to a Checkpoint B battlement accessible from an opening on the right of Checkpoint A, which opens when that first Checkpoint is captured by BLU. | ||
| + | |||
| + | <gallery widths=140px heights=80px> | ||
| + | File:Pl_snowycoast_beginning.png | BLU's first spawn and the beginning of the map. | ||
| + | File:Pl_snowycoast_cp1.png | The first checkpoint, below the Radio Tower. | ||
| + | File:Pl_snowycoast_side_hut.png | The flank though the Side Structure on the right. | ||
| + | File:Pl_snowycoast_underground.png | Underground path. | ||
| + | </gallery> | ||
| + | |||
| + | === {{anchor|Checkpoint B}} Checkpoint B / Kennel Gates === | ||
| + | * '''BLU Spawn''': To the right of the first Checkpoint is the second BLU Spawn that opens once the second Checkpoint is captured. | ||
| + | * '''RED Spawn''': RED's first Spawn has two exits; one on the right that leads closer to the battlements, and one in front of the second Checkpoint into a '''Hallway''' over the Kennels. | ||
| + | * '''Quonset Hut''': A [[w:Quonset hut|small structure]] next to the second Checkpoint, with two rooms and a ladder up the far end to a '''Sniper Deck''' on the roof. | ||
| + | ** A doorway at the far end of the Hallway opens to the remainder of the map when the first Checkpoint is captured, giving RED respawns an escape if the second Checkpoint is captured. | ||
| + | |||
| + | <gallery widths=140px heights=80px> | ||
| + | File:Pl_snowycoast_cp2.png | Checkpoint B and RED's first Spawn. | ||
| + | File:Pl_snowycoast_quonset_hut.png | A look inside the Quonset Hut. | ||
| + | </gallery> | ||
| + | |||
| + | === {{anchor|Checkpoint C}} Checkpoint C / The Mines === | ||
| + | * '''Cart Gate''': After capturing the second Checkpoint, the door to the right opens immediately, but BLU must wait a few seconds as four red lamps count down to all blue before the yellow Gate opens for the Cart. | ||
| + | * '''Kennels''': A room between the yellow Gates with a drop-down flank in and out of the Mines. | ||
| + | * '''BLU Spawn''': BLU's third and final Spawn overlooking the entrance to the mines opens when the third Checkpoint is captured. | ||
| + | * '''Mines''': The mines have three routes from the final BLU Spawn; straight ahead is the main cart path, and to the left and right (in the Kennels) are small tunnels for flanking. | ||
| + | |||
| + | <gallery widths=140px heights=80px> | ||
| + | File:Pl_snowycoast_cp3.png | Checkpoint C | ||
| + | File:Pl_snowycoast_mines.png | The path through the Mines. | ||
| + | File:Pl_snowycoast_side_walkway.png | Another path through the Mines, near Checkpoint C. | ||
| + | </gallery> | ||
| + | |||
| + | === {{anchor|Final Checkpoint / The Frozen Vessel}} Final Checkpoint === | ||
| + | * '''Shutter Gate''': The path to the '''Flying Saucer''' is cut off by a central gate station. Once the cart reaches the designated Capture Zone D, the large gate begins slowly opening in two cycles, the second cycle being a gate that both sides can see and shoot through. | ||
| + | ** There are two side doorways out the left and right of the gate's Capture Zone. | ||
| + | ** There are two flanks around the Shutter Gate; one in front of RED Spawn, the other through the building at the '''Far End'''. | ||
| + | * '''Excavation Site''': The area in front of the Flying Saucer and final Checkpoint. BLU must push the cart up the small ramp to win, but if no BLU player is pushing, the cart immediately rolls back down. | ||
| + | ** Two oversized {{botignore|crates}} are thrown by the [[Environmental Death#Payload Cart explosion|Payload Cart explosion]], killing any player they hit. | ||
| + | * '''RED Spawn''': The final RED spawn has four exits: A left-side exit leads to Checkpoint C. A right front exit leads to the Excavation Site. Another front exit leads toward the Shutter Gate Capture Zone. The '''Escape Hole''' in the floor leads to lower routes to that Capture Zone and the Excavation Site. | ||
| + | |||
| + | <gallery widths=140px heights=80px> | ||
| + | File:Pl_snowycoast_cp_4.png | The Excavation Site (final Checkpoint). | ||
| + | File:Pl_snowycoast_shutter_gate.png | The Shutter Gate. | ||
| + | </gallery> | ||
| + | |||
| + | == Helpful overview == | ||
| + | [[File:Snowycoast overview with lines.png|left|Snowycoast's locations|350px]] | ||
| + | <big>1.Side structure | ||
| + | 2.Quonset Hut | ||
| + | 3.Kennels | ||
| + | 4.Mines | ||
| + | 5.Shutter gate | ||
| + | 6.Excavation site. | ||
| + | |||
| + | Blue/red diagonal lines: Blu/Red first | ||
| + | Blue/red double diagonal lines: Blu/Red second spawn | ||
| + | Blue/red double diagonal lines w/ a circle: Blue/Red third spawn | ||
| + | Yellow circle: First checkpoint | ||
| + | Green circle: Second checkpoint | ||
| + | Purple circle: Third checkpoint | ||
| + | Pink circle: Final checkpoint</big> | ||
| + | |||
| + | {{clr}} | ||
== Strategy == | == Strategy == | ||
| − | + | {{map strategy link|Snowycoast|main=yes|stub=yes}} | |
| − | {{main| | ||
== Update history == | == Update history == | ||
| + | {{Update history| | ||
'''{{Patch name|12|17|2015}}''' ([[Tough Break Update]]) | '''{{Patch name|12|17|2015}}''' ([[Tough Break Update]]) | ||
* Added Snowycoast to the game. | * Added Snowycoast to the game. | ||
| + | |||
| + | '''{{Patch name|1|7|2016}}''' | ||
| + | * Fixed several unintended perches. | ||
| + | * Fixed being able to damage through the setup gates. | ||
| + | * Added some fences & cover inside BLU's first spawn to reduce spam angles. | ||
| + | * Added an extra resupply in BLU's first spawn and RED's last spawn. | ||
| + | * Moved medium health kit at 1st point back towards BLU's side of choke. | ||
| + | * Changed collision on large railings to allow projectiles. | ||
| + | * Added some cover to the sentry platform inside last. | ||
| + | * Adjusted lighting/detailing at stair to 2nd point low flank to make it more obvious. | ||
| + | * Quonset hut Sniper deck raised. | ||
| + | * Spawn locations in RED's first moved further from the door. | ||
| + | * Added windows to main entrance of RED's first spawn. | ||
| + | * Adjusted the narrow fence near RED spawn. | ||
| + | * Prevented building Teleporters at the edge of spawn doors. | ||
| + | * Fixed an exploit related to BLU's 2nd forward spawn's entrances. | ||
| + | * Added some logic to prevent players getting stuck when RED's first spawn closes. | ||
| + | * Changed how RED spawn moves players to their last spawn when 2nd is capped (no longer slays & respawns). | ||
| + | * Replaced dump truck in kennels with crates. | ||
| + | * Door near RED's first spawn now opens as the cart approaches 2nd instead of after capture. | ||
| + | * Switched main exit and window on RED's last spawn. | ||
| + | * Adjusted placement of health and ammo near RED's last spawn. | ||
| + | * Fixed various floating props. | ||
| + | * Fixed some texture alignment issues in the tunnels. | ||
| + | * Fixed spot on last ramp that would keep the cart from rolling back. | ||
| + | * Fixed some smoothing/geometry problems on crates at last. | ||
| + | * Reduced size of kill zone on falling crates during finale. | ||
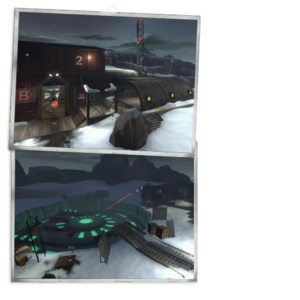
| + | * Added map menu photos. | ||
| + | |||
| + | '''{{Patch name|2|29|2016}}''' | ||
| + | * Adjusted various spawn point facings to make side exits more obvious. | ||
| + | * Adjusted position of resupply cabinet in RED's 1st spawn. | ||
| + | * Added ledge to 2nd point flank route window. | ||
| + | * Adjusted common sentry nests on 2nd. | ||
| + | * Added stronger light to entrance of lower flank route. | ||
| + | * Door near RED's first spawn now opens on A capture and closes on final bulkhead opening. | ||
| + | * RED no longer get forced respawn when 2nd is captured. | ||
| + | * Added minor spawn for RED once 2nd is captured, active until BLU pushes through kennels. | ||
| + | * Adjusted timing of flank doors at 2nd and in mines. | ||
| + | * Updated door texture for flank exit by 2nd point gate. | ||
| + | * Improved defendability and enlarged 3rd point. | ||
| + | * Adjusted position of 3rd cap. | ||
| + | * Adjusted health & ammo at 3rd. | ||
| + | * Updated door texture for flank exit by mines. | ||
| + | * Changed a medium ammo pack at last to full ammo pack. | ||
| + | * Added door to ledge at last to improve RED defendability (closes when bulkhead opens). | ||
| + | * Added 3rd exit to BLU's last forward spawn. | ||
| + | * Improved defendability of ledges at last inside building. | ||
| + | * Added new dropdown area to RED's last. | ||
| + | * Adjusted lighting in various areas. | ||
| + | * Fixed dx settings on light pole props. | ||
| + | |||
| + | '''{{Patch name|4|25|2016}}''' | ||
| + | * {{Undocumented}} Added [[Vanguard]], [[Landfall]], [[Highpass]] and Snowycoast to their respective modes' [[Quickplay]] rotations. | ||
| + | }} | ||
| + | |||
| + | == Bugs == | ||
| + | * Due to the damage trigger not completely covering the crash site it's possible to stand on top of the flying saucer.<ref>[https://www.youtube.com/watch?v=fx1xO0Eymiw Getting onto the flying saucer]</ref> | ||
| + | |||
| + | == Gallery == | ||
| + | <gallery> | ||
| + | File:BLU Snowycoast Bombcart.png|The special Snowycoast bomb cart. | ||
| + | </gallery> | ||
== See also == | == See also == | ||
* [[Mercs vs. Aliens]] | * [[Mercs vs. Aliens]] | ||
| − | == | + | == References == |
| + | <references/> | ||
{{Tough Break Update Nav}} | {{Tough Break Update Nav}} | ||
{{Maps Nav}} | {{Maps Nav}} | ||
Latest revision as of 00:57, 18 January 2024
| Snowycoast | |
|---|---|

| |
| Basic Information | |
| Map type: | Payload |
| File name: | pl_snowycoast
|
| Released: | December 17, 2015 Patch (Tough Break Update) |
| Developer(s): | E-Arkham FissionMetroid101 |
| Map Info | |
| Environment: | Snow |
| Setting: | Snowing, Nighttime |
| Hazards: | Pitfall |
| Map Items | |
| Map Photos | |
| Map Overview | |
| Map Stamp | |
| Supporters Leaderboard | |
Snowycoast is a single-stage snow-themed community-made Payload map that was originally part of the Mercs vs. Aliens contest that took place before the Invasion Update. The map features 4 Checkpoints, two additional capture zones, and a variety of changing passageways and flank routes. Many alien-related objects and scenes are seen around the map (as the map was intended for the Invasion Update). It is mostly a wide-open map with only a few buildings and mineshafts breaking up the path along the way. The final Checkpoint is an alien flying saucer excavation, which BLU must destroy with the bomb cart to win the round.
Snowycoast was made an official map in the Tough Break Update.
Snowycoast was contributed to the Steam Workshop.
Contents
Locations
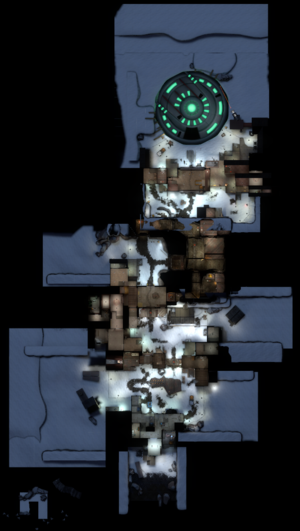
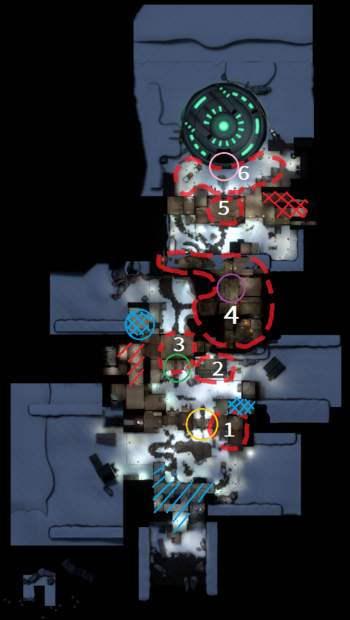
Note: If you are having trouble with finding the locations listed here, see the Helpful overview section to see their exact position marked on the map.
Checkpoint A / Radio Tower
- BLU Spawn: BLU's first spawn has three exits: Gate 1 flank on the right, Gate 2 on the front with the Track, and Gate 3, a defilade exit facing the cart.
- Fence: An obstruction between BLU Spawn and the first Checkpoint with two side routes around the ends of the fence: Truck and Track.
- Incline: The incline cart path on the left beyond the Fence.
- Side Structure: A flank through the Sea Side Exports building around first checkpoint.
- Underground Path: A path to a Checkpoint B battlement accessible from an opening on the right of Checkpoint A, which opens when that first Checkpoint is captured by BLU.
Checkpoint B / Kennel Gates
- BLU Spawn: To the right of the first Checkpoint is the second BLU Spawn that opens once the second Checkpoint is captured.
- RED Spawn: RED's first Spawn has two exits; one on the right that leads closer to the battlements, and one in front of the second Checkpoint into a Hallway over the Kennels.
- Quonset Hut: A small structure next to the second Checkpoint, with two rooms and a ladder up the far end to a Sniper Deck on the roof.
- A doorway at the far end of the Hallway opens to the remainder of the map when the first Checkpoint is captured, giving RED respawns an escape if the second Checkpoint is captured.
Checkpoint C / The Mines
- Cart Gate: After capturing the second Checkpoint, the door to the right opens immediately, but BLU must wait a few seconds as four red lamps count down to all blue before the yellow Gate opens for the Cart.
- Kennels: A room between the yellow Gates with a drop-down flank in and out of the Mines.
- BLU Spawn: BLU's third and final Spawn overlooking the entrance to the mines opens when the third Checkpoint is captured.
- Mines: The mines have three routes from the final BLU Spawn; straight ahead is the main cart path, and to the left and right (in the Kennels) are small tunnels for flanking.
Final Checkpoint
- Shutter Gate: The path to the Flying Saucer is cut off by a central gate station. Once the cart reaches the designated Capture Zone D, the large gate begins slowly opening in two cycles, the second cycle being a gate that both sides can see and shoot through.
- There are two side doorways out the left and right of the gate's Capture Zone.
- There are two flanks around the Shutter Gate; one in front of RED Spawn, the other through the building at the Far End.
- Excavation Site: The area in front of the Flying Saucer and final Checkpoint. BLU must push the cart up the small ramp to win, but if no BLU player is pushing, the cart immediately rolls back down.
- Two oversized crates are thrown by the Payload Cart explosion, killing any player they hit.
- RED Spawn: The final RED spawn has four exits: A left-side exit leads to Checkpoint C. A right front exit leads to the Excavation Site. Another front exit leads toward the Shutter Gate Capture Zone. The Escape Hole in the floor leads to lower routes to that Capture Zone and the Excavation Site.
Helpful overview
1.Side structure
2.Quonset Hut
3.Kennels
4.Mines
5.Shutter gate
6.Excavation site.
Blue/red diagonal lines: Blu/Red first
Blue/red double diagonal lines: Blu/Red second spawn
Blue/red double diagonal lines w/ a circle: Blue/Red third spawn
Yellow circle: First checkpoint
Green circle: Second checkpoint
Purple circle: Third checkpoint
Pink circle: Final checkpoint
Strategy
 | “Sun Tzu's got nothing on us!” This map's Community strategy page is a stub. As such, it is not complete. You can help the Team Fortress Wiki Community Strategy Project by expanding it. Notes: None added |
Update history
- Added Snowycoast to the game.
- Fixed several unintended perches.
- Fixed being able to damage through the setup gates.
- Added some fences & cover inside BLU's first spawn to reduce spam angles.
- Added an extra resupply in BLU's first spawn and RED's last spawn.
- Moved medium health kit at 1st point back towards BLU's side of choke.
- Changed collision on large railings to allow projectiles.
- Added some cover to the sentry platform inside last.
- Adjusted lighting/detailing at stair to 2nd point low flank to make it more obvious.
- Quonset hut Sniper deck raised.
- Spawn locations in RED's first moved further from the door.
- Added windows to main entrance of RED's first spawn.
- Adjusted the narrow fence near RED spawn.
- Prevented building Teleporters at the edge of spawn doors.
- Fixed an exploit related to BLU's 2nd forward spawn's entrances.
- Added some logic to prevent players getting stuck when RED's first spawn closes.
- Changed how RED spawn moves players to their last spawn when 2nd is capped (no longer slays & respawns).
- Replaced dump truck in kennels with crates.
- Door near RED's first spawn now opens as the cart approaches 2nd instead of after capture.
- Switched main exit and window on RED's last spawn.
- Adjusted placement of health and ammo near RED's last spawn.
- Fixed various floating props.
- Fixed some texture alignment issues in the tunnels.
- Fixed spot on last ramp that would keep the cart from rolling back.
- Fixed some smoothing/geometry problems on crates at last.
- Reduced size of kill zone on falling crates during finale.
- Added map menu photos.
- Adjusted various spawn point facings to make side exits more obvious.
- Adjusted position of resupply cabinet in RED's 1st spawn.
- Added ledge to 2nd point flank route window.
- Adjusted common sentry nests on 2nd.
- Added stronger light to entrance of lower flank route.
- Door near RED's first spawn now opens on A capture and closes on final bulkhead opening.
- RED no longer get forced respawn when 2nd is captured.
- Added minor spawn for RED once 2nd is captured, active until BLU pushes through kennels.
- Adjusted timing of flank doors at 2nd and in mines.
- Updated door texture for flank exit by 2nd point gate.
- Improved defendability and enlarged 3rd point.
- Adjusted position of 3rd cap.
- Adjusted health & ammo at 3rd.
- Updated door texture for flank exit by mines.
- Changed a medium ammo pack at last to full ammo pack.
- Added door to ledge at last to improve RED defendability (closes when bulkhead opens).
- Added 3rd exit to BLU's last forward spawn.
- Improved defendability of ledges at last inside building.
- Added new dropdown area to RED's last.
- Adjusted lighting in various areas.
- Fixed dx settings on light pole props.
Bugs
- Due to the damage trigger not completely covering the crash site it's possible to stand on top of the flying saucer.[1]
Gallery
See also
References
| |||||||||||||||||||||||||||||||


