Difference between revisions of "Sinshine"
Dovahbilly (talk | contribs) m (Added "Badlands and Process" text from the original Sunshine page.) |
|||
| (59 intermediate revisions by 23 users not shown) | |||
| Line 1: | Line 1: | ||
| − | {{ | + | {{Stub|Description of the map.}} |
{{Map infobox | {{Map infobox | ||
| − | + | | map-status = community | |
| − | + | | map-game-type = Control Point | |
| − | + | | map-file-name = cp_sunshine_event | |
| − | + | | map-image = Cp sunshine event.png | |
| − | + | | map-released = {{Patch name|10|28|2015}} | |
| − | + | | map-released-major = Scream Fortress 2015 | |
| + | | map-environment = Halloween | ||
| + | | map-setting = Nighttime | ||
| map-hazards = [[Environmental death#Pitfalls|Pitfall]], [[Pumpkin bomb]]s | | map-hazards = [[Environmental death#Pitfalls|Pitfall]], [[Pumpkin bomb]]s | ||
| − | | map- | + | | map-stamp-link = https://steamcommunity.com/stats/TF2/leaderboards/954166 |
| − | | map-health | + | | map-pickups-health-small = 10 |
| − | | map-ammo | + | | map-pickups-health-medium = 10 |
| − | | map-ammo | + | | map-pickups-ammo-small = 4 |
| − | | map-special | + | | map-pickups-ammo-medium = 14 |
| + | | map-pickups-special-pumpkin = yes | ||
}} | }} | ||
| − | '''Sinshine''' | + | {{Quotation|'''Sinshine''' publicity blurb|A spooky trip into darkness and a hellish landscape, dotted with pumpkins and clocktowers. All Hallow's Eve is upon us, take a walk in this nightmarish 5cp map known only as SINSHINE. (Get it? It's like SUNshine, but with SIN!)}} |
| − | It features the standard 5CP layout with a mid, two seconds, and two lasts, with forward spawns for each point beyond mid owned. | + | '''Sinshine''' is a [[Steam Workshop|community-created]] symmetrical [[Control Point (game mode)|control point]] map added in the [[Scream Fortress 2015]] update. |
| + | |||
| + | It features the standard 5CP layout with a mid, two seconds, and two lasts, with forward spawns for each point beyond mid owned. | ||
| + | |||
| + | Sinshine was [https://steamcommunity.com/sharedfiles/filedetails/?id=532473747 contributed] to the Steam Workshop. | ||
| + | |||
| + | == Locations == | ||
| + | {{HelpfulOverviewNote}} | ||
| + | === Control Point 3 === | ||
| + | * '''ClockTower''': The Clocktower serves as the middle control point. It is accessed from the sides with openings in the front and back for fire. There is a small platform above for jumping classes and a small health kit. Directly beneath the point is a pool of lava with a Large health kit cauldron on a small platform. | ||
| + | *'''Shacks''': On each of the four corners of the Bell Tower are small wooden shacks that can be used as cover. | ||
| + | *'''Valley''': One of the ways to get to the middle control point is to go through the Valley, a relatively open area that leads from the second and the fourth control point to the middle one. | ||
| + | *'''Cafe''': Another way to reach control point 3 is to head through the Cafe, a large stone buildings which are in front and behind the Bell Tower. | ||
| + | *'''Chokepoints''': The main entrance to the middle point for both teams. | ||
| + | |||
| + | <gallery> | ||
| + | File:Sinshine midpoint.png|The central control point. | ||
| + | File:Sinshine valley.png|The Valley. | ||
| + | File:Sinshine cutthrough.png|The cut through "Cafe." | ||
| + | </gallery> | ||
| + | |||
| + | === Control Point 2 & 4 === | ||
| + | * '''Deteriorated Clocktower''': Both teams have a worn-down clock tower that serves as the second and fourth control points. | ||
| + | *'''Platforms''':On the left of the clocktower (or the right when looking from the attacking team perspective) is a wooden platform that leads into the Valley. | ||
| + | *'''Staircase''': Just behind the clocktower is a set of stairs that lead down to the tunnel. | ||
| + | *'''Wooden Warehouse''': Further behind the clocktower is the Warehouse, a giant three-story structure that acts as a gate from the last point to the second/fourth one and reverse. | ||
| + | |||
| + | <gallery> | ||
| + | File:Sinshine blu tower.png|The clocktower on BLU side. | ||
| + | File:Sinshine red tower.png|The clocktower on RED side. | ||
| + | File:Sinshine warehouse blu.png|Outside view of BLU's warehouse | ||
| + | File:Sinshine warehouse red.png|Outside view of RED's warehouse | ||
| + | </gallery> | ||
| + | |||
| + | === Control Point 1 & 5 === | ||
| + | *'''Control point platform''': This is the location of the first/fifth control point. | ||
| + | *'''Elevation''': To the left of the lava pit (from defending team side) is an elevated platform that overlooks the point. | ||
| + | *'''Crates''': On the right of the capture point is a set of barrels and crates. | ||
| + | |||
| + | <gallery> | ||
| + | File:Sinshine blu last.png|Last point for BLU. | ||
| + | File:Sinshine red last.png|Last point for RED. | ||
| + | </gallery> | ||
| + | |||
| + | == Helpful overview == | ||
| + | [[File:Sinshine overview with lines.png|left|Sinshine's locations|550px]] | ||
| + | <big>1.Shacks | ||
| + | 2.Cafe | ||
| + | 3.Chokepoint | ||
| + | 4.Valley | ||
| + | 5.Platform | ||
| + | 6.Staircase | ||
| + | 7.Wooden Warehouse | ||
| + | 8.Elevation | ||
| + | 9.Wall and the area behind it | ||
| + | 10.Crates | ||
| + | |||
| + | Red/blue diagonal lines: Red/Blu first spawn | ||
| + | Red/blue double diagonal lines: Red/Blu second spawn | ||
| + | Red/blue double diagonal lines w/ a circle: Red/Blu third spawn | ||
| + | |||
| + | Purple circle: Third/middle point and the Clocktower | ||
| + | Yellow circles: Second/fourth points and the Deteriorated Dlocktower | ||
| + | Green circles: First/fifth points and the control platform</big> | ||
| + | |||
| + | {{clr}} | ||
| + | |||
| + | == Strategy == | ||
| + | {{map strategy link|Sinshine|main=yes|stub=yes}} | ||
== Control Point timing == | == Control Point timing == | ||
{{Control Point Timing/Official Map}} | {{Control Point Timing/Official Map}} | ||
| − | |||
| − | |||
== Update history == | == Update history == | ||
'''{{Patch name|10|28|2015}}''' ([[Scream Fortress 2015]]) | '''{{Patch name|10|28|2015}}''' ([[Scream Fortress 2015]]) | ||
* Added Sinshine to the game. | * Added Sinshine to the game. | ||
| + | |||
| + | '''{{Patch name|11|2|2016}}''' | ||
| + | * Fixed multiple visible nodraws and other texture bugs. | ||
| + | * Fixed nonsolid pumpkin in lobby. | ||
| + | * Fixed trigger bounds in RED spawn. | ||
| + | * Various lighting changes. | ||
| + | |||
| + | == Bugs == | ||
| + | * Both the RED and BLU teams can place buildings inside their 2nd forward spawns. | ||
| + | |||
| + | == Gallery == | ||
| + | <gallery> | ||
| + | File:Sinshinesideroute.png|A side route. | ||
| + | File:Sinshinemid2.png|Angled view of the midpoint. | ||
| + | File:Sinshinemid.png|Second/fourth point. | ||
| + | File:Sinshinefinal.png|RED team's final point. | ||
| + | File:sinshineworkshopimage.jpeg|Steam Workshop thumbnail for Sinshine. | ||
| + | </gallery> | ||
{{Scream Fortress 2015 Nav}} | {{Scream Fortress 2015 Nav}} | ||
| + | {{Halloween Map Nav}} | ||
{{Maps Nav}} | {{Maps Nav}} | ||
| + | |||
| + | [[Category:Halloween maps]] | ||
Latest revision as of 16:40, 21 November 2024
| “You are so small! Is funny to me!” This article is a stub. As such, it is not complete. You can help Team Fortress Wiki by expanding it. Notes: Description of the map. |
| Sinshine | |
|---|---|

| |
| Basic Information | |
| Map type: | Control Point |
| File name: | cp_sunshine_event
|
| Released: | October 28, 2015 Patch (Scream Fortress VII) |
| Variants: | Sunshine |
| Developer(s): | Rebecca "phi" Ailes Kimberly "iiboharz" Riswick Harlen "UEAKCrash" Linke |
| Map Info | |
| Environment: | Halloween |
| Setting: | Nighttime |
| Hazards: | Pitfall, Pumpkin bombs |
| Map Items | |
| Map Overview | |
| Map Stamp | |
| Supporters Leaderboard | |
| “ | A spooky trip into darkness and a hellish landscape, dotted with pumpkins and clocktowers. All Hallow's Eve is upon us, take a walk in this nightmarish 5cp map known only as SINSHINE. (Get it? It's like SUNshine, but with SIN!)
— Sinshine publicity blurb
|
” |
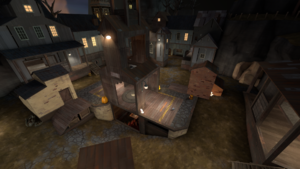
Sinshine is a community-created symmetrical control point map added in the Scream Fortress 2015 update.
It features the standard 5CP layout with a mid, two seconds, and two lasts, with forward spawns for each point beyond mid owned.
Sinshine was contributed to the Steam Workshop.
Contents
Locations
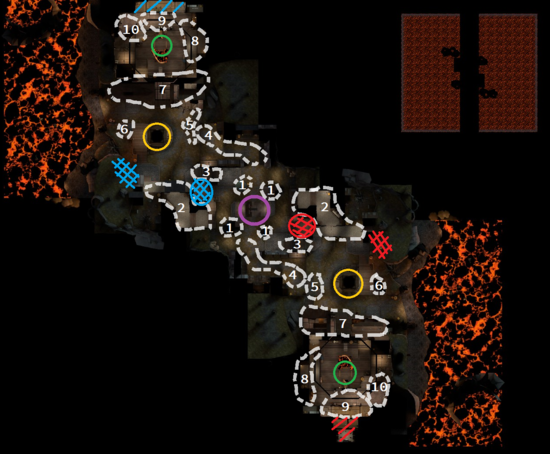
Note: If you are having trouble with finding the locations listed here, see the Helpful overview section to see their exact position marked on the map.
Control Point 3
- ClockTower: The Clocktower serves as the middle control point. It is accessed from the sides with openings in the front and back for fire. There is a small platform above for jumping classes and a small health kit. Directly beneath the point is a pool of lava with a Large health kit cauldron on a small platform.
- Shacks: On each of the four corners of the Bell Tower are small wooden shacks that can be used as cover.
- Valley: One of the ways to get to the middle control point is to go through the Valley, a relatively open area that leads from the second and the fourth control point to the middle one.
- Cafe: Another way to reach control point 3 is to head through the Cafe, a large stone buildings which are in front and behind the Bell Tower.
- Chokepoints: The main entrance to the middle point for both teams.
Control Point 2 & 4
- Deteriorated Clocktower: Both teams have a worn-down clock tower that serves as the second and fourth control points.
- Platforms:On the left of the clocktower (or the right when looking from the attacking team perspective) is a wooden platform that leads into the Valley.
- Staircase: Just behind the clocktower is a set of stairs that lead down to the tunnel.
- Wooden Warehouse: Further behind the clocktower is the Warehouse, a giant three-story structure that acts as a gate from the last point to the second/fourth one and reverse.
Control Point 1 & 5
- Control point platform: This is the location of the first/fifth control point.
- Elevation: To the left of the lava pit (from defending team side) is an elevated platform that overlooks the point.
- Crates: On the right of the capture point is a set of barrels and crates.
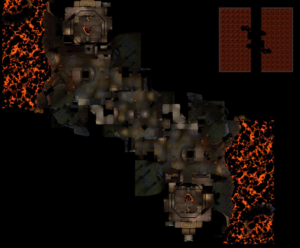
Helpful overview
1.Shacks
2.Cafe
3.Chokepoint
4.Valley
5.Platform
6.Staircase
7.Wooden Warehouse
8.Elevation
9.Wall and the area behind it
10.Crates
Red/blue diagonal lines: Red/Blu first spawn
Red/blue double diagonal lines: Red/Blu second spawn
Red/blue double diagonal lines w/ a circle: Red/Blu third spawn
Purple circle: Third/middle point and the Clocktower
Yellow circles: Second/fourth points and the Deteriorated Dlocktower
Green circles: First/fifth points and the control platform
Strategy
Main article: Community Sinshine strategy
 | “Sun Tzu's got nothing on us!” This map's Community strategy page is a stub. As such, it is not complete. You can help the Team Fortress Wiki Community Strategy Project by expanding it. Notes: None added |
Control Point timing
| Control Point | Multiplier | Seconds | ||
|---|---|---|---|---|
| Control Point 1 and 5 | ×1 |
| ||
| ×2 |
| |||
| ×3 |
| |||
| ×4 |
| |||
| Control Point 2 and 4 | ×1 |
| ||
| ×2 |
| |||
| ×3 |
| |||
| ×4 |
| |||
| Control Point 3 | ×1 |
| ||
| ×2 |
| |||
| ×3 |
| |||
| ×4 |
|
Update history
October 28, 2015 Patch (Scream Fortress 2015)
- Added Sinshine to the game.
- Fixed multiple visible nodraws and other texture bugs.
- Fixed nonsolid pumpkin in lobby.
- Fixed trigger bounds in RED spawn.
- Various lighting changes.
Bugs
- Both the RED and BLU teams can place buildings inside their 2nd forward spawns.
Gallery
| ||||||||||||||||||||||||||||||||||||||||||||||
| |||||||||||||||||||||||||||||||||||||||||||||||||||||||||||||||||||


