Difference between revisions of "Hydro"
m (Auto: infoboxIndentFilter, templateParamFilter (Review RC#1974698)) |
(→Update history: No actual saucers, just posters.) |
||
| Line 99: | Line 99: | ||
* Fixed players getting on top of monument. | * Fixed players getting on top of monument. | ||
'''{{Patch name|9|10|2015}}''' | '''{{Patch name|9|10|2015}}''' | ||
| − | * {{Undocumented}} Added [[saucers]] | + | * {{Undocumented}} Added [[saucers|UFO]] posters to Hydro.}} |
== Bugs == | == Bugs == | ||
Revision as of 11:23, 11 September 2015
| Hydro | |
|---|---|
| |
| Basic Information | |
| Developer(s): | Unknown |
| Map Info | |
| Environment: | Industrial |
| Setting: | Daylight, sunny |
| Hazards: | Pits |
| Map Photos | |
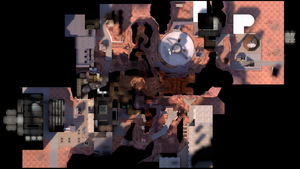
| Map Overview | |
| “ | This point ain't gonna cap itself! Get over here!
Click to listen
— The Engineer
|
” |
Hydro is a Territorial Control map, and one of the six initial maps included with the game's release. So far, Hydro is the only official Territorial Control map, possibly due to the complexity and difficulty of designing such a map type.
The goal of Hydro is to take over the entire map by capturing "territories". Each game is randomly selected from the six available layouts in a "point against point" game in which both teams must capture the opposite control point while protecting their own. After a team successfully captures the enemy control point, the next round will start, taking place in a different area of the map (which is also randomly selected). After a team captures all four territories, the attacking team must capture the enemy team's base while the opposing team defends for their life. If the Base point is captured, the attacking team wins the round. When the next round begins, territories are reset and a new random game is selected.
In any round of Territorial Control (except in RED/BLU Base rounds), if a control point is not captured within the eight minute time clock, the game will go into Sudden Death mode.
Contents
Introduction video
Locations
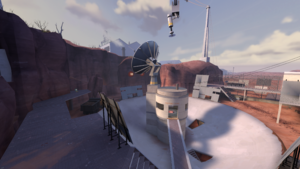
RED Control Point 1: Radar Dish
- Control Point: The control point is located in a small circular building under a large radar dish. The building is raised up in the center of a large bowl-shaped concrete formation.
- Entrances from the flood area: The radar dish is connected to the flooded area of the map via a pair of ground level tunnels.
- Entrances from the turbine room: The turbine room is connected to the radar dish by a large suspended rock formation. This formation is split into two paths with a hole in the middle, the paths splitting left and right at the radar dish end, and connecting to the turbine room at the other end.
- Entrances from the bridge area: There are three paths from the radar dish to the bridge area. The first is the large path on the right hand side of the map. The other two paths are to the left of the main path, one of which goes off to the left (either down to the ground or onto a catwalk), while the middle one connects directly to the raised rocky ledge of the bridge area.
- Under the stairs: All of the stairs in the radar dish area can be shot through, and are a common place for Sentry Guns.
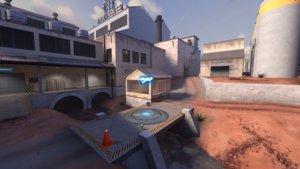
BLU Control Point 1: Power Plant
- Control Point: The control point is located on a metal bridge in the turbine room.
- Entrances from the flood area: The flood area connects to the turbine room via three paths. The two left paths connect to an open area outside of the turbine room, which in turn allows access to either the lower area of the building, or the room with the large pipes. The third path is on the right, and goes from the flooded area through a small tunnel and meets with the lower left path.
- Entrances from the bridge area: The turbine room is connected to the bridge area by a main road, sewer tunnels, and the ventilation system. The main road leads to an area outside of the turbine room that allows access either to the lower or middle levels of the building. The sewers connect the bridge area to the lower area of the turbine building, while the vents connect the roof of the bridge area to the room full of pipes next to the main building.
- Entrances from the radar dish: The radar dish connects to the turbine room via a rock formation. Once inside the building, the exits lead either onto the cat walk, or follow the stairs down to the middle of the room.
- Service room: There is a small windowed room that is next to the bridge. This room is often used as a hiding place for Engineers as it allows them to see attackers without being shot at.
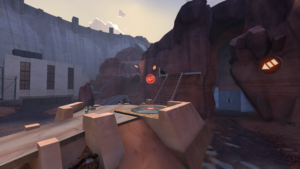
RED Control Point 2: Dam
- Control Point: The flood area control point is located on top of a raised concrete block in the middle of a large open area with standing water.
- Entrances from the bridge area: The bridge area connects to the flood area via an upper and lower path. Both paths converge in a cavern that then splits into an upper, lower, and sewer path. The upper path connects to the ledge overlooking the bridge. The lower path follows the water along the ground under the ledge. The sewer path exits in front of a truck just next to the bridge.
- Entrances from the radar dish: The flood area is connected to the radar dish by a pair of small tunnels. One tunnel comes out near the flood area spawn room, while the other comes out behind the flood area point.
- Entrances from the turbine room: The turbine room connects to the flood area via three paths. One path leads from the ground level and to the right, and eventually connects to the long stairs in the flood area. The second path follows the ground around to the left, and can either stay at ground level, or connect to the top of the long stairs. The final path branches off the second path, and leads down a small tunnel to the water area behind the flood area capture point.
- Second story windows: The flood area spawn room has a second floor that Snipers often use as a nest.
BLU Control Point 2: The Warehouse
- Control Point: The bridge area control point is on a low concrete bridge outside of a large building.
- Entrances from the radar dish: The bridge area is connected to the radar dish via three paths. The main path hugs the left side of the map. The second path connects the bridge area ledge to the middle of the radar dish area, while the right path comes out on the ledge on the radar dish side.
- Entrances from the flood area: The flood area connects to the bridge area by two paths. The upper path connects exits above the flood area capture point, while the lower path comes out in the water behind the flood area capture point.
- Entrances from the turbine room: The bridge area connects to the turbine room via the road, the sewers, and the vents. The road leads to a small area that connects to the middle and lower levels of the turbine room. The sewers lead to the lower level of the turbine room, and the vents connect to the room full of pipes adjacent to the main building.
BLU & RED Final Control Points: Base
Strategy
Control Point timing
| Control Point | Multiplier | Seconds | ||
|---|---|---|---|---|
| Center four control points | ×1 |
| ||
| ×2 |
| |||
| ×3 |
| |||
| ×4 |
| |||
| Final control points | ×1 |
| ||
| ×2 |
| |||
| ×3 |
| |||
| ×4 |
|
Related achievements
 General
|
|
Update history
- Fixed a case where players could get stuck in
tc_hydro.
- Fixed issues on Hydro that could occur when a server emptied in the middle of a round.
- Fixed an exploit that would allow players to jump out of the map.
- Added respawn time advantages when a team begins to cap any point. Resets when the cap progress resets.
- Fixed various nobuild and playerclip issues reported by the community.
- Removed logic that reduced spawn times based on roundtime.
- Fixed clip brush exploit where players could get out of world.
- Fixed players getting on top of monument.
- [Undocumented] Added UFO posters to Hydro.
Bugs
- The boom barrier at the BLU Base entrance is solid when the Power Plant control point is owned by BLU, but not when it is owned by RED and the BLU Base is under attack.
Trivia
- The Radar Dish control point is based on the Arecibo radio telescope.
- Hydro appears in Worms: Reloaded as one of the forts.
Gallery
Pyro and Hydro as a playable fort in Worms: Reloaded.
See also

