|
|
| Line 84: |
Line 84: |
| | | | |
| | == Previous Changes == | | == Previous Changes == |
| − | *After the [[Australian Christmas]] Update, Steel did not load, instead returning the user to the Main Menu. This has since been fixed in the [[December 21, 2010 Patch]] | + | * Steel would not load after the [[Australian Christmas]] Update, instead returning the user to the Main Menu. This was fixed in the [[December 21, 2010 Patch]] |
| | | | |
| | | | |
| | {{Maps nav}} | | {{Maps nav}} |
Revision as of 19:33, 22 December 2010
| Steel
|

|
| Basic Information
|
| Developer(s): |
Unknown
|
| Map Photos
|
|
|
| Map Overview
|
|
|
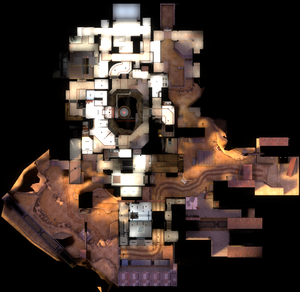
Steel is a complex Attack/Defense control point map, with some unique gameplay. Unlike most TF2 maps, capturing a control point modifies the layout of the map, opening and closing routes for each team. As a result, the offensive team has a wide variety of tactical choices around how they'd like to assault the final point. Unlike normal linear TF2 capture point maps, Steel allows the attacking team, BLU, to capture the final point no matter how many other points have been captured. However, the more points captured by BLU, the more ways they can get to the final capture point, E. Should they use Scouts and Soldiers to rush the final point with only the routes they start with? Should they go for the side control points and open up more routes to the final? Should they capture extra points to shut down the defender's routes? The many choices keep the map interesting for a long time, providing a wide variety of experiences in a game.
Steel is one of the community maps chosen by Valve as honorary official maps due to their high quality.
Introduction video
Goal
BLU must capture point E in order to win the round. Point E is always in play. BLU can capture it at any time. Capturing points A, B, C and D will make E easier to take!
Capturing A opens additional paths to B and E. Capturing B moves RED's spawnroom and also opens an additional route to C. Capturing C extends bridges to E. Capturing D blocks RED from easily reaching E, and extends guardrails on the bridges. Without the bridges, E cannot be reached by everyone. Watch out for the pit!
Note: in the event that BLU fails to capture E in time the missile in the E point room launches and it is advisable NOT to stand anywhere near it while it does. Even being in the same room will get players from either team either sucked into the flames or the pit.
Locations
BLU's Staging Area
A train station at the very bottom of the map. The base has three exits, two to Command Point A (one low and one high), and one to Command Point B. From spawn orientation, Point A is to the right and point B is to the left.
RED's Initial Spawn
A small room with exits leading to A, B and E. From spawn orientation, A is to the left, B is to the right and E is forward.
RED's Second Spawn
After BLU captures point B, RED is forced to spawn between points C and D. From spawn orientation, C is to the left, D is to the right and E is forward. After BLU captures point D, the exit to E is closed off.
Capture Point A
Point A is a shipping dock located directly to the left of RED's initial spawn. BLU is required to climb up a short hill to get to the point at the top, while a couple of walls prevent RED from directly firing at the point. The higher exit from BLU's base leads to the top of a wall. Capturing point A immediately opens a door to the right of the point leading to B, as well as a slow-opening door directly on the point that leads to D and E.
Capture Point B
Point B is located to the right of RED's initial spawn and is partially protected by a small wall facing the RED spawn. There is only one path leading to B before A is captured, while capturing A opens up another. RED's entrance to point B leads into a small 2 story building with a window at the top that can shoot out onto the whole B area except for the closest half of point B. Blue's spawn exit has a passageway off the side which leads to a small overlook and a shack that Snipers may use in attacking B. To the left of point B and just off of the building in front of RED's spawn is a passageway that leads to point E and then a ledge in the C area. Capturing point B causes a door to slowly open to point C and also moves RED's spawn to the opposite side of point E.
Capture Point C
Point C is located on an elevated platform north of point B. The hill leading up from B spikes down into a canyon. Several large rocks provide cover from incoming fire on the B side. There are two sets of stairs to get onto C, one on the outside with no cover, and on to the right which is a small tunnel. RED has a choice of 2 doorways to defend from, one of which includes a small wall on the B side. Capturing C causes three bridges to extend to point E very slowly.
Capture Point D
Point D is located directly next to RED's second spawn, on the opposite side of C. A narrow hallway with a small ledge connects C and D, but one must travel in front of RED's back spawn. RED can also see anyone moving through this hallway by way of a window above their exit to point E, but the window is closed off when the exit is. Capturing D raises guardrails on the bridges and also seals off RED spawn's closest exit to E.
Capture Point E
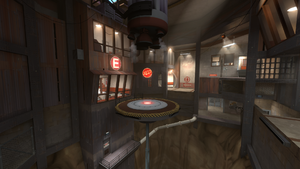
Point E is located in the center of the base, on a small platform above a deep pit. At first, only Scouts, Soldiers, and Demomen can effectively reach it, but once C is captured, bridges appear and allow all classes to get to the point. Point E is available from the start of the round, but capturing all the other points can make E easier to capture.
Common strategies
- In the event that RED is pushed back to Point D and Point E, it is advised that RED be ready to defend attacks from behind and defend Point D as well. This happens frequently as the more RED control points there are, the more thinly stretched RED becomes.
- After capturing Point A, send a three Scout rush through the open door to point E while the rest of your team attack Point B. The Scouts need to place themselves on the edges of the point to prevent a single rocket removing them. Check the point for stickies before jumping onto it.
- Defenders should always have point E protected by a Sentry Gun or sticky bombs; never leave it unattended after point A is captured.
- The windows by point A serve is a vantage point to E, they can be used to eliminate any Sentry Guns defending E or as a sniping spot.
- When attackers are focusing on B or C defending Pyros can easily get behind enemy lines and ambush with the Backburner.
- While attacking A, some of BLU can use Scouts to cap E as a distraction.
- When attacking A, an Engineer can build a Teleporter behind B or at C so if A is capture it can be used for ambushing and flanking.
- The pipes and platform beneath E can be traveled down and built on. This is a useful spot for a sentry as it can cover the catwalks to the point.
Control Point Timing
| Control Point A
|
×1
|
|
| ×2
|
|
| ×3
|
|
| ×4
|
|
| ×5
|
|
| Control Point B
|
×1
|
|
| ×2
|
|
| ×3
|
|
| ×4
|
|
| ×5
|
|
| Control Point C
|
×1
|
|
| ×2
|
|
| ×3
|
|
| ×4
|
|
| ×5
|
|
| Control Point D
|
×1
|
|
| ×2
|
|
| ×3
|
|
| ×4
|
|
| ×5
|
|
| Control Point E
|
×1
|
|
| ×2
|
|
| ×3
|
|
| ×4
|
|
| ×5
|
|
Trivia
- The doors that open after A is captured aren't entirely sealed when closed, allowing Pyros to get behind it and flame through them.
- Currently, every single class can get to control point E when the bridges aren't lowered. However, they will need speed or height altering abilities such as double jumping, sticky jumping, rocket jumping, the Eyelander or the GRU. Engineers can help teammates jump on E by building a teleporter on the edge on the other side, and because Teleporters are solid to friends and foes alike, 100% speed classes will be able to make the jump.
Previous Changes


