Difference between revisions of "Sinshine"
GrampaSwood (talk | contribs) m |
(Removed a strange inaccuracy in the intro, added reference to Sunshine) |
||
| Line 17: | Line 17: | ||
}} | }} | ||
| − | '''Sinshine''' is a [[Steam Workshop|community-created]] symmetrical [[Control Point (game mode)|control point]] map added in the [[Scream Fortress 2015]] update. | + | '''Sinshine''' is a [[Steam Workshop|community-created]] symmetrical [[Control Point (game mode)|control point]] map added in the [[Scream Fortress 2015]] update. It is a Halloween version of [[Sunshine]]. |
| − | It features the standard 5CP layout with a mid, two seconds, and two lasts, with forward spawns for each point beyond mid owned | + | It features the standard 5CP layout with a mid, two seconds, and two lasts, with forward spawns for each point beyond mid owned. |
Sinshine was [https://steamcommunity.com/sharedfiles/filedetails/?id=532473747 contributed] to the Steam Workshop. | Sinshine was [https://steamcommunity.com/sharedfiles/filedetails/?id=532473747 contributed] to the Steam Workshop. | ||
Revision as of 02:08, 9 January 2024
| Sinshine | |
|---|---|

| |
| Basic Information | |
| Variants: | Sunshine |
| Developer(s): | Unknown |
| Map Info | |
| Environment: | Halloween |
| Setting: | Nighttime |
| Hazards: | Pitfall, Pumpkin bombs |
| Map Overview | |
 | |
| Map Stamp | |
| Supporters Leaderboard | |
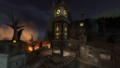
Sinshine is a community-created symmetrical control point map added in the Scream Fortress 2015 update. It is a Halloween version of Sunshine.
It features the standard 5CP layout with a mid, two seconds, and two lasts, with forward spawns for each point beyond mid owned.
Sinshine was contributed to the Steam Workshop.
Contents
Locations
Note: If you are having trouble with finding the locations listed here, see the Helpful overview section to see their exact position marked on the map.
Control Point 3
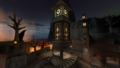
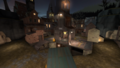
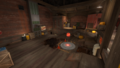
- ClockTower: The Clocktower serves as the middle control point. It is accessed from the sides with openings in the front and back for fire. There is a small platform above for jumping classes and a small health kit. Directly beneath the point is a pool of lava with a Large health kit cauldron on a small platform.
- Shacks: On each of the four corners of the Bell Tower are small wooden shacks that can be used as cover.
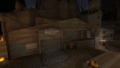
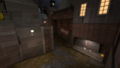
- Valley: One of the ways to get to the middle control point is to go through the Valley, a relatively open area that leads from the second and the fourth control point to the middle one.
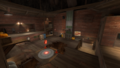
- Cafe: Another way to reach control point 3 is to head through the Cafe, a large stone buildings which are in front and behind the Bell Tower.
- Chokepoints: The main entrance to the middle point for both teams.
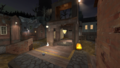
The central control point.
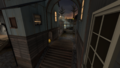
The Valley.
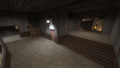
The cut through "Cafe."


Control Point 2 & 4
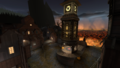
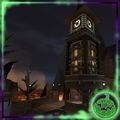
- Deteriorated Clocktower: Both teams have a worn-down clock tower that serves as the second and fourth control points.
- Platforms:On the left of the clocktower (or the right when looking from the attacking team perspective) is a wooden platform that leads into the Valley.
- Staircase: Just behind the clocktower is a set of stairs that lead down to the tunnel.
- Wooden Warehouse: Further behind the clocktower is the Warehouse, a giant three-story structure that acts as a gate from the last point to the second/fourth one and reverse.
The clocktower on BLU side.
The clocktower on RED side.
Outside view of BLU's warehouse
Outside view of RED's warehouse


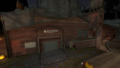
Control Point 1 & 5
- Control point platform: This is the location of the first/fifth control point.
- Elevation: To the left of the lava pit (from defending team side) is an elevated platform that overlooks the point.
- Crates: On the right of the capture point is a set of barrels and crates.
Last point for BLU.
Last point for RED.


Helpful overview

1.Shacks
2.Cafe
3.Chokepoint
4.Valley
5.Platform
6.Staircase
7.Wooden Warehouse
8.Elevation
9.Wall and the area behind it
10.Crates
Red/blue diagonal lines: Red/Blu first spawn
Red/blue double diagonal lines: Red/Blu second spawn
Red/blue double diagonal lines w/ a circle: Red/Blu third spawn
Purple circle: Third/middle point and the Clocktower
Yellow circles: Second/fourth points and the Deteriorated Dlocktower
Green circles: First/fifth points and the control platform
Strategy
 | “Sun Tzu's got nothing on us!” This map's Community strategy page is a stub. As such, it is not complete. You can help the Team Fortress Wiki Community Strategy Project by expanding it. Notes: None added |
Control Point timing
| Control Point | Multiplier | Seconds | ||
|---|---|---|---|---|
| Control Point 1 and 5 | ×1 |
| ||
| ×2 |
| |||
| ×3 |
| |||
| ×4 |
| |||
| Control Point 2 and 4 | ×1 |
| ||
| ×2 |
| |||
| ×3 |
| |||
| ×4 |
| |||
| Control Point 3 | ×1 |
| ||
| ×2 |
| |||
| ×3 |
| |||
| ×4 |
|
Update history
October 28, 2015 Patch (Scream Fortress 2015)
- Added Sinshine to the game.
- Fixed multiple visible nodraws and other texture bugs.
- Fixed nonsolid pumpkin in lobby.
- Fixed trigger bounds in RED spawn.
- Various lighting changes.
Bugs
- Both the RED and BLU teams can place buildings inside their 2nd forward spawns.
Gallery
A side route.
Angled view of the midpoint.
Second/fourth point.
RED team's final point.
Steam Workshop thumbnail for Sinshine.


| ||||||||||||||||||||||||||||||||||||||||||||||
| |||||||||||||||||||||||||||||||||||||||||||||||||||||||||||||||||||