Difference between revisions of "Bread Space"
m |
(Locations overhaul, added more information and images) |
||
| Line 43: | Line 43: | ||
== Locations == | == Locations == | ||
=== Checkpoint A: Outer Perimeter === | === Checkpoint A: Outer Perimeter === | ||
| − | * '''Front Yard''': The area where the Cart starts. It is a desolate piece of terrain without much of anything around it. | + | * '''BLU Spawn''': BLU's first spawn, with two exits directly to the Cart and one exit to the far right side of the base. |
| − | * ''' | + | * '''Front Yard''': The area where the Cart starts. It is a desolate piece of terrain without much of anything around it, save for a small platform in front of the Cart. |
| − | * ''' | + | * '''Gate 5''': A large gate that opens to a small loading dock, inside of which Checkpoint A sits. |
| + | * '''Side Path''': A short flank to the right of Gate 5, leading to the right side of the Tycho Corp building. It ends in a room with a large window looking out over the area behind Checkpoint A. | ||
| + | * '''Collapsed Room''': To the left of Gate 5 is a small collapsed room, which can be used to access the area sitting over Checkpoint A. | ||
<gallery widths=150px heights=80px> | <gallery widths=150px heights=80px> | ||
| − | File:Bread Space A Path.png | + | File:Bread Space A Yard.png|BLU's base and the front yard. |
| − | File:Bread Space A Side Path.png | + | File:Bread Space A Path.png|The path to Gate 5. |
| − | File:Bread Space | + | File:Bread Space A Side Path.png|The side path |
| − | File:Bread Space A | + | File:Bread Space A Upper Room.png|The upper floor by the collapsed room. |
| + | File:Bread Space Point A.png|Checkpoint A from RED's side. | ||
</gallery> | </gallery> | ||
=== Checkpoint B: Transition Area === | === Checkpoint B: Transition Area === | ||
| − | * '''Tycho Corp''': | + | * '''Tycho Corp''': A large building labeled "Tycho Corp", sitting opposite of Checkpoint A. The right entrance contains a small room that leads into the Elevators, acting as a secondary path toward the next checkpoint. |
| − | * '''Slope''': After passing | + | * '''Slope''': After passing Checkpoint A, the cart makes its way down a slope towards Checkpoint B through the main entry of the Tycho Corp building. |
| − | * '''Cave Flank''': | + | * '''Cave Flank''': Next to the slope is an enclosed flank route leading down to the center of the Overrun Room. |
| − | * ''' | + | * '''Elevators''': A set of dysfunctional elevator shafts. Occasionally, a [[Environmental death#Falling_Elevator|malfunctioning elevator]] will rush by a nearby open shaft, killing players it hits. |
| − | * ''' | + | * '''Overrun Room''': The large interior of Tycho Corp that houses the second checkpoint, marked by signs of violence and destruction. BLU team's second spawn is located here, opening after Checkpoint B is captured. |
<gallery widths=150px heights=80px> | <gallery widths=150px heights=80px> | ||
| − | File:Bread Space B Path.png| | + | File:Bread Space B Path.png|The slope after Checkpoint A and cave flank entrance. |
| − | File:Bread Space B Side Path.png| | + | File:Bread Space B Side Path.png|The side room leading to the elevators. |
| − | File:Bread Space B Entrance.png| | + | File:Bread Space B Elevators.png|The elevator shafts. |
| − | File:Bread Space Point B.png|Checkpoint B | + | File:Bread Space B Entrance.png|The main entryway for the overrun room. |
| + | File:Bread Space Point B.png|Checkpoint B. | ||
</gallery> | </gallery> | ||
=== Checkpoint C: The Caves === | === Checkpoint C: The Caves === | ||
| + | * '''Loading Area''': Past Checkpoint B is a series of hills below a loading dock. The loading platform connects the upper pathways, and an alternate route is accessible by Checkpoint B. | ||
| + | * '''Shifting Spawn Room''': RED' team's first spawn room, lying behind a set of walls on the outer edge of the loading area. It closes after Checkpoint B is captured, later becoming a BLU team spawn after Checkpoint C is captured. | ||
| + | * '''Pipe Room''': A small room with a set of small pipes running through it. It opens into the Cart's tracks, and leads to an additional entrance into the main caves. | ||
| + | * '''Airlocks''': A set of airlocks, one of which is closed, and the other one being the path which the Cart travels down. | ||
| + | * '''Open Pipe''': A massive red pipe that runs through the center of the expansive cave, with Checkpoint C sitting directly under it. A section of the pipe is removed, giving access to a platform that overlooks the airlocks. | ||
| + | * '''Side Caves''': The winding path to the right of the main cave entrance, leading behind the checkpoint near the Blast Doors. | ||
| + | |||
<gallery widths=150px heights=80px> | <gallery widths=150px heights=80px> | ||
| − | File:Bread Space C Path.png| | + | File:Bread Space C Path.png|The main path through the loading area. |
| − | File:Bread Space C Side Path.png| | + | File:Bread Space C Shifting Spawns.png|The shifting spawn rooms, under RED control. |
| − | File:Bread Space Point C.png|Checkpoint C | + | File:Bread Space C Side Path.png|The pipe room. |
| − | File:Bread Space C Flank.png| | + | File:Bread Space Point C.png|Checkpoint C. |
| + | File:Bread Space C Flank.png|The alternate route to the right of Checkpoint C. | ||
</gallery> | </gallery> | ||
=== Checkpoint D: The Pit === | === Checkpoint D: The Pit === | ||
| − | * '''Excavation Drill Site''' | + | * '''Blast Doors''': A large, looming set of blast doors that remain closed until the Cart approaches them, after which they will remain open for the rest of the round. Once activated, Big Mama will emerge from a large crater in the ground. |
| − | ** ''' | + | * '''Alternate Doors''': There are additional doorways on either side of the Blast Doors, providing other means to enter the final area from both low ground and high ground. |
| − | * ''' | + | * '''Excavation Drill Site''': The final terminus, and home of Big Mama. Centered around the pit containing Big Mama and the large drill above it, the area is wide open with little cover on the linear Cart track. |
| + | * '''Ventilation''': A small ventilation area to the left of the Drill Site. A RED team spawn exit drops into this room from a duct in the ceiling. | ||
| + | * '''Computer Room''': The room to the right of the main Drill Sit, with computers and terminals across the walls. | ||
| + | * '''Cryopod Chamber''': RED team's second, final spawn room lies behind the main pit, in a room lined with cyropods. | ||
<gallery widths=150px heights=80px> | <gallery widths=150px heights=80px> | ||
| − | File:Bread Space D Gate.png| | + | File:Bread Space D Gate.png|The blast doors while closed. |
| − | File:Bread Space D Side Path.png| | + | File:Bread Space D Ventilation.png|The ventilation room. |
| − | File:Bread Space Point D.png|Checkpoint D | + | File:Bread Space D Side Path.png|The computer room. |
| − | File: Bread Space | + | File:Bread Space Point D.png|Checkpoint D, blast doors opened. |
| + | File:Bread Space D Front.png|Ditto, from the front. | ||
</gallery> | </gallery> | ||
Revision as of 06:57, 13 August 2024
| Bread Space | |
|---|---|

| |
| Basic Information | |
| Map type: | Payload |
| File name: | pl_breadspace
|
| Released: | December 2, 2021 Patch (Smissmas 2021) |
| Developer(s): | Bailey "Glitch" Hodges Jesse "Custard1" Budd Alberto "Petachepas" Zarzuela Jonas "Grambee" Carson Dylan "doggoh" Lee Oliver "OverPovered" Pennanen Christoph "Gadget" Manschitz Peter "Tabby" Bryant William "Cheesypuff" Bartley-Bolster Kirill "Le Bruhe?" Ruzanov Hugh "HueZee_" Madoc Schneider Brandon "Brantopias" Sinkovich human1 |
| Map Info | |
| Environment: | Space |
| Setting: | Night, Moon |
| Hazards: | Big Mama, Pitfalls, Fatties, Falling Elevator |
| Bot support: | Yes |
| Map Items | |
| Map Photos | |
 | |
| Map Overview | |
 | |
| Map Stamp | |
| Supporters Leaderboard | |
| “ | A payload map set in a decaying moonbase. Blu are trying to destroy the monster in the caves. Red are trying to stop them.
— Bread Space publicity burb
|
” |
Bread Space is a community-made Payload map released during the Smissmas 2021 update.
Set in a decaying moonbase, the map features a giant Bread Monster that lurks in an excavated pit. Littered about the site are attempts to fight off the strange, murderous forms of tentacled bread, including wrecked structures and barricaded rooms. Attempts at studying the bread-based life forms and mad wall scrawlings indicate the Bread Forms have successfully brainwashed the mercenaries, and a plan to place "shells" in cryogenic stasis to fly back to Earth.
BLU is tasked with pushing a drill cart into the maw of the Bread Monster, while RED, having been turned into mind-controlled "breadheads", work to defend it.
This map also features its own announcer, the Astronaut.
Bread Space was contributed to the Steam Workshop.
Contents
Bread Forms
Several Bread Forms (Latin: Panismorph) can be found across the map.
- Shells
- Cross-top shells are found deeper in the level. They do not open for the players, but are suspected of infecting RED Team through "spores".
- Breadcrabs
- Possessing only upper teeth, tentacled Breadcrabs are purported to come from Shells and are rarely found alive. They cannot be accessed by players, but one can be found immediately under first BLU Spawn. Graffiti suggests that they attach to the heads of victims, taking over their minds.
- Burstchester
- Possibly contracted from spore particles emitted by opened Shells, Burstchester is a life form that rapidly develops within the chest of a victim before bursting out, taking the form of a small, juvenile Bread Monster that crawls off to eat and grow.
- Fatties
- Littered in the facility are corpses of Bread Monsters that appear to have succumbed to immense green tumors. These are tentatively named 'Fatties' in a recovered Report of Postmortem Examination, Case No. SW1969-04275. Their swollen tumors rupture and spray strong acid when disturbed.
- Big Mama (Specimen 79)
- Big Mama is a humongous Bread Monster that has crawled into Tyco Excavation's borehole. Its tentacles seem to reach throughout the moonbase.
- When surrounded by its protective "Bread Heads" (mind-controlled RED mercenaries), Big Mama lies dormant at the bottom, seemingly sleeping, but at great enough depth to cause a lethal fall.
- When the cart reaches the Gate, Big Mama is roused, rising up from the borehole and roaring. Big Mama retracts slightly afterwards, peeping just above the borehole, and snaps at and gibs any player that touches it.
Locations
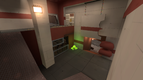
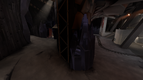
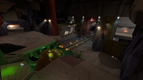
Checkpoint A: Outer Perimeter
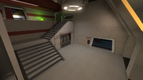
- BLU Spawn: BLU's first spawn, with two exits directly to the Cart and one exit to the far right side of the base.
- Front Yard: The area where the Cart starts. It is a desolate piece of terrain without much of anything around it, save for a small platform in front of the Cart.
- Gate 5: A large gate that opens to a small loading dock, inside of which Checkpoint A sits.
- Side Path: A short flank to the right of Gate 5, leading to the right side of the Tycho Corp building. It ends in a room with a large window looking out over the area behind Checkpoint A.
- Collapsed Room: To the left of Gate 5 is a small collapsed room, which can be used to access the area sitting over Checkpoint A.

BLU's base and the front yard.
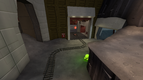
The path to Gate 5.
The side path

The upper floor by the collapsed room.
Checkpoint A from RED's side.


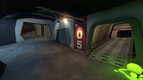
Checkpoint B: Transition Area
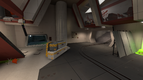
- Tycho Corp: A large building labeled "Tycho Corp", sitting opposite of Checkpoint A. The right entrance contains a small room that leads into the Elevators, acting as a secondary path toward the next checkpoint.
- Slope: After passing Checkpoint A, the cart makes its way down a slope towards Checkpoint B through the main entry of the Tycho Corp building.
- Cave Flank: Next to the slope is an enclosed flank route leading down to the center of the Overrun Room.
- Elevators: A set of dysfunctional elevator shafts. Occasionally, a malfunctioning elevator will rush by a nearby open shaft, killing players it hits.
- Overrun Room: The large interior of Tycho Corp that houses the second checkpoint, marked by signs of violence and destruction. BLU team's second spawn is located here, opening after Checkpoint B is captured.
The slope after Checkpoint A and cave flank entrance.
The side room leading to the elevators.

The elevator shafts.
The main entryway for the overrun room.
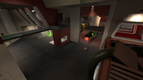
Checkpoint B.


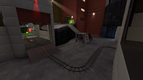
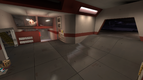
Checkpoint C: The Caves
- Loading Area: Past Checkpoint B is a series of hills below a loading dock. The loading platform connects the upper pathways, and an alternate route is accessible by Checkpoint B.
- Shifting Spawn Room: RED' team's first spawn room, lying behind a set of walls on the outer edge of the loading area. It closes after Checkpoint B is captured, later becoming a BLU team spawn after Checkpoint C is captured.
- Pipe Room: A small room with a set of small pipes running through it. It opens into the Cart's tracks, and leads to an additional entrance into the main caves.
- Airlocks: A set of airlocks, one of which is closed, and the other one being the path which the Cart travels down.
- Open Pipe: A massive red pipe that runs through the center of the expansive cave, with Checkpoint C sitting directly under it. A section of the pipe is removed, giving access to a platform that overlooks the airlocks.
- Side Caves: The winding path to the right of the main cave entrance, leading behind the checkpoint near the Blast Doors.
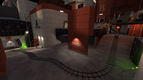
The main path through the loading area.

The shifting spawn rooms, under RED control.
The pipe room.

Checkpoint C.
The alternate route to the right of Checkpoint C.


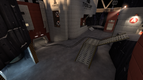
Checkpoint D: The Pit
- Blast Doors: A large, looming set of blast doors that remain closed until the Cart approaches them, after which they will remain open for the rest of the round. Once activated, Big Mama will emerge from a large crater in the ground.
- Alternate Doors: There are additional doorways on either side of the Blast Doors, providing other means to enter the final area from both low ground and high ground.
- Excavation Drill Site: The final terminus, and home of Big Mama. Centered around the pit containing Big Mama and the large drill above it, the area is wide open with little cover on the linear Cart track.
- Ventilation: A small ventilation area to the left of the Drill Site. A RED team spawn exit drops into this room from a duct in the ceiling.
- Computer Room: The room to the right of the main Drill Sit, with computers and terminals across the walls.
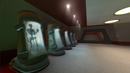
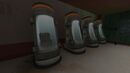
- Cryopod Chamber: RED team's second, final spawn room lies behind the main pit, in a room lined with cyropods.
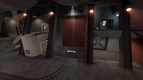
The blast doors while closed.

The ventilation room.
The computer room.
Checkpoint D, blast doors opened.

Ditto, from the front.


Strategy
 | “Sun Tzu's got nothing on us!” This map's Community strategy page is a stub. As such, it is not complete. You can help the Team Fortress Wiki Community Strategy Project by expanding it. Notes: None added |
Update history
- Added Bread Space to the game.
- Fixed some clipping around cliffs and BLU base
- Fixed a bug where players could get stuck behind a wall of computers near the final point
- Fixed location by BLU spawn where you can build under cliff
- Fixed an issue with sound in the final sequence
- Fixed decals
- Fixed missing Breadcrab animations
- Added updated drill model
- Added normal maps for the rock cliffs
- Added missing decals and logos
- Added bread chunks that fly when Big Mama explodes
- Optimized areas to reduce lag
- Updated backpack and matchmaking images
- Fixed a bug where BLU could teleport into RED spawn
- Fixed an animation error within the final arena
- Fixed some displacements seams
- Deleted some light effects no longer in use in the final area
- Fixed being able to place buildings in the forward BLU spawn room
Bugs
- It is possible to place stickybombs on the bomb cart and spawn door. If the bomb cart moves or spawn doors open, the stickies float in the air.
- It is possible to jump or fly right though the body of Big Mama while it is roaring.
Trivia
- The name "Bread Space" is a reference to the Dead Space franchise.[1]
- Rupturing, fluid-filled pustules are an element of one of the Dead Space Necromorphs.
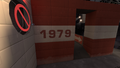
- Outside the first RED spawn, the number "1979" can be seen, a reference to the release year of the movie Alien.[1]
- There are some graffiti drawings by "Hatman" resembling the art style of ones drawn by Rattman in the Portal universe[1], tying the Community map's background to events of Valve's Expiration Date and Bread ARG.
- Other graffiti suggests that Mann Co. has been controlled by Bread for generations.
- In the cryopods in the final RED spawn room, there are chilling cases of Cerveza Royale[1] from Expiration Date, Bread Forms (see the plan in the Lab Notes), and a skeleton (a tribute to Futurama's main protagonist Fry[1]).
- Certain computer screens are scrolling common x86 assembly code.
Gallery
- General corporate signage

Bread Space logo for BLU.

Bread Space logo for RED.

Earth seen from inside the dome.

Lunar excavation facility defended by RED.
Tycho Corp company poster.
Alien, 1979 film.
Steam Workshop thumbnail for Bread Space.


- Attempts to study the Bread Forms
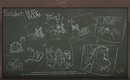
Blackboard drawings seen in both RED & BLU spawns.

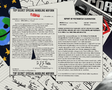
Postmortem Exam report found on floor in final RED spawn.

NOFORN lab notes also found on floor in final RED spawn.
NOFORN report fragments reassembled.

Plan to send Breadcrabs to Earth in the cryopods.
Cryopods, with skeleton, cerveza, and shells.
Demoman's secret bottles.


- Hatman's desperate graffiti in the RED base, suggesting, among other things, Mann Co. is controlled by Bread Aliens, and the role of Teleporters in it all.
Example of "Hatman" graffiti (in first RED spawn).

Suggestion that Mann Co. is under Bread control (note the teleporter).

Mind-controlling Breadcrabs hidden by Mann Co. hats.

Soldier teleporting as much bread as he likes.

Same rocket design as in lab notes.


- Bread Space map posters

"Hang in there, Baby" poster trope.


Unused.


References
| |||||||||||||||||||||||||||||||||||||||||||||||||||||||||||||||||||