Difference between revisions of "Hydro"
m (grammering around) |
|||
| Line 87: | Line 87: | ||
== Control Point Timing == | == Control Point Timing == | ||
{{Control Point Timing/Official Map}} | {{Control Point Timing/Official Map}} | ||
| + | |||
| + | == Trivia == | ||
| + | *A map of Hydro is seen on one of the Steam Community event pictures. | ||
==See also== | ==See also== | ||
Revision as of 21:59, 29 July 2010
| Hydro | |
|---|---|

| |
| Basic Information | |
| Developer(s): | Unknown |
| Map Photos | |
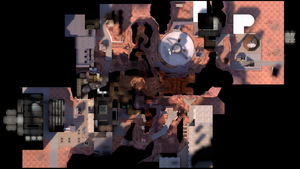
| Map Overview | |
Hydro is a Territorial Control and was one of the six initial maps included with the game's release. So far, Hydro is the only official territorial control map of its kind, most possibly due to the complexity and difficulty of designing such a map type.
The goal of Hydro is to take over the entire map by capturing "territories." Each game is randomly selected from the six available layouts in a "point against point" game where both teams must capture the opposite point while preventing their own. After a team successfully captures the enemy control point, the next round will start, taking place in a different area of the map (which is also randomly generated). After a team captures all four territories, the offending team must capture the enemy team's base while the other defends for their life. If the base point is captured the team wins the round, if offending team loses the closest point to the base (the Radar Dish for RED, the Power plant for BLU). When the next round begins, territories are reset and a new random game is selected.
In any game in TC (except in RED/BLU base games), if a point is not captured within the eight minute time clock, the game then will go into Sudden Death mode.
Contents
Introduction video
Locations
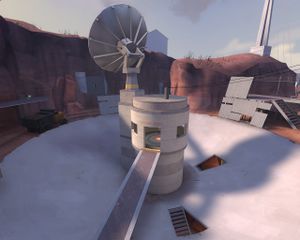
RED CP1: The Radar Dish
A large radar dish. The capture point is located in the center.
- Entrances from the flood area: The radar dish is connected to the flooded area of the map via a pair of ground level tunnels.
- Entrances from the turbine room: The turbine room is connected to the radar dish by a large suspended rock formation. This formation is split into two paths with a hole in the middle, the paths splitting left and right at the radar dish end, and connecting to the turbine room at the other end.
- Entrances from the bridge area: There are three paths from the radar dish to the bridge area. The first is the large path on the right hand side of the map. The other two paths are to the left of the main path, one of which goes off to the left (either down to the ground or onto a catwalk), while the middle one connects directly to the raised rocky ledge of the bridge area.
- Under the stairs: All of the stairs in the radar dish area can be shot through, and are a common place for sentries.
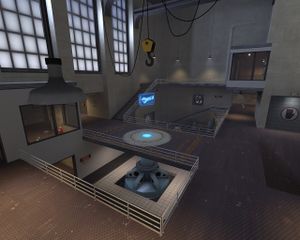
BLU CP1: The Power Plant
The turbine room capture point is located on a metal bridge suspended in the middle of the building.
- Entrances from the flood area: The flood area connects to the turbine room via three paths. The two left paths connect to an open area outside of the turbine room, which in turn allows access to either the lower area of the building, or the room with the large pipes. The third path is on the right, and goes from the flooded area through a small tunnel and meets with the lower left path.
- Entrances from the bridge area: The turbine room is connected to the bridge area by a main road, sewer tunnels, and the ventilation system. The main road leads to an area outside of the turbine room that allows access either to the lower or middle levels of the building. The sewers connect the bridge area to the lower area of the turbine building, while the vents connect the roof of the bridge area to the room full of pipes next to the main building.
- Entrances from the radar dish: The radar dish connects to the turbine room via a rock formation. Once inside the building, you can either exit onto the cat walk, or follow the stairs down to the middle of the room.
- Service room: There is a small windowed room that is next to the bridge. This room is often used as a hiding place for Engineers as it allows them to see attackers without being shot at.
RED CP2: The Dam
The flood area control point is located on top of a raised concrete block in the middle of a large open area with standing water.
- Entrances from the bridge area: The bridge area connects to the flood area via an upper and lower path. Both paths converge in a cavern that then splits into an upper, lower, and sewer path. The upper path connects to the ledge overlooking the bridge. The lower path follows the water along the ground under the ledge. The sewer path exits in front of a truck just next to the bridge.
- Entrances from the radar dish: The flood area is connected to the radar dish by a pair of small tunnels. One tunnel comes out near the flood area spawn room, while the other comes out behind the flood area point.
- Entrances from the turbine room: The turbine room connects to the flood area via three paths. One path leads from the ground level and to the right, and eventually connects to the the long stairs in the flood area. The second path follows the ground around to the left, and can either stay at ground level, or connect to the top of the long stairs. The final path branches off the second path, and leads down a small tunnel to the water area behind the flood area capture point.
- Second story windows: The flood area spawn room has a second floor that Snipers often use as a nest.
BLU CP2: The Warehouse
The bridge area control point is on a low concrete bridge outside of a large building.
- Entrances from the radar dish: The bridge area is connected to the radar dish via three paths. The main path hugs the left side of the map. The second path connects the bridge area ledge to the middle of the radar dish area, while the right path comes out on the ledge on the radar dish side.
- Entrances from the flood area: The flood area connects to the bridge area by two paths. The upper path connects exits above the flood area capture point, while the lower path comes out in the water behind the flood area capture point.
- Entrances from the turbine room: The bridge area connects to the turbine room via the road, the sewers, and the vents. The road leads to a small area that connects to the middle and lower levels of the turbine room. The sewers lead to the lower level of the turbine room, and the vents connect to the room full of pipes adjacent to the main building.
BLU & RED Base
Strategy
- One of the keys with Hydro is understanding just how a Territorial control map works and which parts of Hydro are currently in play. At the start of each round you will emerge from your spawn area and will be connected to one of the enemy territories detailed above. A key to good play is working this out quickly and getting your assault underway.
- There is always more than one route to the opposition's control point.
- As with all other maps familiarize yourself with all these various routes.
- For defending the Dish CP Demomen should place their sticky bombs on the ceiling to hide them from the enemy.
- Engineers can defend the Dish CP well by placing Sentries on the metal catwalks adjacent to the the three exits - the mountain ramp leading from the Turbine CP, the walkway nearest the spawn, which covers the paths diverging from the Bridge CP, and the walkway leftmost of the spawn, which can prevent entrance into the point from the Flood Area tunnels.
- On most sections of Hydro, it is a long trip between the spawn room and the enemy Capture Point. Engineers would do well to construct a Teleporter early in the round to help their teammates move forward.
- Always keep an eye on your own Control Point, and be near enough to defend it if necessary. A hard fought battle for the enemy CP can be lost by just a few seconds' inattentiveness.
Section-Specific Strategy
The Warehouse (BLU)
- ATTACKERS: This is a very good area for Spies to be put to use. There are several areas in this area that serve little interest to the enemy team, and thus are rarely paid any attention to when not in use, not to mention that there are several areas in this part of the map where Snipers particularly like to feel nice and cozy in, making it good for you to drive a knife into their backs.
- DEFENDERS: Engineers can build their Sentry Gun next to the small raised ledge. This way, they are protected from enemy fire outside of the Sentry's sensor range.
The Dam (RED)
- ATTACKERS: With it's little use to the enemy team, aside from Snipers, Spies tend to decloak in the area behind the enemy Spawn, unless you are taking out Snipers, do not do so. The enemy team will be VERY suspicious of any class in that area and will instantly Spy check you if they see you coming from behind the spawn, even more so then the other areas on the map.
- DEFENDERS: A good Sentry spot is behind the rocks near the CP, it allows your Sentry to cover the CP while being out of sight of the enemy team, however, it is easy to take down in that position after they know where it is.
The Radar Dish (RED)
- DEFENDERS: In addition to placing sticky bombs on the ceiling, Demomen can position themselves on one of the raised steel platforms (see picture) where they can easily take cover from opposing fire whilst in a good position to fire pipe bombs through the windows of the CP.
- DEFENDERS: Soldiers and Demomen can rocket/sticky bomb jump onto the top of the CP, and are able to take easy shots at oncoming enemies. Be aware though, you are also more exposed to well placed shots from oncoming Snipers and Heavies here.
The Power Plant (BLU)
- DEFENDERS: It is possible, as a Soldier or a Demoman, to rocket/sticky bomb jump onto the topmost entrance to the room (the one which has the door to the upper half and the staircase down to the CP). From here, you have a perfect view of the capture point and can easily take out enemies that enter the room. If you have two of you get up there then you can watch over both entrances for total security.
Control Point Timing
| Control Point | Multiplier | Seconds | ||
|---|---|---|---|---|
| Center four control points | ×1 |
| ||
| ×2 |
| |||
| ×3 |
| |||
| ×4 |
| |||
| Final control points | ×1 |
| ||
| ×2 |
| |||
| ×3 |
| |||
| ×4 |
|
Trivia
- A map of Hydro is seen on one of the Steam Community event pictures.
See also
| Languages: | English · čeština · dansk · Deutsch · español · suomi · français · italiano · 日本語 · 한국어 · Nederlands · polski · português do Brasil · română · русский · Türkçe · 中文(简体) · 中文(繁體) |


