| Gravel Pit
|

|
| Basic Information
|
| Variants: |
Coal Pit and Lava Pit
|
| Developer(s): |
Unknown
|
| Map Info
|
| Environment: |
Industrial
|
| Setting: |
Daylight, sunny
|
| Map Photos
|
|
|
| Map Overview
|
|
|
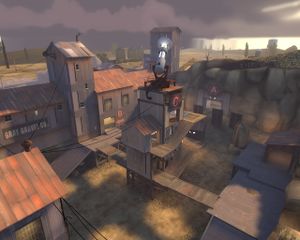
Gravel Pit is an Attack/Defend Control Point map. It was one of the six maps included with TF2's initial release.
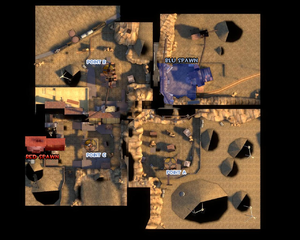
Like all Attack/Defend maps, RED always plays defense and BLU always plays offense, and once the BLU team has captured a control point, it is locked and can never be retaken by RED. The map differs from other Attack/Defend control point maps in that it allows the attackers to capture the first two points (points A and B) in any order before assaulting the final control point (point C). Points A and B are directly accessible from the BLU base, while they must cross through one of them in order to reach point C. RED's base is located near point C.
The objective of Gravel Pit is that BLU must attack and capture all three points in order to win the match. A and B must be captured before C can be. The objective for RED is that they must hold out and prevent BLU from capturing the final point C. Time is added to the countdown if BLU captures either points A or B in order to buy more time for capture point C.
Junction, an official community made map, shares the same gameplay design with Gravel Pit.
Introduction Video
Locations
Capture Point A - The Radio Tower
Capture Point A is to the left as you exit the BLU base. The point is at the top of a hill, inside a building. There are two exits from the BLU tunnel to this area, and they allow access to the two ramps around the outside of the point. . A medium health pack is under the capture point. There are also two medium ammo boxes near the cap building, one to the front and one at the back of the CP building. From point A, there are tunnels that connect to points B and C.
- BLU Spawn Base: Located on one side of the map, the BLU Base has two exits - one to cap A, and the other one to cap B.
- A Tunnel: The tunnel which connects BLUs spawn yard and the A battlefield. The tunnels leading to the BLU base are accessible by rocket, grenade, or double jumping; they can also be entered by crouch-jumping onto the part of the wall jutting out next to the left entrance, then by crouch-jumping toward the left entrance while strafing right and turning right to barely land on the tunnel ledge
- Valley: The valley is the area between the two dirt paths which lead up to the control point building. There are numerous small buildings in this area.
- Paths: On both sides of the area are dirt paths which lead to the top of the area and the control point building.
- Radio Tower: The radio tower houses the control point. It is atop the dirt paths at the far end of the valley. There are two floors, the bottom directly under the control point and the control point floor. On the side of the building is a set of stairs which lead to the control point from the valley. The roof of the building is also accessible by rocket/sticky jumping or through double jumping across various clippings along the building's sides.
Capture Point B - The Radar
Capture Point B is to the right as you exit the BLU base. The point is in the large structure in the center of the area.
- B Tunnel: There are two tunnels coming from the BLU base. The Short B is covered by a small house and a fence that partially obscures the BLU tunnel, amd exits out next to the A/B Connector. Long B exits out on the far side of the B area. Both require players to rocket/grenade/double jump to access the tunnels from the Capture Point side. Two ramps along the back wall give access to Capture Point C.
- The Radar: The Radar is the building which houses the control point. It has two main entrances, the main entrance on the far side of the area atop a ramp, and the other on the C side atop two ramps. There are four windows, two on each side which are all accessible. The roof is a common spot for Soldiers or Demomen and contains a dropdown directly to the point.
- Shadow Side: Next to the building, on the side opposite the B Tunnel exits is the shadow side, named for the building's shadow which is cast on it.
- Balcony: Directly outside the C entrances is the balcony. It s a high point which serves as a vantage point for most of the B area. There are two ramps on both sides which lead down to ground level.
- A/B Connector: Between the A and B areas is the A/B Connector which is a tunnel which connects from BLU's A tunnel exit to BLU's short B tunnel exit.
Capture Point C - The Laser Gun
Capture Point C is past the first two points, and adjacent to the RED base. The tunnels leading to the other Capture Points are on a higher level than the ground in this area. The capture point is located at the top of the central structure.
- RED Spawn Base: Located directly adjacent to Capture Point C, on the opposite side of the area from the tunnels to Capture Points A and B.
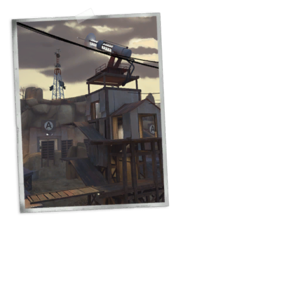
- The Laser Tower: In the center of the area is the giant tower, which atop sits a laser gun. There are three floors to the tower. The first is accessable from ground level by a ramp, and from two bridges connecting to the catwalks. The second floor is accessible by two sets of ramps of which lead along the outside of the tower and one through it. The third floor is the top which contains the capture point and a small room behind the point open on three of its sides.
- Catwalks: All along the outside edge of the area are the catwalks. These are the metal walk-ways which are accessible via four entrances, two from the A/C connector tunnels and two from the B/C connector tunnels, and are also accessible from two ramps outside the RED spawn.
- Ground Level: Below the catwalks and surrounding the tower is the ground level. On the far side is an entrance which leads to the A/C connector tunnels.
Gravel Pit Cap Point C.jpg
Common strategies
- Frequently, defenders will pick one point (A or B) to defend, and offense groups will strike heavily at one or the other at the start of the match. It is up to your team to decide if this is a valid strategy. It is common for defending Pyros or Spies to invade the poorly defended point to clear it.
- There are many enclosed areas in the first two areas, so bring Medics and watch out for Demomen and Pyros. Intelligent Sentry Gun placement can make a big difference.
- Consider flanking enemy forces, especially once you've taken one of the initial points. Generally the RED team will be too focused on getting back to the other point to notice that you're Backstabbing or sniping them.
Capture Point A
- Defense: Defending capture point A can be challenging since there are more ways to assault it and less defensive areas at the point. Early in the round, some players like to try to repel invading BLU team members on the two ramps along the outside of the area. Engineers tend to set up Sentry Guns inside the building with the point. Another interesting place to set up is beneath the BLU exit. Sentry Guns can even be placed in the BLU exit itself: if an Engineer builds a Dispenser below the exit, he can jump on top of it which will allow him to place a Sentry Gun in the exit tunnel. Pyros can surprise enemy players, who assume this area to be empty.
- Offense: Sentry Guns in the building with the CP are easy to remove, since you have many angles of attack and the building provides only limited protection. Watch out for Sticky bombs on the door while you are exiting the starting area when the round begins, as this is a popular strategy.
- Sometimes, the defenders will set up 3 or 4 level 3 Sentry Guns around the point. The best way to take them down is to have a Spy disable them and have Demomen and Soldiers charge in and destroy them. Once the Sentry Guns are down, it is very easy to take the point. Have Snipers watch the entryway from C to A. Also be ready for any Pyros running up the stairs that are closest to the point. This is a popular defense tactic. Have your Demoman sticky up the point so if Pyros do break through, they will be killed before they can do much (or any) damage.
Capture Point B
- Defense: Most rounds start with a Heavy defense at Capture Point B. Sentry Guns inside the building and on the ramp out in front of the building can be difficult to remove. Demomen can get on top of the building and lob grenades or set Sticky bombs on the point. Soldiers can also get onto the building using Rocket jumps, as well as Scouts using the Force-A-Nature.
- A good tactic is to have an Engineer place buildings on top of the base. You can do this by placing a Dispenser on the ramp closest to the big rock formation, then jumping on top of this. Then place a Teleporter exit on top of the little tin roof. Build the entrance anywhere you'd like (preferably where enemies are least likely to look.) Teleport onto the tin roof and then crouch-jump on the red roof (note: it may be tricky if you are doing it first time). Once there, rebuild the Dispenser. Be sure to keep your Dispenser safe because you'll need it to build an exit Teleporter as well as a Sentry Gun. Alternatively, you can build a Level 3 Sentry Gun outside your spawn, carry it to the Shadow Side, and then Sentry Jump to the roof.
- Be sure to have your team defend your Engineer as he's doing this. The process can take up to a minute and a half (or even before the match start if perfectly done) but a Sentry Gun up there is very useful for defense. A level 3 Sentry Gun is excellent up there but you must defend it due to its limited range. This Sentry Gun can prevent Soldiers and Demomen from Rocket jumping up there as well as covering a wide view of control point B. Have a Sniper pick off enemies who are trying to destroy the Sentry Gun from outside its range.
- Offense: Spies should focus on taking out any Sentry Guns that can hit the BLU entry hall. Demomen are good at clearing the CP room once the outer area is clear. Pyros and Medics should try to hold the point, but expect Heavy resistance.
- Do a Rocket/Grenade jump onto the roof of B. Shoot through the windows to destroy their defense and Sentry Guns. Just remember, there's no health and ammo up there. However, if you are close to the edge of the roof, a Medic will be able to heal you.
Capture Point C
- Defense: If one of the initial points is taken, check C for Scouts and Spies. They like to camp there so they can instantly capture C when both initial points are captured.
- There are four routes into the defensive area; the left side, the right side (on the ramp or from below via the tunnel) and directly from in front. A highly effective solution to this is to have one Sentry Gun on each side of the map, at the top of the ramps leading to the ledges. This covers the left and right sides, leaving the direct route from in front and the right side tunnel. (Both Sentry Guns need a Sentry Gun guard, preferably a Soldier, to prevent the enemy having enough time to set up Sticky traps around the guns, or kill them with splash damage, etc, and to protect against Spies).
- The direct entrance is fairly easily held by two or so players simply fighting at that exit; a Sticky trap here is effective. This leaves the right side tunnel which is fairly well covered by the right side Sentry Gun; any enemy who comes through that route must come into view of the Sentry Gun. The Sentry Gun guard will protect against a Demoman trying to lob grenades onto the Sentry Gun from cover.
- If these defenses fail, the only remedy is direct combat. If this happens and the offense uses ÜberCharges to clear the tower, a Pyro can stand in the rear area of the point and use compression blast on anyone that makes it to the top. This can force the ÜberCharge back to the base of the tower.
- The Compression Blast strategy is also effective against Soldiers and Demomen who try to Rocket/Sticky-jump from the small shed across from the A corridor up to Capture Point C. The damage from the explosion and the resulting fall from being pushed back can sometimes kill already weakened opponents. Even if it doesn't, it's still a long, dangerous hike back to the top of the tower.
- Offense: Watch for Sentry Guns, and try to take them out from a distance. Soldiers and Demomen can skip many of the ramps by Rocket jumping or Grenade jumping. Another popular strategy is to have a Spy waiting on Cap C (even easier with the "Cloak and Dagger" unlockable) when you capture the last of the other two points. Generally there are only light defenses while C is locked, so the Spy should be able to survive. If the point is heavily defended, Demomen are very useful.
- The CP can be easily reached by a Soldier or Demoman through Rocket jumping or Sticky jumping, respectively. To do this, begin by approaching the C area through the tunnel between areas A and C. Take the right exit from the tunnels to the C area. There is a small building between the tunnel exit and the CP. The roof of this building can be seen while looking out of the exit of the tunnels. As a Soldier, leap on this roof and Rocket jump to the CP. As a Demoman, fire a Sticky bomb onto the roof and leap onto the roof while detonating the bomb. Both of these methods should propel the player onto the CP. You can also reach the CP by Rocket Jumping from the left tunnel from A (Don't take the downward stairs) or from the Capture Point B entrances. These approaches, however, are slightly riskier, as defenders usually gather around these areas.
- As a Pyro, try to reach the CP unnoticed. While it's not too spectacular, you can rush onto the top of the structure while both teams are busy fighting each other. Once you're up there feel to wreak havoc with your Flamethrower as due to the size of the room, a lone Pyro can wipe out the defenses by himself. If the CP is already occupied by an Engineer, the best tactic is to team up with any nearby Spy. The Spy will sap the Sentry Gun by any possible means (including a Disguised suicide rush) giving the Pyro a split-second to go in and burn the place down.
Related Achievements
|
|
Impossible Defense
Successfully defend Gravel Pit without giving up a capture.
|
|
|
|
Update history
January 25, 2008 Patch
- Changed the scoring method in CP_GravelPit to score per capture rather than per round
- Updated CP_GravelPit to fix all known exploits
Trivia
- Gravel Pit is locale number 34 in the 'Pits of America' stamp range.[1]
- Before their War, the RED Demoman and BLU Soldier went on the 'Gravel Pits of America' scenic bus tour together.
- 'The Insult that made a "Jarate Master" out of Sniper' takes place in Gravel Pit.
- There are many healthkits and ammo packs underneath displacements in Gravel Pit, which you can access through noclip.
- According to the Map of Mann's Land, Gravel Pit is westward from Badwater Basin and northeast from Well (called The Well). A sea of gravel (called The Gravel Sea on the map) lies to the west.
Control Point Timing
| Control Point A
|
×1
|
|
| ×2
|
|
| ×3
|
|
| ×4
|
|
| Control Point B
|
×1
|
|
| ×2
|
|
| ×3
|
|
| ×4
|
|
| Control Point C
|
×1
|
|
| ×2
|
|
| ×3
|
|
| ×4
|
|
Bugs
- It is possible for a RED Engineer to build a Teleporter inside the RED spawn on top of a control console.
- If a BLU Engineer builds a Teleporter exit in the BLU-only area outside the main spawn, it is possible for an enemy Spy to teleport into the BLU spawn.
See also

 General


