Dustbowl
| Dustbowl | |
|---|---|

| |
| Basic Information | |
| Variants: | Training Mode |
| Developer(s): | Unknown |
| Map Photos | |
| Map Overview | |
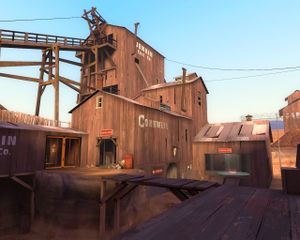
Dustbowl is an Attack/Defend Control point map, and is the subsequent remake of the Team Fortress Classic map of the same name. It and Gravel Pit were the first Attack/Defend CP maps for Team Fortress 2 and it was one of the six initial maps included with the game's release. Dustbowl is currently the only map for which a training mode has been created.
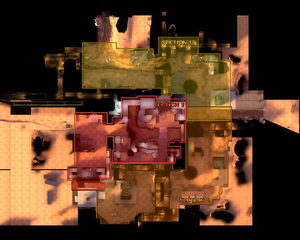
In Dustbowl, the goal of the attackers (BLU) is to win through a series of stages in order to win the map. Within each stage the attackers must capture two control points, A and B, which are held by the defenders (RED). Point A must be captured before the attackers can assault B. The timer is increased for every point capture and once a point is captured it is locked and cannot be retaken by the defenders.
Like all Attack/Defend maps, BLU plays the attackers while RED plays the defenders. Egypt and Gorge share a similar design with Dustbowl.
Contents
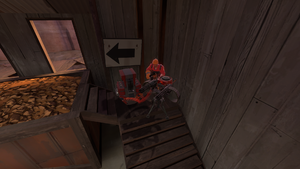
Introduction video
Goal
BLU is attacking and must capture both points (A and B) in all three stages to win the match. RED must prevent BLU team from achieving their goal.
Locations
Note all viewed from Blu’s perspective after leaving spawn.
Stage 1, Point A
Control point A Inside a small building on the left.
- Attackers' spawn: Three exits - Left, Middle and Right. Defenders are able to shoot into spawn.
- Canyon: The long straight pathway from the middle spawn door leads right to the back door of Control point A.
- Main shed: Next to the left door contains a large Health and Ammo pack. Path leads straight into the front entrance of the Control point building. Has one doorway.
- Side shed: Next to right hand spawn door contains medium health and ammo. Has two doorways
- Control point “A” building: Contains a large Health and a large Ammo pack. Steps lead the mining tunnel which has a large Health pack and leads to Control point B. Has two doorways plus higher windows and balcony.
- Exits Left tunnel, Right tunnel and (upper) Mine tunnel.
Stage 1, Point B
Control point B is again inside a building on the left.
- Cave paths: 3 tunnel pathways lead to the second area.
- Second floor from upper Mine Tunnel, leads to one way gate and tyre exit above and to the left of Control point B. Contains medium Health and Ammo Pack.
- Ground level from left tunnel behind control point A.
- Right tunnel leading to large cave (right cave) with upper an lower level exits. contains a medium Health pack and large Ammo pack.
The bridge leads from the upper exit of the right cave to the one gate.
- Control point B building: Contains a small Health and Ammo pack.
- Sniper roof: Located above the defenders' spawn. Is split into two parts connected by the Snipers' bridge, and has a small Health and Ammo pack on one side.
- Defenders' spawn: The spawn point for the defenders (RED team). It is located underneath the Snipers' roof.
Stage 2, Point A
The first point is on top of a building on the left (from BLU's perspective).
- BLU Spawn: This is a small building which opens into the Dugout.
- Dugout: Two entryways emerge from the spawn, one leading left, and one right. Defenders are free to enter after the setup gates open.
- Large Shed: On the right hand side are two large Health and Ammo packs. The ladder at the back leads to the roof of the building.
- Control Point Building: Control point is on top of the second level of the building. The second level has a small hut which contains a large Health and Ammo pack. The first floor has a small, open room facing the BLU spawn with a medium Health and Ammo pack. It has two doorways, and may also be entered through a window and via crates located at the front-left and tires at the rear-left.
- The Office: At the back of this area. There are two rooms; the one to the right contains a large Ammo and medium Health pack. The second room has a window facing the dugout.
- Signpost: A large Health pack and a medium Ammo pack are located to the left of The Office.
- Exits: One on the left and one on the right, both leading to point B.
Stage 2, Point B
The second Control point is on a platform next to RED's spawn.
- The Mining Tunnel: A long narrow tunnel which starts at the back right of the office building.
- The Double Exits: These two tunnels are located parallel to each other. The left tunnel leads to the double doors, and the right one leads to the double doors or to the gate.
- The Gate: Far right from the double exits lies a one way gate via another tunnel. There is a large Health pack at the end, near the grate.
- The Courtyard: The open area right outside the double exits and the exit of the long mining tunnel. It is situated next to the middle building.
- The Middle Building: A large building in the middle of the Courtyard area. The second floor contains two medium Health and Ammo packs. A ground-level corridor runs through the building which exits on the other side, directly in front of the final Control point. There is also a path around the outside, sporting some tall boulders.
- Control Point B: The Control Point sits on a platform which is near the defenders' spawn and is accessible by stairs on either side.
- RED Spawn Building: This is the spawn point for the defending RED team and is behind the control point.
Stage 3, Point A
The first Control point is on a platform straight across from BLU's exit. RED has a shortcut from one of their spawn rooms to this point. This shortcut is sealed once BLU captures this point.
- Three Exits: Left, Middle and Right all behind gates that open at the start of the round defenders can then move towards spawn.
- BLU Spawn: As you leave you can take an immediate right turn and go up a long corridor to the right-hand locked gate, or you can take either the left or the right stairs. Both bring you to the double gate exits.
- Loading Dock: A small building containing a large Ammo and small Health pack. The building stands between the gates and the Control point and has a wide window which looks toward the double gates.
- Control point A: Located at the back of the area on a slightly raised platform.
- The Ledge: A ledge at the end of the defenders' shortcut to Control point A. Once the first Control point has been taken, the doorway from RED’s spawn is locked.
Stage 3, Point B
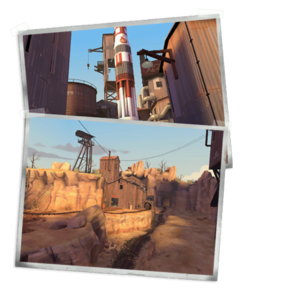
The final Control point is the base of a launch pad, under a rocket, in the centre of RED's base.
- The Alleys: These are the narrow alleyways that lead you from Control point A to Control point B. They consist of two levels with the main road having no health or ammo the side rooms on the upper level have some health and ammo packs.
- Downstairs: Side doorway leading down underneath the base and into the valley under Control point B area.
- The Balcony House: Has a bridge over the alley and small health and ammo pack. It faces control point B.
- The Sniper House: Opposite the Balcony House. Has a medium Health and large Ammo pack on the second level. On the first level, there is a bunker with windows facing down the long alley. There are two doors, one in the alley, the other at the back. These can be accessed from outside by defenders via a tiny ledge.
- Control point B: This is the final Control point for this map and is situated between RED's two spawn exits.
- RED Spawn: Has exits leading to either side of Control point B.
- Equipment Room: In front of the Control point, a long room with an Ammo pack at the front and a medium Health pack in the back. Accessible by stairs.
- The Valley: Located underneath the final bridge, the Valley has one entrance, and a flight of stairs leading up to the bridge.
Strategy
Team Balance
As with any map, ÜberCharges and teamwork are the key to pushing through to victory or preventing defeat.
Refer to the individual strategy pages for more help on how to play these classes.
General
- Attackers
- Teleporters are very helpful for capturing the second point.
- Engineers are the most useful on attack for the second point of each stage.
- Spies may sneak through enemy lines while cloaked, and then capture the point before they are noticed.
- Defenders
- Defenders have much longer respawn times than compared to attackers.
- Guard the second point, and watch out for Spy capping.
- Teleporters are beneficial for defending the first point effectively.
Stage 1, Point A
- Attackers
- ÜberCharges from the left side can make it onto the Control point before they expire. Be sure to go through the door and immediately up the stairs; otherwise Sentry Gun fire can keep you knocked back at the door. Because of the close quarters, a Pyro assault is very effective here, particularly if the airblast is used to clear the route.
- Sentry Guns in the capture building can be cleared using Soldiers and Demomen to fire into the windows from the outside. These classes can also jump up to those windows and enter them from behind.
- Look for unguarded exits and communicate with your team so you can swarm the point from both angles.
- The third exit is so far away from the Control point that it is often uncovered. Classes with long distance weapons may fire into the Control point with relative ease.
- Defenders
- The offence only has three exits available to them: controlling and watching all of these choke points is vital. The high vantage points on the sheds, ledges and spires give you the high ground advantage. Inform your team if the offence makes a breakthrough or push out from these exits.
- Sentry Guns are best positioned inside the control point room on the first set of steps and on the bridge just in the doorway, about half a unit (inch) down the stairs. This covers the point in the same way as the corner Sentry Gun, but without being so susceptible to Pyros.
Stage 1, Point B
- Attackers
- Point B should be rushed immediately upon capturing the first point. Defenders are often scattered or dead and Sentry Guns at Level 1. Scouts are ideal using their speed on this map.
- A forward base in the mining tunnel provides easy passage into the enemy base through the one way gate. A sentry is recommended to prevent Demomen and Soldiers from ambushing this point. Soldiers and other ranged classes can eliminate Sentry Guns behind the water tower from this angle behind the one way gate.
- Defenders
- A base set up in the mining tunnel after Point A is capture can often delay the attacking team for a few precious minutes.
- As with any control point map have someone guarding the point to prevent Spy caps and Scout rushes, Any defensive class will do.
- Control the entrances to prevent pushes being co ordinated across all three fronts.
- Well place Sentry Guns are key to defending this point, and can be placed on the ramp in front of the point, next to the silo, or inside the building that houses the point. Do not however, depend on many Sentry Guns alone to defend the point, as a well co-ordinated ÜberCharge can quickly rush the point.
Stage 2, Point A
- Attackers
The dugout attracts a barrage of explosives and Sentry Gun fire. Defences will be most vulnerable at the start and with your faster respawn time it is easier to keep up the pressure and wear these down.
- Try to limit the time defenders have setup or settle.
- If defenders gain control of the dugout don’t forget the entryway on the left.
- Anti spam measures such as Bonk, Ubers and Compression blasts can help clear a pathway.
- The building on the right is a great staging area due to its health , ammo and protection Use the passageway around the back to assault the defenders on the roof.
- Defenders
- Knock them back: explosive fire can constantly fill the dugout area, making it very difficult to move through.
- Engineer emplacements are effective in the Control point building and on top of the hut above the dugout.
- The dugout is an ideal spot to break up incoming attacks using Spies and other close quarter specialists such as Pyros and Heavies.
Stage 2, Point B
- Notes
- This is classified as one of the hardest Control points to take mainly due to its distance from the spawn, leading to uncoordinated solo rushes on the point coupled with the ease with which two or three Sentry Guns can lock down the area by the final Control point.
- Attackers
- Search everywhere for Engineer’s buildings, including underneath the control point and behind the office block at point A.
- Defend the area next to the office block. to prevent flanking or being pushed back to far.
- Teleporters should be placed near the office building. It's a long walk from the respawn to this point which can remove attackers respawn advantage.
- The rock spire and one way gate are the usual staging areas for coordinated assaults. It is always best to combine this push with attacks through middle and from the opposite side.
- Overcoming the defences around the control point is key. The usual techniques of Ubercharges, sapping and ranged assault apply. Attackers need to be aware of knockback, airblasts and explosive separation. Don’t forget to cap the point while the defences are taken down.
- Defenders
- You must hold the rock spire and the area down to the first tunnel exit. If attackers establish themselves behind the rock spire, they can attack the control point and any equipment there with relative impunity.
- Sentry Guns can be used to control the area around the control point and explosives used to hold or control the ledge above.
- Spies and Ubercharges are a major threat therefore airblasting and Spy checking Pyros while infuriating for the attackers are an ideal accompaniment to the inevitable Dispensers in this area.
- Try not to push the attacking team back to their spawn. Not only is this frowned upon, but it frequently results in an embarrassing Spy cap.
Stage 3, Point A
- Attackers
- Clear the left side. Defenders on the left can cover the entire capture zone from behind the pavilion. If you break the defence on the left side and prevent them from reinforcing that area, you can usually capture the point. Defenders cannot cover the whole capture area from the right side making Spy caps possible once the left side is cleared.
- Launching explosive through the windows can help to eliminate the defenders, Sentry Guns can also be built through that window to surprise the defenders.
- Dispensers and Teleporters near the front lines will help the attacking team keep the pressure on
- Defenders
- Use the shortcut: One spawn point has a door that opens to a shortcut to the first point. Note: if you happen to be passing through this door as the attackers capture the point, you will be killed by the closing door.
- Build Teleporter exits in the shortcut area: If the attackers capture the point, the shortcut door will become locked. But, if you have Teleporter exits in the shortcut area, you can still teleport into there. The exit doorway is an excellent spot for a Sentry Gun.
Stage 3, Point B
- Attackers
- Clear RED's closed spawn door: RED Teleporter exits can remain in this area even after the first point is captured. It is best to clear this out to be safe from surprise attacks from behind. Always confirm this with your team.
- It is a long walk from the respawn so Teleporters are necessary. A forward base can help hold the line after the passageways are cleared.
- Breaking through the final line here is very hard and games often stall at the final hurdle due to un co ordinated pushes by insufficient numbers of players. Use team talk or speak to co ordinate pushes.
- Defenders
- Defend the last point, do not push too far forward.
- Use the tunnel to ambush an attacking team setting up in the halfway area in the alley approaching. The team will (hopefully) be facing the opposite direction.
- The last cap is where Wrangler shines. Sentry with high health and unlimited range is an almost guaranteed win against uncoordinated teams.
Sentry Gun placements
- Dustbowl Sentry Gun spots:
- 2iu6-1c.png
Dustbowl first stage, first cap
- 2iu6-1d.png
Dustbowl first stage, second cap
- 2iu6-1e.png
Dustbowl second stage, first cap
- 2iu6-1f.png
Dustbowl second stage, second cap
- 2iu6-1g.png
Dustbowl, third stage
Related Achievements
|
|
Bugs
- On the Console versions, Snipers and other classes are able to shoot through the grating and pick off the enemies (this is an exploit that has been fixed on the PC version but not on the Console versions (see Differences between platforms).
Trivia
- Dustbowl is one of the maps designed after existing Team Fortress Classic maps, the others being 2Fort, Well, and Badlands. The gameplay of the original version was similar to one-sided Capture the Flag, in which one player on the BLU team must take a flag to the RED team's control points, with only one control point per stage.
- Dustbowl was the map featured in the closing scene of Meet the Heavy, with the same scene featured in Meet the Sandvich. The area featured was the area just outside BLU's spawn on first stage.
- The Cornwell company logos scattered around the map are a likely reference to Dean Cornwell, an artist who greatly inspired the visual design of Team Fortress 2.[1]
- The last cap of Dustbowl is featured as a background map in Xbox 360 version of TF2.
Control Point Timing
All Control points have the same capture times.
| Control Point | Multiplier | Seconds | ||
|---|---|---|---|---|
| All control points | ×1 |
| ||
| ×2 |
| |||
| ×3 |
| |||
| ×4 |
|
See also
Notes and References
- ↑ Jason Mitchell, Moby Francke, Dhabih Eng, Illustrative Rendering in Team Fortress 2 (2007), retrieved 2010-10-23.


