Difference between revisions of "Example"
GrampaSwood (talk | contribs) (→See also) |
|||
| (54 intermediate revisions by 33 users not shown) | |||
| Line 1: | Line 1: | ||
| − | |||
{{Map infobox | {{Map infobox | ||
| − | | | + | | map-status = dev |
| − | | game-type = Mann vs. Machine | + | | map-game-type = Mann vs. Machine |
| − | | file-name = mvm_example | + | | map-file-name = mvm_example |
| − | | map-image = Example5.png | + | | map-image = Example5.png |
| − | | map-environment = | + | | map-environment = Dev Textures |
| − | | map-setting = Day | + | | map-setting = Day, Dusk, cloudy |
}} | }} | ||
| − | '''Example''' is | + | '''Example''' is an example map that comes with the [[Source SDK]]. It shows the minimum needed [[vdc:Entity|entity]] setup for a functioning [[Mann vs. Machine]] map as well as including a mission that showcases all features in the mission file format in a decently sane manner. The provided mission file starts all players with 20,000 credits to spend on [[Upgrade Station|upgrades]]. |
| + | |||
| + | The map is one long field with the floor split into three trenches, separated by low walls. The middle trench is twice as wide as the other trenches and the side trenches have raised flanking areas on their outsides. The spawn room sits on top of a cliff overlooking the bomb hatch and has ramps on the sides. There are dead end closets in the cliff, intended as spawn areas for Spy bots. The bots spawn from a cliff on the opposite side of the map and the cliff has two tunnels where tanks spawn. | ||
| + | |||
| + | __TOC__ | ||
| + | {{clr}} | ||
| + | == Mission == | ||
| + | {{Mission infobox | ||
| + | | mission-name = Example | ||
| + | | mission-file-name = mvm_example | ||
| + | | mission-map = Example | ||
| + | | mission-waves = 11 | ||
| + | | mission-type = {{common string|Invasion}} | ||
| + | | mission-diff = {{common string|N/A}} | ||
| + | | mission-startingmoney = 20{{thou}}000 | ||
| + | | mission-totalmoney = 4{{thou}}200 | ||
| + | | mission-maxmoney = 4{{thou}}200 | ||
| + | | mission-minrespawn = 2 | ||
| + | | mission-maxrespawn = 10 | ||
| + | | mission-fixedrespawn = | ||
| + | | mission-followedby = {{common string|N/A}} | ||
| + | | mission-tour = {{common string|N/A}} | ||
| + | | mission-busterspawn = 5 | ||
| + | | mission-busterrespawn = 35 | ||
| + | }} | ||
| + | {{Mvm mission Example}} | ||
| + | |||
| + | == Installation instructions == | ||
| + | # Install the Source SDK. If it is already installed, make sure to use the "Refresh SDK Content" option within the SDK before continuing. | ||
| + | # Copy the BSP and NAV files from {{code|<steam installation>\steamapps\common\sourcesdk_content\tf\mvm}} to the TF2 maps folder. | ||
| + | # Copy the .pop files to {{code|<steam installation>\steamapps\common\team fortress 2\tf\scripts\population}}. Create the population folder if it does not exist. | ||
| + | |||
| + | == Update history == | ||
| + | '''{{Patch name|8|15|2012}}''' ({{update link|Mann vs. Machine (update)}}) | ||
| + | * {{Undocumented}} Added Example to the game. | ||
== Gallery == | == Gallery == | ||
<gallery widths=150px heights=90px> | <gallery widths=150px heights=90px> | ||
| − | File:Example1. | + | File:Example1.png|The defenders' spawn zone. |
| − | File:Example2. | + | File:Example2.png|The bots' spawn zone. |
| − | File:Example3. | + | File:Example3.png|An overview of the whole map. |
| − | File:Example4. | + | File:Example4.png|An overview of the whole map with bomb hole. |
</gallery> | </gallery> | ||
| − | == | + | == See also == |
| − | * | + | * [[:File:Example.pop.txt|The pop file for Example]] |
| + | |||
| + | {{Mann Vs Machine Nav}} | ||
| + | {{Maps Nav}} | ||
| − | + | [[Category:Development]] | |
Latest revision as of 23:36, 15 August 2024
| Example | |
|---|---|

| |
| Basic Information | |
| Map type: | Mann vs. Machine |
| File name: | mvm_example
|
| Developer(s): | Valve |
| Map Info | |
| Environment: | Dev Textures |
| Setting: | Day, Dusk, cloudy |
| Map Overview | |
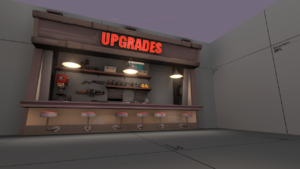
Example is an example map that comes with the Source SDK. It shows the minimum needed entity setup for a functioning Mann vs. Machine map as well as including a mission that showcases all features in the mission file format in a decently sane manner. The provided mission file starts all players with 20,000 credits to spend on upgrades.
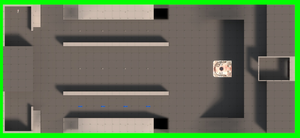
The map is one long field with the floor split into three trenches, separated by low walls. The middle trench is twice as wide as the other trenches and the side trenches have raised flanking areas on their outsides. The spawn room sits on top of a cliff overlooking the bomb hatch and has ramps on the sides. There are dead end closets in the cliff, intended as spawn areas for Spy bots. The bots spawn from a cliff on the opposite side of the map and the cliff has two tunnels where tanks spawn.
Mission
| Example | |
|---|---|
| Basic Information | |
| Name: | Example |
|
File name: |
mvm_example
|
| Developer(s): | Valve |
| Map: | Example |
| Mission type: | Invasion |
| Waves: | 11 |
| Difficulty: | N/A |
| Starting credits: | 20,000 |
| Maximum possible credits: | 4,200 |
| Minimum respawn wave time: | 2 |
| Maximum respawn wave time: | 10 |
| Fixed respawn time: | |
| Tour: | N/A |
| Sentry Buster spawn time: | 5 |
| Sentry Buster respawn time: | 35 |
| Sub-wave | Class | Count | Delay(s) | Credits | |||||
|---|---|---|---|---|---|---|---|---|---|
| Wave 1 | |||||||||
| 1 | Normal | — | 5 | 10 | 15 | 0 | 5 | 400 | |
| Wave 2 | |||||||||
| 2 | Hard | Melee only | 5 | 10 | 15 | 0 | 5 | 400 | |
| Wave 3 | |||||||||
| 3A | Hard | Melee only | 2 | 8 | 8 | 0 | 5 | 300 | |
| 3B | 1,000 | — | — | — | 1 | 15 | — | 100 | |
| Support | Expert | — | 4 | — | — | 20 | 15 | — | |
| Wave 4 | |||||||||
| 4 | 1,000 | — | — | — | 1 | 0 | — | 200 | |
| 1,000 | — | — | — | 1 | 10 | — | 200 | ||
| Support | Expert | — | 2 | — | — | 10 | 35 | — | |
| Wave 5 | |||||||||
| 5 | 1/3 | Easy | — | 3 | 9 | 18 | 0 | 1 | 400 |
| 1/3 | Easy | — | |||||||
| 1/3 | Easy | — | |||||||
| Wave 6 | |||||||||
| 6 | Easy | Melee only | 5 | 5 | 5 | 0 | 0 | 100 | |
| 1/2 | Easy | Flank Left | 4 | 8 | 12 | 5 | 1 | 300 | |
| 1/2 | Easy | Flank Right | |||||||
| Wave 7 | |||||||||
| 7 | Expert | 1 | 2 | 2 | 0 | 5 | 400 | ||
| Wave 8 | |||||||||
| 8 | Expert | — | 1 | 2 | 2 | 0 | 5 | 400 | |
| Wave 9 | |||||||||
| 9 | Type 1 |
Expert | — | 6 | 12 | 18 | 0 | 8 | 400 |
Type 1 |
Hard | — | |||||||
| Wave 10 | |||||||||
| 10 | Type 1 |
Expert | — | 4 | 8 | 8 | 0 | 5 | 400 |
| Expert | |||||||||
| Wave 11 | |||||||||
| 11 | Hard | Melee only | 5 | 10 | 15 | 0 | 8 | 200 | |
| Support | Type 1 |
Hard | — | 4 | 4 | 4 | 2 | 5 | 200 |
Installation instructions
- Install the Source SDK. If it is already installed, make sure to use the "Refresh SDK Content" option within the SDK before continuing.
- Copy the BSP and NAV files from
<steam installation>\steamapps\common\sourcesdk_content\tf\mvmto the TF2 maps folder. - Copy the .pop files to
<steam installation>\steamapps\common\team fortress 2\tf\scripts\population. Create the population folder if it does not exist.
Update history
August 15, 2012 Patch (Mann vs. Machine Update)
- [Undocumented] Added Example to the game.
Gallery
See also
| ||||||||||||||||||||||||||||||||||||||


